Clip Versus Track Effects
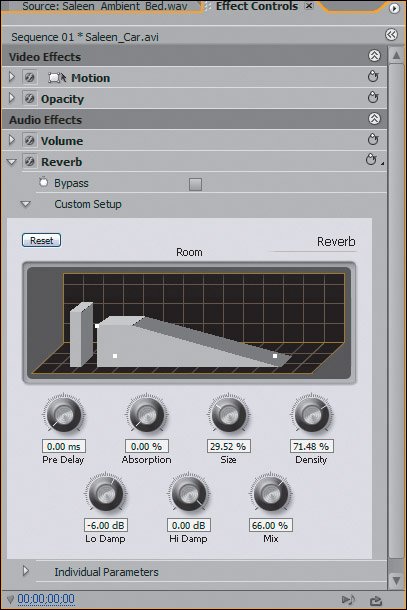
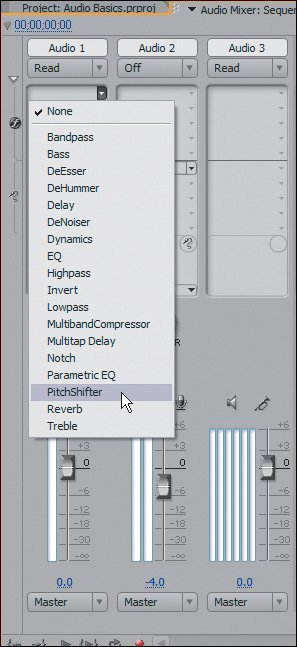
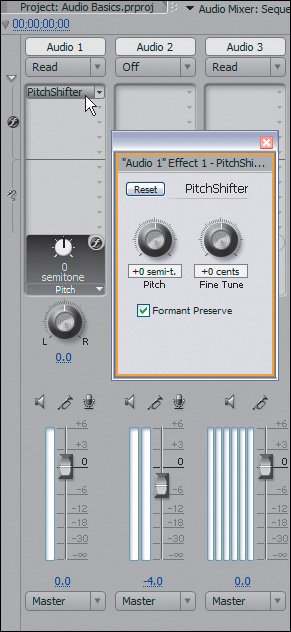
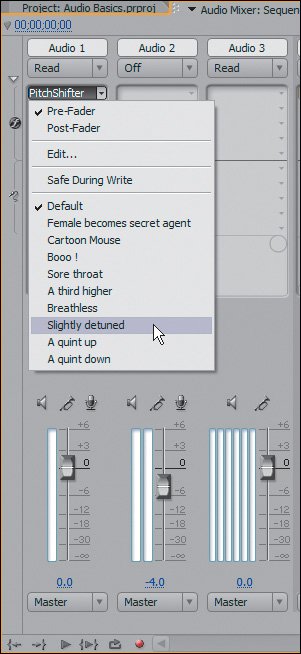
| In Premiere Pro, you can apply audio effects at the clip or track level, just as you can assign clip and track volume. Like clip volume adjustments, clip effects apply to only one clip. Track effects, like track volume adjustments, apply to a specific track and not the individual track content. To add audio clip effects, you follow the same workflow as for video effects, with one exception. To decide which effect you want to use, you need to identify the type of clip you are adding the effect to: mono, stereo, or 5.1. Clip EffectsAs mentioned in Chapter 8, you must choose the proper type of clip Standard effectMono, Stereo, or 5.1to match the clip to which you are applying it. As with video effects, you can adjust an audio effect by selecting a clip in the timeline and placing the CTI over the clip boundary. The clip's properties will appear in the Effect Controls panel (Figure 9.14). Figure 9.14. The Audio Effects listing is below the Video Effects listing in the Effect Controls panel. Here the Reverb effect listing has been expanded. Expanding the Custom Setup listing reveals a graphic interface that enables you to manipulate and adjust the reverb value A number of effects have the standard twirl down slider to adjust settings, but for others you must twirl down to access a custom setup display with a nice visually interactive adjustment area. As for video effects, you can add keyframes for audio effects only when the Toggle Animation button is switched on. When you move a clip with a keyframed effect applied, the keyframes preserve their position as the clip defines their boundary. Again as for video effects, you can view audio effects and their keyframes in the track area by setting the track display to Show Clip Keyframes. Track EffectsClip effects adjust only the clip instance, as it is visible in the sequence. Track effects are a means of adding effects to an entire track. Although you might want to change the pitch of one specific clip (using the PitchShifter clip effect), you may also want to add a reverb to an entire track. Using the Audio Mixer, adding and adjusting track effects is quite simple. With the Audio Mixer open, you can view all of the tracks in your sequence; each has a unique panel in the mixer. Each panel has a name that corresponds to the associated track in the sequence. To add an effect to a track, you click on the top drop-down menu and select the effect from the list (see Figure 9.15). Once you select your effect, double-clicking on it brings up a dialog with visual parameters that you can adjust (see Figure 9.16). Right-clicking on the effect name reveals a drop-down menu of presets for that effect (see Figure 9.17). Figure 9.15. To assign a track effect in the Audio Mixer, click the Effects area of the desired track and select the effect from the drop-down menu Figure 9.16. Double-click on the PitchShifter, or any effect listing, to open its dialog and visually manipulate it. At the bottom of the Sends area, notice the control knob that reveals one of the PitchShifter's effect parameters Figure 9.17. To access a custom preset, right-click on the effect and select the preset from the drop-down menu Clip effect manipulation in the Audio Mixer leaves some features to be desired, because some audio effects do not have a visual display in which you can make adjustments. For these, you can make adjustments in a small area of the Audio Mixer's track panel (Figure 9.16). Highlight the added effect, and a drop-down list with the effect's name appears just above the radio buttons. Click on that drop-down list to reveal all of the parameters that you can adjust for the effect. To adjust the parameters, modify their value in the little box that appears above the list. With no keyframes or Automation applied, any effect adjustment will be static for the entire track. To apply effects, you can click and use the Pen tool in the timeline with Show Track Keyframes turned on, or you can set your track into an Automation mode and start adjusting. With track-based effects (and mixing), keyframes have nothing to do with clip position and everything to do with track position. A track volume fade from 0dB to 4dB at 5 seconds into your timeline will persist no matter if there is clip media underneath the keyframes or not. If you have automated or added track-based keyframes, you may want to lock your track so that the mixing properties are preserved with the audio clips underneath. You'll learn more about effects in the chapters of the "Advanced Audio Techniques" section. Previewing and PlaybackDepending on the effects and adjustments being made, Premiere Pro does not always need to create audio preview files. If you add a number of effects, however, Premiere Pro will render audio files when you press Enter to play your sequence back. |
EAN: 2147483647
Pages: 200