| The most straightforward and intuitive way to start the editing workflow is to open a clip from the Project panel into the Source Monitor. Once the clip is open in the Source Monitor, navigate through the clip and mark your In and Out points around the portion of the clip that you wish to use. Drag the clip down to the timeline and place it in its desired location. Of course, there's a little more to it than that. Drag and Drop, Insert and Overlay As long as your mouse button is pressed, you have control of the clip and can move it. While holding the clip in the track that you want to add it to, find the downward arrow between two lines that's to the right of the cursor. This tells you the method in which the clip will be added to the timeline (Figure 6.4). Figure 6.4. When you drag a clip or item into the timeline, Premiere will edit to the timeline in Overlay mode (the default). The cursor updates to indicate an Overlay edit as you drop the media. Notice the text in the bottom-left corner of the screen that gives you additional tips and information 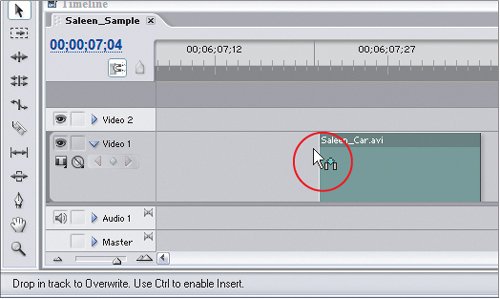
A downward arrow means the default method, which is an Overlay edit for Premiere Pro (a change from earlier versions of the program). In an Overlay edit, the clip will be placed directly on top of and replace the material underneath when you drop it in the timeline. A right-facing arrow means an Insert edit (more on that later). Additionally, as you are editing there will be text feedback as to the mode you are editing in and the available keyboard modification keys. While you have a clip held, the bottom bar of the application displays helpful text. Releasing the mouse releases the clip wherever your pointer is located, adding it to the timeline using your chosen method of placement: Overlay or Insert. Overlay Edits To better understand overlay edits, try a short exercise. You can use the Sample Project in the APPST2 Lesson Files folder or substitute your own video clips. 1. | Open the APPST2 Lesson Files/Sample Project NTSC folder and double-click on the Sample_NTSC.prproj icon inside the folder to open the project.
| 2. | Choose File > New > Sequence to create a new sequence in the project. Name the Sequence OVERLAY and assign it two video tracks and two stereo audio tracks. Double-click on the Sample Media folder in the Project panel; you will use these clips to edit with.
| 3. | Click on the menu bar of the Timeline window to make it active. Zoom in to the timeline by dragging the zoom toward the large mountains. In the timecode area, be sure that Snapping is turned on (Figure 6.5). (Clicking the Snap to Edges button or pressing S toggles Snapping on and off.)
Figure 6.5. With the Timeline panel active, notice how the selected sequence has a yellow rim on it; this is the active sequence. The Snap to Edge button is turned on, and you are zoomed in about halfway through the zoom scale 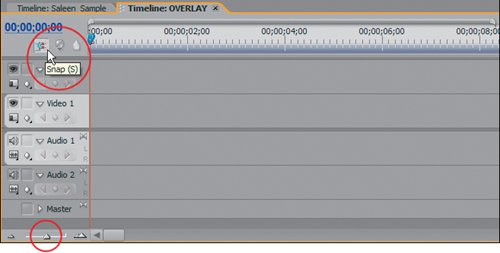
| | | 4. | Select the clip Saleen_Car_01.avi from the Project panel, drag it down into the timeline, and slowly move it to the left toward the start of the timeline. Notice how it snaps to the far left side; this is the effect of Snapping mode (Figure 6.6). When it's on, you can add media to the timeline without creating gaps or unwanted spaces. Also notice that the cursor icon indicates an Overlay edit.
Figure 6.6. When Snapping is turned on, you see a thick black line with arrow on its top and bottom specifying where the clip will snap to. Here, the clip snaps to the head of the timeline in an Overlay edit 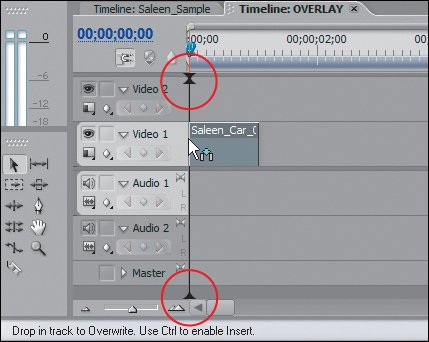
| 5. | Grab the Saleen_Car_02.avi clip, and place it immediately after the first clip on the same track. You should be able to easily drop this clip at the end of the other first clip; it should snap to the end. In fact, this clip can snap to either the start of the timeline or the Out-point edge of the first clip.
| | | 6. | With two clips back to back in the timeline, drag the Saleen_Car_03.avi clip directly on top of Saleen_Car_02 (Figures 6.7a and b) so that it snaps to the cut between the two clips. When you release Saleen_Car_03, it will be added to the timeline in the position you determined, replacing the content that was beneath it.
Figures 6.7a and b. When you snap to the cut between the first two clips (top), notice how the Saleen_Car_03 clip is somewhat transparent, revealing what the Overlay edit will be replacing (the track instance of Saleen_Car_02) beneath it. Once the mouse is released (bottom), the Car_03 clip replaces the beginning of Car_02, leaving its tail after the end of the Car_03 instance 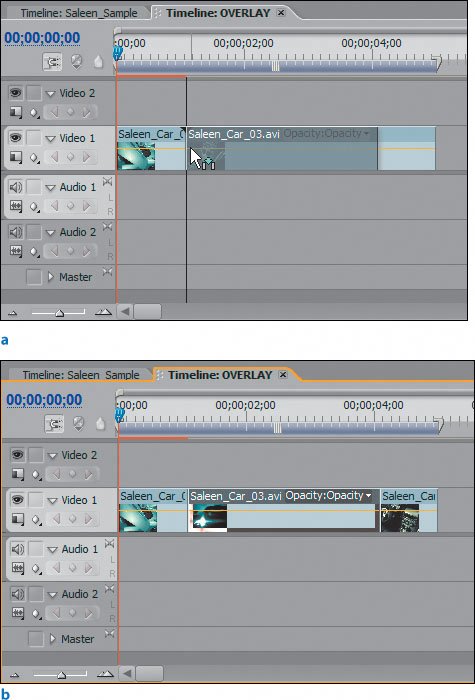 
|
When you add media to the timeline using an Overlay edit, it replaces whatever media was beneath it when you release the clip. The newly added clip replaces only the content that it covers. Because Saleen_Car_02 is longer than Saleen_Car_03, the remainder of Car_02 stays in the timeline. If you don't want the remainder of Car_02 in the timeline, you can select the remaining instance of it and delete it. (If there is media to the right, say Saleen_Car_04, you can use the Ripple Delete command to delete the clip and the space it occupies.) Don't like the way an edit turns out? Press Ctrl+Z to back up one step. The next short lesson looks at Insert edits. If you get confused by all of this, be sure to notice the feedback of the cursor and the text feedback in the bottom program bar. So, pay attention to the cursor icon and read the associated text. Insert Edits and the Ctrl Key Premiere Pro's second type of edit is the Insert edit. Instead of replacing and overlaying the content of the timeline, an Insert edit splits the content beneath the clip and inserts the clip in between. Here's how it works. 1. | Make a new sequence and name it INSERT. Arrange the Saleen_Car_01 and Saleen_Car_02 clips back to back in the Video 1 track of your new INSERT sequence. Remember to zoom in with the slider control or + key.
| 2. | Click and drag Saleen_Car_03 from the Project window down to the same cut point that you edited it at in the last lesson. Snap the clip to the edit point and continue holding the mouse down.
| | | 3. | Instead of releasing the clip as you did before, press the Ctrl key while holding your mouse. Notice that when you press the Ctrl key, the cursor changes from the downward arrow of an Overlay edit to the right arrow of an Insert edit (Figures 6.8a and b). Additionally, there will be right-facing teeth marks that appear on your other tracks. These teeth marks signify which tracks the Insert edit will be applied to. Notice that the text in the bottom bar updates to confirm the Insert mode and its behavior.
Figures 6.8a and b. Press the Ctrl key while dragging and dropping a clip to toggle to Insert editing mode (a). The cursor icon updates to a right-pointing arrow, indicating that the clip will push the current media to the right to make room for itself in the timeline (b) 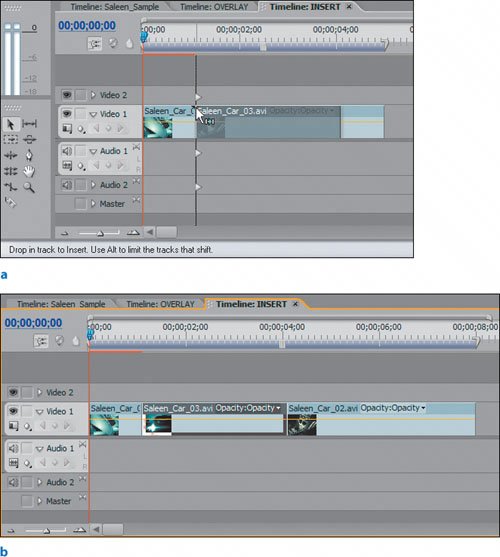
In an Insert edit, Premiere Pro "pushes" all the media to the right of your cursor position, leaving enough free space for the new clip. The new clip is inserted between the existing clips and nothing is overwritten. The Insert edit will occur on all those tracks displaying the teeth marks, meaning that space will be allocated for the selected clips on all those tracks. If a specific track is locked, it will not have an insert tooth and you cannot perform Insert edits on it.
| 4. | With the Ctrl key pressed, release the mouse to drop the clip. Be sure not to release Ctrl before the mouse. Saleen_Car_03 inserts itself before Car_02, shifting the timeline material to the right.
| 5. | Drag the clip Saleen_Car_04 from the Project window, and drop it onto Video 2 above the cut between Car_03 and Car_02.
Notes When using Insert edits, remember that track items shift positions. Unless a track is locked, a standard Insert edit (Ctrl) inserts onto all tracks. An Insert on Target Track Only edit (Ctrl+Alt) limits the track shifting to only the track to which you are adding the media. | | | 6. | Pressing Ctrl, drag Saleen_Car_05 from the Project panel and drop it at the middle of Car_04 on Video 2 (Figure 6.9). It splits the media in half on both Video 1 and Video 2, because insert editing by default makes space for the inserted clip on all tracks.
Figure 6.9. With the teeth marks identifying the tracks being inserted onto, inserting Saleen_Car_05 into Car_04 on Video 2 splits the content of Video 1 in half as well 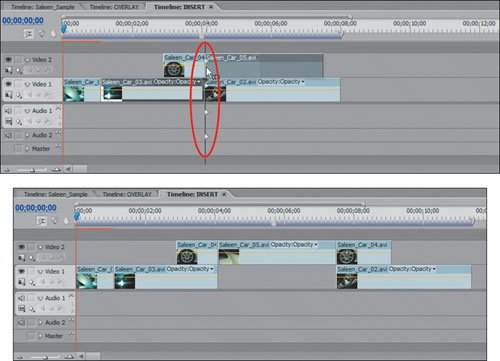
| | | 7. | Press Ctrl+Z to undo the last edit, then try another variation of the Insert edit. While pressing Ctrl and Alt, drag Saleen_Car_05 to the same cut point in as the last step, then release the mouse (Figures 6.10a and b). This edit is called an Insert Only on Target Track. Notice how it affects only the target track and there are no teeth marks on the tracks other than where your media is being added.
Figures 6.10a and b. When you press Ctrl+Alt while dragging and dropping, the cursor indicates an Insert Only on Target Track edit (a). Now Premiere shifts only the media on Video 2; Video 1 remains intact (b) 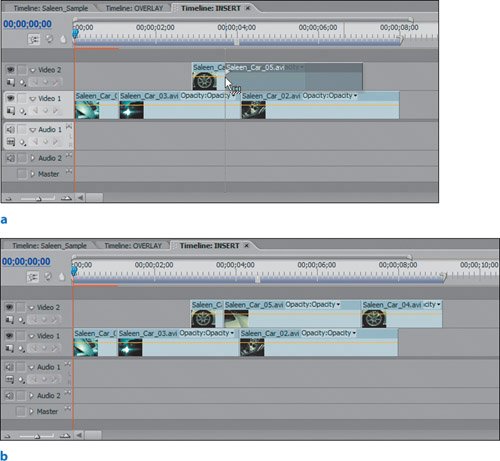
|
All Insert edits place the media based on the location of the inserted clip's first frame. To find this spot, look for the dotted line that displays as you hold down the Ctrl key. The dropped clip will begin at the point on the timeline under this dotted line. You can also see that the Program Monitor has a two-up display that shows the start frame of the clip being added and the exact frame in the timeline where the clip will be edited. When you drag and drop media from the Source Monitor into the timeline, Overlay and Insert editing functions similarly. The big difference is that the Source Monitor allows you to make adjustments to the In and Out points for your source material before adding the media to the timeline. Notes When assembling your initial edit, try adding all your clips to the timeline to establish the basic order of shots. If you open a clip that you want to add earlier in the cut, use an Insert edit (press the Ctrl key while dragging and dropping) to place the shot where you like.
Edit Functions and the CTI An alternative workflow for editing from the Source Monitor is to use the Insert and Overlay buttons with an open clip. Look in the right group of transport controls, bottom row. The Insert button depicts a clip being inserted into another that is separated; Overlay shows one clip being dropped directly on top of another. If you prefer keyboard shortcuts, use the comma (,) to insert and the period (.) to overlay. Editing with the buttons or shortcuts is a bit more rigid than the freedom of dragging and dropping with your mouse. For example, there is no button to insert only on a target track, the equivalent of Ctrl+Alt. Dragging and dropping with the mouse allows you to drop your added media wherever you define in the timeline. Using the edit controls adds the media to the timeline in the location of either the CTI/Edit Line or an assigned In point from the Program Monitor. Notes To target video tracks you can use the keyboard shortcuts as well. Ctrl+plus sign (+) targets the track above the current targeted track, and Ctrl+hyphen (-) targets the track below the currently targeted track. For audio tracks, use Ctrl+Shift+plus sign to target the audio track above (closest to bottom) or Ctrl+Shift+hyphen to target the track below (closer to the video tracks).
To understand the edit buttons, try another method of editing the clips from Premiere Pro's Sample Project. 1. | Create a new sequence, and name it SOURCE EDIT.
| 2. | To edit properly from the Source Monitor, you need to specify the tracks on which you want your edit to occur by targeting your tracks. To target a track, click within the empty space of the track header area. The area around the track header when targeted will turn a lighter gray and the left edge will become darkened and rounded.
| 3. | Use the range select method (click and drag over the clips with the cursor) in the Project panel to select two clips (Saleen_Car_01 and Saleen_Car_02). Drag them into the targeted track so that they start at the beginning of the timeline. Notice how the multiselected clips are placed one immediately after the other in the track. You will most likely have to zoom in again; press the \ key to snap your zoom to fit the current clips within the boundary of the window.
| 4. | Click and scrub in the time ruler area of the timeline to move the CTI/Edit Line to 02;12. With the CTI on this frame, press I to add an In point to the timeline at the position of the CTI.
When you execute either the Insert or Overlay editing command using the Source Monitor's edit buttons, Premiere first looks for an assigned In point at which to perform the edit. If no In point is assigned, Premiere performs the edit at the Edit Line's position.
| | | 5. | Double-click on the Saleen_Car_03 clip from the Project panel to open it in the Source Monitor. (Notice that clip has a previously assigned In/Out point. This is fine.) Press the Insert Edit button to insert the clip from the Source Monitor into the timeline at the In point you specified on the targeted track (Figure 6.11).
Figure 6.11. With Target Video 1 in the Timeline, assign an In point at 02;12 in the Source Monitor, then click the Source Monitor's Insert button to execute an Insert edit of the source material down into the timeline. Take note that when the edit is executed, the CTI snaps to the end of the added clip and the previously marked In point is cleared 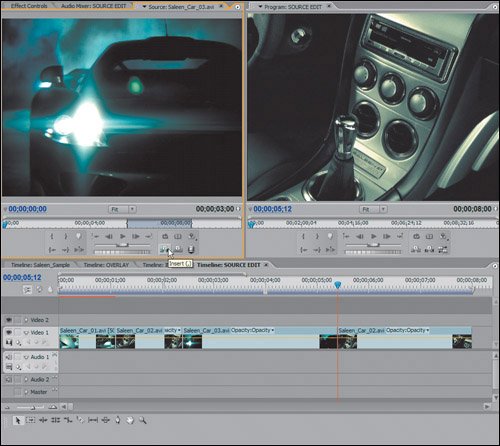
| | | 6. | Press Ctrl+Z to undo, then click the Overlay button to see that an Overlay edit differs from an Insert edit. This time, the source material replaces the underlying clip material instead of pushing it out of the way to the right. Keep this sequence as it is; you will be using it for the next short lesson.
|
Using the editing commands is excellent for instances when you are either defining a specific region to which you want to edit (as in the three- and four-point editing techniques coming up), or if you have found an exact frame at which you want to insert or overlay. Instead of dragging and dropping, you just execute the desired edit at precisely the position you desire. It certainly ensures position accuracy, and used in conjunction with the Program Monitor's timeline transport controls, it can be a quick and efficient way to navigate and edit. |