| Now that you have the pieces and structure in place, you need to clean up the edit and adjust the timing to fit the flow of the scene. In this lesson, you will establish continuity of action between shots to create a better rhythm. 1. | Open the project Trim_Start.prproj from the APPST2 Lesson Files/Chapter 26 folder. Notice that I renamed the timeline instances of each clip so it is easier to identify the clips and cut points that you need to adjust. You will start at the beginning of the timeline and work your way right.
Also, notice that I no longer have a frame for my Source Monitor, instead I have my Program Monitor and Trim panel in one large frame above the frame for the Timeline panel.
| | | 2. | With Video 1 and Audio 1 targeted in the Timeline panel, press Ctrl+T to open the Trim panel. Press Page Down to advance the Edit Line to the cut between shots 1 and 2 (Figure 26.6). Place the cursor within the frame boundary for the outgoing shot on the left, click and drag to the left, trimming off -3;19 of material; the new Out point for the clip should be 18;12 (Figure 26.7). Using the Jog wheel below the incoming shot, jog to the right to move the In point to 11;19, which is a shift of +1;19 (Figure 26.8).Press Play Edit to preview the trim that you just made.
Figure 26.6. The Trim panel enables you to perform Ripple and Rolling edits on the cut points between material in your sequence. The left frame shows the outgoing shot, and the right frame, the incoming. Like the Ripple Edit tool in the timeline, the Trim panel enables you to grab the edge of a clip and drag it, but with greater clarity because of the frame size and detailed window feedback 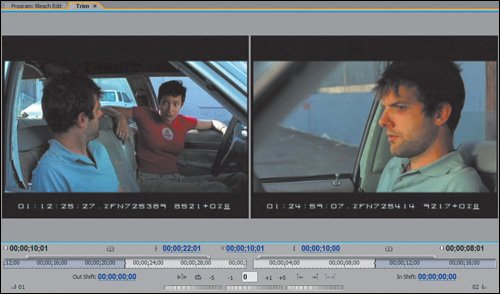
Figure 26.7. Holding the cursor inside the frame boundary puts the Trim panel into Ripple Edit mode. Clicking and dragging left inside the outgoing frame reduces the duration of the clip being trimmed. All the material to the right of the cut will be shifted left so that no gaps are created between the shots. Notice the out shift is -3;19, meaning 3 seconds and 19 frames have been trimmed off and the new Out point of the subclip in the timeline is 18;12 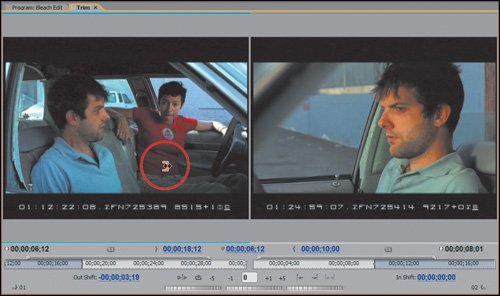
Figure 26.8. The same way clicking and dragging within the frame enables you to perform a Ripple edit, jogging the wheel below either the outgoing or incoming shot achieves the same effect. Dragging to the right on the incoming shot trims off material from the head of the subclip in the timeline. Jogging the wheel to the left adds material to the head of the incoming shot. In both cases, a Ripple edit occurs either replacing the space created or pushing material right to make room for added content 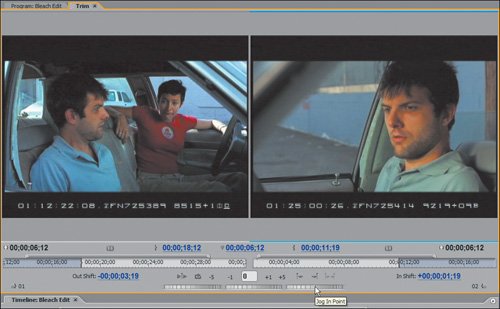
If your Trim panel is not open in your workspace, after you press Ctrl+T to open it, dock it in the frame with the Program Monitor.
To cut from shot 1 to shot 2 without the edit feeling too abrupt, you want to cut in the middle of action or movement that hopefully exists in both shots. You trimmed off the tail of the first shot and the head of the second shot so that as the character's head turns left you cut from one shot to the other. When you have a rough cut sketched out, it's very simple and easy to open the Trim panel, trim the Out and In points at each cut, preview the adjustments, then move on to the next cut.
| | | 3. | With the Trim panel still open on the cut between shots 1 and 2, click in the gray space below the two frames and above the center counter so that the blue selection line runs below both images. Enter 9 in the text box above the center jog wheel. Press Enter, then press Play Edit to preview the adjustment (Figure 26.9). Activate the Program Monitor.
Figure 26.9. Holding the cursor in the gray space between the two frames reveals the Rolling Edit tool. If dragged to the right, the Rolling Edit tool synchronously extends the Out point of the outgoing shot and retracts the In point of the incoming shot. Dragging left extends the In point of the incoming shot and retracts the Out point of the outgoing shot. In both cases, there is no shifting or rippling of the timeline, only the edit rolls to reveal a new cut point between the shots. The center jog wheel is the one for rolling the edit. The empty text box above the center jog is for entering edit adjustment values (frames or samples). If you select the left frame, the entered value ripples the number of frames entered; the same applies if you choose the right frame. If you select both frames as pictured (note the blue underline under both images), the value entered rolls both clips 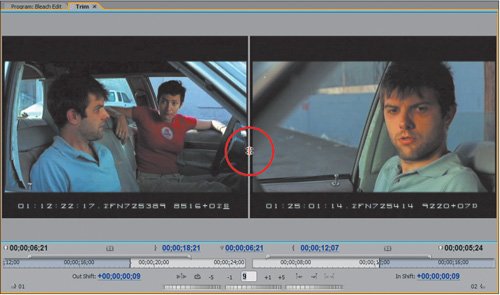
With both clips selected, entering a value of 9 rolls the edit forward nine frames, so that the Out point from the outgoing shot is extended by nine frames and the In point from the incoming shot is reduced by the same number. Positive values roll the edit right, and negative values roll the edit left. In this trim adjustment, you rolled the cut point between shots 1 and 2 to a spot a bit more in the middle of the action for a more subtle cut.
Tip The Trim panel is essentially a glorified Ripple and Rolling Edit tool that enables you to clearly see the frame you are trimming.Additionally, you have corresponding visual data about the entire range of the clip you are trimming, the number of frames you are trimming off or adding, and so forth. Although using the Ripple Edit tool in the timeline reveals a two-up display in the Program Monitor, the Trim panel can be as large as you like with a lot more detailed information. A few rules about the Trim panel: To trim linked audio and video tracks together, both audio and video tracks need to be targeted in the track header area. To trim just video, target only the video track you want to trim. To trim just audio, target only the audio track you want to trim. If you happen to move the Edit Line off of a cut point in your sequence, the Trim panel will continue to display the previously loaded cut point. | | | 4. | Back in the timeline, make sure Snapping is turned on and move the Edit Line to 11;00. Hold down the Ctrl key to toggle the Selection tool to the Ripple Edit tool. Click and drag from the tail of clip 2 to the left, snapping the edit to the Edit Line (Figure 26.10). Move the Edit Line to 13;19, and holding down the CTRL key, ripple the In point of clip 3 so that it snaps to the Edit Line.
Figure 26.10. Holding down the Ctrl key turns the Selection tool into the Ripple Edit tool. Using the Edit Line as a guide to the new cut point's location, you can drag and snap the Out point of shot 2 to the Edit Line. When using the Ripple Edit tool, notice how the Program Monitor reveals the small two-up displays of the frame being trimmed (left) and the first frame of the next shot (right). A new feature for 2.0 is that the source clip's timecode displays in the overlay so you know exactly which frame you are cutting on 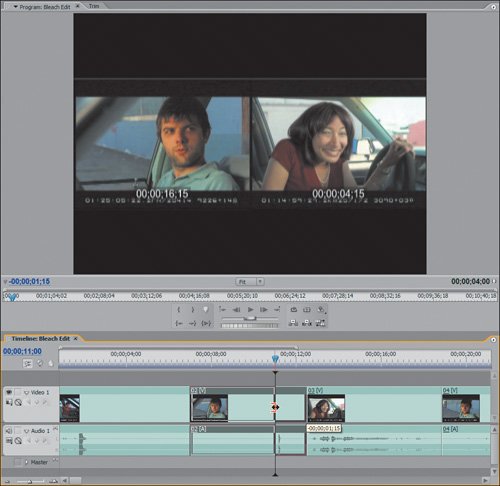
Using the Ctrl key, rippling an edit point in the timeline is quite quick and simple. First, scrub through the clip in the timeline to find the moment at which you want the cut to occur, then use the Ripple Edit tool to trim off the tail or head of the clip that needs trimming. Because of timeline snapping, you can have exact precision as to where the cut occurs.
For this cut, Fulton looks at Laura and you will notice that his eyes size her up. After his eyes go from down to up is a perfect moment to cut. Although this cuts in the middle of Laura's dialog, you will use the Rolling Edit tool to roll the audio cut separate from the video cut.
| | | 5. | Press the N key to switch the cursor to the Rolling Edit tool. Hold down the Alt key, and click in Audio Track 01 at the cut point of clips 2 and 3. Click and roll the cut left -3;02 (Figures 26.11a and b). Press the V key to switch back to the Selection tool, move the edit before the clip 2, and play back the adjustment you made.
Figures 26.11a and b. Holding down the Alt key allows you to temporarily break the link between the audio and video to select and adjust only one or the other. In this case, you are rolling only the audio edit between the two shots. When using the Rolling Edit tool, not only does the Program Monitor display your adjustments, but a new 2.0 tool tip tells you how far you have adjusted the cut (a). For this example, you needed to roll back -3 seconds and 2 frames. You can see that this was the perfect amount of time to allow for all of Laura's dialog (b) 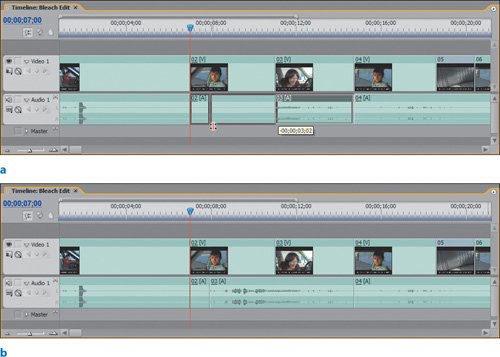
Tip The Alt key can be very useful when you want to trim and adjust the audio or video separately from each other. This can happen when you have an abrupt sound just before the end of a shot that is being used in your edit. Instead of trimming both the audio and video, you can try rolling the audio back a bit from the next shot in the sequence to cover the unwanted sound. In this case, you would want to be sure you had the extra material from the incoming shot to extend. This edit is called aJ cut,because the audio portion of shot 3 occurs before the video portion.An L cut is when the video cuts out before the audio cuts out. (These names are based on the shape of the letters, of course.)
The audio of Laura's voice further helps to motivate the cut to the POV of Fulton. Even though Adam's performance was not in response to Katrina speaking dialog, it looks as if he is quite taken by what he is seeing and hearing. I think it works very well.
| | | 6. | Move the Edit Line to 14;04, and ripple the Out point of clip 3 to the Edit Line. Move the Edit Line to 15;07, and ripple the In point of clip 4 to the Edit Line. Move the Edit Line to 16;13, and press the U key to switch from the Selection tool to the Slide tool. Click and drag clip 5 left so that the left edge of the clip snaps to the Edit Line (Figure 26.12).
Figure 26.12. The Slide tool is essentially a double-sided tool for rolling edits. With it, you can select a clip and slide it left or right while retaining the clip's In and Out points. As you slide it left, you trim off frames from the adjacent clip to the left and reveal frames of the adjacent clip on the right. Notice how the four-up display in the Monitor window shows the In and Out frames from the selected clip smaller at the top. On the bottom, the large frames reveal the new Out point from the clip to its left and the new In point from the clip to its right. The tool tip in the timeline tells you how many frames you slid 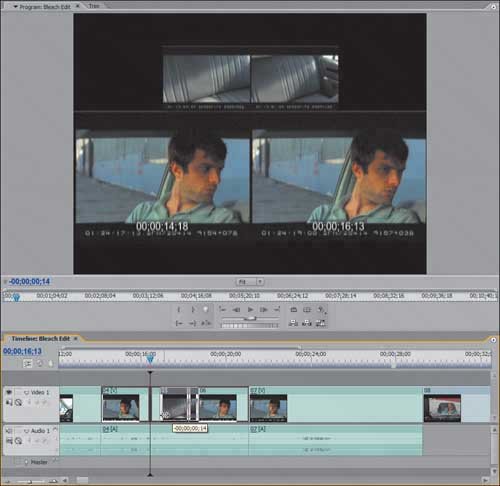
After adjusting the edit point for better timing between clips 3 and 4, you used the Slide tool to slide the entire clip 5 to the left. Now when Fulton looks to the back seat, the scene cuts directly to his POV shot. The Slide tool moves the entire selected clip, not just one edge. The Slide tool works very well when you have a clip that exists in the timeline for an exact duration and you want to adjust its position. The Slip tool, preserves the position of the selected clip, but modifies the content of the clip.
| 7. | Press Y on your keyboard to select the Slip tool. Still working with clip 5, click and drag just slightly to the left for -10 frames (Figure 26.13). Release the mouse button, and play the section you just adjusted.
Figure 26.13. The Slip tool takes the defined edges of your edited clip in the timeline and slips the material left or right to reveal new content using the same duration and clip position. The four-up display shows the adjacent Out frame and In frame from left to right on the top with the updated slipped to In point on the bottom left and the slipped to Out point on the bottom right. The counter value in the bottom right corner displays the frame adjustment. Negative values equal slips left, and positive values slips right 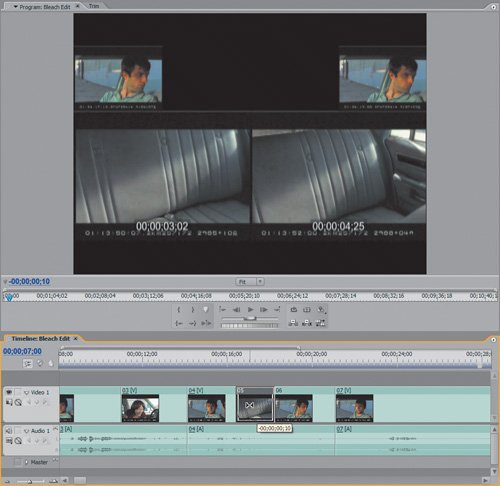
Notes The easiest way to visualize what the Slip tool does is to mark an In and Out point in a clip in the Source Monitor. The In and Out points have a specific duration, say one second. If you click in the center of the In/Out point markers in the Source Monitor, you can drag that In/Out duration to cover a different portion of the source clip. The Slip tool essentially does the same thing. As you drag left, you are slipping the content of the subclip left, revealing a later portion of the clip. If you drag right, you slip the clip material to the right, revealing an earlier portion of the clip. For this step, you slipped the clip material to reveal a different portion of the shot. The adjustment you made of -10 frames slipped the material up so that the beginning and end of clip 5 was ten frames later than before. This fit the head movements of the characters you were cutting from and to, much better. The Slip tool is very effective for updating the contents of a clip without disturbing the overall duration of the shot or affecting the surrounding media.
The Slide tool modifies the physical position of the clips being adjusted, but the Slip tool modifies just the material inside of the clip at its current timeline position.
| | | 8. | Using the tools and techniques illustrated in this lesson, continue editing the sequence so that you have continuity of action and better timing for the rest of the cuts between the rest of the shots.
To see what I came up with, open the Trim_Finished.prproj file from the APPST2 Lesson Files/Chapter 26 folder.
|
Despite the number of steps in this lesson, there are a great number of details and techniques to be extracted. Using the Ctrl key to quickly toggle from your Selection tool to the Ripple Edit tool is very intuitive. Using the Alt key to adjust only the audio or only the video of linked clips is another gem not to be forgotten. If at the end of the day, you find yourself struggling with the editing tools behavior, then you can use the Trim panel to help with a solid visual reference for Ripple and Rolling edits. Keep in mind that you can make much more precise adjustments by zooming in to the timeline to increase the size of the frames. Once you are comfortable with the editing tools and the ideas introduced in this chapter, I encourage you to stray from the lesson and explore a different version of the scene, trying to edit it in a slightly different manner with different timing or shot selection. |