| When initially editing a scene, first identify the shots and takes that you like most. When I am working with an editor on a film, for example, I make sure I know all of my footage and material inside and out. I identify which shots convey the right emotion and have the actors' best performances. My initial rough cut of a scene is a loose edit based on the original script that was photographed. I cut from one shot to the next feeling out the story being told and the performances given. In many cases, the rough cut of Scene B, for example, may need to be overhauled once I see it in juxtaposition to Scenes A, C, and D. Notes For more information on Bleach, go to www.bleachyoursoul.com or www.formikafilms.com.
To successfully reflect a scene's mood and tempo, you need to understand not only what's happening in the scene, but also how it fits into the film's greater story. In the example scene from Bleach, the main character, Fulton (played by Adam Scott), has already gone into his friend Zach's house to deliver some stereo equipment and get some money. While his girlfriend Laura (played by Katrina Bronson) impatiently waits for him to emerge, Fulton's recent sobriety is challenged by an uncanny offer from his crazed friend. With a promise to clean the stains from his life, Fulton returns to Laura with the money and a surprising new perspective. The scene that you are editing is supposed to reveal through the eyes of Fulton that the world he sees is not the same as the world others see him in. Cutting from the dirty environment that he occupies to his "cleaned up" point of view, you will establish a distinct difference between the real world and the bleached world of Fulton's mind. The Rough Cut The steps in this section will guide you through an initial rough edit, explaining a specific order for placing all of the scene's clips. You will use the Ctrl modifier key to toggle between inserting and overlaying the clips. In the next lesson, you will trim and fine-tune the edits to make the scene flow better. As you become more comfortable in Premiere Pro, you will combine these three processes into a single workflow. For now, however, concentrate on the rough cut only. Notes Continuity is important in editing; you do not want to surprise or jar the audience when cutting from one shot to another. Cutting on the movement in one shot to the movement in another shot is a way of making the editing feel more fluid. This technique is referred to as continuity editing. Note that this lesson's edit is purposefully loose without exact continuity, so that I can demonstrate techniques to fix and clean an edit in the next lesson.
| | 1. | Open Editing_Start.prproj in the APPST2 Lesson Files/Chapter 26 folder. Watch all the source material in the Video Files folder to become familiar with the entire content of each clip.
I can't emphasize enough that you need a good understanding of the scene's flow. After linking all of the material to the project (all associated clips are in the Chapter 26 folder), open and look at 13E_TK01. This clip is a master shot that shows the entire scene from beginning to end. Watching it, you can see the basic structure of the scene and perhaps start sensing when you want to cut and to which shot. Looking at the rest of the shots, you can see the options and choices you have; these are your shot selections.
| | | 2. | Open clip 13E_TK02. Mark an In point at 12;00 and an Out point at 22;00.Add the clip to the head of the timeline using an Overlay edit (drag and drop it into position). Open clip 13G_TK02, mark the In point at 10;00, and the Out point at 18;00. With Snapping turned on, drop the second clip so it snaps to the end of the first. Open clip 18E_TK01,and mark In and Out points at 1;18 and 3;20, respectively. Overlay this clip after the second shot. Open clip 13G_TK01, mark an In at 11;07 and an Out at 27;13, then drag the clip into position at the end of 18E_TK01. Your edit should look like Figure 26.1.
Figure 26.1. A first edit is not meant to flow perfectly from shot to shot. Once assembled, the shots and moments can be refined in a second pass. Here, the first four shots are placed back to back so that none of the material is edited out. Notice the Snap icon indicates Snapping is active (at top) 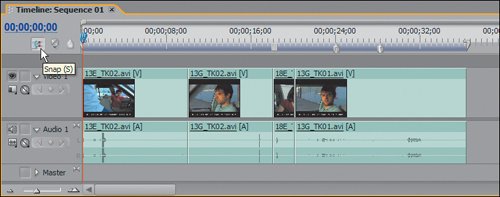
Clip 13E_TK02 is the master shot that establishes the scene's setting: Fulton sits down in the car and looks to his left at Laura, who appears as she is in reality.
The key to this scene is Fulton's altered point-of-view, so you cut from the master, establishing shot to a medium shot of Fulton turning his head to look at Laura. This edit works because the medium shot (13G_TK02)is of the character who is the focus of the scene and it continues the action of the scene. With the cut to the medium shot, you now see Fulton looking directly at Laura. He is clearly perplexed and responding to what he sees. His reaction in this medium shot motivates the next cut, which reveals his exact POV of Laura(18E_TK01).
To continue on with the scene and show him looking in the back seat, you edited in an alternate shot, 13G_TK01, in which he looks at Laura and then into the back seat.
| 3. | Continue adding the necessary shots into the edit: Open clip PU_01 in the Source Monitor panel, mark an In point at 1;03 and an Out point at 8;03, and drop the clip at the end of 13G_TK01 (the fourth clip). Open a second instance of clip 13G_TK02 in the Source Monitor panel.(Do not double-click and open the instance already in the timeline.) Mark In and Out points at 29;13 and 42;26, respectively. Drop this down as the sixth clip. Finally, open a new instance of clip 13E_TK01, in the source side and mark an In at 47;17 and an Out at 51;13, and add it to the timeline as the seventh clip.
From the fourth clip (13G_TK01) set in step 2, you cut to a POV shot of Fulton looking at himself in the side mirror (PU_01). You then cut back to the medium shot (13G_TK02), this time using a different take that has better eye contact and action that matches the previous shot. You finish the scene back on the master shot of the two characters seated in the car (13E_TK01).
| | | 4. | So far, you have created a rough, shot-to-shot template and you still have to insert a few more shots (clips) into and between shots already in the edit. The same way you cut to the POV on Laura (18E_TK01) after the second shot, you now need to edit in the other POV shots in their proper places. Table 26.1 lists markers for placing the remaining shots, as well as their In and Out points. To switch from the default Overlay mode, use the Ctrl key modifier while dragging and dropping for Insert edits. Your complete sequence should look like Figure 26.2.
Figure 26.2. With all the shots in place, your rough cut is an exact copy of my initial cut of the scene for Bleach 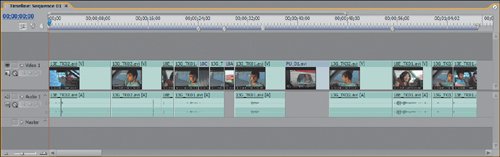
Table 26.1. Shots and Edit PointsShot | In Point | Out Point | Timeline Marker | Edit Type |
|---|
18C_TK01 | 2;22 | 4;15 | 0 | Overlay | 18A_TK02 | 9;03 | 10;21 | 1 | Insert | 18E_TK01 | 4;15 | 10;25 | 2 | Insert |
To follow the table, consider the example of inserting the second POV shot: Give 18A_TK02 an In point at 9;03 and an Out point at 10;21 in the Source panel. Insert it in the timeline at marker 1 by holding the Ctrl key while dragging it to the timeline. Holding the Ctrl key modifier switches from the default Overlay edit to an Insert edit.
You overlay the first shot on top of existing material because you want to preserve the timing of the moment, by not adding to it. By overlaying it you don't shift the placement or ripple any of the surrounding media. For the other two shots, you use Insert edits to add the material to the timeline and ripple the existing material right from the cut point, so that nothing is overwritten. Because the response time by the actor looking at each of the things in the car is not that long, you are extending those moments by inserting the Point of View shots and not overlaying them.
|
With all the pieces in place, pause and consider the scene you've made. Keep in mind the toggling of the edit modes (Insert/Overlay) that you used to piece the scene together, the snapping of clips, and the rhythm or flow of the scene. Reflect and Reorganize Play back the entire sequence to get a feel for the flow of the scene and the pacing of the cuts. I sat with this exact order of shots for this scene for a couple of months while we worked on the sound mix. Eventually, I decided it needed reworking, and re-edited the scene with a few very minor, but very effective changes. The next few steps reflect this re-editing and re-placement process. Using the Ctrl key to Extract and Insert edit, you will make a few simple changes to adjust and get the proper placement for the shots. 1. | Right-click on clip 18A_TK02 at timeline marker 1, and select Ripple Delete.
Because this clip was inserted into at timeline marker 1, ripple deleting the clip instance brings the separated shots back together by rippling the timeline media left to fill the gap that 18A occupied. If you scrub over the cut and observe the burned in timecode in the frame, you will see it flow continuously (Figure 26.3).
Figure 26.3. The numbers at the bottom of the video frame reflect timecode (left) and keycode (right). The timecode value is a window burn from the master Digibeta tapes onto which Bleach was transferred from film. The keycode numbers reflect the literal frame counting format from the original film negative. Using timecode and keycode you can find out where the shot originates on your video master and where the shot originates on your film negative 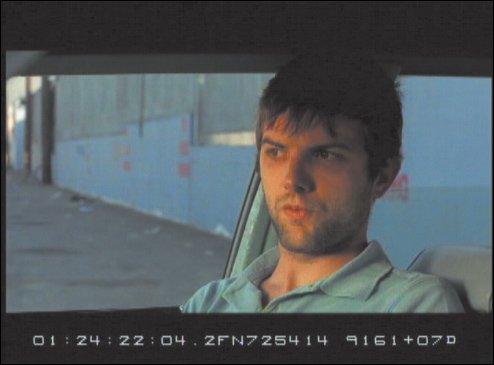
I removed this shot primarily because it seemed a bit overkill and unnecessary. I had already established that what he sees in the car is different from what is really in the car, so the shot of the dashboard was not as important as the shot of him looking around. In this case, more attention is given to Fulton and his realization that the car is different than at the beginning of the film.
| | | 2. | Holding down the Ctrl key, grab (extract) the third clip in the sequence(18E_TK01), which is the first shot of Laura. Continuing to hold down the Ctrl key, insert the shot right before the second shot of Laura (18E_TK01) near timeline marker 2 (Figures 26.4a and b).Holding down the Ctrl key before selecting a clip puts the pointer tool in Extract mode. You may want to look at the figure before performing this edit.
Figures 26.4a and b. Holding down the Ctrl key before you grab the first shot puts the Selection tool into Extract mode (a). Extract ripple deletes the selected clip from its current position when you drag it. Continuing to hold down Ctrl enables you to drop the shot at a new timeline position as an Insert edit (b) 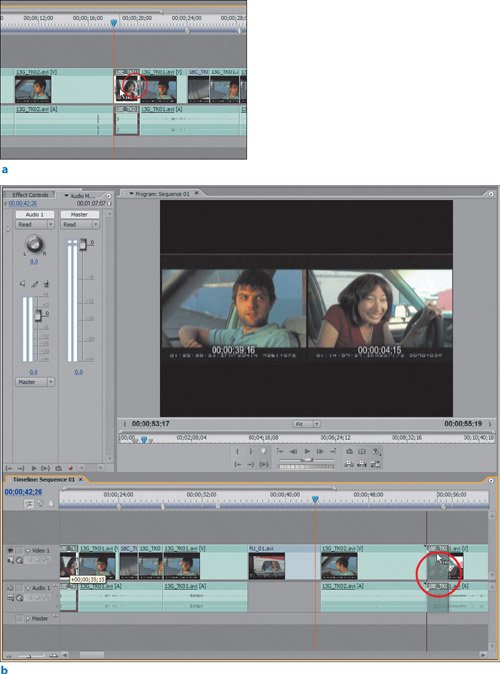
| | | 3. | Using the same technique, select the second, longer clip of Laura (18E_TK01, right next to the newly inserted shot), extract it, and then insert it at the cut that the previously moved clip occupied (Figures 26.5a and b and c).
Figures 26.5a, b and c. Figures 26.5a, b, and c The Extract tool icon appears next to the pointer as you Ctrl-grab the clip to move it (a). Continuing to hold the Ctrl key down, you are then in an Insert edit mode (b). Dropping the clip into the same position that the former clip (from Figure 26.4) occupied produces the revised cut (c) 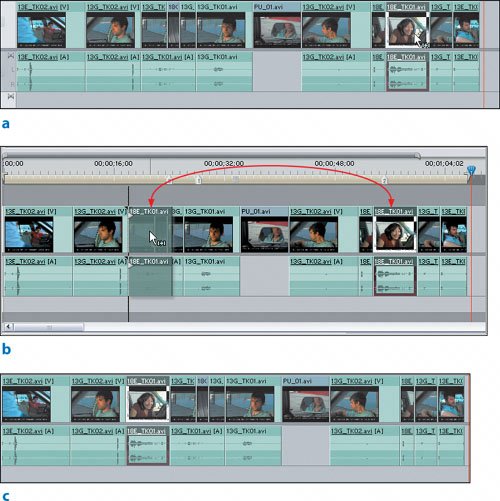
In two moves, you swapped both shots and quickly changed the order of the edit. Swapping the two shots of Laura distinctly changed the rhythm and tone of the edit. In the former version, Fulton sat down and slowly took in the altered environment culminating in the dialog from Laura. In the adjusted version, Fulton is immediately engaged by Laura and her dialog. This image contradicts her portrayal throughout the film and the rest of the scene serves as a reassurance that the world Fulton perceives is truly different. In the last POV shot of Laura, she smiles at him in a manner affirming the fantasy. Two shots later, the audience sees a stark contrast to the POV images from Fulton's eyes and ends on a master shot of the two in the car.
|
With the adjustments made here, the sequence now reflects the final version of the film. Although the looseness of the edit still needs trimming, the basic scene structure is intact. The lesson establishes a workflow of finding the In and Out points in your source material, and then one by one editing the clips together. Using the Ctrl key, you can use the Insert, Overlay, Lift, and Extract edit functions to quickly add, replace, and shuffle the material of your edit. Now it's time to play with the tool box! |