Setting Up Your GreenBlue Screen Shoot
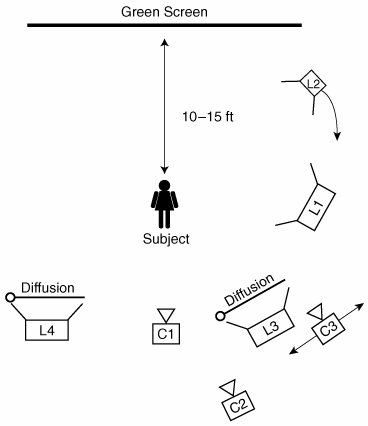
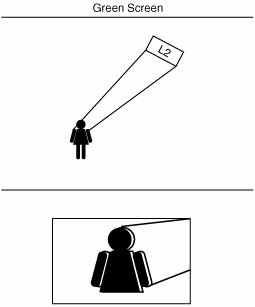
Setting Up Your Green/Blue Screen ShootFrom the screen itself to properly placing your lights, here's what you should consider when setting up a green screen shoot. Any place where you can rent lighting or grip equipment you can likely pick up a big roll of thick green screen paper. The rolls are typically six to ten feet wide, and you can hang them from the ceiling and unroll them to reveal a flat, pure green background. I used this type of green screen for the example material. If you want more space and more room to move around, you might consider renting a stage that has a cyclorama painted the proper green color, which is technically called Ultimatte Green. Notes A cyclorama is a stage with walls that smoothly curve into the floor, instead of meeting it perpendicularly (Figure 25.1). Because of this slightly curved transition, no harsh shadows get caught in the angle of the wall hitting the floor. Cycloramas painted white give the appearance of an infinite background, as in George Lucas' film THX-1138 where characters wandered aimlessly, lost in an empty, sterile pure white world. Figure 25.1. Where a regular wall meets the floor, a shadow hits the floor and also hits the wall in a slightly disjointed fashion. With a cyclorama, you cannot see where the floor ends and the wall begins, and the shadow appears as one continuous shadow Ultimatte, a company that is synonymous with green/blue screen compositing, offers several plug-ins that assist with green screen post-production work as well. For a complete list of Ultimatte plug-ins and hardware acceleration products. Your screen is hung; now you need lights. Figure 25.2 illustrates proper lighting for the subject and green screen in medium to close-up shots. Do the best with the resources you have; even the lighting for the example footage wasn't perfect. Premiere Pro and other tools can help you later. Figure 25.2. In this overhead shot, cameras are marked as C1 through C3 and lights as L1 through L4. Note the distance between the subject and the green screen. Also notice that both the green screen and the subject are lit from a host of angles Position your subject far enough from the green screen that the shadows created from the lights on the subject do not cast on it. Keep an even light source on the green screen itself (L1 in Figure 25.2), producing an even tone rather than various shades of green. An evenly lit green screen background can be more effectively keyed out. If the light is severely angled and very close to the screen, you'll see color shades and a noticeable bright spot. If a green screen is lit too brightly or the subject is too close to the screen, you risk the green color reflecting off the screen and spilling onto the subject. The spill color, which could end up on clothes or the side of your subject's face, is the same color as the screen; when you key the screen, the spill area will be keyed out as well. Pointing one light directly at your subject produces a flat effect. Instead, place at least two lights at or slightly above head height, pointing downward on the subject (L3 and L4 in Figure 25.2). Of these two lights, one light should be half as bright as the other. With each light coming from a different angle, the lighting has some mild depth. To create a clear distinction between the background green screen and the foreground subject, you need a back light. This third light (L2 in Figure 25.2) should be small, bright, and narrowly focused at an angle so that it hits the back of your subject's head and shoulders (Figure 25.3). In terms of exposure, the background green should be equal to the exposure of the foreground subject. The back light should be brighter so that it is visible above the lighting of the other elements. With your subject well lit, both front and back, you can more easily get an exact edge to your subject, meaning it will integrate better with whatever is keyed into the green screen. With your lighting set up, you're ready to find the right camera angle and start recording. Figure 25.3. In the aerial view, you can see that the back light (L2) is pointed at an angle at which it can spread light over the entire back of the subject without pointing directly into any of the shooting cameras. In the head-on camera view, the outline to the subject shows the result of the light Notes If you can't avoid the green screen reflecting on your subject during the shoot, you can try the Spill Suppression feature of Adobe After Effects to remove the green tone in post-production. |

EAN: 2147483647
Pages: 200
- Step 1.1 Install OpenSSH to Replace the Remote Access Protocols with Encrypted Versions
- Step 2.1 Use the OpenSSH Tool Suite to Replace Clear-Text Programs
- Step 3.4 Use PuTTYs Tools to Transfer Files from the Windows Command Line
- Step 4.2 Passphrase Considerations
- Step 4.4 How to Generate a Key Using PuTTY