Assigning and Publishing Applications
| | ||
| | ||
| | ||
Once you have a .msi package on a share, you can offer it to your client systems via Group Policy. GPSI is located under both Computer and User directories and then Software Settings ˜ GPSI. Before we set up our first package, it's important to understand the options and the rules for deployment. You, the administrator, can offer applications to clients in two ways: Assigning or Publishing.
Assigning Applications
The icons of Assigned applications appear in the user's Start menu. More specifically , they appear when the user selects Start ˜ All Programs. However, colloquially, we just say that they appear on the Start menu. You can Assign applications to users or computers.
What Happens When You Assign Applications to Users If you Assign an application to users, the application itself isn't downloaded and installed from the source until its initial use. When the user first clicks the application's icon, the Windows Installer (which runs as a background process on the client machine) kicks into high gear, looks at the database of the .msi package, locates the installation point, and determines which components are required.
Assigning an application saves on initial disk space requirements since only an application's entry points are actually installed on the client. Those entry points are shortcuts, CLSIDs (Class Identifiers), file extensions, and sometimes other application attributes that are considered .msi entry points.
Once the icons are displayed, the rest of the application is pulled down only when necessary. Indeed, many applications are coded so that only portions of the application are brought down in chunks when needed, such as a help file that is only grabbed from the source when it's required the first time.
When portions of an application are installed, the necessary disk space is claimed. The point is that if users roam from machine to machine, they might not choose to install the Assigned application, and, hence, it would not use any disk space. If users are Assigned an application but never get around to using it, they won't use any extra disk space. Once the files are grabbed from the source, the application is installed onto the machine, and the application starts. If additional subcomponents within the application are required later (such as the Help files in Office XP's Word 2002, for example), those components are loaded on demand in a just-in-time fashion as the user attempts to use them.
What Happens When You Assign Applications to Computers If the application is Assigned to computers, the application is entirely installed and available for all users who use the machine the next time the computer is rebooted. This won't save disk space, but will save time because the users won't have to go back to the source for installation.
Publishing Applications
The icons of Published applications are placed in the Add or Remove Programs folder in Control Panel. You can Publish to Users (but not computers). When you Publish applications to users, the application list is dynamically generated, depending on which applications are currently being Published. Users get no signals whatsoever that any applications are waiting for them in the Add or Remove Programs folder.
Once the application is selected, all the components required to run that application are pulled from the distribution source and installed on the machine. The user can then close the Add or Remove Programs folder and use the Start menu to launch the newly installed application.
By default, the icons of Assigned applications are also placed in the Add or Remove Programs folder for download. In other words, by default, all Assigned applications are also Published. The "Do Not Display this Package in the Add/Remove Programs Control Panel" option is unchecked by default; therefore, the application appear in both places by default upon Assignment. (I'll discuss this option in the "Advanced Published or Assigned" section.)
Rules of Deployment
Some rules constrain our use of GPSI, regardless of whether applications are Assigned through the Computer or User node of Group Policy. As just stated, the icons of Assigned applications appear on the Start menu, whereas the icons of Published applications appear in the Add or Remove Programs folder. With that in mind, here are the deployment rules:
-
RULE #1 Assigning to computers means that anyone who can log on to machines affected by the GPO sees the Assigned application on the Start menu. This is useful for situations such as nurses' stations . You can also Assign applications to users in the GPO, which means that whenever users roam, their applications follow themno matter which machine they reside at physically.
-
RULE #2 You can't Publish to computers; You can only Assign to computers within a GPO.
Why the funky rules? Although I have no specific confirmation from Microsoft, I'll make an observation that might help you remember these rules: Most users can use the Start menu to launch applications. Therefore, Assigning applications to users makes sense.
Additionally, since applications Assigned to computers apply to every user who logs on to a targeted machine, the users in question can also surely use the Start menu to launch the Assigned applications. But using Published applications takes a little more computer savvy. Users first need to know that applications are Published at all and then check the Add or Remove Programs folder to see if any applications are targeted for them. A specific user might know that applications are waiting for them, but it's unlikely that all users using a computer would know that. Since this level of sophistication isn't really the norm, I bet Microsoft avoided providing Publishing capabilities for computers because there is no guaranteed level of sophistication for a specific user of a specific computer.
In any event, just remember the following rules:
-
You can Assign to users.
-
You can Assign to computers.
-
You can Publish to users.
-
You cannot Publish to computers.
Package-Targeting Strategy
So far, we've set up our software distribution shared folder, prepared the package to the point of distribution, and ( optionally ) tied it down with NTFS permissions. Now we need to target a group of users or computers for the software package. Here are some possible options:
-
Leverage an OU for the users you want to get the package, move the accounts into this OU, and then Assign or Publish the application to that OU. Whenever members of the OU log on, the application are available for download. Each user can connect to the distribution source and acquire a copy of the installation. This is best for when your users are mostly using desktops. Because desktops are connected to the network, the "just-in-time" fashion of the download really makes sense here.
-
Leverage an OU for the computers that you want to get the package, and then Assign the application to the computers in that OU. Whenever any user logs on to the targeted machines, the application is fully downloaded and ready to go. This is best if you have a gaggle of laptop users. You'll want to ensure that the entire application is loaded before users go on the road with their machines. This strategy is ideal for this scenario.
-
Assign or Publish the application at the domain or OU level, and then use GPO Filtering with Security Groups (see Chapter 2). This is a more advanced technique, but can be very useful when you want to give someone only the ability to modify group memberships, and (by modifying the group membership) also deploy software to a group of users.
-
Assign or Publish the application at the domain or OU level, and then use WMI (Windows Management Instrumentation) Filtering based on specific information within machines. (See the section "GPO Targeting with WMI Filters" later in this chapter.) This is most useful if you want to strategically target machines based on very, very specific criteria. For instance, "Only deploy this software to users using Dell D600 laptops with revision 15 of the BIOS."
We could use any of these methods to target our users. The first two options are the most straightforward and most common practice. In our first example, we'll leverage an OU and Assign the application to our computers. We'll use the Human Resources Computers OU and Assign them Office XP.
Creating and Editing the GPO to Deploy Office
We are now ready to create our GPO and Assign our application to our users. Open the GPMC, and then follow these steps:
-
To create a GPO that deploys Office XP to the Human Resources Computers OU, right-click the OU and choose "Create and link a GPO here" from the shortcut menu to open the "New GPO" dialog box. Enter a descriptive name , in the New GPO dialog box such as Deploy Office XP (to computers) . The GPO should now be linked to the Human Resources Computers OU.
-
Right-click the link to the GPO (or the GPO itself), and choose Edit from the shortcut menu to open the Group Policy Object Editor.
The software distribution settings are found in both Computer Configuration and Users Configuration, as shown in Figure 10.3.
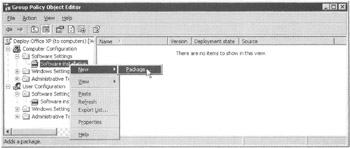
Figure 10.3: Right-click the GPSI settings to deploy a new package.
For this first package, we will Assign the application to the computers in the Human Resources Computers OU.
-
Choose Computer Configuration ˜ Software Settings.
-
Right-click Software Installation and choose New ˜ Package, as shown in Figure 10.3 to open the Open dialog box, which lets you specify the MSI file.
| |
A FAQ I often get when I teach GPO essentials is this: "If I use GPSI to deploy applications to my users, how does this affect my licensing agreements with Microsoft or other software vendors ?" The next most frequently asked question about GPSI is this: "If I use GPSI to do mass rollouts, how can I keep track of licensing for reporting during audits ?" Bad news on both fronts, friends .
Occasionally, the Microsoft technology doesn't work in lockstep with usable licensing agreements. Specifically, if you use GPSI as your mechanism to get software to the masses, you need to be especially careful with your Microsoft licensing agreements or any other licensing agreements. When you deploy any software via GPSI, you have the potential to load the software on a machine and make it available to any number of users who can log on to that machine. As I discussed, using GPSI to deploy to computers gives everyone who logs on to the machine (via the domain) access to the icons on the Start menu. And, if you target users, whether the application is available only for that user depends on the application. For instance, a well-written .msi , say Office XP, prevents users who aren't assigned the application from using it; but other .msi applications (especially those you create with third-party tools) may not. And when you use GPSI to deploy an application to, say, users in an OU, you won't know how many users accept the offer and how many users don't end up using the application.
With that in mind, GPSI is a wonderful mechanism for deploying software. But in terms of licensing and auditing, you're on your own. My advice is that if you're planning to use GPSI for your installations, check with each vendor to find out their licensing requirements when you Assign to Users and Assign to Computers.
Remember: you have a large potential for exposure by doing a GPSI to users and/or computers; protect yourself by checking with your vendor before you do a mass deployment of any application in this fashion. Additionally, it's important to remember that there is no facility for counting or metering the number of accepted offers of software for auditing purposes.
That's where Microsoft's SMS is supposed to come into play to help you determine "who's using what." But stay tuned more on that later.
| |
You will need to specify the full UNC path on the shared folder for the application. Back at Figure 10.1, we put our Office XP Administrative Installation inside the APPS share on the WinDC01 server inside the OFFICEXPDISTRO directory. Therefore, the full UNC path to the application is \\windc0l\apps\officexpdistro\PROPLUS.msi , as shown in Figure 10.4.
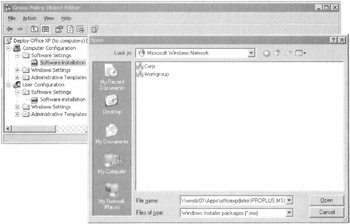
Figure 10.4: Always use the full UNC and never the local path when this dialog box requests the file.
| Warning | Do not I repeat do not use the Open dialog box's interface to click and browse for the file locally. Equally evil is specifying a local file path, such as d:\apps\officexpdistro\proplus.msi . Why is this? Because the location needs to be from a consistently available point, such as a UNC path. Entering a local file path prevents the Windows Installer at the client from finding the package on the server. Merely clicking the file doesn't guarantee that the package will be delivered to the client. Again entering the full UNC path as shown in Figure 10.4 is the only guaranteed method to deliver the application to the client. |
Once the full UNC path is entered, a dialog box will appear, asking which type of distribution method we'll be using: "Assigned" or "Advanced." "Published" will be grayed out because you cannot Publish to computers.
For now, choose "Assigned" And press OK. When you do, you'll see the application listed as shown in Figure 10.5.
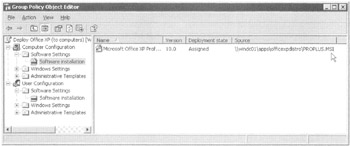
Figure 10.5: The applications you assign are listed under the node you chose to use (Computer ˜ Software Installation or User ˜ Software Installation).
Understanding When Applications will be Installed
Once you've Assigned or Published an application, you'll need to test it to see if it's working properly. Here's how users and computers should react :
-
Applications Published to users on any operating system should show up right away in the Add or Remove Programs folder in Control Panel. No reboot or log out (and log back in) should be required, but you might have to refresh the Add or Remove Programs folder. An application isn't installed until a user specifically selects it (or the application is launched via Document Invocation (also called Auto-Install ). Recall that Document Invocation allows the application to be installed as soon as a file associated with the application is opened.
-
Applications Assigned to users on Windows 2000 or Windows 2003 computers should show up on next logon on the Start menu. Applications Assigned to Windows 2000 or Windows 2003 computers should show install upon next reboot. All users logging on to those computers will see the icons on the Start menu.
-
If you're deploying to users on Windows XP computers or directly to Windows XP computers themselves , you need to know whether Fast-Boot is turned on. Recall from Chapter 3 that Fast Boot is enabled by default for Windows XP machines, and you will need to explicitly turn it off. To review:
-
If Windows XP Fast-Boot is enabled, and you Assign applications to users, it will take two logoffs and logons for the icons to appear on the Start menu
-
If Windows XP Fast-Boot is enabled, and you Assign applications to computers, it will take two reboots before the Assignment is installed. Afterward, icons appear for all users on the Start menu.
-
-
If you want to turn off this behavior for Windows XP, you can do so. Just check out Chapter 3.
| Warning | You'll need to adjust the deployment properties before certain applications will deploy properly to users. (More on this in the "Advanced Published or Assigned" section later in this chapter.) |
Testing Assigned Applications
Before you go headlong and try to verify your deployment of Office XP, first verify that a Windows 2000 or Windows XP machine is in the Human Resources Computers OU, and then reboot the first test machine in the OU. Office XP should load on the machine, as shown in Figure 10.6.
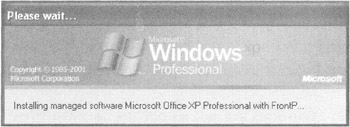
Figure 10.6: Applications Assigned to computers install completely upon reboot.
Go ahead and get a cup of coffee while this is installing. It takes a while. Really. Go ahead. I'll wait.
Once the application is fully installed, you can log on as any user in the domain (or the local computer) and see the application's icons on the Start menu, as shown in Figure 10.7.
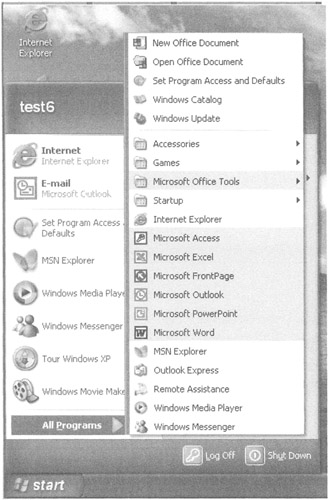
Figure 10.7: The Office XP icons and program names will appear on the Start menu (more specifically on the Start ˜ All Programs menu).
A neat Windows XP and Windows 2003 feature is that they highlight icons and program names for newly installed items on the Start ˜ All Programs menu. If you try this experiment with a Windows 2000 client, you'll notice that the new icons and program titles are not highlighted.
Any user can select any Office application, and the application is briefly prepared and then displayed for the user.
Stay tuned for more information on Assigning and Publishing .msi applications (particularly to users). For now, however, let's switch gears and look at another deployment option.
Understanding .zap Files
Using .msi files is one way to distribute software to your computers and users, but one disadvantage is associated with this process: you must actually have a .msi package that you deploy. Indeed, some applications don't come with .msi packages, and repackaging them with a third-party tool doesn't always work as expected. If you already have your own Setup.exe (or similar program), you can leverage a different type of installation .zap files, which invoke your currently working Setup.exe program.
Sounds greatbut there is a downside: .zap files are not as robust as .msi files. This "unro-bustness" comes in several forms:
-
They do not take advantage of the Windows Installer, and therefore they are not self-repairing should something go awry on the client.
-
You can Publish but not Assign .zap files. Their icons are available only in the Add or Remove Programs applet in Control Panel, and the application is installed all at once. And since .zap files are always Published, they can only be Published to users, not computers.
-
The user is in full control of the install, unless you've magically scripted Setup.exe . This can create trouble for end users.
-
The .zap files run with the user's privileges. They cannot run with elevated privileges. Again, only .msi applications (not .zap files) automatically run elevated even for nonprivileged users once deployed via GPSI.
Like .msi files, .zap files (and their corresponding setup executables) can also be automatically invoked when a specific extension (or set of extensions) is chosen via document invocation (also called Auto-Install ). Auto-Install is described in more detail in the "Advanced Published or Assigned" section, later in this chapter.
Creating Your Own .zap File
A .zap file resembles a .ini file. That is, it is a simple file created with a text editor such as Notepad, and it has headings and values. Instead of repackaging WinZip 8 with WinINSTALL LE (or any of the third-party applications), you can simply create a .zap file for a WinZip 8 setup executable, WinZip80.exe .
A sample WinZip 8 .zap file might look like this:
[Application] FriendlyName = "Winzip 8.0 ZAP Package" SetupCommand = "WINZIP80.exe" DisplayVersion = 8.0 Publisher = WinZip Computing [EXT] .ZIP= .ARC=
Let's briefly break down each entry. The [Application] heading is required, and the only other required elements are the FriendlyName and the SetupCommand , which are self-explanatory.
The entry pointed to in the SetupCommand should be in the same folder as the .zap file itself. If it isn't, you can use UNC paths to specify, such as:
SetupCommand = "\WinDC01\winzipsource\winzip8.exe"
Everything else is completely optional, but might help you and your users sort things out. The [EXT] heading can list the file extensions that can fire off this particular .zap installation and the corresponding WINZIP80.exe setup executable. Listed in this sample file are .zip and .arc , but you can also add file types such as .tar and .z . The [EXT] heading is not required and may not even be desired, depending on the application and its setup routine.
Publishing Your Own ZAP File
If you want to Publish your own ZAP file, you'll need to bring all the steps you've learned together.
-
Place the setup executable (in this case, WINZIP80.exe ) in a subfolder (say, WINZIPSOURCE) underneath a shared folder (in this case APPS).
-
Lock down the WINZIPSOURCE subfolder with NTFS permissions.
-
Create the WINZIP8.zap file as directed earlier using Notepad.
-
Copy the .zap file to the distribution subfolder (WINZIPSOURCE).
-
Finally distribute (Publish) the .zap package to your users.
Testing Your ZAP File
Test your ZAP file and distribution point by logging on to a workstation to which the GPSI policy applies. Open the Add or Remove Programs folder in Control Panel, and click Add New Programs in the column on the left. The application should appear in the list of programs available to add, named according to the entry in the FriendlyName field that you specified in the .zap file, as shown in Figure 10.8.
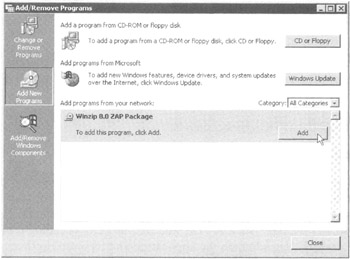
Figure 10.8: You always Publish .zap files in Add/Remove Programs.
Once you've selected it and clicked Add, the WinZip setup program will launch and can be set up in any desired fashion.
| Tip | Alternatively, you can double-click either a .zip or an .arc file to automatically lap launch the .zap file setup application via Document Invocation (also known as Auto-Install). |
Testing Publishing Applications to Users
You can also test Publishing applications before continuing. Recall that the icons of Published applications appear in the Add or Remove Programs folder in Control Panel. However, the usefulness of Published applications is minimal, which is why it's relegated to such a small section for discussion. Users must be specifically told there's something waiting for them, hunt it down themselves, and install it. To test this for yourself, simply select "Publish" when adding a new application, or right-click an existing package Assigned to users and choose "Publish" from the shortcut menu.
To see a Published application in action, follow these steps from a client who is receiving a Published application:
-
Choose Start ˜ Control Panel ˜ Add or Remove Programs to open the Add or Remove Programs applet in Control Panel.
-
Click the "Add New Programs" button to display those applications that have been Published for the user as seen above in Figure 10.8.
-
Ask the user to click the Add button next to the application, and it will be fully loaded upon the machine.
The applications will then appear on the Start ˜ All Programs menu as seen previously in Figure 10.7, ready to be utilized.
A Published application needn't be fully relegated to lying dormant until a user selects it. Indeed, the default is to specify that the application automatically launch via Document Invocation (also known as Auto-Install) as soon as an associated file type is opened. In this way, you can have the application available for use, but just not have the application's icons appear on the Start menu as you do when you Assign it. However, you can turn off Document Invocation by clearing the "Auto install this application by file extension activation" check box as specified in the Deployment Options section a bit later.
| Warning | You'll need to adjust the deployment properties before certain applications will deploy properly to users. (More on this in the "Advanced Published or Assigned" section later in this chapter.) |
Application Isolation
In many circumstances, applications are isolated for their intended use. Here are some examples:
-
Users do not share Assigned or Published applications that an administrator has set up. For instance, User A is Assigned an application and installs it. User B can use User A's machine, but is not Assigned the application via Group Policy. Therefore, when User B logs on to that machine, they do not see the Assigned icons for User A.
-
Users require their own "instance" of the application. If User A and User B are Assigned the same application, each user must contact the source and download their own copy of the application. In most circumstances, this will not double the used disk space, and the time for installation for the second user would not be very long because portions of the application are already installed for User A.
-
If two users are assigned different applications that register the same file types, the correct application is always used. For instance, Joe and Dave share the same machine. Joe is assigned Word 2000, and Dave is Assigned Office XP. When Joe opens a .doc file, Office 2000's Word 2000 launches. When Dave opens a .doc file, Office XP's Word 2002 launches.
-
Depending on the .msi application, users might not be able to go "under the hood" and select the .exes of installed programs. For instance, if User A is Assigned an application, User B (who is not Assigned the application) cannot just use Explorer, locate the application on the hard drive, and double-click the application to install it. This is not a hard-and-fast rule and is based on how the .msi application itself is coded. In Figure 10.9, you can see what happens when a user who is not specifically Assigned Office 2000 tries to run Winword.exe from Program Files.
-
Users can uninstall applications that they have access to in the Add or Remove Programs folder. This has a two-part implication . First, by default, all Assigned applications are also Published, and thus users can remove them using the Add or Remove Programs folder. The icons for the applications will still be on the Start ˜ All Programs menu the next time the user logs on. The first time the user attempts to run one of these applications by choosing Start ˜ All Programs ˜ application , the application reinstalls itself from the distribution point. The second implication deals with who, precisely, can remove Assigned (or Published) applications. First, users cannot delete applications that are directly Assigned to computers. Next, users cannot delete applications that aren't directly Assigned to their user account.
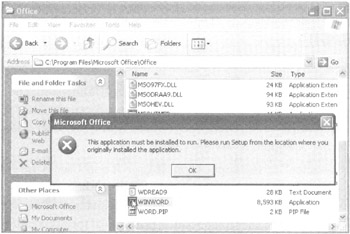
Figure 10.9: Office installations prevent users from just clicking the actual .exe of the installed file. Again, this behavior is entirely application specific.
| Note | Office 2000 and later can prevent users from just clicking their installed .exes . These applications use .msi APIs to verify the application state. For more information about how an application can become "installer-aware," see www.microsoft.com/msj/0998/windowsinstaller.aspx . |
| | ||
| | ||
| | ||
EAN: 2147483647
Pages: 110
- Chapter V Consumer Complaint Behavior in the Online Environment
- Chapter VI Web Site Quality and Usability in E-Commerce
- Chapter IX Extrinsic Plus Intrinsic Human Factors Influencing the Web Usage
- Chapter XVII Internet Markets and E-Loyalty
- Chapter XVIII Web Systems Design, Litigation, and Online Consumer Behavior