Group Policy Software Installation (GPSI) Overview
| | ||
| | ||
| | ||
Group Policy Software Installation (GPSI) Overview
Without any third-party software distribution mechanism (such as Microsoft's Systems Management Server (SMS) or Altiris, most environments require that you spend most of your time running from desktop to desktop. In a typical scenario, a user is hired and fills out the human resources paperwork, and a computer with the standard suite of software is dropped on their desk. Usually this machine comes from some sort of "deployment farm" in the backoffice , where scads of machines are imaged (la Ghost ) by the scores.
The user then starts to surf the Interneter, I meangets to work. Soon enough, it's discovered that the user needs a specific or special application, and a desktop technician is dispatched to fulfill the user's request for new software. When the desktop technician arrives, they either load the user's special software via the CD drive or connect to a network share to pull down the software.
Group Policy Software Installation, or GPSI for short, is the next IntelliMirror feature we'll set up. It's with this feature that users can automatically pull applications through the network, without needing anyone to be dispatched. This feature further chips away at the total cost of ownership (TCO) regarding workstation maintenance.
There are essentially four steps to going from zero to 60 when it comes to deploying software with IntelliMirror's GPSI features:
-
Acquire software with a .msi extension
-
Share and secure a software distribution shared folder
-
Set up a GPO to deliver the software
-
Assign or Publish the software
We will approach each of these steps in our software configuration journey in the next few pages.
The good news is that Group Policy GPSI can solve many of your software deployment woes. The bad news is that, like all other Group Policy features, the magic only happens with the marriage between Active Directory on the back end and Windows 2000 Professional, Windows XP, or Windows 2003 on the client.
Before we get too far along, I want to clear up a terminology misnomer. Specifically , many people incorrectly refer to the Group Policy Software Installation mechanism as the lone word "IntelliMirror." But as you can see, the Group Policy Software Installation mechanism is but one part of the unified IntelliMirror plan. So, to that end, we'll keep on truckin' with the proper terminology of Group Policy Software Installation or simply GPSI.
| Note | Although it's true that Microsoft provides an "Active Directory Client" for Windows 9 x and for Windows NT Workstation to be used with Active Directory, that "Active Directory Client" does not enable any Group Policy functionality. That client, by the way, is available on the Windows 2000 Server CD under the clients\win9x directory and provides additional features such as NTLMv2 authentication and some Active Directory searching. But it doesn't allow old clients to take advantage of Group Policy or GPSI. |
The Windows Installer Service
A background service called the Windows Installer Service must be running on the client for the software deployment magic to happen. Although the actual service is the same, I like to think about there being almost two versions of this servicethe "full" and the "lite" versions. The full version is built into Windows 2000, Windows XP, and Windows 2003 on the client. The full version can understand when Group Policy is being used to install or retract an application and react accordingly . The full version is also extra smart; it can run under "elevated" privileges. In other words, the user does not need to be a local administrator of the workstation to get software deployed via Group Policy. The Windows Installer Service installs the software with administrative privileges. Once installed, however, the program is run under the user's context.
The full version can also be initiated using document invocation ; that is, it is automatically started when you choose a specific extension or extensions. For instance, if you select a file with a . pdf extension, the Windows Installer Service can be automatically invoked to bring down Adobe Acrobat Reader from one of your servers. This is also called auto-install and is described in more detail in the "Advanced Published or Assigned" section, later in this chapter. Additionally, the full version can determine when an application is damaged and repair it automatically by downloading the required files from the source to fix the problem.
The lite version of the Windows Installer Service, however, can only perform that last function: that is, it can determine when an application is damaged and repair it automatically by downloading the required files from the source to fix the problem. But it has no way to understand Group Policy, so it only gets us half of the equation. Installing Office 2000, for instance, on a Windows NT machine installs the lite version of the Windows Installer Service. And, if Office 2000 becomes damaged (for instance, Winword.exe is suddenly deleted), the user is prompted for the location of the source distribution: CD, network, or otherwise .
Again, there really isn't a full or lite version of the service; they are really the same animal. However, the number of features you can leverage depends on the underlying operating system.
Since Windows 2000 was released, there has been an update to the Windows Installer Service. It is integrated into Windows 2000 Service Pack 3 and higher. However, if you don't yet have Windows 2000 Service Pack 3 (and I can't imagine why you wouldn't), you can install the Windows Installer 2.0 Redistributable, which, at last check is, located at go.microsoft.com/fwlink/?LinkId=7613
However, before you go forth and deploy that update, note that Windows Installer 3.0 is now out. We discuss the ins and outs of Windows Installer 3.0 in the "Inside the MSIEXEC Tool" section coming up.
Understanding .msi Packages
About 99 percent of the magic in software deployment with Group Policy is wrapped in a file format called .msi . The new .msi standard file has two goals: increase the flexibility of software distribution and reduce the effort required to make new packages. Files in the .msi format are becoming more and more "standard issue" when a software application is rolled out the door (though sometimes they are not.) For instance, every edition of Office since Office 2000 has shipped as a .msi distribution.
On the surface, .msi files appear to act as self-expanding distribution files, like familiar, self-executing ZIP files. But really, under the surface, .msi files contain a database of "what goes where" and can contain either pointers to additional source files or all the files rolled up inside the .msi itself. Additionally, .msi files can " tier " the installation; for instance, you can specify "Don't bother loading the spell checker in Word, if I only want Excel." Sounds simple, but it's revolutionary.
Moreover, because .msi files are themselves a database, an added feature is realized. The creator of the .msi package (or sometimes the user) can designate which features are loaded to the hard drive upon initial installation, which features are loaded to the hard drive the first time they are used, which features are run from the CD or distribution point, and which features are never loaded. This lets administrators pare down installations to make efficient use of both disk space and network bandwidth.
With .msi files, the bar is also raised when it comes to the overall management of applications. Indeed, two discreet .msi operations really come in handy: Rollback and Uninstall. When .msi files are being installed, the entire installation can be canceled and simply rolled back. Or, after a .msi application is fully installed, it can be fully uninstalled . You are not guaranteed the exact same machine state from Uninstall as you are with Rollback, however. The GPSI features in Active Directory are designed mainly to integrate with the new .msi file format. There is other legacy support, as you'll see later.
Utilizing an Existing .msi Package
As stated, lots of applications come as .msi files. Some are full-blown applications, such as Office 2000 and later. Others are smaller programs that you might use a lot, such as the GPMC (Group Policy Management Console) or the .NET Framework. All these aforementioned applications come as an .msi . Be forewarned: just because an application comes as an .msi doesn't necessarily mean it can always be deployed via GPSI; however, that's a pretty good indication. Yet even though versions of the Norton AntiVirus client shipped as an .msi , it wasn't installable via GPSI until version 9.0. Ditto for Adobe Acrobat. Until the most recent version (version 7.0), the Reader Program didn't ship as an .msi , but the full "writer version" did. Even though earlier versions of Adobe Acrobat writer shipped as .msi files, they simply weren't deployable via GPSI.
Additionally, some .msi applications (such as Office 2000 and later) can be deployed to either users or computers. However, some applications, such as the GPMC.msi and the .NET Framework's .msi can only be deployed successfully to computers.
You'll want to check with the manufacturer of the .msi file to understand specifically how it needs to be installed. The .msi files that can be deployed via GPSI usually come in three flavors:
-
Some .msi packages are just one solitary file, and they come ready to be deployed. The GPMC, and the Windows Administration tools ( Adminpak.msi ) are examples in this category.
-
Some .msi packages have one file to "kick off" the installation. Then, there are a gaggle of other files behind it. The .NET Framework ( netfx.msi ) and service packs ( update.msi ) are examples in this category
-
Other .msi files need to be "prepared" for installation. Usually, these applications are more complex. Office 2000 (and later) and Microsoft TechNet are examples in this category.
| Note | The first edition of this text used an Adminpak.msi as its demonstration package for GPSI. The goal of Adminpak.msi is to plunk down all the administrative tools on your client systems for when you're performing system administration. If you don't have Adminpak.msi handy, you can read the previous edition to see how to distribute Adminpak.msi.Adminpak.msi is a bit special; however, there are versions specific for Windows 2000, Windows 2003, and Windows XP. See the Knowledge Base article Q304718 for more details. |
Many people want to deploy big applications, such as the Office suite. In the following example, I'll assume you have a copy of Office XP and that you're licensed to distribute it to all your targeted clients. This same procedure will work for the enterprise editions of Office 2000 and Office 2003 if you are licensed for those instead.
Setting Up the Software Distribution Share
The first step is to set up the software distribution shared folder on a server. In this example, we'll use WinDC01 and create a shared folder with the name of Apps. We want all our users to be able to read the files inside this software distribution share because later we might choose to create multiple folders to house additional applications' source. Later, we'll create our first application subfolder and feed Office XP into its own subfolder.
To set up the software distribution shared folder, follow these steps:
-
Log on to WinDC01 as Administrator.
-
From the Desktop, click My Computer to open the My Computer folder.
-
Find a place to create a Users folder. In this example, we'll use D:\APPS. Once you've opened the D: drive, right-click D: and select the Folder command from the New menu; then type in Apps as the name.
Tip You can substitute any name for Apps.
-
Right-click the newly created Apps folder, and choose Sharing from the shortcut menu to open the Properties of the Apps folder, but focused on the Sharing tab. Click "Share this Folder." Windows 2003 servers should automatically have the Everyone group set to Read. While you're in the Permissions for the Apps dialog, additionally click the Add button and add the Administrators group to have Full Control permissions upon the share. Click OK to return to the Apps properties, and then click OK at the properties of the folder to share the folder.
You can use Share permissions, NTFS permissions, or both to restrict who can see which applications. The most restrictive permissions between Share level and NTFS level permissions are used. Here, at the Apps share, you want everyone to have access to the share. You'll then create subfolders to house each application and use NTFS permissions to specify, at each subfolder level, which groups or users can see which applications' subfolders .
Setting Up the .msi Package with an Administrative Installation
For our examples, we'll deploy Office XP. As stated, not all .msi files are "ready to go"; some need to be prepared. To prepare Office XP (or other Office installations later than Office 2000), you must perform an Administrative Installation of its .msi file. In this procedure, the system will rebuild and copy the .msi package from your CD-ROM source to a destination folder for use by your clients. While the package is being rebuilt, it injects the serial number for your users and other customized data. Again, to be clear, not all .msi packages must be prepared in this manner. Be sure to check your documentation.
To perform an Administrative Installation of Office 2000 or later, you'll use the msiexec command built in to Windows 2000 and Windows 2003. The generic command is msiexec /a whatever.msi. For Office XP, the command is msiexec /a PROPLUS.MSI .
| Tip | For Office 2003, the command is msiexec /a PROI11N.MSI . |
| |
The GPSI features are like the postal service; they're a delivery mechanism. Their duty is to deliver the package and walk away. But it's something of a production before that package is delivered into your hands, and that's what we'll tackle in the next section.
Before we get there, however, you need to prepare for software distribution by setting up a distribution point to store the software. You can choose to create a shared folder on any server hopefully one that's close to the users who will be pulling the software. The closer to the user you can get the server, the faster the download of the software and the less saturated your network in the long run.
In a nutshell , IntelliMirror's GPSI routines deliver a message to the client about the shared folder from which the software is available. However, if you are concerned that your users will often roam your distributed enterprise, you can additionally set up Dfs. Dfs is the Distributed File Sys tem that, when used in addition to Active Directory Site Topology definitions, can automatically direct users toward the share containing the software closest to them. The essence of Dfs is to set up a front end for shared folders and then act as the traffic cop, directing users to the closest replica. To explore Dfs, visit www.microsoft.com/windows2000/techinfo/planning/fileandprint/dfssteps.asp and http://www.microsoft.com/windowsserver2003/technologies/storage/dfs/default.mspx
When you set up shared folders, also lock them down with NTFS permissions to prevent unauthorized users from accessing the installations. Even though GPSI can target specific users, it makes no provisions for security. Rather, if your users discover the distribution shared folder, they'll have the keys to the candy store unless you put security upon the shared folder or, even better, utilize NTFS permissions as a deadbolt on the lock.
You can expose or hide your shared folders; to hide them, add a $ (dollar sign) to the end of the share name. You can have one shared folder for each package or one shared folder for all your software with subfolders underneath, each with the appropriate NTFS permissions.
It is not recommended (or really possible) to dump all the installations in one shared folder without using subfolders. Using subfolders lets you differentiate between two applications that have the same name (for example, Setup.msi ) or two versions of the same application (Office 2000 and Office XP).
| |
When you run this command, Office XP is not installed on your server (or wherever you're performing these commands). This can be confusing, as the Office Installation Wizard is kicked off, and it will write a bunch of data to your disk. Again, to be clear, an Administrative Installation simply prepares a source installation folder for future software deployment.
The Office Installation Wizard will show that it's getting ready for an Administrative Installation, as shown in Figure 10.1.
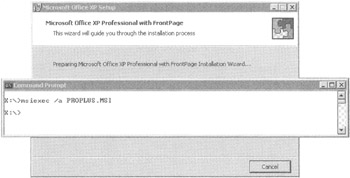
Figure 10.1: You need to perform an Administrative Installation to prepare a source installation folder for Office.
Your next steps in the installation wizard are to specify the organization and the installation location and to enter the product key. For the installation location, choose a folder in the share you already created, say, d:\apps\officexpdistro . Be sure to enter a valid product key, or you cannot continue. The next screen asks you to confirm the End User License Agreement. Finally, the administrative installation is kicked off, and files are copied to the share and the folder (see Figure 10.2).
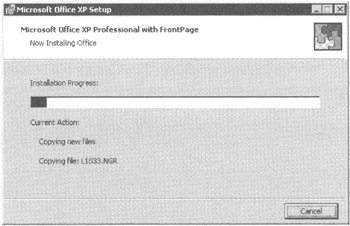
Figure 10.2: The files are simply copied to the share; Office isn't being installed (despite the notification that it is).
| |
It's great when applications such as Office XP come with their own .msi packages, but not every vendor supplies .msi packages. You can, however create your own .msi packages to wrap up and deploy the software you've already bought but that doesn't come with a .msi package.
WinINSTALL LE (for Light Edition) is included with the Windows 2000 Server CD. Up until recently, an updated version was available for free download at www.ondemandsoftware.com/FREELE2003/ . But recently it seems that it now costs about $50.
The general steps for using a repackaging tool are as follows :
-
Take a snapshot of a clean source machine.
-
Run the current setup program of whatever you want to wrap up.
-
Fully install and configure the application as desired.
-
Reboot the machine to ensure that changes are settled in.
-
Take a snapshot again, and scour the hard drive for changes.
Once the changes are discovered, they're wrapped up into a .msi file of your choice, which you can then Assign or Publish!
Due to page count, I can't go in to the ins and outs of creating your own .msi files. However, I have two options for you. First, you can take a look at the first edition of this book (ISBN 0-7821-2881-5), which includes the step-by-step process. Or you can check out another resource that demonstrates this process with free and "pay" tools. The Definitive Guide to Windows Installer Technology for System Administrators (which is free and which I co-wrote) is available at www.wise.com/ebook . The WinINSTALL LE tool I used in the first edition is good for light use, but if you want to deploy many applications across your enterprise, you'll start bumping heads with DLL conflicts and other nasties. To that end, you might have to check out some of the bigger, badder, third-party tools. Some of the more popular are InstallShield for Windows Installer ( www.installshield.com ) and Wise for Windows Installer ( www.wisesolutions.com ).
The third-party tools have some fairly robust features to assist you in your .msi package creation. As I stated, the .msi format lets you detect a damaged component within a running application. This feature is called keying files for proper operation. For example, if your Ruff.dll gets deleted when you run DogFoodMaker 7, the Windows Installer springs into action and pulls the broken, but keyed, component back from the distribution point all without user interaction.
| |
| | ||
| | ||
| | ||
EAN: 2147483647
Pages: 110