Using the Crop Tool
Sometimes the best way to resize your image is to eliminate part of it. The Crop tool ![]() enables you to trim your images precisely. (You can also select an area with the Rectangular Marquee or Elliptical Marquee tool and then choose Image ’ Crop, but with the marquees, you sacrifice the flexibility and control of the Crop tool s features.) The Crop tool is found in the default Tool palette, on the left column in the third row.
enables you to trim your images precisely. (You can also select an area with the Rectangular Marquee or Elliptical Marquee tool and then choose Image ’ Crop, but with the marquees, you sacrifice the flexibility and control of the Crop tool s features.) The Crop tool is found in the default Tool palette, on the left column in the third row.
To perform a basic crop with the Crop tool, open the mandrill.psd file from the ch13 folder on the CD and follow these steps:
-
Choose Image Duplicate to make a copy of the image.
-
Choose the Crop tool from the Tool palette.
-
You ll crop the black border out of the picture. Drag the mouse to define the bounding box. As you can see in Figure 13.10, the area outside the crop will darken , highlighting your selection.
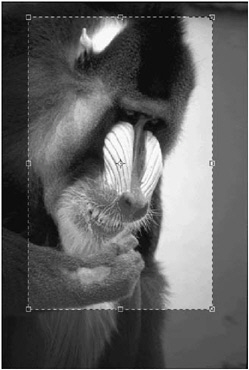
Figure 13.10: After you define the initial cropped area, the borders outside the Crop bounding box will darken. Use the handles to fine-tune the bounding box. -
Fine-tune the bounding box interactively. Use the handles to encompass more or less of the image, and move the bounding box by placing the cursor inside its boundaries and dragging.
Note Pressing the Shift key will constrain the crop bounding box proportions . As you drag from a corner point, the opposite corner point will retain its position on the image. Pressing the Option/Alt key will constrain the crop bounding box proportions as you drag from a corner point, but the point of origin in the center of the box will retain its position. You can reposition the point of origin by clicking and dragging it.
-
To implement the crop, click the Commit (check mark) button

 in the Options bar or press Return (Mac) or Enter (Win). You can also double-click inside the cropping area to commit your crop. Figure 13.11 shows the result of applying the crop. If you decide to cancel the crop, press the Esc key or click the Cancel button.

Figure 13.11: Applying a crop removes all areas outside the bounding box.
| Note | You can turn the crop shield on and off by checking or clearing the Shield Color box in the Crop tool Options bar. Choose a color for the shield by clicking the swatch to display the Color Picker. Click the arrow in the Opacity box, and drag the slider or type a numerical value for the opacity of the shield. |
Rotating a Crop
One of the Crop tool s most useful features enables you to crop down to a rotated area. To practice simultaneously cropping and rotating an image, start, as earlier, by opening the mandrill.psd file from your CD. Then follow these steps:
-
Choose Image Duplicate to make a copy of the image.
-
Choose the Crop tool from the Tool palette, and define your initial crop area, just as in Figure 13.10 in the previous procedure.
-
Move your mouse just outside any of the corner selection handles until the cursor changes to the curved rotation icon.
The Crop Rotation option becomes active when the cursor is anywhere outside the crop selection; when the cursor is too close to the bounding box, a Crop Bounding Box Resize icon will appear.
-
Drag the mouse to rotate the bounding box (see Figure 13.12). Make further adjustments by dragging any of the handles until you re satisfied with the new, rotated crop.
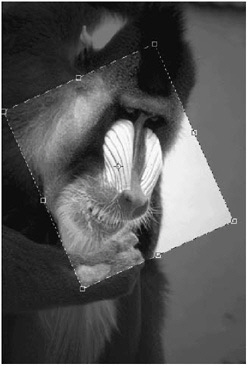
Figure 13.12: With the Crop tool, you can rotate the bounding box to encompass a diagonal area. -
As before, click the Commit (check mark) icon in the Options bar. Photoshop crops the image and rotates it (see Figure 13.13).
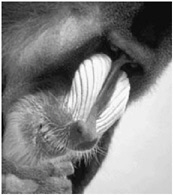
Figure 13.13: The resulting crop, after rotation and cropping
Cropping to Size
With the Crop tool, you can trim your image to a fixed size and new interpolated resolution by entering values for the height, width, and resolution. The Crop bounding box automatically constrains to your specified image size. Here are the steps:
-
Duplicate the mandrill.psd file again. Choose the Crop tool from the Tool palette.
-
Locate the Width and Height fields in the Options bar. Enter 6 inches for the width, 4 inches for the height, and 72 (ppi) for the resolution (see Figure 13.14).

Figure 13.14: The Crop Options bar -
Click the arrows between the width and height fields to reverse the width and height values. The height is now 6 inches and the width is 4 inches.
-
Drag the bounding box. It will automatically be constrained within the proportions that you entered in the Width and Height fields. No matter what part of the man-drill the bounding box encompasses, its contents will be 4 ² wide by 6 ² high and 72 ppi when the crop is applied. You can still rotate the bounding box as described previously.
-
Commit your change (click the check mark icon in the Options bar or press Return/Enter) to finish cropping your image.
Most cropping is usually performed with the Width, Height, and Resolution fields left blank. The Clear button on the Options bar will clear the number fields so that no resampling takes place. The Front Image button on the Options bar fills the current active document s width/height/resolution into the number fields.
| Note | The Crop tool can be used to increase the size of a cropped area if the height and width values entered are greater than the original size. |
Using Perspective Cropping
After you ve drawn a Crop marquee, the Options bar presents several additional options. The Perspective option enables you to adjust the corner anchor points of the bounding box independently. This feature is useful if you want to distort an image as you crop it or to fit an image s content into a rectangular document of a specific size. When you implement the crop, the image area will distort to conform to the new document s height and width (see the examples in Figures 13.15 and 13.16).
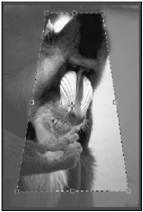
Figure 13.15: The Perspective crop option lets you crop an irregular shape into a rectangle.

Figure 13.16: The image after perspective cropping
EAN: 2147483647
Pages: 355