| The Environment preferences group enables you to modify characteristics of the overall GroupWise program interface. When you double-click the Environment icon, you see a dialog box with six (seven in Remote Mode) tabs: General, Views, File Location, Cleanup, Default Actions, Signature, and Backup Options (Remote Mode only), as shown in Figure 11.2. Figure 11.2. Environment options pertain to the overall default settings for GroupWise. 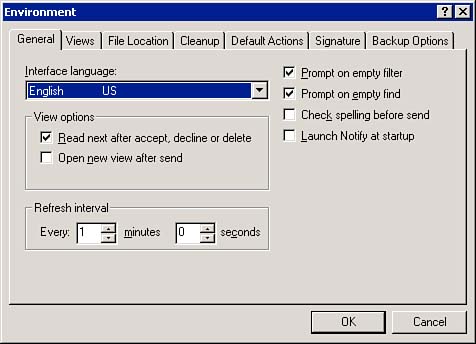 General Under the General tab, you can set the following preferences: -
Interface Language ” This is the language you want to use in the client interface ( menus , views, and so on). If the language you desire does not appear, contact your system administrator. Languages are enabled at the system level. -
View Options ” These options enable you to read the next message after you accept, decline, or delete a message and to open a new, blank message after you send a message. -
Refresh Interval ” This option determines how often GroupWise checks for new messages. (The minimum is 1 minute, the maximum is 60 minutes and 59 seconds, and the default is 1 minute.) -
Prompt on Empty Filter ” This option causes a message to appear if a filter you created does not allow any messages to appear. -
Prompt on Empty Find ” This option causes a message to appear if a Find session doesn't generate any results. -
Check Spelling Before Send ” This option checks the spelling of each message (subject line and message body) when the Send or Post button is selected. -
Launch Notify at Startup ” This option loads the Notify program, which will alert you to new messages and/or alarms set for appointments, when you start GroupWise. Once you have set the General tab's options, you can select the Views tab's preferences. Views Under the Views tab, shown in Figure 11.3, you can set the following preferences: -
Item Type ” Select the category (Mail, Phone, Reminder note, Appointment, Task, and Calendar) and the message type (Group or Posted) for which you want to set the default. -
Views ” Choose from a list of available views for the selected item type. -
Set Default View ” Highlight the view you want as the default for the item type you specify. (When you choose File, New, this is the view that will appear for the message type you choose.) -
Default Compose/Read View ” Choose between plain text and HTML for composing and reading messages. Figure 11.3. The Views tab's options configure the default views for sending and receiving messages. 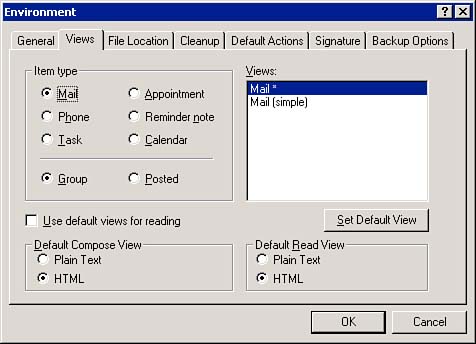 NOTE The Calendar default view is the view that appears when you select the Calendar View option from the Window menu.
The Use default views for reading option enables you to read messages using your default views instead of the views the messages were sent with. For example, if someone sends you a Small Mail view message, you would normally see the message using the Small Mail view. However, if you marked the Use default views for reading check box, you see the message in whichever view you chose as the default. File Location Following are the preferences you can set under the File Location tab, which is shown in Figure 11.4: -
Archive Directory ” The location of the parent directory of the actual archive directory that holds your archive message files. The system administrator may want you to place your archive files in a certain location. -
Custom Views ” The location for Custom View files. (Custom views are specialized GroupWise views created with a view designer utility.) -
Save, Check Out ” The default location for messages and attachments that you save, and the default location to place the documents that you check out of a GroupWise library. (See Chapter 9 for more information on using GroupWise libraries.) -
Caching Mailbox Directory (Cache Mode only) ” This is the path to your cached Mailbox on your local computer. It is only available (obviously) in Caching Mode (see Chapter 10). Figure 11.4. These fields allow you to specify default file locations for some elements of GroupWise. 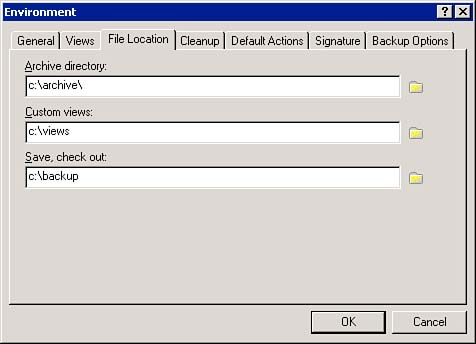 Once you have set up these file locations, you can configure the Cleanup tab's options. Cleanup Following are the preferences you can select under the Cleanup tab, which is shown in Figure 11.5: -
Mail and Phone ” Specifies how old a phone or mail message will be when it is automatically archived or deleted. (The minimum is 1 day, the maximum is 250 days, and the default is Manual Delete and Archive.) -
Appointment, Task, and Reminder Note ” Specifies how much past Calendar information you want to keep. (The minimum is 1 day, the maximum is 250 days, and the default is Manual Delete and Archive.) -
Empty Trash ” Specifies how long any deleted item will stay in the Trash folder. (The minimum is 1 day, the maximum is 250 days, and the default is 7 days.) Once messages have been emptied from the Trash folder, they are no longer retrievable. Figure 11.5. You can determine default actions to be taken based on the age of your messages. 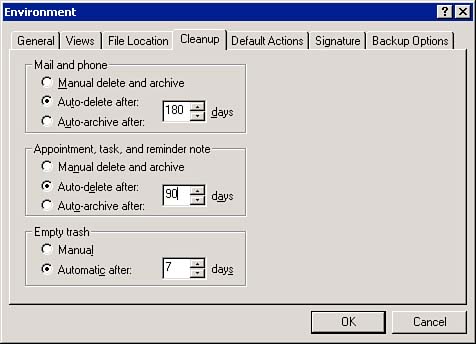 The options in the Cleanup tab are performed when you start GroupWise. For example, if you have set Cleanup options so that messages are archived after 180 days, the archiving occurs when you start GroupWise on the 180th day after a message was received. The automatic Cleanup options can cause a slight delay when you start GroupWise. Default Actions The Default Actions tab, shown in Figure 11.6, lets you configure what happens when you access different items in GroupWise: -
Sent Items ” These options specify what happens when you double-click a message you have sent. Open item opens the message, whereas Show properties displays the properties of the item. -
Web Browser ” These options specify what happens when you click a Web page address within a message. Use existing window redirects your open Web browser to the address, whereas Open new window launches a new Web browser pointed to the address. -
Show or Hide QuickViewer On ” These options let you configure what happens when you access QuickViewer (show or hide on all or selected folders or display a dialog box for a prompt). -
File Attachments ” These options specify what happens when you click a file that is attached to a message. View in a new window opens a new message window displaying the contents of the file, whereas Open Attachment launches the application associated with the attached file. -
Message Attachments ” These options specify what happens when you click a message that has been attached to an email. You can choose to view the attachment in either a new window by itself or within the same window of the message you are reading. Figure 11.6. You can determine the default activities when accessing messages, Web addresses, and other items within the Default Actions tab.  Once you have set up the default actions, you can configure your signature. Signature You can enhance your GroupWise messages with an Internet-style, custom signature. The signature can be added to the end of any message you send. You can include information such as a disclaimer, an encouraging quotation, or your phone number. GroupWise also lets you send your own personal information ( name , phone numbers , and so on) as they appear in the Address Book in the new vCard format. You can specify additional signature information for each mail account you are accessing with GroupWise. (This is covered in more detail in Chapter 8, "Advanced Features.") To configure a signature or vCard sending options, click the Signature tab in the Environment dialog box, as shown in Figure 11.7. Figure 11.7. The Signature tab lets you configure your signature information for messages. 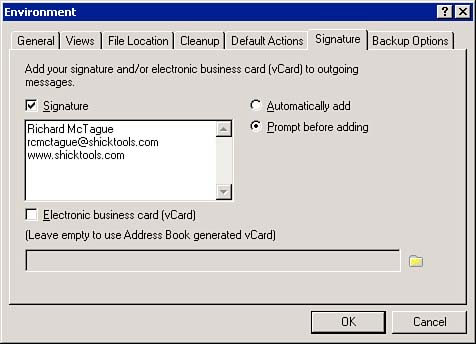 Following are the options available in the Signature tab: -
Signature ” When you select this check box, you can type a signature in the Signature box as you want it to appear at the end of your messages. -
Electronic Business Card (vCard) ” Enables the sharing of your personal information in the vCard (VCF) format. vCard is a format for contact information that is recognized by many Internet-based and other types of email systems. Sending a message with a vCard adds a VCF file as an attachment. The recipient then opens the attachment and specifies which address book to add the contact into. For example, if you send a vCard attachment to a GroupWise recipient, the contact information is added to that person's personal address book or Frequent Contact list. Specify the path to the vCard file in the path area at the bottom of the dialog box. NOTE If you leave the path to the vCard file empty, the information that you send when you include a vCard signature (that is, attachment) is pulled from the GroupWise System address book, which is entered and created by the administrator.
-
Automatically Add ” Automatically adds the signature and/or vCard at the end of every message when you click Send. -
Prompt Before Adding ” Asks whether you would like to add a signature and/or vCard information when you choose Send. (This is the default option.) TIP You can copy text into the Clipboard from any application and place it in the Signature box. Graphics and other Rich Text Format (RTF) data cannot be used. Also, any text you enter will be preceded by two hard returns. This is helpful to know if you want your signature to appear with exactly one line between it and the last line of text in your message ”in this case, don't end that last line with a hard return.
Backup Options (Remote Only) The Backup Options tab lets you specify the directory (provided by the administrator) in order to back up your remote GroupWise Mailbox to a file location. Click Backup Remote Mailbox, enter the directory path, make a selection in the Backup Remote Mailbox Every # Days option, and click OK. GroupWise will back up your remote Mailbox to the location you specify. Remember, this option is only available in Remote Mode.  |