8.26 Docking Controls
| < Day Day Up > |
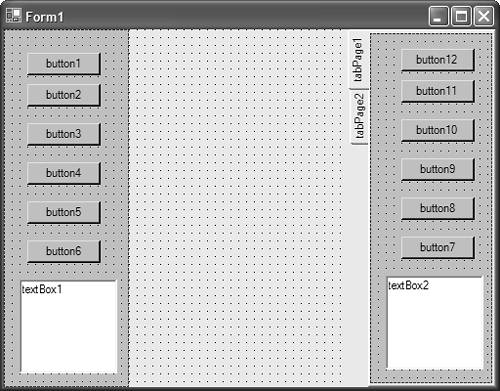
TechniqueSelect the control or control container to dock within the forms designer and access the docking UI Type Editor using the Dock property. Because the Dock property is exclusive, select one of the buttons within the editor. The available options include one of the four edges of the Windows Form or all the edges, which is known as a fill dock. CommentsDocking is similar to that of anchoring in that it allows you to easily associate the edges of a control with the edges of the form so that any resizing of the form translates into a resizing of the control. However, the Anchor property can accept any combination of anchor values, whereas the Dock property can use only a single value. Docking, as its name implies, allows you to force a control to always remain on the edge of the Windows Form without any visible separation between the forms border and the control edge. The Visual Studio .NET IDE uses a special form of docking for the various tool windows. Although it is off by default, you can collapse a docked tool window so that it only shows a tab on the edge of the IDE by clicking the push-pin icon on the top right of the tool window. When the mouse cursor hovers over the tab, the tool window expands back to full size , allowing you to work with it. By using the Dock property and handling certain mouse events, you can imitate this same behavior. To create a collapsible docked control, change the Dock property so that the control docks to the edge of the Windows Form. Within the forms designer, resize the docked control to the maximum size you want when it is in its expanded form. In Figure 8.10, you can see a Windows Form with two control containers docked to the left and right edges of the form. The left side of the form contains a docked Panel control and the right side contains a docked TabControl , both of which hold a collection of controls themselves . Figure 8.10. Create collapsible groups of controls by docking control containers and changing their corresponding Size property. The next step is to create a few mouse event handlers. For each docked control on the form, add an event handler for the MouseEnter event and add an event for the form's MouseMove event. Switch to code view within the IDE after you create the event handlers. At this point, you have visually created two docked controls and added three mouse event handlers. You can now add the code necessary to expand and collapse the docked controls. We chose to create a simple class that holds information about the maximum and minimum size of each control as well as the state of its expansion. Therefore, create a class named ToolDockInfo , as shown in Listing 8.9. Listing 8.9 Docking Information for Tool Windows public class ToolDockInfo { public System.Drawing.Size Min; public System.Drawing.Size Max; public bool Expanded; public ToolDockInfo( System.Drawing.Size Min, System.Drawing.Size Max ) { this.Min = Min; this.Max = Max; Expanded = false; } } As you can see, the class contains two Size variables that will hold the maximum and minimum size of the control corresponding to the expanded and collapsed size of the control, respectively. There is a reason why we chose a class over a struct even though it is a likely candidate to be a value type. An instance of the class will be placed in each docked control's Tag property, which is a System.Object data type. If ToolDockInfo were a struct, there would be extra steps involved to box the struct when assigning it to the Tag property. Now that you have created the docking information class, you can create new instances of this type and assign them to each docked control container's Tag property. Within the form class constructor, create an instance of the ToolDockInfo class for each docked control and assign it to the Tag property of each control. The constructor is also a good place to initially collapse each docked control, which you can do by changing the Size property using the Min variable in the ToolDockInfo object for that control: public Form1() { InitializeComponent(); panelLeft.Tag = new ToolDockInfo( new Size( 10, panelLeft.Size.Height), panelLeft.Size ); panelLeft.Size = ((ToolDockInfo) panelLeft.Tag).Min; tabControl1.Tag = new ToolDockInfo( new Size( 19, tabControl1.Size.Height), tabControl1.Size ); tabControl1.Size = ((ToolDockInfo) tabControl1.Tag).Min; } The final step involves filling in the definition for the three mouse event handlers. The MouseEnter event handler for each docked control simply changes the Size property of each control based on the ToolDockInfo.Max information defined within the control's Tag property that you created earlier: private void panelLeft_MouseEnter(object sender, System.EventArgs e) { panelLeft.Size = ((ToolDockInfo) panelLeft.Tag).Max; ((ToolDockInfo)panelLeft.Tag).Expanded = true; } private void tabControl1_MouseEnter(object sender, System.EventArgs e) { tabControl1.Size = ((ToolDockInfo) tabControl1.Tag).Max; ((ToolDockInfo)tabControl1.Tag).Expanded = true; } You might be wondering why you didn't create MouseLeave event handlers for the controls to control the subsequent collapse of the control when the mouse leaves the control's area. The reason is due to the controls within the control containers. In Figure 8.10, you can see that each control container contains a series of buttons and a text box. Once the mouse cursor moves over one of those controls, the control container receives the MouseLeave event, which subsequently collapses the control container. Within the MouseMove event handler for the main form, check each docked control's Expanded property defined in the ToolDockInfo class. If the control container is in an expanded state, also check to see whether the mouse cursor is outside of that control container's area. If it is, then collapse the control by setting the Size property to the Min value specified in its corresponding ToolDockInfo object. Listing 8.10 Expanding Docked Windows private void Form1_MouseMove(object sender, System.Windows.Forms.MouseEventArgs e) { if( (((ToolDockInfo)panelLeft.Tag).Expanded == true) && e.X >= (((ToolDockInfo)panelLeft.Tag).Max.Width) ) { ((ToolDockInfo)panelLeft.Tag).Expanded = false; panelLeft.Size = ((ToolDockInfo) panelLeft.Tag).Min; } if( (((ToolDockInfo)tabControl1.Tag).Expanded == true) && e.X <= (this.Size.Width-((ToolDockInfo)tabControl1.Tag).Max.Width) ) { ((ToolDockInfo)tabControl1.Tag).Expanded = false; tabControl1.Size = ((ToolDockInfo) tabControl1.Tag).Min; } } When you build and run the application, you see that both control containers are collapsed to the edges of the form. The only visible portions of the TabControl are the tabs themselves. When the mouse cursor moves over one of the tabs, the TabControl expands to show the internal controls it contains. |
| < Day Day Up > |
EAN: 2147483647
Pages: 440