Visual Studio .NET
 | |||||||||||
| Chapter 6 - Programming in the .NET Environment | |
| bySimon Robinsonet al. | |
| Wrox Press 2002 | |
Visual Studio .NET is a fully integrated development environment. It is designed to make the process of writing your code, debugging it, and compiling it to an assembly to be shipped, as easy as possible. What this means in practice is that Visual Studio .NET gives you a very sophisticated multiple-document-interface application in which you can do just about everything related to developing your code. It offers:
-
A text editor in which you can write your C# code (as well as VB.NET and C++ code). This text editor is quite sophisticated, and it is also aware of the syntax of C#. This means that as you type, it can automatically lay out your code, for example by indenting lines, matching start and end brackets of code blocks, and color coding keywords. It will also perform some syntax checks as you type, and will underline code that will cause compilation errors. Also, it features IntelliSense, which automatically displays the names of classes, fields or methods as you begin to type them. As you start typing parameters to methods , it will also show you the parameter lists for the available overloads. The screenshot below shows this feature at work with one of the .NET base classes, ListBox .
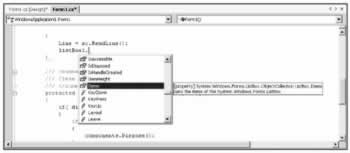
Important A useful shortcut to remember is that by pressing CTRL+SPACE , you can bring back the IntelliSense list box if you need it and for any reason it's not visible.
A design view editor of your code, that allows you to visually place user -interface and data-access controls in your project. When you do this, Visual Studio .NET will automatically add the necessary C# code to your source files to instantiate these controls in your project. (This is possible as, under .NET, all the controls are actually just instances of particular base classes.) Supporting windows that allow you to view and modify aspects of your project. For example, there are windows available that show you the classes in your sourcecode as well as the available properties (and their startup values) for Windows Forms and Web Forms classes. You can also use these windows to specify compilation options, such as which assemblies your code needs to reference. Compilation from within the environment . Instead of having to run the C# compiler from the command line, you can simply select a menu option to compile the project and Visual Studio .NET will call the compiler for you. It will pass all the relevant command-line parameters to the compiler detailing such things as which assemblies to reference and what type of assembly you want to be emitted (executable or library .dll , for example). If you so wish, it will even run the compiled executable for you straight away so you can see whether it runs satisfactorily, and you can choose between different build configurations for example, a release or debug build.An integrated debugger . It's in the nature of programming that you can virtually guarantee that your code won't run correctly the first time you try it. Or the second time. Or the third, etc. Visual Studio .NET will seamlessly link up to a debugger for you, allowing you to set breakpoints and watches on variables all from within the environment. Integrated MSDN help . Visual Studio .NET can call up the MSDN documentation for you. For example, this means that in the text editor if you're not sure of the meaning of a keyword, you can select it, hit the F1 key, and Visual Studio .NET will then bring up MSDN to show you related topics. Similarly, if you're not sure what a certain compilation error means, you can bring up the documentation for that error by selecting the error message and hitting F1 . Access to other programs . And if all that wasn't enough, Visual Studio .NET is also able to call on a number of other utilities that allow you to examine and modify aspects of your computer or network, without you having to leave the developer environment. Among the tools available, you can check running services, and database connections, and there's even an Internet Explorer window that lets you browse the Web.
Of course, assuming you are experienced in C++ or VB, you will already be familiar with the relevant Visual Studio 6 version of the developer environment for your particular language so you will know that many of the features listed above are not new you're probably already used to doing much the same things in Visual Studio 6. However, what's new in Visual Studio .NET is that it combines all the features that were previously available across all VS 6 developer environments. This means that, whatever language you used in VS 6, you'll find some new features in Visual Studio .NET. For example, in Visual Basic, you could not compile separate debug and release builds. On the other hand, if you are coming to C# from a background of C++, much of the support for data access and the ability to drop controls into your application with a click of the mouse, which has long been part of the Visual Basic developers experience, will be new to you. The C++ developer environment did include some support for this, but it was very limited, and was restricted to the most common user-interface controls.
We should point out to people coming from a C++ background that you will find two things from VS 6 missing in VS .NET: edit-and-continue debugging, and an integrated profiler. Microsoft was apparently unable to get edit-and-continue debugging for .NET working in time and has hinted that that facility will appear with a future service pack. MS is also not shipping any full profiler application with .NET. Instead, there are a number of .NET classes to assist with profiling in the System.Diagnostics namespace. The perfmon profiling tool is available from the command line (just type perfmon ) and has a number of new .NET-related performance monitors . At the time of writing, Microsoft is also working with a number of partner companies who are developing performance profilers.
Whatever your background, you will find the overall look of the developer environment has changed to accommodate the new features, the single cross-language IDE, and the integration with .NET. There are new menu options and toolbar options, and many of the existing ones from VS 6 have been renamed . So you'll need to spend some time familiarizing yourself with the layout and commands available in Visual Studio .NET.
Since this is a professional-level book, we are not going to look in detail at every feature or menu option in Visual Studio .NET. We are assuming that you are a sufficiently competent programmer that you are capable of exploring the environment and seeing what's available for yourself. The real aim of our Visual Studio .NET coverage is to ensure that you are sufficiently familiar with all the concepts involved with building and debugging a C# application to be able to get the best out of Visual Studio .NET and in particular to make sure that you are able to use particular features that might not have been available in the developer environment for whatever language you previously used.
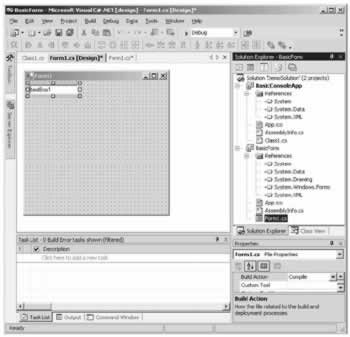
To give you an idea of some of the features, the following screenshot shows what Visual Studio .NET might typically look like when you are coding (note that since the appearance of Visual Studio .NET is highly customizable, the windows might not be in the same locations or different windows might be visible when you launch the environment).
The way this part of the chapter is organized is that we are going to go through the process of creating, coding, and debugging a project, seeing what Visual Studio .NET can do to help you at each stage.
Creating a Project
Once you have installed Visual Studio .NET, you will want to start your first project. With Visual Studio .NET, you rarely start with a blank file that you type C# code into from scratch, in the way that we've been doing in the previous chapters in this book. Instead, the idea is that you tell Visual Studio .NET roughly what type of project you are going to create, and then Visual Studio .NET starts you off by automatically generating the C# code that gives you an outline framework for that type of project. You then work by adding your code to this outline. For example, if you are writing a Windows GUI-interface based application (or with .NET terminology, a Windows Form), Visual Studio .NET will start you off with a file containing C# sourcecode that creates a basic form. This form is capable of talking to Windows, and receiving events. It can let itself get maximized or minimized or resized but it doesn't have any controls on it or any other functionality that will be for you to add. If your application is intended to be a command-line utility (a console application) then Visual Studio .NET will give you a basic namespace, class, and Main() method to start you off. Of course, the option is there to ask for an empty application if you really do want to start writing your code from scratch.
However, Visual Studio .NET doesn't stop here in giving you your start-up project. Recall that we said earlier that Visual Studio .NET would call up the compiler for you when you need to compile your code? Well, when you create your project, it also sets up the compilation options that you are likely to need to supply to the C# compiler whether or not it is to compile to a command-line application, a library, or a Windows application. It will also tell the compiler which base class libraries you will need to reference (a Windows GUI application will need to reference many of the Windows.Forms -related libraries; a console application probably won't). You can of course modify all these settings as you are editing, if you need to.
The first time you start Visual Studio .NET, you will be presented with what is known as the Start Page. The Start Page is an HTML page that contains various links to take you to useful web sites, let you set the appearance and configuration of Visual Studio .NET (the My Profile link), open existing projects, or start a new project.
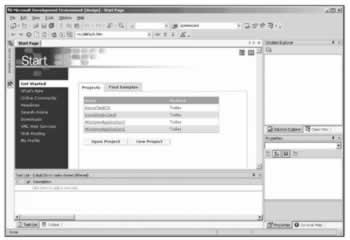
This screenshot shows the situation after I've used Visual Studio .NET a couple of times, and so features a list of the most recently edited projects. You can just click on one of these projects to open it again. Obviously the first time you start up Visual Studio, this list will be empty.
Under the My Profile option, you can even change the appearance of Visual Studio .NET to match what you will have been used to in the previous developer environment for whatever your preferred language was. For example you can set up Visual Studio .NET so its user interface looks a bit like the old VB or C++ IDEs . Note, however, that this option only really changes where the various windows are positioned on the screen. You'll still find that most of the menu and toolbar options, as well as the detailed features of each window, are new.
Selecting a Project Type
You can create a new project either by clicking on the appropriate link on the start page or by clicking on the File menu then choosing New , then Project . Either way, you will get presented with the New Project dialog that gives you the first inkling of the variety of different projects you can create.
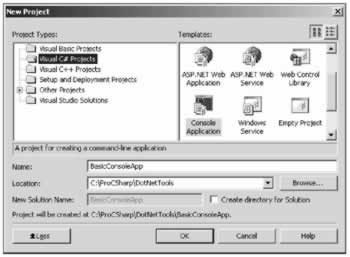
Effectively, what this dialog box is asking you is what kind of initial framework code you want Visual Studio .NET to generate for you, and what compilation options you want. And for that matter what compiler you want to compile your code with the C#, VB.NET, or C++ compiler. We can immediately see the language integration that Microsoft has promised for .NET at work here! For this particular example, we've opted for a C# console application, the same type that we've been using up until now in the book.
We don't have space to cover all the various options for different types of project here. On the C++ side, all the old C++ project types are there MFC application, ATL project, etc. On the VB.NET side, the options have changed somewhat for example, you can create a VB.NET command-line application (Console Application), something that was impossible in VB 6. You can also create a .NET component (Class Library) or .NET control (Windows Control Library), but you can't create an old-style COM-based control (the .NET control is intended to replace such ActiveX controls).
However, since this is a C# book, we will list all the options that are available to you under Visual C# Projects . You should note that there are some other more specialized C# template projects available under the Other Projects option.
| If You Choose | You get the C# code and compilation options to generate | Chapter |
|---|---|---|
| Windows Application | A basic empty form that responds to events. | 7 |
| Class Library | A .NET class that can be called up by other code. | 8 |
| Windows Control Library | A .NET class that can be called up by other code and which has a user interface. (Like an old-style ActiveX control.) | 7 |
| ASP.NET Web Application | An ASP.NET-based web site: ASP.NET pages and C# classes that generate the HTML response sent to browsers from those pages. | 14 |
| ASP.NET Web Service | A C# class that acts as a fully operational Web Service. | 15 |
| Web Control Library | A control that can be called up by ASP.NET pages, to generate the HTML code that gives the appearance of a control when displayed on a browser. | 16 |
| Console Application | An application that runs at the command-line prompt, or in a console window. | 6 |
| Windows Service | A service that runs in the background on Windows NT and Windows 2000. | 22 |
| Empty Project | Nothing. You have to write all your code from scratch but you still get the benefit of all the Visual Studio .NET facilities when you are writing. | |
| Empty Web Project | As for Empty Project, but the compilation settings are set to instruct the compiler to generate code for ASP.NET pages. | |
| New Project In Existing Folder | New project files for an empty project. Use this option if you have some straight C# sourcecode (for example typed in a text editor) and want to turn it into a Visual Studio .NET project. |
The final column of this table gives the number of the chapter(s) in this book in which we cover that type of application (there are some types of project without chapter numbers . These project types aren't really complex enough to warrant their own chapters.)
The Newly Created Console Project
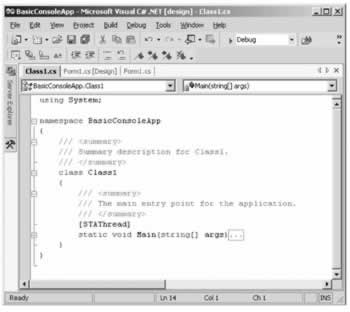
Let's see what happens when we OK the above dialog to generate a C# console application. Visual Studio .NET gives us a number of files, including a sourcecode file, Class1.cs , which contains the initial framework code. We'll discuss the case for a console application here, but the same principles hold for all the other types of project.
This screenshot shows exactly what code Visual Studio .NET has written for us.
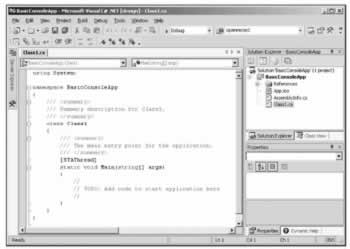
As you can see, we have here a C# program that doesn't yet actually do anything, but which contains the basic items required in any C# executable program: a namespace and a class that contains the Main() method, which is the program's entry point. ( Strictly speaking, the namespace isn't necessary, but it would be very bad programming practice not to declare one.) This code is all ready to compile and run, which you can do immediately by hitting the F5 key, or equivalently, by selecting the Debug menu and choosing Start . However, before we do that we'll just add one line of code to make our application actually do something!
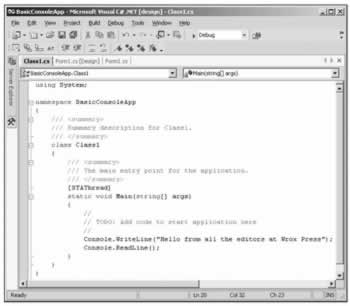
static void Main(string[] args) { // // TODO: Add code to start application here // Console.WriteLine("Hello from all the editors at Wrox Press"); } If you compile and run the project, you'll find a console window appears and disappears almost straight away, only just about giving you time to see the message. The reason this happens is that Visual Studio .NET, remembering the settings you specified when you created the project, arranged for it to be compiled as a console application and then immediately run. Windows then realized that it needed to run a console application but didn't have a console window to run it from. So Windows helpfully created a console window and ran the program. As soon as the program exited, Windows saw that it didn't need the console window any more and promptly destroyed it. That's all very logical but doesn't help you very much if you actually want to look at the output from your project!
A good way to avoid this problem is to insert the following line just before the Main() method returns in your code.
static void Main(string[] args) { // // TODO: Add code to start application here // Console.WriteLine("Hello from all the editors at Wrox Press"); Console.ReadLine(); } That way, your code will run, display its output, and then it will hit the Console.ReadLine() statement, at which point it will wait for you to hit the Return key before the program exits. This means that the console window will hang around until you hit Return .
Note that all this is only a problem for console applications that you test-run from Visual Studio .NET if you are writing a Windows application then the window displayed by the application will automatically stay on the screen until you explicitly exit it. Similarly, if you run a console application from the command-line prompt, as we've been doing up until now, you won't have any problems about the window disappearing .
Other Files Created
The Class1.cs sourcecode file isn't the only file that Visual Studio .NET has created for you. If you have a look in the folder in which you asked Visual Studio .NET to create your project, you will see not just the C# file, but a complete directory structure that looks like this:

The two folders, bin and obj , are there for compiled and intermediate files. Subfolders of obj hold various temporary or intermediate files that may be generated, while subfolders of bin will hold the compiled assemblies.
This is something that may be unfamiliar to legacy VB developers. When running old VB 6 and earlier versions, you would traditionally simply write the code then run it. In VB, as with all languages, the code would need to be compiled into something containing executable instructions before being shipped but VB tended to hide the process when debugging. In C#, it's more explicit: to run the code, you have to compile (or build) it first, which means an assembly must be created somewhere.
The remaining files in the project's main folder, BasicConsoleApp , are there for Visual Studio .NET's benefit. They contain information about the project what files are in it etc., so that Visual Studio .NET knows how to have the project compiled, and also how to read it in the next time you open the project.
Solutions and Projects
One important distinction we need to understand is that between a project and a solution.
-
A project is a set of all the sourcecode files and resources that will compile into a single assembly (or in some cases, a single module). For example, a project might be a class library, or a windows GUI application.
-
A solution is the set of all the projects that make up a particular software package (application).
To see the difference, we need to recall that when you ship an application it will probably consist of more than one assembly. For example, there might be a user interface; there may be certain custom controls and other components that ship as libraries of the parts of the application. There may even be a different user interface for administrators. Each of these parts of the application might be contained in a separate assembly, and hence, they are regarded by Visual Studio .NET as a separate project. However, it is quite likely that you will be coding these projects in parallel and in conjunction with each other. Thus it is quite useful to be able to edit them all as one single unit in Visual Studio .NET. Visual Studio .NET allows this by regarding all the projects as forming one solution, and treats the solution as the unit that it reads in and allows you to work on.
Up until now we have been loosely talking about creating a console project. In fact, in the example we are working on, Visual Studio .NET has actually created a solution for us this particular solution contains just one project. We can see the situation in a window in Visual Studio .NET known as the Solution Explorer , which contains a tree structure that defines your solution.

This screenshot shows that the project contains our source file, Class1.cs , as well as another C# source file, AssemblyInfo.cs , which contains information describing the assembly and to specify versioning information. (We'll examine this file in Chapter 8). The Solution Explorer also indicates the assemblies that our project references, according to namespace.
If you haven't changed any of the default settings in Visual Studio .NET you will probably find the Solution Explorer in the top right corner of your screen. If you can't see it, just go to the View menu and click on Solution Explorer .
The solution is described by a file with the extension .sln so in the case of our example it's BasicConsoleApp.sln . The project is described by various other files in the project's main folder. If you attempt to edit these files using Notepad, you'll find that they are mostly plain text files and, in accordance with the principle that .NET and .NET tools rely on open standards wherever possible, they are mostly in XML format.
C++ developers will recognize that a Visual Studio .NET solution corresponds to an old Visual C++ project workspace (stored in a .dsw file) and a Visual Studio .NET project corresponds to an old C++ project ( .dsp file). On the other hand, VB developers will recognize that a solution corresponds to an old Visual Basic project group ( .vbg file) and the .NET project to an old Visual Basic project ( .vbp file). Visual Studio .NET differs from the old VB IDE in that it always creates a solution for you automatically. In Visual Studio 6, Visual Basic developers would get a project initially, and a project group only if they explicitly asked the IDE for one.
Adding Another Project to the Solution
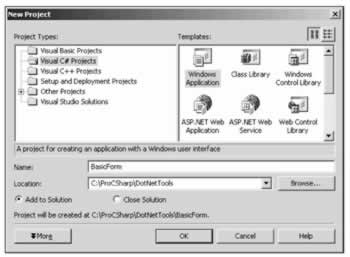
As we work through this chapter we will want to demonstrate how Visual Studio .NET works with Windows applications as well as console ones. So at this point we are going to kill two birds with one stone, and simultaneously get ourselves a windows project while at the same time showing how to get a solution that contains more than one project. We are going to create a windows project called BasicForm , but instead of creating it as a new solution we will ask Visual Studio .NET to add it to our current solution, BasicConsoleApp .
This means we'll end up with a solution containing a Windows application and a console application. That's not a very common scenario you're more likely to have one application and a number of libraries but it allows us to demonstrate more code! You might, however, create a solution like our one if for example you are writing a utility that you want to be able to run either as a Windows application or as a command-line utility.
There are a couple of ways of creating the new project. One way is to right-click on the name of the solution in the Solution Explorer . This will bring up a context menu in which one of the options is to add items to the solution. The other way is simply to go to the File menu and click on the New Project option as we did before. Either way will bring up the New Project dialog box that we saw earlier, but this time, if we go through the file menu, we will notice it has two radio buttons near the bottom of the dialog which allow us to specify whether we want to create a new solution for this project or add it to the existing solution.
If we do this and specify Add to Solution , we will get a new project so that the BasicConsoleApp solution now contains a console application and a windows application.
In accordance with the language-independence of Visual Studio .NET, the new project doesn't have to be a C# project. It's perfectly acceptable to put a C# project, a VB.NET project and a C++ project in the same solution.But we'll stick with C# here since this is a C# book!
Of course, this means that BasicConsoleApp isn't really an appropriate name for the solution any more! We can change this by right-clicking on the name of the solution and choosing Rename from the context menu. If we rename the solution DemoSolution , the Solution Explorer window will now look like this.
We can see from this that Visual Studio .NET has automatically made the windows project reference some of the extra base classes that are important for Windows Forms functionality.
You'll notice if you look in Windows Explorer that the name of the solution file has changed to DemoSolution.sln . In general, if you want to rename any files, the Solution Explorer window is the best place to do so, because Visual Studio .NET will then automatically be able to update any references to that file in the other project files. If you just rename files using Windows Explorer, you'll probably find you break the solution because Visual Studio .NET won't be able to locate all the files it needs to read in. You will then have to manually edit the project and solution files to update the file references.
Setting the Startup Project
One thing you'll need to bear in mind if you have multiple projects in a solution is that only one of them can be run at a time! When you compile the solution, all the projects in it will be compiled. However, you have to specify which one is the one you want Visual Studio .NET to start running when you press F5 or select Start . If you have one executable and several libraries that it calls, then this will clearly be the executable. In our case, where we have two independent executables in the project, we'd simply have to debug each in turn.
You can tell Visual Studio .NET which project to run by right-clicking on that project in the Solution Explorer window and selecting Set as Startup Project from the context menu. You can tell which is the current startup project because it is the one that appears in bold in the Solution Explorer window in the above screenshot it's BasicConsoleApp .
Windows Application Code
A Windows application contains a lot more code right from the off than a console application when VS .NET first creates it, because creating a window is an intrinsically more complex process. We're not going to discuss the code for a Windows application in detail here that's the subject of the next chapter, but take a look at the code in the Form1 class in the BasicForm project to see for yourself how much is autogenerated.
Reading in Visual Studio 6 Projects
If you are coding in C#, then clearly you won't need to read in any old Visual Studio 6 projects, since C# doesn't exist in Visual Studio 6. However, language interoperability is a key part of the .NET framework, so it is possible that you may want your C# code to work alongside code written in VB or in C++. In that situation you may need to edit projects that were created with Visual Studio 6.
In fact, Visual Studio .NET is quite happy to read in Visual Studio 6 projects and workspaces, although as it does so it will upgrade them to Visual Studio .NET solutions. The situation is different for C++, VB, and J++ projects.
-
In Visual C++, no change to the sourcecode is needed. All your old Visual C++ code will still work fine with the new C++ compiler. Obviously it will not be managed code, but it will still compile to code that runs outside the .NET runtime if you want your code to integrate with the .NET Framework then you will need to edit it. If you get Visual Studio .NET to read in an old Visual C++ project, it will simply add a new solution file and updated project files. It will leave the old .dsw and .dsp files unchanged so that the project can still be edited by Visual Studio 6, if necessary.
-
For Visual Basic we have more of a problem, since Visual Basic has been replaced by VB.NET. As we remarked in Chapter 1, although VB.NET has been designed very much around VB, and shares much of the same syntax, it is in many ways a new language. In Visual Basic, the sourcecode largely consisted of the event handlers for the controls. The code that actually instantiated the main window and many of the controls on it was not part of Visual Basic, but was instead hidden behind the scenes as part of the configuration of your project. By contrast, VB.NET works in the same way as C#, by putting the entire program out in the open as sourcecode, so all the code that displays the main window and all the controls on it needs to be in the source file. Also, like C#, VB.NET requires everything to be object-oriented and part of a class, whereas VB didn't even recognize the concept of classes in the .NET sense. If you try to read a Visual Basic project with Visual Studio .NET, it will have to upgrade the entire sourcecode to Visual Basic .NET before it can handle it and this involves making a lot of changes to the VB code. Visual Studio .NET can, to a large extent, make these changes automatically and will then create a new VB.NET solution for you. You will find that the sourcecode it gives you looks very different from the corresponding VB code that it was converted from, and you will still need to carefully check through the generated code to make sure the project still works correctly. You may even find areas of code where Visual Studio .NET has left comments to the effect that it can't figure out exactly what you wanted the code to do, and you may have to edit the code manually.
-
As far as Microsoft is concerned , J++ is now an obsolete language and is not directly supported in .NET. However, in order that existing J++ code can continue to operate , separate tools are available to allow J++ code to work with .NET. These include a developer environment known as Visual J# .NET, and a utility that can convert legacy J++ code to C# code similar to the VB 6 to VB.NET upgrade facility. These tools are grouped under the name JUMP (Java User Migration Path), and at the time of writing are not bundled with .NET or VS .NET, but instead are available separately. Details are available at http://msdn.microsoft.com/visualj/jump/default.asp .
Exploring and Coding a Project
In this section we will look at the features that Visual Studio .NET gives us to help as we add code to our project.
The Folding Editor
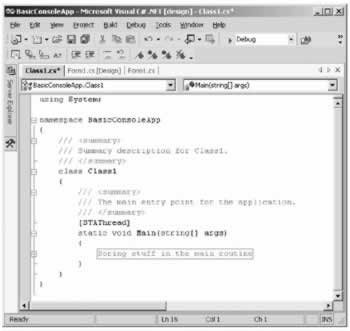
One really exciting innovation with Visual Studio .NET is its use of a folding editor as its default code editor. Have a look at this screenshot:
This shows the code for the console application that we generated earlier. Notice those little minus signs down the left-hand side of the window. These mark the points where the editor thinks a new block of code (or documentation comment) starts. You can click on these icons to close up the view of the corresponding block of code just as you would close a node in a tree control.
This means that while you are editing you can focus on just the areas of code you want to look at, and you can close up the bits of code you're not interested in. Not only that, but if you don't like the way the editor has chosen to block off your code you can indicate a different way with the C# preprocessor directives, #region and #endregion , which we examined in Chapter 4. For example, suppose we decide we'd like to be able to collapse just the code inside the Main() method. We'd add this code:
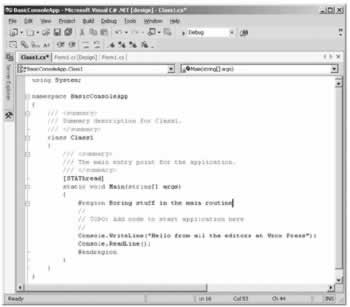
The code editor will automatically detect the #region block and place a new minus sign by the #region directive as shown above, allowing you to close the region. Enclosing this code in a region means that we can get the editor to close up the block of code, marking the area with the comment we specified in the #region directive. The compiler, however, will ignore the directives and compile the Main() method as normal.
Besides the folding editor feature, Visual Studio .NET's code editor brings across all the familiar abilities from Visual Studio 6. In particular it features IntelliSense as we saw earlier. This not only saves you typing, but also helps make sure that you get the parameters correct. C++ developers will notice that the Visual Studio .NET IntelliSense feature is a bit more robust than the Visual Studio 6 version (which often missed items out of the listbox), and also works more quickly.
The code editor will also perform some syntax checking on your code and will underline most syntax errors with a short wavy line, even before you compile the code. Hovering the mouse pointer over the underlined text will bring up a small box telling you what the error is. This feature is something that VB developers have been used to for years , but will be new to developers coming to C# from C++.
Other Windows
Besides the code editor, Visual Studio .NET provides a number of other windows that allow you to view your project from different points of view.
For the rest of this section we'll be describing a number of other windows. If you find that one of these windows doesn't seem to be visible in your Visual Studio .NET setup, then you should just go to the View menu and click on the name of the appropriate window. The only exception to this is the Design View and Code Editor, since these are regarded as two tabs of the same window. You display these by either right clicking on the file name in the Solution Explorer and selecting View Designer or View Code from the context menu, or from the toolbar at the top of the Solution Explorer.
The Design View Window
If you are designing a user interface application, such as a Windows application, Windows control library, or ASP.NET application, then one window that you will use frequently is the Design View, which presents a visual overview of what your form will look like. You normally use the Design View in conjunction with a window known as the Toolbox (and the Layout toolbar). The Toolbox contains a large number of .NET components that you can drag onto your program:
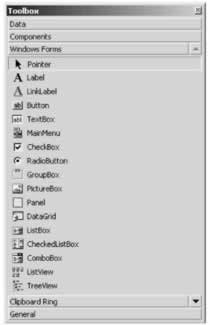
The principle of the toolbox was applied in all developer environments in Visual Studio 6, but with .NET the number of components available from the toolbox has vastly increased. The categories of component available through the toolbox depend, to some extent, on the type of project you are editing you'll find, for example, that you get a far wider range when you are editing the BasicForm project in the DemoSolution solution than you do when you are editing the BasicConsoleApp project. The most important ranges of items available include:
-
Data Access Components . Classes that allow you to connect to data sources.
-
Windows Forms Components . Classes that represent visual controls such as textboxes, listboxes, tree views etc.
-
Web Forms Components . Classes that basically do the same thing as Windows controls, but which work in the context of web browsers, and which work by sending HTML output to simulate the controls to the browser.
-
Components . Miscellaneous .NET classes that perform various useful tasks on your machine, such as connecting to directory services or to the event log.
You can also add your own custom categories of item to the toolbox if you wish, by right-clicking on any category and selecting Add Tab from the context menu. You can place other tools in the toolbox by selecting Customize Toolbox from the same context menu this is particularly useful for adding your favorite COM components and ActiveX controls, which are not present in the toolbox by default. If you add a COM control, you can still click to place it in your project just as you would with a .NET control. Visual Studio .NET will automatically add all the required COM interoperability code to allow your project to call up the control. In this case, what will actually be added to your project is a .NET control that VS .NET creates behind the scenes, and which acts as a wrapper for your chosen COM control.
C++ developers will recognize the toolbox as Visual Studio .NET's (much enhanced) version of the resource editor. VB developers will probably think at first sight that there is not much new about the toolbox, since they have one in Visual Studio 6, but should beware because this toolbox has a dramatically different effect on your sourcecode from that which the one in the VB 6 IDE did.
We'll see how the toolbox works by using it to place a textbox in our basic form project. We simply click on the TextBox in the toolbox then click again to place it in the form in the design view (or if you prefer, you can click and drag). Now the design view looks like this, showing roughly what BasicForm will look like if we compile and run it:
What is more interesting is that if we look at the code view, we see the developer environment has added the code that instantiates a TextBox object to go on the form. There's a new member variable in the Form1 class:
public class Form1 : System.Windows.Forms.Form { private System.Windows.Forms.TextBox textBox1; There is also some code to initialize it in the method, InitializeComponent() , which is called from the Form1 constructor:
/// <summary> /// Required method for Designer support - do not modify /// the contents of this method with the code editor. /// </summary> private void InitializeComponent() { this.textBox1 = new System.Windows.Forms.TextBox(); this.SuspendLayout(); // // textBox1 // this.textBox1.Location = new System.Drawing.Point(8, 8); this.textBox1.Name = "textBox1"; this.textBox1.TabIndex = 0; this.textBox1.Text = "textBox1"; // // Form1 // this.AutoScaleBaseSize = new System.Drawing.Size(5, 13); this.ClientSize = new System.Drawing.Size(292, 268); this.Controls.AddRange(new System.Windows.Forms.Control[] { this.textBox1}); In one sense there is no difference between the code editor and the design view: they simply present different views of the same code. What actually happened when we clicked to add the TextBox into the design view is that the toolbox (or strictly, Visual Studio .NET responding to our mouse clicks in the toolbox) has placed the above extra code in our C# source file. The design view simply reflects this change because Visual Studio .NET is able to read our sourcecode and determine from it what controls should be around when the application starts up. This is a fundamental shift from the old VB way of looking at things, in which everything was based around the visual design. Now, your C# sourcecode is what fundamentally controls your application, and the design view is just a different way of viewing the sourcecode. Incidentally, if you do write any VB.NET code with Visual Studio .NET, you'll find the same principles apply.
If we'd wanted to, we could have worked the other way round: if we manually added the same code as above to our C# source files, then Visual Studio .NET would have automatically detected from the code that our application contained a TextBox , and would have shown this textbox in the design view at the designated position. It is best to add these controls visually, and let Visual Studio handle the initial code generation it's a lot quicker and less error-prone to click the mouse button a couple of times than to type quite a few lines of code!
Another reason for adding these controls visually is that, in order to recognize that they are there, Visual Studio .NET does need the relevant code to conform to certain criteria and code that you write by hand might not do so. In particular, you'll notice that the InitializeComponent() method that contains the code to initialize the TextBox is commented to warn you against modifying it. That's because this is the method that Visual Studio .NET looks at in order to determine what controls are around when your application starts up, which it should be aware of. If you create and define a control somewhere else in your code, Visual Studio .NET won't be aware of it and you won't be able to edit it in the design view or certain other useful windows.
In fact, despite the warnings, you can modify the code in InitializeComponent() , provided you are careful. There's generally no harm in changing the values of some of the properties, for example, so that a control displays different text or so that it is a different size. In practice, the developer studio is pretty robust when it comes to working around any other code you place in this method. Just be aware, however, that if you make too many changes to InitializeComponent() , you do run the risk that Visual Studio .NET won't recognize some of your controls. We should stress that this won't affect your application whatsoever when it is compiled, but it may disable some of the editing features of Visual Studio .NET for those controls. Hence, if you want to add any other substantial initialization, it's probably better to do so in the Form1 constructor or in some other method.
The Properties Window
This is another window that has its origins in the old VB IDE. We know from Properties window displays and allows you to edit the initial values of most of these properties for the controls that Visual Studio .NET has been able to detect by reading your sourcecode.
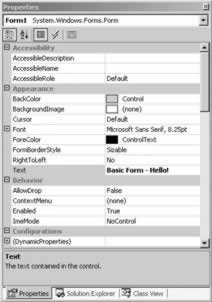
| Important | The Properties window can also show events. You can view events by clicking on the icon that looks like a flash of lightning at the top of the window. |
At the top of the Properties window is a listbox that allows you to select which control you want to view. We've selected Form1 , the main form class for our BasicForm project, and have edited the text to 'Basic Form Hello! ' If we now check the sourcecode we can see that what we have actually done is edit the sourcecode via a more friendly user interface.
this.AutoScaleBaseSize = new System.Drawing.Size(5, 13); this.ClientSize = new System.Drawing.Size(292, 268); this.Controls.AddRange(new System.Windows.Forms.Control[] {this.textBox1}); this.Name = "Form1"; this.Text = "Basic Form - Hello!"; Not all the properties shown in the Properties window, a statement explicitly setting that property will magically appear in your sourcecode and vice versa.
The Properties window provides a convenient way to get a broad overview of the appearance and properties of a particular control or window.
It is interesting to note that the Properties window is implemented as a System.Windows.Forms.PropertyGrid instance, which will internally use the reflection technology we described in the previous chapter to identify the properties and property values to display.
The Class View
Unlike the Properties window, the Class View window owes its origins to the C++ (and J++) developer environments. It will, rather obviously, be new to VB developers since VB 6 did not even support the concept of the class, other than in the sense of a COM component. The class view is not actually treated by Visual Studio .NET as a window in its own right rather it is an additional tab to the Solution Explorer window. The class view shows the hierarchy of the namespaces and classes in your code. It gives you a tree view that you can expand out to see what namespaces contain what classes and what classes contain what members .
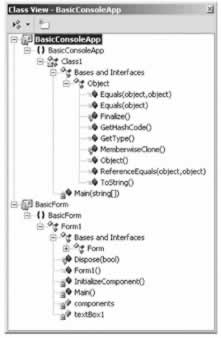
A nice feature of the Class View is that if you right-click on the name of any item for which you have access to the sourcecode, the context menu features an option, Go To Definition , which immediately takes you to the definition of the item in the code editor. You can alternatively do this by double-clicking on the item in Class View (or, indeed, by right-clicking on the item you want in the sourcecode editor and choosing the same option from the resulting context menu). The context menu also gives you the option to add a field, method, property, or indexer to a class. This means that you specify the details of the relevant member in a dialog box, and the code gets added for you. This is possibly not so useful for fields or methods, for which the effort to type in the definition manually into your code is small, but you may find it helpful for properties and indexers, where it can save you quite a bit of typing.
The Object Browser Window
One important aspect of programming in the .NET environment is being able to find out what methods etc. are available in the base classes and any other libraries that you are referencing from your assembly. This feature is available through a window called the Object Browser .
The Object Browser window is quite similar to the Class View window in that it displays a tree view that gives the class structure of your application, allowing you to inspect the members of each class. The user interface is slightly different in that it displays class members in a separate pane rather than in the tree view itself. The real difference is that it lets you look at not just the namespaces and classes in your project, but also the ones in all the assemblies that are referenced by the project. The screenshot below shows the object browser viewing the SystemException class from the .NET base classes.

The only point you have to watch with the Object Browser is that it groups classes by the assembly in which they are located first, and by namespace second. Unfortunately, since namespaces for the base classes are often spread across several assemblies, this means you might have trouble locating a particular class unless you know what assembly it is in.
The object browser is there to view .NET objects. If for any reason you want to investigate installed COM objects, you'll find that the OLEView tool previously used in the C++ IDE is still available it's under the Tools menu (the OLE/COM Object Viewer menu item), along with several other similar utilities.
VB developers should not confuse the .NET Object Browser with the Object Browser of the VB 6 IDE they are different. The .NET Object Viewer is there to view .NET classes, whereas the tool of that name in VB 6 was there to view COM components. If you want the functionality of the old object browser, you should now use the OLEView tool.
The Server Explorer Window
You can use the Server Explorer window to find out about aspects of the computer while coding.

As you can see from the screenshot, among the things you can access through the Server Explorer are database connections, information about services, Web Services, and running processes.
The Server Explorer is linked to the Properties window.
Pin Buttons
While exploring Visual Studio .NET you may have noticed that many of the 'windows' we are describing have some interesting functionality more reminiscent of toolbars . In particular, apart from the code editor, they can all be docked. Another, very new, feature of them is that when they are docked , they have an extra icon that looks like a pin next to the minimize button in the top right corner of each window. This icon really does act like a pin it can be used to pin the windows open. When they are pinned (the pin is displayed vertically), they behave just like all the 'normal' windows that you are used to. When they are unpinned, however, (the pin is displayed horizontally), they only remain open as long as they have the focus. As soon as they lose the focus (because you clicked somewhere else) they smoothly retreat into the main border around the entire Visual Studio .NET application.
Pinning and unpinning windows provides another way of making the best use of the limited space on your screen. It's not really been seen a great deal in Windows before, though a few third-party applications such as PaintShop Pro have used similar concepts. Pinned windows have, however, been around on many Unix-based systems for quite a while.
Building a Project
In this section we'll examine the options that Visual Studio .NET gives you for building your project.
Building, Compiling, and Making
Before we examine the various build options, we will just clarify one point of terminology. You'll often see three different terms used in connection with the process of getting from your sourcecode to some sort of executable code: compiling, building, and making. The origin of these various terms comes from the fact that until recently, the process of getting from sourcecode to executable code involved more than one step (and this is still the case in C++). This was largely because, typically, a program would contain many source files. In C++, for example, each source file needs to be compiled individually. This leads to what are known as object files, each containing something like executable code, but where each object file relates to only one source file. In order to generate an executable, these object files need to be linked together, a process that is officially known as linking . The combined process was usually referred to at least on the Windows platform as building your code. However, in C# terms the compiler is more sophisticated and is able to read in and treat all your source files as one block. Hence there isn't really a separate linking stage, so in the context of C# the terms "compile" and "build" are used interchangeably.
The term "make" basically means the same as "build", though it's not really used in the context of C#. The term originated on old mainframe systems on which, when a project was composed of many source files, a separate file would be written that contained instructions to the compiler on how to build a project which files to include and what libraries to link in etc. This file was generally known as a make file and is still quite standard on Unix and Linux etc. Make files are not normally needed on Windows though you can still write them (or get Visual Studio .NET to generate them) if you need to.
Debug and Release Builds
The idea of having separate builds is something that will be well known to developers with C++ background, and less so to those with VB background. The point here is that when you are debugging you tend to want a rather different behavior from your executable from that which you do when you actually ship the software. When you ship, what you are mostly concerned with, besides the fact that your code works, is that the size of the executable should be as small as possible and that it should run as fast as possible. Unfortunately, these requirements aren't really compatible with your needs when you are debugging code, for the following reasons.
Optimization
High performance is achieved partly by the compiler doing a lot of optimizations on the code. This means that the compiler actively looks at your sourcecode as it's compiling in order to identify places where it can mangle the precise details of what you're doing in a way that doesn't change the overall effect, but which makes things more efficient. As one example of the principle, if the compiler encountered the following sourcecode:
double InchesToCm(double Ins) { return Ins*2.54; } // later on in the code Y = InchesToCm(X);
it might replace it with this:
Y = X * 2.54; Or it might replace this code:
{ string Message = "Hi"; Console.WriteLine(Message); }
with this:
Console.WriteLine("Hi"); Thereby saving having to declare an unnecessary object reference in the process.
It's not possible to exactly pin down what optimizations the C# compiler does or whether the two above examples actually would occur with any particular example, because those kinds of details are not documented (it is most likely that for managed languages such as C#, the above optimizations would occur at JIT compilation time, not when the C# compiler compiles sourcecode to assembly). For obvious commercial reasons, companies that write compilers are usually quite reluctant to give too many details about the tricks that their compilers use. We should stress that optimizations do not affect your sourcecode they affect only the contents of the executable code. However, the above examples should give you a good idea of what to expect from optimizations.
The problem is that while optimizations like the ones above help a great deal in making your code run faster, they aren't so good for debugging. Suppose with the first example, that you want to set a breakpoint inside the InchesToCm() method to see what's going on in there. How can you possibly do that if the executable code doesn't actually have an InchesToCm() method because the compiler has removed it? And how can you set a watch on the Message variable when that doesn't now exist in the compiled code either?
Debugger Symbols
When you're debugging, you often need to look at values of variables, and you will specify them by their sourcecode names. The trouble is that executable code generally doesn't contain those names the compiler replaces the names with memory addresses. .NET has modified this situation somewhat, to the extent that certain items in assemblies are stored with their names, but this is only true of a small minority of items such as public classes and methods and those names will still be removed when the assembly is JIT-compiled. Asking the debugger to tell you what the value is in the variable called HeightInInches isn't going to get you very far if, when the debugger examines the executable code, it sees only addresses and no reference to the name HeightInInches anywhere . So, in order to debug properly, you need to have extra debugging information made available in the executable. This information will include, among other things, names of variables and line information that allows the debugger to match up which executable machine assembly language instructions correspond to those of your original sourcecode instructions. You won't, however, want that information in a release build, both for commercial reasons (debugging information makes it a lot easier for other people to disassemble your code) and because it increases the size of the executable.
Extra Source code Debugging Commands
A related issue is that quite often while you are debugging there will be extra lines in your code to display crucial debugging-related information. Obviously you want the relevant commands removed entirely from the executable before you ship the software. You could do this manually but wouldn't it be so much easier if you could simply mark those statements in some way so that the compiler ignores them when it is compiling your code to be shipped. We've already seen in Chapter 4 how this can be done in C# by defining a suitable processor symbol, and possibly using this in conjunction with the Conditional attribute giving you what is known as conditional compilation.
What all these factors add up to is that you need to compile almost all commercial software in a slightly different way when debugging, compared to the final product that is shipped. Visual Studio .NET is able to take this into account because, as we have already seen, it stores details of all the options that it is supposed to pass to the compiler when it has your code compiled. All that Visual Studio needs to do in order to support different types of build is to store more than one set of such details. The different sets of build information are referred to as configurations . When you create a project Visual Studio .NET will automatically give you two configurations, called Debug and Release .
-
The Debug configuration will usually specify that no optimizations are to take place, extra debugging information is to be present in the executable, and the compiler is to assume that the debug preprocessor symbol Debug is present unless it is explicitly #undefined in the sourcecode
-
The Release configuration will usually specify that the compiler should optimize, that there should be no extra debugging information in the executable, and that the compiler should not assume that any particular preprocessor symbol is present
You can define your own configurations as well. You might do this, for example if you wish to set up professional-level builds and enterprise-level builds so you can ship two versions of the software. In the past, for C++ projects, because of issues concerning the Unicode character encodings being supported on Windows NT but not on Windows 95, it was common for C++ projects to feature a Unicode configuration and an MBCS (multibyte character set) configuration.
Selecting a Configuration
One obvious question is that, since Visual Studio .NET is storing details of more than one configuration, how does it determine which one to use when arranging for a project to be built? The answer is that there is always an active configuration, which is the configuration that will be used when you ask Visual Studio .NET to build a project. (Note that configurations are set for each project rather than for each solution.)
By default, when you create a project, the debug configuration will be the active configuration. You can change which configuration is the active one by clicking on the Debug menu option and selecting the item Set Active Configuration . It also available through a dropdown in the main VS .NET toolbar.
Editing Configurations
Besides choosing the active configuration you can also examine and edit the configurations. To do this, you need to click on the Project menu while the relevant project is selected in the Solution Explorer, and then select the Properties from the context menu.)
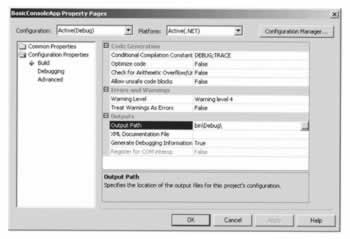
This dialog contains a tree view, which allows you to select quite a lot of different general areas to examine or edit. We don't have space to show all of these areas but we will show a couple of the most important ones.
The screenshot below shows that the tree view has two top-level nodes, Common Properties and Configuration Properties . Common properties are those properties that are common across all the configurations while configuration properties are specific to a particular configuration:
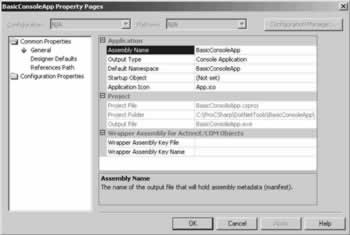
For this screenshot we are showing the general cross-configuration compiler options for the BasicConsoleApp project that we created earlier in the chapter. Among the points to note are that we can select the name of the assembly, as well as the type of assembly to be generated. The options here are console application, Windows application, and class library. You can, of course, change the assembly type if you want. (Though arguably, if you do want to, you might wonder why you didn't pick the correct project type at the time that you asked Visual Studio .NET to generate the project for you in the first place!)
The next screenshot shows the build configuration properties. You'll notice that a listbox near the top of the dialog allows you to specify which configuration you wish to look at. In this case we can see for the Debug configuration that the compiler will assume that the DEBUG and TRACE preprocessor symbols have been defined. Also, as we mentioned above is typical for Debug configurations, the code is not optimized and extra debugging information is generated.
In general, although we've gone into some detail about configurations, it's not that often that you'll need to adjust them. However, you will need to be able to select the appropriate configuration depending on why you are building your project, and it is useful to know what the effect of the different configurations is.
Debugging
After the long discussion about building and build configurations, you might be surprised to learn that we're not going to spend a great deal of time discussing debugging itself. The reason for that is that the principles and the process of debugging setting breakpoints and examining the values of variables isn't really significantly different in Visual Studio .NET from in any of the various Visual Studio 6 IDE's. Instead we will briefly review the features offered by Visual Studio .NET, focusing on those areas that may be new to some developers. We will also discuss in more detail how to deal with exceptions, since these can cause problems for debugging.
In C#, as in pre-.NET languages, the main technique involved in debugging is simply setting breakpoints and using them to examine what is going on in your code at a certain point in its execution.
Breakpoints
You can set breakpoints from Visual Studio .NET on any line of your code that is actually executed. The simplest way is simply to click on the line in the code editor, in the shaded area towards the far left of the window (or hit the F9 key when the appropriate line is selected). This will set up a breakpoint on that line, which will cause execution to break and control to be transferred to the debugger as soon as that line is reached. As in previous versions of Visual Studio, a breakpoint is indicated by a large circle to the left of the line in the code editor. Visual Studio .NET also highlights the line by displaying the text and background in a different color. Clicking on the circle again removes the breakpoint.
If breaking every time a particular line is hit isn't adequate for your particular problem, you can also set conditional breakpoints. To do this, click on the Debug menu, select the Windows then the Breakpoints menu options. This brings up the dialog box asking you for details of the breakpoint you wish to set. Among the options available you can:
-
Specify that execution should break only after the breakpoint has been hit a certain number of times.
-
Specify that the breakpoint should come into effect only every so-many times that the line is reached, for example every twentieth time that a line is executed (useful when debugging large loops ).
-
Set the breakpoints relative to a variable rather than to an instruction. In this case, the value of the variable will be monitored and the breakpoints will be triggered whenever the value of this variable changes. You may find, however, that using this option slows your code down very considerably. Checking whether the value of a variable has changed after every instruction adds a lot of processor time.
Watches
Once a breakpoint has been hit you will usually want to investigate the values of variables. The simplest way to do this is to simply hover the mouse cursor over the name of the variable in the code editor. This will cause a little box to appear that gives the value of that variable. However, you may also prefer to use the Watch window to examine the contents of variables. The watch window is a tabbed window that appears only when the program is running under the debugger. It looks like this:
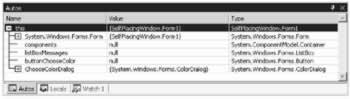
Variables that are classes or structs are shown with a + icon next to them, which you can click on to expand the variable and see the values of its fields.
The three tabs to this window are each designed to monitor different variables:
-
Autos monitors the last few variables that have been accessed as the program was executing
-
Locals monitors variables that are accessible in the method currently being executed
-
Watch monitors any variables that you have explicitly specified by typing their names into the Watch window
Exceptions
Exceptions are great when you ship your application for making sure that error conditions are handled in an appropriate way within your application. Used well, they can ensure that your application copes well and the user never gets presented with some technical dialog box. Unfortunately, exceptions are not so great when you're trying to debug. The problem is twofold.
-
If an exception occurs when you're debugging, then you quite often don't want it to be handled automatically especially if automatically handling it means retiring gracefully and terminating execution! Rather, you want the debugger to help you find out why the exception has occurred. Of course the trouble is that if you have written good, robust, defensive code, then your program will automatically handle almost anything including your bugs that you want to detect!
-
If an exception occurs that you haven't written a handler for, the .NET runtime will still go off looking for a handler. But by the time it discovers that there isn't one, it will have terminated your program. There won't be a call stack left and you won't be able to look at the values of any of your variables because they will all have gone out of scope.
Of course, you can set breakpoints in your catch blocks, but that often doesn't help very much because when the catch block is reached, flow of execution will, by definition, have exited the corresponding try block. That means that the variables you probably wanted to examine the values of in order to find out what's gone wrong will have gone out of scope. You won't even be able to look at the stack trace to find out what method was being executed when the throw statement occurred because control will have left that method. Setting the breakpoints at the throw statement will of course solve this, except that if you are coding defensively there will be a lot of throw statements in your code. How can you tell which one is the one that threw the exception?
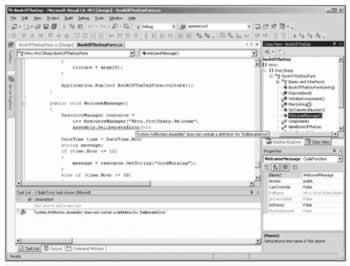
In fact, Visual Studio has a very neat answer to all this. If you look at the main Debug menu, you'll find a menu item in it called Exceptions . This brings up the Exceptions dialog box that allows you to specify what happens when an exception is thrown. You can choose to continue execution or to automatically stop and start debugging in which case execution stops and the debugger steps in at the throw statement itself.
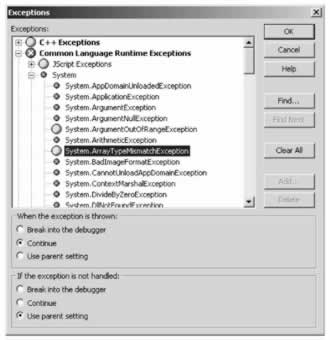
What makes this a really powerful tool is that you can customize the behavior according to which class of exception is thrown. For example, in the above screenshot, we've told Visual Studio .NET to break into the debugger whenever it encounters any exception thrown by a .NET base class (shown by the red cross next to the category of exception), but not to break into the debugger if the exception is an ArgumentOutOfRangeException or an ArrayTypeMismatchException .
Visual Studio .NET knows about all the exception classes available in the .NET base classes, and also about quite a few exceptions that can be thrown outside the .NET environment. Visual Studio .NET isn't automatically aware of your own custom exception classes that you write, but you can manually add your exception classes to the list and thereby specify which of your exceptions should cause execution to stop immediately. To do this you just click on the Add button above (which is enabled when you have selected a top-level node from the tree) and type in the name of your exception class.
EAN: 2147483647
Pages: 244