Managing Security Policy
 | |||||||||||
| Chapter 23 - .NET Security | |
| bySimon Robinsonet al. | |
| Wrox Press 2002 | |
Although .NET's security features are wide ranging and far in advance of anything seen before on Windows, there are some limitations that we should be aware of:
-
.NET security policy does not enforce security on unmanaged code (although it provides some protection against calls to unmanaged code).
-
If a user copies an assembly to their local machine, the assembly has FullTrust and security policy is effectively bypassed. To work around this, we can limit the permissions granted to local code.
-
.NET security policy provides very little help in dealing with script-based viruses and malicious Win32 .EXE files, which Microsoft is dealing with in different ways. For example, recent versions of Outlook do not allow you to run executable files from e- mails - the user is warned they may contain a virus and forced to save them to disk where there are opportunities for administrative restraints to be installed, including blocking access to the local drive and providing an opportunity for anti-virus software to act.
However, .NET helps enormously in assisting the operating system in making intelligent decisions about how much trust to give to code, whether it is from an intranet application, a control on a web page, or a Windows Forms application downloaded from a software supplier on the Internet.
The Security Configuration File
As we've seen already, the glue that connects together code groups, permissions, and permission sets is our three levels of security policy ( Enterprise , Machine , and User ). Security configuration information in .NET is stored in XML configuration files that are protected by Windows security. For example, the Machine -level security policy is only writable to users in the Administrator , Power User , and SYSTEM Windows 2000 groups.
On Windows 2000, the files that store the security policy are located in the following places:
-
Enterprise policy Configuration: C:\WinNT\Microsoft.NET\Framework\v1.0.xxxx\Config\enterprise.config
-
Machine policy configuration: C:\WinNT\Microsoft.NET\Framework\v1.0.xxxx\Config\security.config
-
User policy configuration: %USERPROFILE%\application data\Microsoft\CLR security config\vxx.xx\security.config
The version number marked with several x 's will vary depending on the version of the .NET Framework you have on your machine. If necessary, it's possible to manually edit these configuration files, for example, if an administrator needs to configure policy for a user without logging into their account. However, in general it's recommended to use caspol .exe or the Runtime Security Policy node in the .NET Framework Configuration MMC snap-in to manage security policy.
A Simple Example
Given everything you've read so far, let's create a simple application that accesses the local drive, the kind of behavior we're likely to want to manage carefully . The application is a C# Windows Forms application with a listbox and a button. If you click the button, the listbox is populated from a file called animals.txt in the root of the C:\ drive:
The application was created using Visual Studio.NET and the only changes were to add the listbox and Load Data button to the form and to add an event to the button that looks like this:
// Example from SecurityApp9 private void button1_Click(object sender, System.EventArgs e) { StreamReader stream = File.OpenText(@"C:\animals.txt"); String str; while ((str=stream.ReadLine()) != null) { listBox1.Items.Add(str); } }
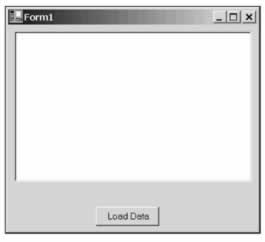
It opens a simple text file from the root of the C :\ drive, which contains a list of animals on separate lines, and loads each line into a string, which it then uses to create each item in the listbox.
If we run the application from our local machine and click the button, we'll see the data loaded from the root of the C:\ drive and displayed in the listbox as we'd expect. Behind the scenes the runtime has granted our assembly the permission it needs to execute, access the user interface, and read data from the local disk:
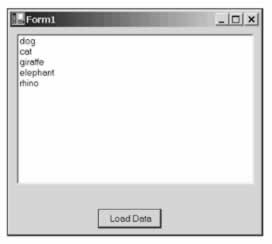
You may remember that the permissions on the intranet zone code group are more restrictive than on the local machine, in particular, they do not allow access to the local disk (except in the folder from which the application runs). If we run the application again, but this time from a network share, it will run just as before as it is granted the permissions to execute and access the user interface, however, if we now click the Load Data button on the form, a security exception is thrown:
You'll see in the exception message text that it mentions the System.Security.Permissions.FileIOPermission object; this is the permission that our application was not granted that was demanded by the class in the Framework that we are using to load the data from the file on the local disk.
By default, the Intranet code group is granted the LocalIntranet permission set; let's change the permission set to FullTrust so any code from the intranet zone can run completely unrestricted.
First, we need to get the numeric label of the LocalIntranet code group. We can do this with the following command.
> caspol.exe -listgroups
This will output something like this:
Code Groups: 1. All code: Nothing 1.1. Zone - MyComputer: FullTrust 1.1.1. StrongName - 002400000480000094000000060200000024000052534 131000400000100010007D1FA57C4AED9F0A32E84AA0FAEFD0DE9E8FD6AEC8F87FB03766 C834C99921EB23BE79AD9D5DCC1DD9AD236132102900B723CF980957FC4E177108FC6077 74F29E8320E92EA05ECE4E821C0A5EFE8F1645C4C0C93C1AB99285D622CAA652C1DFAD63 D745D6F2DE5F17E5EAF0FC4963D261C8A12436518206DC093344D5AD293: FullTrust 1.1.2. StrongName - 00000000000000000400000000000000: FullTrust 1.2. Zone - Intranet: LocalIntranet 1.2.1. All code: Same site Web. 1.2.2. All code: Same directory FileIO - Read, PathDiscovery 1.3. Zone - Internet: Internet 1.3.1. All code: Same site Web. 1.4. Zone - Untrusted: Nothing 1.5. Zone - Trusted: Internet 1.5.1. All code: Same site Web.
Notice the LocalIntranet group is listed as 1.2. We now use the following command to apply full trust.
> caspol.exe -chggroup 1.2 FullTrust
If we now run the application from the network share again and click the button, we'll see that the listbox is populated from the file in the root of the C:\ drive and no exception occurs.
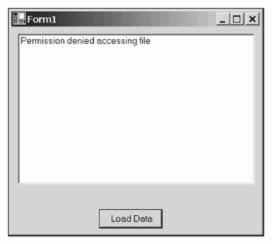
In scenarios like these where we're making use of resources that are governed by permissions, it is advisable to extend the code so security exceptions are caught, so that the application can degrade gracefully. For example, in our application we can add a try-catch block around the file access code and if a SecurityException is thrown we display a line in the listbox saying, Permission denied accessing file :
// Code from SecurityApp9 private void button1_Click(object sender, System.EventArgs e) { try { StreamReader din = File.OpenText(@"C:\animals.txt"); String str; while ((str=din.ReadLine()) != null) { listBox1.Items.Add(str); } } catch (SecurityException exception) { listBox1.Items.Add("Permission denied accessing file"); } }
In reality, if we wanted to run a specific application from a network share, we'd most likely opt for a solution that didn't open up our client machine to all code on the intranet. Instead, we would use code groups and membership conditions to tightly control the requirements of the application - perhaps using its location on the intranet, a strong name , or a certificate proving the identity of the publisher.
Managing Code Groups and Permissions
In managing security on .NET, we find that if an assembly is failing with a security exception we usually have three choices:
-
Ease the policy permissions
-
Move the assembly
-
Apply a strong name to the assembly
When making these kinds of decisions you must ensure that you to take into account your level of trust of the assembly.
Turning Security On and Off
By default .NET security is enabled. If, for any reason, you need to turn it off, you can do it like this:
> caspol.exe -security off
To turn security back on, use this:
> caspol.exe -security on
Generally, the security risks inherent in opening a machine up by turning off security mean that it's only necessary to turn off security for testing and debugging.
| Important | Something you should be aware of is that the command above does not need administrative privileges; this means any user (or a virus) could turn off .NET security. You are well advised to alter the Windows file security on the caspol utility to guard against malicious or misinformed usage. |
Resetting Security Policy
If you need to return the security configuration to its original state, you can type this command:
> caspol.exe -reset
This command resets the security policy to the installation default.
Creating a Code Group
We can create our own code groups and then apply specific permissions to them. For example, we could specify that we want to trust all code from the web site www.wrox.com and give it full access to our system (without trusting code from any other web site).
Earlier we ran caspol to list the available group and number assignments. We saw then the fact that Zone: Internet is labeled 1.3 , so we now type this command:
> caspol.exe -addgroup 1.3 -site www.wrox.com FullTrust
Note that this command will ask for confirmation as we are attempting to explicitly alter the security policy on the machine. If we now run the caspol.exe -listgroups command again, we'll see the new code group has been added and assigned FullTrust :
1.2. Zone - Intranet: LocalIntranet 1.2.1. All code: Same site Web. 1.2.2. All code: Same directory FileIO - Read, PathDiscovery 1.3. Zone - Internet: Internet 1.3.1. All code: Same site Web. 1.3.2. Site - www.wrox.com: FullTrust 1.4. Zone - Untrusted: Nothing 1.5. Zone - Trusted: Internet 1.5.1. All code: Same site Web. Let's look at another example. Let's say we want to create a code group under the Intranet code group ( 1.2 ) that grants FullTrust to all applications running from a specific network share:
> caspol.exe -addgroup 1.2 -url file:///\intranetserver/sharename/* FullTrust
Deleting a Code Group
To remove a code group we have created, we can type a command like this:
> caspol.exe -remgroup 1.3.2
It will ask for confirmation that you want to alter the security policy, and if you give positive confirmation it will state that the group has been removed.
| Important | Be aware that although you cannot delete the code group All Code , it is possible to delete code groups at the level below, including the groups for Internet , MyComputer , and LocalIntranet . |
Changing a Code Group's Permissions
To ease or restrict the permissions assigned to a code group, we can use caspol.exe again. Let's say we want to apply FullTrust to the Intranet zone, first we need to get the label that represents the Intranet code group:
> caspol.exe -listgroups
The output shows the Intranet code group:
Code Groups: 1. All code: Nothing 1.1. Zone - MyComputer: FullTrust 1.1.1. StrongName - 00240000048000009400000006020000002400005253413 1000400000100010007D1FA57C4AED9F0A32E84AA0FAEFD0DE9E8FD6AEC8F87FB03766C834 C99921EB23BE79AD9D5DCC1DD9AD236132102900B723CF980957FC4E177108FC607774F29E 8320E92EA05ECE4E821C0A5EFE8F1645C4C0C93C1AB99285D622CAA652C1DFAD63D745D6F2 DE5F17E5EAF0FC4963D261C8A12436518206DC093344D5AD293: FullTrust 1.1.2. StrongName - 00000000000000000400000000000000: FullTrust 1.2. Zone - Intranet: LocalIntranet 1.2.1. All code: Same site Web. 1.2.2. All code: Same directory FileIO - Read, PathDiscovery 1.3. Zone - Internet: Internet 1.3.1. All code: Same site Web. 1.4. Zone - Untrusted: Nothing 1.5. Zone - Trusted: Internet 1.5.1. All code: Same site Web. Once we have the Intranet code group's label, 1.2 , we enter a second command to alter the code group's permissions:
> caspol.exe -chggroup 1.2 FullTrust
The command will ask us to confirm the change to the security policy, and if we now run the caspol.exe -listgroups command again, we can see the permission on the end of the Intranet line has changed to FullTrust :
Code Groups: 1. All code: Nothing 1.1. Zone - MyComputer: FullTrust 1.1.1. StrongName - 002400000480000094000000060200000024000052 534131000400000100010007D1FA57C4AED9F0A32E84AA0FAEFD0DE9E8FD6AEC8F87F B03766C834C99921EB23BE79AD9D5DCC1DD9AD236132102900B723CF980957FC4E177 108FC607774F29E8320E92EA05ECE4E821C0A5EFE8F1645C4C0C93C1AB99285D622CA A652C1DFAD63D745D6F2DE5F17E5EAF0FC4963D261C8A12436518206DC093344D5AD2 93: FullTrust 1.1.2. StrongName - 00000000000000000400000000000000: FullTrust 1.2. Zone - Intranet: FullTrust 1.2.1. All code: Same site Web. 1.2.2. All code: Same directory FileIO - Read, PathDiscovery 1.3. Zone - Internet: Internet 1.3.1. All code: Same site Web. 1.4. Zone - Untrusted: Nothing 1.5. Zone - Trusted: Internet 1.5.1. All code: Same site Web. Creating and Applying Permissions Sets
We can create new permission sets using a command like this:
> caspol.exe -addpset MyCustomPermissionSet permissionset.xml
This command specifies that we are creating a new permissions set called MyCustomPermissionSet , and basing it on the contents of the specified XML file. The XML file must contain a standard format specifying a PermissionSet . For reference, here's the permission set file for the Everything permission set, which you can trim down to the permission set you want to create:
<PermissionSet class="System.Security.NamedPermissionSet" version="1" Name="Everything" Description="Allows unrestricted access to all resources covered by built-in permissions"> <IPermission class="System.Security.Permissions.EnvironmentPermission, mscorlib, Version=1.0.3300.0, Culture=neutral, PublicKeyToken=b77a5c561934e089" version="1" Unrestricted="true"/> <IPermission class="System.Security.Permissions.FileDialogPermission, mscorlib, Version=1.0.3300.0, Culture=neutral, PublicKeyToken=b77a5c561934e089" version="1" Unrestricted="true"/> <IPermission class="System.Security.Permissions.FileIOPermission, mscorlib, Version=1.0.3300.0, Culture=neutral, PublicKeyToken=b77a5c561934e089" version="1" Unrestricted="true"/> <IPermission class="System.Security.Permissions.IsolatedStorageFilePermission, mscorlib, Version=1.0.3300.0, Culture=neutral, PublicKeyToken=b77a5c561934e089" version="1" Unrestricted="true"/> <IPermission class="System.Security.Permissions.ReflectionPermission, mscorlib, Version=1.0.3300.0, Culture=neutral, PublicKeyToken=b77a5c561934e089" version="1" Unrestricted="true"/> <IPermission class="System.Security.Permissions.RegistryPermission, mscorlib, Version=1.0.3300.0, Culture=neutral, PublicKeyToken=b77a5c561934e089" version="1" Unrestricted="true"/> <IPermission class="System.Security.Permissions.SecurityPermission, mscorlib, Version=1.0.3300.0, Culture=neutral, PublicKeyToken=b77a5c561934e089" version="1" Flags="Assertion, UnmanagedCode, Execution, ControlThread, ControlEvidence, ControlPolicy, SerializationFormatter, ControlDomainPolicy, ControlPrincipal, ControlAppDomain, RemotingConfiguration, Infrastructure"/> <IPermission class="System.Security.Permissions.UIPermission, mscorlib, Version=1.0.3300.0, Culture=neutral, PublicKeyToken=b77a5c561934e089" version="1" Unrestricted="true"/> <IPermission class="System.Net.DnsPermission, System, Version=1.0.3300.0, Culture=neutral, PublicKeyToken=b77a5c561934e089" version="1" Unrestricted="true"/> <IPermission class="System.Drawing.Printing.PrintingPermission, System.Drawing, Version=1.0.3300.0, Culture=neutral, PublicKeyToken=b03f5f7f11d50a3a" version="1" Unrestricted="true"/> <IPermission class="System.Diagnostics.EventLogPermission, System, Version=1.0.3300.0, Culture=neutral, PublicKeyToken=b77a5c561934e089" version="1" Unrestricted="true"/> <IPermission class="System.Net.SocketPermission, System, Version=1.0.3300.0, Culture=neutral, PublicKeyToken=b77a5c561934e089" version="1" Unrestricted="true"/> <IPermission class="System.Net.WebPermission, System, Version=1.0.3300.0, Culture=neutral, PublicKeyToken=b77a5c561934e089" version="1" Unrestricted="true"/> <IPermission class="System.Diagnostics.PerformanceCounterPermission, System, Version=1.0.3300.0, Culture=neutral, PublicKeyToken=b77a5c561934e089" version="1" Unrestricted="true"/> <IPermission class="System.DirectoryServices.DirectoryServicesPermission, System.DirectoryServices, Version=1.0.3300.0, Culture=neutral, PublicKeyToken=b03f5f7f11d50a3a" version="1" Unrestricted="true"/> <IPermission class="System.Messaging.MessageQueuePermission, System.Messaging, Version=1.0.3300.0, Culture=neutral, PublicKeyToken=b03f5f7f11d50a3a" version="1" Unrestricted="true"/> <IPermission class="System.ServiceProcess.ServiceControllerPermission, System.ServiceProcess, Version=1.0.3300.0, Culture=neutral, PublicKeyToken=b03f5f7f11d50a3a" version="1" Unrestricted="true"/> <IPermission class="System.Data.OleDb.OleDbPermission, System.Data, Version=1.0.3300.0, Culture=neutral, PublicKeyToken=b77a5c561934e089" version="1" AllowBlankPassword="False" Unrestricted="true"/> <IPermission class="System.Data.SqlClient.SqlClientPermission, System.Data, Version=1.0.3300.0, Culture=neutral, PublicKeyToken=b77a5c561934e089" version="1" AllowBlankPassword="False" Unrestricted="true"/> </PermissionSet>
To view all permission sets in XML format, you can use this command:
> caspol.exe -listpset
If you want to give a new definition to an existing permission set by applying an XML PermissionSet configuration file, you can use this command:
> caspol.exe -chgpset permissionset.xml MyCustomPermissionSet
Distributing Code Using a Strong Name
.NET provides the ability for us to match an assembly to a code group when the assembly's identity and integrity have been confirmed using a strong name. This scenario is very common when assemblies are being deployed across networks, for example, distributing software over the Internet.
If you are a software company, and you want to provide code to your customers via the Internet, you build an assembly and give it a strong name. The strong name ensures that the assembly can be uniquely identified, and also provides protection against tampering. Your customers can incorporate this strong name into their code access security policy; an assembly that matches this unique strong name can then be assigned permissions explicitly. As you saw in the chapter on assemblies, the strong name includes checksums for hashes of all the files within an assembly, so we have strong evidence that the assembly has not been altered since the publisher created the strong name.
Note that, if your application uses an installer, the installer will install assemblies that have already been given a strong name. The strong name is generated once for each distribution before being sent to customers; the installer does not run these commands. The reason for this is that the strong name provides an assurance that the assembly has not been modified since it left your company; a common way to achieve this is to give your customer not only the application code, but also, separately, a copy of the strong name for the assembly. You may find it beneficial to pass the strong name to your customer using a secure form (perhaps fax or encrypted e-mail) to guard against the assembly being tampered with enroute.
Let's look at an example where we want to create an assembly with a strong name that we can distribute in such a way that the recipient of the assembly can use the strong name to grant the FullTrust permission to the assembly.
First, we need to create a key pair, as strong names make use of public key encryption. The public and private keys are stored in the file we specify, and are used to sign the strong name. To create a key pair, we use the Strong Name Tool ( sn.exe ), which in addition to helping us create key pairs can also be used to manage keys and strong names. Let's create a key; do this by typing the following command:
> sn.exe -k key.snk
We then place the keyfile ( key.snk in our case) in the folder where Visual Studio builds our output file (normally the Debug folder) and add the key to our code using an assembly attribute. Once we have added this attribute to AssemblyInfo.cs , we just rebuild the assembly. The recompilation ensures the hash is recalculated and the assembly is protected against malicious modifications:
[assembly: AssemblyKeyFileAttribute("key.snk")] Our assembly has now been compiled and signed; it has a unique identifying strong name. We can now create a new code group on the machine where we want the assembly to execute, which has a membership condition that requires a match for the strong name of our assembly.
The following command states that we want to create a new code group using the strong name from the specified assembly manifest file, that we do not mind which version of the assembly is used, and that we want the code group to be granted the FullTrust permissions:
> caspol.exe -addgroup 1 -strong -file \bin\debug\SecurityApp10.exe -noname -noversion FullTrust
The application in this example will now run from any zone, even the Internet zone, because the strong name provides powerful evidence that the assembly can be trusted. If we look at our code groups using caspol.exe -listgroups , we'll see the new code group ( 1.6 and its associated public key in hexadecimal):
Code Groups: 1. All code: Nothing 1.1. Zone - MyComputer: FullTrust 1.1.1. StrongName - 00240000048000009400000006020000002400005253413 1000400000100010007D1FA57C4AED9F0A32E84AA0FAEFD0DE9E8FD6AEC8F87FB03766C834 C99921EB23BE79AD9D5DCC1DD9AD236132102900B723CF980957FC4E177108FC607774F29E 8320E92EA05ECE4E821C0A5EFE8F1645C4C0C93C1AB99285D622CAA652C1DFAD63D745D6F2 DE5F17E5EAF0FC4963D261C8A12436518206DC093344D5AD293: FullTrust 1.1.2. StrongName - 00000000000000000400000000000000: FullTrust 1.2. Zone - Intranet: LocalIntranet 1.2.1. All code: Same site Web. 1.2.2. All code: Same directory FileIO - Read, PathDiscovery 1.3. Zone - Internet: Internet 1.3.1. All code: Same site Web. 1.4. Zone - Untrusted: Nothing 1.5. Zone - Trusted: Internet 1.5.1. All code: Same site Web. 1.6. StrongName - 002400000480000094000000060200000024000052534 1310004000001000100D51335D1B5B64BE976AD8B08030F8E36A0DBBC3EEB5F8A18D0E30E89 51DA059B440281997D760FFF61A6252A284061C1D714EFEE5B329F410983A01DB324FA85BCE 6C4E6384A2F3BC1FFA01E2586816B23888CFADD38D5AA5DF041ACE2F81D9E8B591556852E83 C473017A1785203B12F56B6D9DC23A8C9F691A0BC525D7B7EA: FullTrust Success If you want to access the strong name in an assembly you can use the secutil.exe tool against the assembly manifest file. Let's use secutil.exe to view the strong name information for our assembly. We'll add the -hex option, so the public key is shown in hexadecimal (like caspol.exe ), and then also the argument -strongname that specifies that we want to view the strong name. Type this command, and you'll see a listing containing the strong name public key, the assembly name, and the assembly version:
> secutil.exe -hex -strongname securityapp10.exe
Microsoft (R) .NET Framework SecUtil 1.0.3705.0 Copyright (C) Microsoft Corporation 1998-2001. All rights reserved. Public Key = 0x0024000004800000940000000602000000240000525341310004000001000100D51335D1B5B6 4BE976AD8B08030F8E36A0DBBC3EEB5F8A18D0E30E8951DA059B440281997D760FFF61A6252A28 4061C1D714EFEE5B329F410983A01DB324FA85BCE6C4E6384A2F3BC1FFA01E2586816B23888CFA DD38D5AA5DF041ACE2F81D9E8B591556852E83C473017A1785203B12F56B6D9DC23A8C9F691A0B C525D7B7EA Name = SecurityApp10 Version = 1.0.756.38019 Success
The curious among you may be wondering what the two strong name code groups installed by default refer to. One is a strong name key for Microsoft code, and the other strong name key is for the parts of .NET that have been submitted to the ECMA for standardization, which Microsoft will have much less control over.
Distributing Code Using Certificates
In the last section, we looked at how we can apply a unique strong name to an assembly so system administrators can explicitly grant permissions to assemblies that match that strong name using a code access group. Although this method of security policy management can be very effective, it's sometimes necessary to work at a higher level, where the administrator of the security policy grants permissions on the basis of the publisher of the software, rather than each individual software component. You'll probably have seen a similar method used before when you have downloaded executables from the Internet that have been Authenticode signed.
To provide information about the software publisher, we make use of digital certificates, and sign assemblies so that consumers of the software can verify the identity of the software publisher. In a commercial environment we would obtain a certificate from a company such as Verisign or Thawte.
The benefit of purchasing a certificate from a supplier such as this, rather than creating your own, is that it provides high levels of trust in its authenticity; the supplier acts as a trusted third-party. For test purposes however .NET includes a command-line utility we can use to create a test certificate. The process of creating certificates and using them to publish software is complex, but to give you a picture of what's involved we'll walk through an example without going into too much detail; if we did this chapter would be twice as long!
Let's imagine we're a company called ABC Corporation, and let's create a certificate for our software product "ABC Suite". First off, we need to create a test certificate; type the following command:
> makecert -sk ABC -n "CN=ABC Corporation" abccorptest.cer
The command creates a test certificate under the name "ABC Corporation" and saves it to a file called abccorptest.cer . The -sk ABC argument creates a key container location, which is used by the public key cryptography.
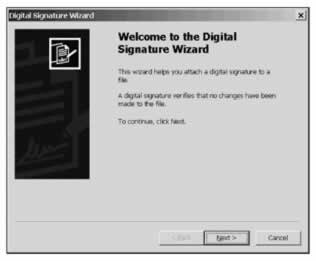
To sign our assembly with the certificate, we use the signcode.exe utility on the assembly file containing the assembly manifest. Often the easiest way to sign an assembly is to use the signcode.exe in its wizard mode; to start the wizard, just type signcode.exe with no parameters:
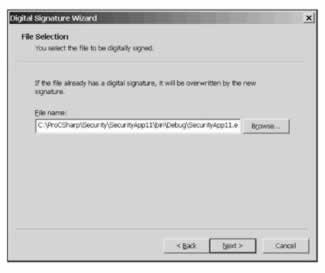
If we click Next , we're asked to specify where the file is that we wish to sign. For an assembly, we sign the file containing the manifest:
If we click Next the next screen is the Signing Options page:
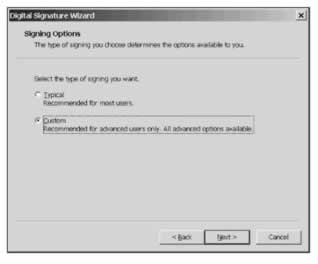
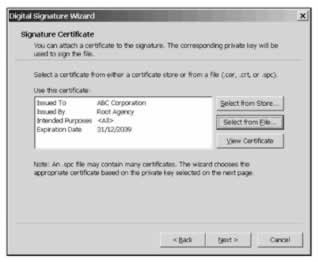
Select Custom and then Next . We're then asked to specify the certificate we want to use to sign the assembly. If we click Select from File and browse to the abccorptest.cer file, we'll see this confirmation screen:
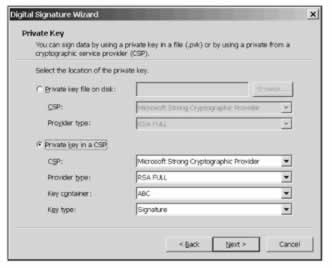
The following screen then appears that asks us for our private key file. This key file was created by the makecert utility, so we can select the options as shown in the next screenshot. The cryptographic service provider is an application that implements the cryptographic standards. Public key cryptography was covered in Assemblies:
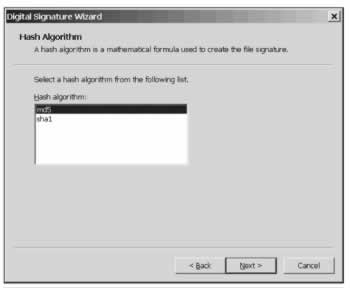
We're then asked a series of question about the way the signing is performed, including this screen, which asks us to specify the encryption algorithm:
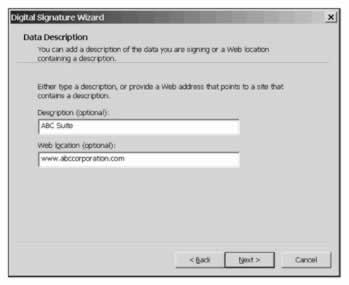
Next, we specify the name of our application and the URL for a web page that gives more information about it:
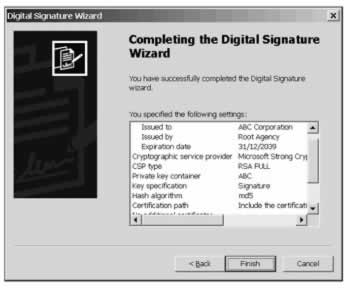
That's pretty much the end of the process; the last screen confirms the details of the certificate and the fact that the assembly has been successfully signed:
As our executable is now signed with the certificate, a recipient of the assembly has access to strong evidence as to who published the software; the runtime can examine the certificate and match the publisher of the assembly to a code group with high levels of confidence as to the identity of the code, because the trusted thirdparty certifies the publisher's identity.
Let's look at the signed assembly in a bit more detail. Although we're using a test certificate, we can temporarily configure .NET to treat test certificates more like trusted certificates issued by a trusted thirdparty using setreg.exe , which lets us configure public key and certificate settings in the Registry. If we enter the following command, our machine will be configured to trust the test root certificate, which gives us a more meaningful test environment:
> setreg.exe 1 true
When you are ready to reset the value, pass false as the last parameter. Let's check out our assembly and verify its trust level using the chktrust.exe utility:
> chktrust.exe securityapp11.exe
This command will pop up a window like this:
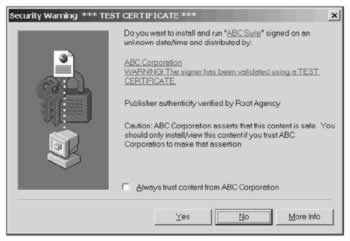
Note that chktrust.exe has successfully confirmed the publisher of the software using the certificate, but also reminded us that, although the certificate has been verified , it is still a test certificate.
Let's now turn our attention to a machine that we want to configure to trust software from the ABC Corporation. To do this we can create a new code access group that matches this software from ABC Corporation. To do that we grab a hexadecimal representation of the certificate from the assembly using the secutil.exe tool:
> secutil.exe -hex -x securityapp11.exe
The command will output something like this:
Microsoft (R) .NET Framework SecUtil 1.0.3705.0 Copyright (c) Microsoft Corp 1999-2001. All rights reserved. X.509 Certificate = 0x3082017B30820125A0030201020210D69BE8D88D8FF9B54A9C689A71BB7E33300D06092A864886F7 0D01010405003016311430120603550403130B526F6F74204167656E6379301E170D30313035323831 38333133305A170D3339313233313233353935395A301A311830160603550403130F41424320436F72 706F726174696F6E305C300D06092A864886F70D0101010500034B003048024100ECBEFB348C1364B0 A3AE14FA9805F893AD180C7B2E57ADABBBE7EF94694A1E92BC5B4B59EF76FBDAC8D04D3DF2140B7616 550FE2D5AE5F15E03CBB54932F5CBB0203010001A34B304930470603551D010440303E801012E4092D 061D1D4F008D6121DC166463A1183016311430120603550403130B526F6F74204167656E6379821006 376C00AA00648A11CFB8D4AA5C35F4300D06092A864886F70D01010405000341001D1B5F6FBB0C4C0E 85A9BB5FDA5FEC1B8D9C229BB0FB8A7CBE3340A527A5B25EAA2A70205DD71571607291272D5A81981C 73028AB849FF273465FAEF2F4C7174 Success
Let's now create the new code group and apply the FullTrust permission to assemblies published by the ABC Corporation using this (rather long) command:
> caspol -addgroup 1 -pub -hex 3082017B30820125A0030201020210D69BE8D88D8FF9B54A9C689A71BB7E33300D06092A8 64886F70D01010405003016311430120603550403130B526F6F74204167656E6379301E170D303130 3532383138333133305A170D3339313233313233353935395A301A311830160603550403130F41424 320436F72706F726174696F6E305C300D06092A864886F70D0101010500034B003048024100ECBEFB 348C1364B0A3AE14FA9805F893AD180C7B2E57ADABBBE7EF94694A1E92BC5B4B59EF76FBDAC8D04D3 DF2140B7616550FE2D5AE5F15E03CBB54932F5CBB0203010001A34B304930470603551D010440303E 801012E4092D061D1D4F008D6121DC166463A1183016311430120603550403130B526F6F742041676 56E6379821006376C00AA00648A11CFB8D4AA5C35F4300D06092A864886F70D01010405000341001D 1B5F6FBB0C4C0E85A9BB5FDA5FEC1B8D9C229BB0FB8A7CBE3340A527A5B25EAA2A70205DD71571607 291272D5A81981C73028AB849FF273465FAEF2F4C7174 FullTrust
The parameters specify that the code group should be added at the top level ( 1. ), and that the code group membership condition is of the type Publisher , and the last parameter specifies the permission set to grant ( FullTrust ). The command will ask for confirmation:
Microsoft (R) .NET Framework CasPol 1.0.3705.0 Copyright (C) Microsoft Corporation 1998-2001. All rights reserved. The operation you are performing will alter security policy. Are you sure you want to perform this operation? (yes/no) y Added union code group with "-pub" membership condition to the Machine level. Success
Our machine is now configured to trust fully all assemblies that have been signed with the certificate from ABC Corporation. To confirm that, we can run a caspol.exe -lg command, which lists the new code access group (1.7):
Security is ON Execution checking is ON Policy change prompt is ON Level = Machine Code Groups: 1. All code: Nothing 1.1. Zone - MyComputer: FullTrust 1.1.1. StrongName - 002400000480000094000000060200000024000052534131000400000 100010007D1FA57C4AED9F0A32E84AA0FAEFD0DE9E8FD6AEC8F87FB03766C834C99921EB23BE79AD9D5D CC1DD9AD236132102900B723CF980957FC4E177108FC607774F29E8320E92EA05ECE4E821C0A5EFE8F16 45C4C0C93C1AB99285D622CAA652C1DFAD63D745D6F2DE5F17E5EAF0FC4963D261C8A12436518206DC09 3344D5AD293: FullTrust 1.1.2. StrongName - 00000000000000000400000000000000: FullTrust 1.2. Zone - Intranet: LocalIntranet 1.2.1. All code: Same site Web. 1.2.2. All code: Same directory FileIO - Read, PathDiscovery 1.3. Zone - Internet: Internet 1.3.1. All code: Same site Web. 1.4. Zone - Untrusted: Nothing 1.5. Zone - Trusted: Internet 1.5.1. All code: Same site Web. 1.6. StrongName - 002400000480000094000000060200000024000052534131000400000100010 0D51335D1B5B64BE976AD8B08030F8E36A0DBBC3EEB5F8A18D0E30E8951DA059B440281997D760FFF61A6 252A284061C1D714EFEE5B329F410983A01DB324FA85BCE6C4E6384A2F3BC1FFA01E2586816B23888CFAD D38D5AA5DF041ACE2F81D9E8B591556852E83C473017A1785203B12F56B6D9DC23A8C9F691A0BC525D7B7 EA: FullTrust 1.7. Publisher - 3048024100E85C3867F321729F1097C86F6B6696ED9DA7D6C6038A6A64354D18 5890841E3C5D5BADDBFA42BF3EE25A5552EACDE8F0395F60B7241E026D35B9EE25655F6F230203010001: FullTrust Success
As another check, let's ask caspol.exe to tell us what code groups our assembly matches:
> caspol.exe -resolvegroup securityapp11.exe Level = Enterprise Code Groups: 1. All code: FullTrust Level = Machine Code Groups: 1. All code: Nothing 1.1. Zone - MyComputer: FullTrust 1.2. Publisher - 3048024100E85C3867F321729F1097C86F6B6696ED9DA7D6C6038A6A64354D185 890841E3C5D5BADDBFA42BF3EE25A5552EACDE8F0395F60B7241E026D35B9EE25655F6F230203010001: FullTrust Level = User Code Groups: 1. All code: FullTrust Success
In the center of the results we can see that the assembly has been successfully matched to our new code group and granted the FullTrust permission set.
Managing Zones
Earlier we talked about the zones that Windows provides and that we manage using Internet Explorer's security tools. The four zones we manage in this way are:
-
Internet - all web sites you haven't placed in other zones
-
Intranet - all web sites that are on your organization's intranet
-
Trusted Sites - web sites that you trust not to damage your data
-
Restricted Sites - web sites that could potentially damage your computer
These settings are managed from within Internet Explorer because they apply to sites visited using the browser that access .NET code (whether downloaded, or in page controls). If you are using a non-Microsoft browser, it will most likely not support .NET code, and so there will be no options to manage the associated zones.
Any user on a machine can alter the zone settings; however, the security settings for the zones that they specify only apply to their account. That is, it is not possible for one user to alter another user's zone settings. That said, there is a risk here as a user might alter the zone settings without understanding what they are doing and inadvertently open their machine up to attack.
To alter the settings associated with each zone, open Internet Explorer and open the Internet Options dialogue box from the Tools menu. In the Options box, move to the Security tab:
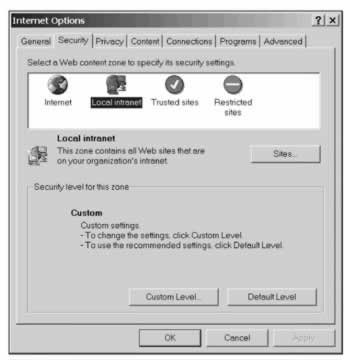
At the top you can see the four zones, and having selected one of the zones by clicking on its icon, you can use the Sites... button to specify sites that you want included in that zone. For example, if you want to configure the Local intranet zone, you will use this dialogue box:
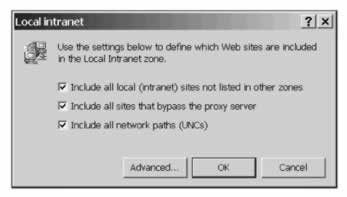
The options here give us enough scope to accurately define what constitutes the intranet in our organization. In addition, the Advanced... button gives us access to a dialogue box where we can specify URI's for particular sites we want included in the Local intranet zone:
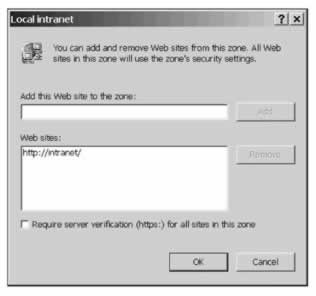
Note the option at the bottom of this dialogue box, which is provided for each of the zones except the Internet zone. It allows you to specify that you only trust sites in this zone when they are accessed over secure HTTP using Secure Sockets Layer (SSL) encryption. If you trust a site that is accessed over an unencrypted connection, you are potentially risking an attack as your traffic may be intercepted. If you want to verify that a site is held within a specific zone, visit the site and look at the bottom right hand corner of the Internet Explorer window, which will display the name of the zone for the web address you are currently viewing.
As well as being able to specify the scope of the zone by detailing sites you trust or do not trust, you can also specify what actions are permitted within each zone using the security-level settings. These specify things like whether a prompt should be given for ActiveX controls, and whether cookies are accepted.
EAN: 2147483647
Pages: 244