Creating a Windows Service
 | |||||||||||
| Chapter 22 - Windows Services | |
| bySimon Robinsonet al. | |
| Wrox Press 2002 | |
The service we are creating will host a quote server. With every request made from a client the quote server returns a random quote from a quote file. The first part of the solution will be done with three assemblies, one for the client and two for the server. The assembly QuoteServer holds the actual functionality. We will read the quote file in a memory cache, and answer requests for quotes with the help of a socket server.
The QuoteClient is a Windows Forms rich-client application. This application creates a client socket to communicate with the QuoteServer . The third assembly we will build is the actual service. The QuoteService starts and stops the QuoteServer; the service will control the server:
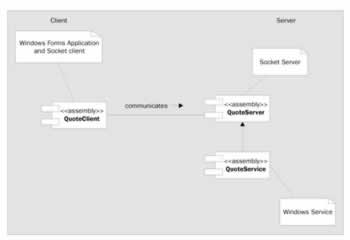
Before creating the service part of our program, we build a simple socket server in an extra C# class library that will be used from our service process.
A Class Library Using Sockets
We could build any functionality in the service such as scanning for files to do a backup or a virus check, or starting a .NET Remoting server, for example. But with any program we can offer as a service there are some similarities. The program must be possible to start (and return to the caller), and possibly to stop and suspend. We will look at such an implementation with a socket server.
With Windows 2000 or Windows XP, the Simple TCP/IP Services can be installed as part of the Windows components . Part of the Simple TCP/IP Services is a "quote of the day" TCP/IP server, short name "qotd". This simple service listens to port 17 and answers every request with a random message from the file < windir > \system32\drivers\etc\quotes . We will build a similar server here. Our server returns a Unicode string, in contrast to the good old "qotd" server that returns an ASCII string.
First we create a Class Library called QuoteServer . Let's step through the sourcecode of our QuoteServer class in the file QuoteServer.cs :
using System; using System.IO; using System.Threading; using System.Net.Sockets; using System.Text; using System.Collections.Specialized; namespace Wrox.ProCSharp.WinServices { /// <summary> /// Socket server example. /// </summary> public class QuoteServer { private TcpListener listener; private int port; private string filename; private StringCollection quotes; private Random random; private Thread listenerThread;
The constructor QuoteServer() is overloaded, so that a filename and a port can be passed to the call. The constructor where just the filename is passed uses the default port 7890 for the server. The default constructor defines the default filename for the quotes as quotes.txt:
public QuoteServer() : this ("quotes.txt") { } public QuoteServer(string filename) : this(filename, 7890) { } public QuoteServer(string filename, int port) { this.filename = filename; this.port = port; }
ReadQuotes() is a helper method that reads all the quotes from a file that was specified in the constructor. All the quotes are added to the StringCollection quotes . In addition, we are creating an instance of the Random class that will be used to return random quotes:
protected void ReadQuotes() { quotes = new StringCollection(); Stream stream = File.OpenRead(filename); StreamReader streamReader = new StreamReader(stream); string quote; while ((quote = streamReader.ReadLine()) != null) { quotes.Add(quote); } streamReader.Close(); stream.Close(); random = new Random(); }
Another helper method is GetRandomQuoteOfTheDay() . This method returns a random quote from the StringCollection quotes :
protected string GetRandomQuoteOfTheDay() { int index = random.Next(0, quotes.Count); return quotes[index]; }
In the Start() method, the complete file containing the quotes is read in the StringCollection quotes by using the helper method ReadQuotes() . After this, a new thread is started, which immediately calls the Listener() method this may be familiar to you from our TcpReceive example in Chapter 20.
We are using a thread because the Start() method may not block and wait for a client; it must return immediately to the caller (SCM). The SCM would assume the start failed if the method didn't return to the caller in a timely fashion (30 seconds):
public void Start() { ReadQuotes(); listenerThread = new Thread( new ThreadStart(this.Listener)); listenerThread.Start(); }
The thread function Listener() creates a TcpListener instance. In the AcceptSocket() method, we are waiting for a client to connect. As soon as a client connects, AcceptSocket() returns with a socket associated with the client. We're calling GetRandomQuoteOfTheDay() to send the returned random quote to the client using socket.Send() :
protected void Listener() { try { listener = new TcpListener(port); listener.Start(); while (true) { Socket socket = listener.AcceptSocket(); string message = GetRandomQuoteOfTheDay(); UnicodeEncoding encoder = new UnicodeEncoding(); byte[] buffer = encoder.GetBytes(message); socket.Send(buffer, buffer.Length, 0); socket.Close(); } } catch (SocketException e) { Console.WriteLine(e.Message); } }
As well as the Start() method, we have some methods to control the service: Stop() , Suspend() , and Resume() :
public void Stop() { listener.Stop(); } public void Suspend() { listenerThread.Suspend(); } public void Resume() { listenerThread.Resume(); }
Another method that will be publicly available is RefreshQuotes() . If the file containing the quotes changes, then we start a re-read of the file with this method:
public void RefreshQuotes() { ReadQuotes(); } } }
Before building a service around our server, it's useful to build a test program that just creates an instance of the QuoteServer and calls Start() . This way, we can test the functionality without the need to handle service-specific issues. This test server must be started manually, and we can easily walk through the code with a debugger.
The test program is a C# console application, TestQuoteServer . We have to reference the assembly of the QuoteServer class. The file containing the quotes must be copied to the directory c:\ProCSharp\WinServices (or you have to change the argument in the constructor to specify where you have copied the file). After calling the constructor, the Start() method of the QuoteServer instance is called. Start() returns immediately after creating a thread, so we keep the console application running until Return is pressed:
static void Main(string[] args) { QuoteServer qs = new QuoteServer(@"c:\ProCSharp\WinServices\quotes.txt", 4567); qs.Start(); Console.WriteLine("Hit return to exit"); Console.ReadLine(); qs.Stop(); }
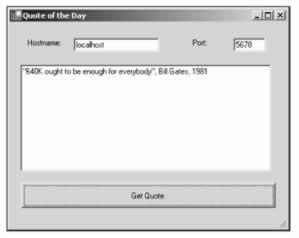
Note that the QuoteServer will be running on port 4567 on localhost using this program you will need to use these settings in the client later.
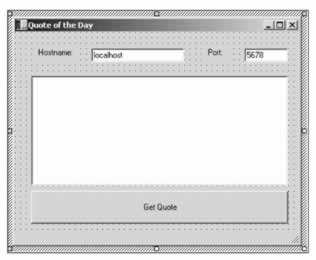
TcpClient Example
The client is a simple Windows application where we can enter the host name and the port number of the server. This application uses the TcpClient class to connect to the running server, and receives the returned message, displaying it in a RichTextBox . There's also a status bar at the bottom of the form. The entire form looks like this:
We have to make the following using directives in our code:
using System; using System.Drawing; using System.Collections; using System.ComponentModel; using System.Windows.Forms; using System.Data; using System.Net; using System.Net.Sockets; using System.Text;
The remainder of the code is automatically generated by the IDE, so we won't go into it in detail here. The major functionality of the client lies in the handler for the click event of the Get Quote button:
protected void buttonQuote_Click (object sender, System.EventArgs e) { statusBar.Text = ""; string server = textBoxHostname.Text; try { int port = Convert.ToInt32(textBoxPortNumber.Text); } catch (FormatException ex) { statusBar.Text = ex.Message; return; } TcpClient client = new TcpClient(); try { client.Connect(textBoxHostname.Text, Convert.ToInt32(textBoxPortNumber.Text)); NetworkStream stream = client.GetStream(); byte[] buffer = new Byte[1024]; int received = stream.Read(buffer, 0, 1024); if (received <= 0) { statusBar.Text = "Read failed"; return; } textBoxQuote.Text = Encoding.Unicode.GetString(buffer); } catch (SocketException ex) { statusBar.Text = ex.Message; } finally { client.Close(); } }
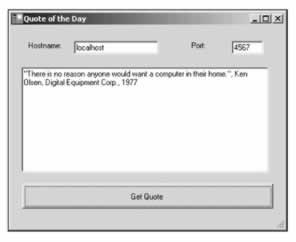
After starting the test server and this Windows application client, we can test the functionality.
A successful run can have this output using the settings in the following screenshot:
Let's now go on and implement what we are here for in this chapter the service functionality in the server. The program is already running, so what more do we need? Well, the server program should be automatically started at boottime without anyone logged on to the system, and we want to control it using service control programs.
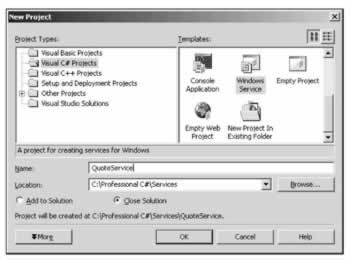
Windows Service Project
Using the new project wizard for C# Windows Services, we can now start to create a Windows Service. I'm naming the project QuoteService . Pay attention not to select a Web Service project!
After pressing OK to create the Windows Service application, the Designer surface appears as in Windows Forms applications, but you can't insert any Windows Forms components because the application cannot directly display anything on the screen. We will use the Designer surface later in the chapter to add other components, such as performance counters and event logging.
Selecting the properties of this service opens up this Properties editor window:
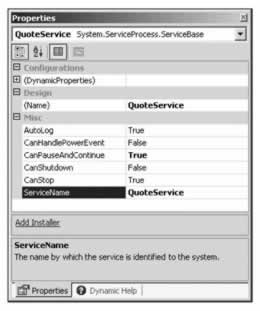
Here, properties of the service can be configured:
-
AutoLog means that events are automatically written to the event log for starting and stopping the service.
-
CanPauseAndContinue , CanShutdown , and CanStop means that the service can handle the specific pause, continue, shutdown, and stop requests.
-
ServiceName is the name of the service that's written to the Registry and is used to control the service.
-
CanHandlePowerEvent is a valid option for services running on a Windows 2000 system. We will talk about the power options in the Windows 2000 Service Features section later in the chapter.
Important The default service name is WinService1 no matter what the project is named. You can install only a single WinService1 service. If you get installation errors during your testing process, this may be the reason. Make sure, therefore, that you change the name of the service with the Properties editor to a more suitable name at the beginning of the service development.
Changing these properties with the Properties editor sets the values of our ServiceBase -derived class in the InitalizeComponent() method. You already know this method from Windows Forms applications. With services it's used in a similar way.
A wizard will generate the code, but we will change the file name to QuoteService.cs , the name of the namespace to Wrox.ProCSharp.WinServices , and the class name to QuoteService . We'll take a detailed look at this code later, but for now, we'll have a look at the ServiceBase class.
ServiceBase Class
The ServiceBase class is the base class for all .NET services. Our class QuoteService derives from ServiceBase; this class communicates with the service control manager using an undocumented helper class, System.ServiceProcess.NativeMethods , which is just a wrapper class to the Win32 API calls. The class is private, so we can't use it in our code.
The following sequence diagram shows the interaction of the SCM, our class QuoteService , and the classes from the System.ServiceProcess namespace. In the sequence diagram below, we can see the lifelines of objects vertically and communication going on in the horizontal direction. The communication is time-ordered from top to bottom:
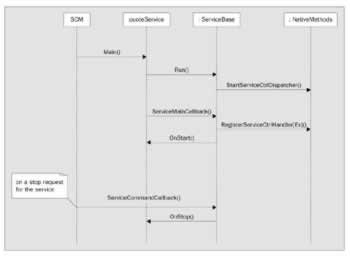
The SCM starts the process of a service that should be started. At startup, the Main() method is called. In the Main() method of our service we call the Run() method of the base class ServiceBase . Run() registers the method ServiceMainCallback() using NativeMethods.StartServiceCtrlDispatcher() in the SCM and writes an entry to the event log.
The next step is that the SCM calls the registered method ServiceMainCallback() in our service program. ServiceMainCallback() itself registers the handler in the SCM using NativeMethods.RegisterServiceCtrlHandler[Ex]() and sets the status of the service in the SCM. Next, the OnStart() method gets called. In OnStart() we have to implement the startup code. If OnStart() is successful, the string " Service started successfully " is written to the event log.
The handler is implemented in the ServiceCommandCallback() method. The SCM calls this method when changes are requested from the service. The ServiceCommandCallback() method routes the requests further to OnPause() , OnContinue() , OnStop() , OnCustomCommand() , and OnPowerEvent() .
Main Function
Let's look into the application-wizard - generated main function of the service process. In the main function, an array of ServiceBase classes, ServicesToRun is declared. One instance of the QuoteService class is created and passed as the first element to the ServicesToRun array. If more than one service should run inside this service process, it's necessary to add more instances of the specific service classes to the array. This array is then passed to the static Run() method of the ServiceBase class. With the Run() method of ServiceBase , we are giving the SCM references to the entry points of our services. The main thread of our service process is now blocked and waits for the service to terminate.
Here's the automatically generated code:
// The main entry point for the process static void Main() { System.ServiceProcess.ServiceBase[] ServicesToRun; // More than one user Service may run within the same process. To // add another service to this process, change the following line // to create a second service object. For example, // // ServicesToRun = New System.ServiceProcess.ServiceBase[] // { // new WinService1(), new MySecondUserService() // }; // ServicesToRun = new System.ServiceProcess.ServiceBase[] { new QuoteService() }; System.ServiceProcess.ServiceBase.Run(ServicesToRun); }
If there's only a single service in the process the array can be removed the Run() method accepts a single object derived from the class ServiceBase , so the Main() method could be reduced to this:
System.ServiceProcess.ServiceBase.Run(new QuoteService()); If there is more than one service, like the Windows program Services.exe that includes multiple services, and we need some shared initialization for the services, then this shared initialization must be done before the Run() method, because the main thread is blocked until the service process is stopped , and any following instructions would not be reached before the end of the service.
The initialization should not take too long: it shouldn't take longer than 30 seconds. If the initialization code were to take longer than this, then the service control manager assume that the service startup failed. We have to take into account the slowest machines where this service should run when considering this 30 second limit. If the initialization takes longer, we could start the initialization in a different thread so that the main thread calls Run() in time. An event object can then be used to signal that the thread completed its work.
Service-Start
At service start the OnStart() method is called - in here we can start our socket server. The QuoteServer.dll assembly must be referenced for the use of the QuoteServer . The thread calling OnStart() may not be blocked; this method must return to the caller, which is the ServiceMainCallback() method of the ServiceBase class. The ServiceBase class registers the handler and informs the SCM that the service started successfully after calling OnStart() :
protected override void OnStart(string[] args) { quoteServer = new QuoteServer(@"c:\ProCSharp\WinServices\quotes.txt", 5678); quoteServer.Start(); } The quoteServer variable is declared as a private member in the class:
namespace Wrox.ProCSharp.WinServices { public class QuoteService : System.ServiceProcess.ServiceBase { /// <summary> /// Required designer variable. /// </summary> private System.ComponentModel.Container components = null; private QuoteServer quoteServer; Handler Methods
When the service is stopped, the OnStop() method gets called. We should stop the service functionality in this method:
protected override void OnStop() { quoteServer.Stop(); } In addition to OnStart() and OnStop() , we can override the following handlers in our class:
-
OnPause() gets called when the service should be paused .
-
OnContinue() gets called when the service should return to normal operation after being paused. To make it possible for the overridden methods OnPause() and OnContinue() to be called, the CanPauseAndContinue property must be set to true .
-
OnShutdown() is called when Windows is undergoing system shutdown. Normally, the behavior of this method should be similar to the OnStop() implementation; if more time would be needed for a shutdown additional time can be requested. Similar to OnPause() and OnContinue() , a property must be set to enable this behavior: CanShutdown must be set to true .
-
OnCustomCommand() is a handler that can serve custom commands that are sent by a service control program. The method signature of OnCustomCommand() has an int argument where we get the custom command number. The value can be in the range 128 to 256; values below 128 are system-reserved values. In our service we are re-reading the quotes file with the custom command 128:
protected override void OnPause() { quoteServer.Suspend(); } protected override void OnContinue() { quoteServer.Resume(); } protected override void OnShutdown() { OnStop(); } public const int commandRefresh = 128; protected override void OnCustomCommand(int command) { switch (command) { case commandRefresh: quoteServer.RefreshQuotes(); break; default: break; } }
Don't forget to add in a reference to our QuoteServer.dll file.
Threading and Services
With services, we have to deal with threads. As stated earlier, the SCM will assume that the service failed if the initialization takes too long. To deal with this, we have to create a thread.
The OnStart() method in our service class must return in time. If we call a blocking method like AcceptSocket() from the TcpListener class, we have to start a thread to do this. With a networking server that deals with multiple clients , a thread pool is also very useful. AcceptSocket() should receive the call and hand the processing off to another thread from the pool. This way, no one waits for the execution of code and the system seems responsive .
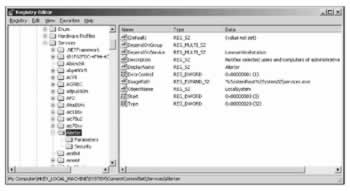
Service Installation
A service must be configured in the Registry. All services can be found in HKEY_LOCAL_MACHINE\System\CurrentControlSet\Services . You can view the Registry entries using regedit . The type of the service, display name, path to the executable, startup configuration, and so on, are all found here:
This configuration can be done using the installer classes from the System.ServiceProcess namespace. We shall look at these now.
Installation Program
We can add an installation program to the service by switching to the Design View with Visual Studio .NET and then selecting the Add Installer option from the context menu. With this option a new ProjectInstaller class is created, and a ServiceInstaller and a ServiceProcessInstaller instance are created.
The class diagram of the installer classes for services should help understanding of the generated code from the wizard:
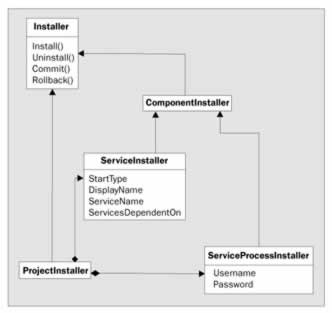
With this diagram in mind, let's go through the sourcecode in the file ProjectInstaller.cs that was created with the Add Installer option.
Installer Class
The class ProjectInstaller is derived from System.Configuration.Install.Installer . This is the base class for all custom installers . With the Installer class, it's possible to build transaction-based installations. With a transaction-based installation, it's possible to roll back to the previous state if the installation fails, and any changes made by this installation so far will be undone. As you can see in the figure above, the Installer class has Install() , Commit() , Rollback() , and Uninstall() methods, and they are called from installation programs.
The attribute RunInstaller(true) means that the class ProjectInstaller should be invoked when installing an assembly. Custom action installers as well as installutil.exe (which we will use later) check for this attribute:
using System; using System.Collections; using System.ComponentModel; using System.Configuration.Install; namespace Wrox.ProCSharp.WinServices { /// <summary> /// Summary description for ProjectInstaller. /// </summary> [RunInstaller(true)] public class ProjectInstaller : System.Configuration.Install.Installer {
ServiceProcessInstaller and ServiceInstaller Classes
Similar to Windows Forms applications, InitializeComponent() is called inside the constructor of the ProjectInstaller class. In InitializeComponent() , instances of the ServiceProcessInstaller class and the ServiceInstaller class are created. Both of these classes derive from the ComponentInstaller class, which itself derives from Installer .
Classes derived from ComponentInstaller can be used as parts within an installation process. Remember that a service process can include more than one service. The ServiceProcessInstaller class is used for the configuration of the process that defines values for all services in this process, and the ServiceInstaller class is for the configuration of the service, so one instance of ServiceInstaller is needed for each service. If there are three services inside the process, then we have to add additional ServiceInstaller objects three ServiceInstaller instances are needed in that case:
private System.ServiceProcess.ServiceProcessInstaller serviceProcessInstaller1; private System.ServiceProcess.ServiceInstaller serviceInstaller1; /// <summary> /// Required designer variable. /// </summary> private System.ComponentModel.Container components = null; public ProjectInstaller() { // This call is required by the Designer. InitializeComponent(); // TODO: Add any initialization after the InitComponent call } /// <summary> /// Required method for Designer support - do not modify /// the contents of this method with the code editor. /// </summary> private void InitializeComponent() { this.serviceProcessInstaller1 = new System.ServiceProcess.ServiceProcessInstaller(); this.serviceInstaller1 = new System.ServiceProcess.ServiceInstaller(); // // serviceProcessInstaller1 // this.serviceProcessInstaller1.Password = null; this.serviceProcessInstaller1.Username = null; // // serviceInstaller1 // this.serviceInstaller1.ServiceName = "QuoteService"; // // ProjectInstaller // this.Installers.AddRange( new System.Configuration.Install.Installer[] {this.serviceProcessInstaller1, this.serviceInstaller1}); } } }
ServiceProcessInstaller installs an executable that implements the class ServiceBase . ServiceProcessInstaller has properties for the complete process. Properties shared by all the services inside the process include:
| Property | Description |
|---|---|
| Username , Password | Indicates the user account under which the service runs if the Account property is set to ServiceAccount.User |
| Account | With this property we can specify the account type of the service. We will discuss the possible values next |
| HelpText | HelpText is a read-only property that returns the help text for setting the user name and password |
The process that is used to run the service can be specified with the Account property of the ServiceProcessInstaller class using this enumeration:
| Value | Meaning |
|---|---|
| LocalSystem | Setting this value specifies that the service uses a highly privileged user account on the local system, but this account presents an anonymous user to the network. Thus it doesn't have rights on the network. |
| LocalService | This account type presents the computer's credentials to any remote server. |
| NetworkService | Similar to LocalService , this value specifies that the computer's credentials are passed to remote servers, but unlike LocalService such a service acts as a non-privileged user on the local system. As the name says, this account should be used only for services that need resources from the network. |
| User | Setting the Account property to ServiceAccount.User means that we can define the account that should be used from the service. |
ServiceInstaller is the class needed for every service; it has properties for each service inside a process: StartType , DisplayName , ServiceName , and ServicesDependedOn :
| Property | Description |
|---|---|
| StartType | The StartType property indicates if the service is manually or automatically started. Possible values: ServiceStartMode.Automatic , ServiceStartMode.Manual , ServiceStartMode.Disabled . With ServiceStartMode.Disabled the service cannot be started. This option is useful for services that shouldn't be started on a system. You may wish to set the option to Disabled if a required hardware controller is not available, for example. |
| DisplayName | DisplayName is the friendly name of the service that is displayed to the user. This name is also used by management tools that control and monitor the service. |
| ServiceName | ServiceName is the name of the service. This value must be identical to the ServiceName property of the ServiceBase class in the service program. This name associates the configuration of the ServiceInstaller to the required service program. |
| ServicesDependentOn | Specifies an array of services that must be started before this service can be started. When the service is started, all these dependent services are started automatically, and then our service will start. |
| Important | If you change the name of the service in the ServiceBase -derived class be sure to also change the ServiceName property in the ServiceInstaller object!
|
ServiceInstallerDialog Class
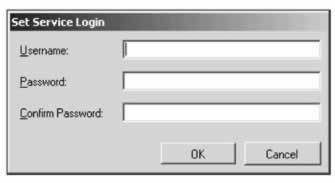
Another installer class in the System.ServiceProcess.Design namespace is the ServiceInstallerDialog . This class can be used if we want the System Administrator to enter the username and password during the installation.
If we set the Account property of the class ServiceProcessInstaller to ServiceAccount.User , and the Username and Password properties to null, then the dialog shown below will automatically be displayed at installation time. It's also possible to cancel the installation here:
installutil
After adding the installer classes to the project we can now use the installutil.exe utility to install and uninstall the service. This utility can be used to install any assembly that has an Installer class. installutil.exe calls the method Install() of the class that derives from the Installer class for installation, and Uninstall() for the uninstallation.
The command-line inputs for the installation and uninstallation of our service are, respectively:
installutil quoteservice.exe installutil /u quoteservice.exe
| Important | If the installation fails be sure to check the installation log files InstallUtil.InstallLog and < servicename > .InstallLog . Often you can find very useful information such as " The specified service already exists ". |
Client
After the service has been successfully installed, we can start the service manually from the Services MMC (see next section for further details), and we can start our client; the following screenshot of the service inaction shows the settings:
EAN: 2147483647
Pages: 244