12.2. Image Maps Ordinarily, placing an image within an anchor element makes the entire image a link to a single document when the user clicks anywhere on the image. As an alternative, you can create an image map that contains multiple links, or "hotspots," within a single image. The effect is created with HTML markup (some image maps also use scripts on the server) and an ordinary image that serves as a backdrop for the pixel coordinates. Favicons Another type of image you often see in association with web sites is the favicon, a small icon that appears with the name or URL of a site in the Favorites list (in Internet Explorer 6), or the location bar and tabs in a tabbed browsing interface (Mozilla and Safari). Favicons are not related to (X)HTML image markup as discussed in this chapter, but this is as logical a point as any to discuss how to create a favicon for your site. Creating the Icon A favicon must be saved in the Windows .ico format. The .ico format is capable of storing several images and is typically used to hold several size variations of the same image. The favicons that appear in the browser location bar or favorites list are 16 x 16 pixels. Some designers also include a 32 x 32 pixel version that may be used for as desktop shortcut icon. Once you have designed an icon, it is recommended to save it as a PNG (to take advantage of transparency) and then convert it to .ico format. File converters for both Windows and Mac are listed at the end of the sidebar. When you save the file, it must be named exactly favicon.ico to be recognized by all favicon-supporting browsers. Installing the Favicon The simplest way to install a favicon is simply to upload the favicon.ico file to the root directory of the site. It is also possible to install favicons to other directories for instances when you wish to use different icons for different areas of the site. While some browsers will find the favicon with no markup at all, to play it safe, include link elements in the head of the document that point to the icon you intend to use. A relative URL may also be provided, such as /favicon.ico. <link rel="shortcut icon" href="http://domain.tld/path/favicon.ico" type="image/x-icon" /> <link rel="icon" href=" http://domain.tld/path/favicon.ico" type="image/x- icon" />
Providing links for "icon" and "shortcut icon" covers all bases of browser compatibility. A relative URL may also be provided, such as /favicon.ico. Favicon Resources For an in-depth tutorial on creating favicons, I recommend www.december14.net/ways/rest/favicon.shtml. To convert a graphic to ICO format on a Macintosh, try the IconBuilder plug-in for Photoshop, available from IconFactory (www.iconfactory.com/iconbuilder.asp). Windows users have more options, including RealWorld Icon Editor (www.rw-designer.com/3D_icon_editor.php) and IconCool Studio (www.iconcool.com/iconcoolstudio.htm). There is also a free command-line converter, called png2ico, by Matthias Benkmann, which is available at www.winterdrache.de/freeware/png2ico/index.html. |
There are two types of image maps: client-side and server-side. For client-side image maps , the coordinate and URL information necessary to create each link is contained right in the document. The process of putting the pieces together happens in the browser on the user's machine (thus, client-side). For server-side image maps , as the name suggests, the map information resides on the server and is processed by the server or a separate CGI script. Client-side image maps are far more prevalent than server-side, which are rarely used due to critical accessibility issues. In fact, due to new techniques and philosophies in web design, even client-side image maps are waning in popularity. Image maps generally require text to be sunk into an image, which is sternly frowned upon. In terms of site optimization, they force all regions of the image to be saved in the same file format, which may lead to unnecessarily large file sizes. That said, take a look at what it takes to make a client-side image map. 12.2.1. Creating Image Maps The key to making image maps work is a text-based map that associates pixel coordinates with URLs. This map is handled differently for client-side and server-side (as outlined in the following sections), but the outcome is the same. When the user clicks somewhere within the image, the browser passes the coordinates of the mouse pointer to the map, which, in turn, generates the appropriate link. 12.2.1.1. Available tools Although it is possible to put together image map information manually, it is much easier to use a tool to do it. If you use any of the Macromedia or Adobe web design software packages, you're in luck, because there are image map tools built into both their HTML editors and web image programs. The image map tools in Dreamweaver and GoLive are particularly handy because you can create the image map right in the current document window.  | As of this writing, the future of these specific products is unclear based on the initial announcement of Adobe's acquisition of Macromedia. It is fairly certain that some sort of image map tool will be available when the dust settles. |
|
There are also standalone image map creation utilities available as shareware. One popular option is MapEdit, by Tom Boutell, available at www.boutell.com/mapedit/. It costs $10 and is available for Windows, Mac OS X, and Unix. A search for "image map tool" on your search engine of choice will turn up many more options. 12.2.1.2. Creating the map Regardless of the tool you're using, and regardless of the type of image map you're creating, the process for creating the map information is basically the same. Read the documentation for your image map tool to learn about features not listed here. Open the image in an image map program. Define areas within the image that should be clickable by using the appropriate shape tools: rectangle, circle, or polygon (for tracing irregular shapes). While the outline of the area is still highlighted, enter a URL for that area in the text entry field provided, as shown in Figure 12-8. Continue adding shapes and their respective URLs for each clickable area in the image. For server-side image maps , you also need to define a default URL, which is the page that displays if users click outside a defined area. Many tools have a prominent field for entering the default URL, but on others, you may need to look for it under a pull-down menu. Select the type of image map (client- or server-side) you want to create. Note that server-side image maps are strongly discouraged. Save or export the map information. Server-side image maps are saved in a map definition file (.map) that resides on the server. For client-side image maps, you may need to copy and paste the resulting map code into your HTML file.
Figure 12-8. Creating map information (shown in Dreamweaver MX) 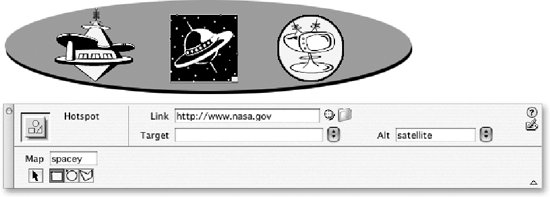
If you do not have an image map tool, it is possible to write out the map information by hand following the examples in this chapter. Simply note the pixel coordinates of the shapes as indicated in an image editing program (in Photoshop, they are provided in the Info palette) and type them into the appropriate place in the map file. 12.2.2. Client-Side Image Maps Client-side image maps have three components: An ordinary image file (.gif, .jpeg, or .png) A map delimited by the map element containing the coordinate and URL information for each clickable area (described by area elements contained within the map element) The usemap attribute within the image element (img) that indicates which map to reference
<map>...</map>
Attributes - Core (id, class, style, title), Internationalization, Events
- name="text"
<area />
Attributes - Core (id, class, style, title), Internationalization, Events, Focus
- alt="text" (Required)
- coords="values"
- href="url"
- nohref
- shape="rect|circle|poly|default"
- target="text"
There are many advantages to using client-side image maps . They are self-contained within the HTML document and do not rely on a server to function. This means you can test the image map on your local machine or make working site demos for distribution on disk. It also cuts down on the load on your server and improves response times. In addition, complete URL information displays in the status bar when the user mouses over the hotspot (server-side image maps display only coordinates). 12.2.2.1. Sample client-side image map This is the markup for the client-side image map pictured in Figure 12-9. While most authors use a web authoring tool to generate map markup such as this, it is helpful to have an understanding of what is happening in the map, area, and img elements. Each component of the image map will be discussed in turn. <map name="spacey"> <area shape="rect" coords="203,23,285,106" href=http://www.nasa.gov alt=""/> <area shape="circle" coords="372,64,40" href="mypage.html" alt=""/> <area shape="poly" coords="99,47,105,41,94,39,98,34,110,35,115,28,120,35,133,38,133, 42,124,42,134,58,146,56,157,58,162,63,158,67,141,68,145,72,155, 73,158,75,159,80,148,83,141,83,113,103,87,83,72,83,64,80,64,76, 68,73,77,72,79,63,70,59,67,53,68,47,78,45,89,45,99,47" href="yourpage.html" alt=""/> </map> <img src="/books/4/439/1/html/2/orbit.gif" width="500" height="125" border="0" usemap="#spacey" />
Figure 12-9. An image map 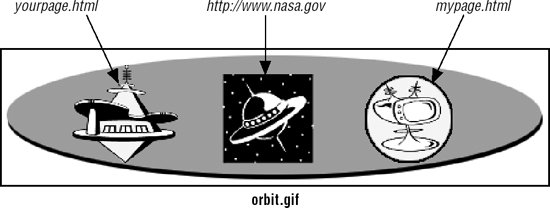
<map name="spacey"> This marks the beginning of the map. You must give the map a name. Within the map element there are area elements for each hotspot within the image.
<area shape="rect" coords="203,23,285,106" href=http://www.nasa.gov alt=""/> Each area element contains the shape identifier (shape), pixel coordinates (coords), and the URL for the link (href). In this case, the shape is the rectangle (rect) that corresponds to the black square in the center of the image. The value of the coords attribute identifies the top-left and bottom-right pixel positions of the rectangle (coords="x1,y1,x2,y2"). Some browsers also support the nonstandard rectangle as an equivalent to rect, but this is not widely supported. In each area element, the alt attribute provides the alternative text for that region of the image. The alt attribute is a required attribute for the area element.
<area shape="circle" coords="372,64,40" href="mypage.html" alt=""/> This area corresponds to the circular area on the right of the image in Figure 12-9. Its shape is circle. For circles, the first two coordinates identify the position of the center of the circle and the third value is its radius in pixels (coords="x,y,r"). Some browsers also support the nonstandard circ as an equivalent to circle.
<area shape="poly" coords="99,47,105,41,94,...additional coordinates omitted to save space... " href="yourpage.html" alt=""/> This is the area element for the irregular (polygon) shape on the left of the image in Figure 12-9. For polygons, the coordinates are pairs of x,y coordinates for each point or vertex along the path that surrounds the area (coords="x1,y1,x2,y2,x3,y3..."). At least three pairs are required to define a triangle; complex polygons generate a long list of coordinates. Some browsers also support the nonstandard polygon as an equivalent to poly.
<img src="/books/4/439/1/html/2/orbit.gif" width="500" height="125" border="0" usemap="#spacey" /> The usemap attribute is required within the image element to indicate that this image is an image map that uses the map named "spacey." 12.2.3. Server-Side Image Maps In the first years of the Web, all image maps were server-side image maps (client-side image maps were introduced later). Because they rely on the server, they are less portable and the information is not self-contained, which introduces serious accessibility problems if the server is not available. As of this writing, the use of server-side image maps is strongly discouraged. For historical interest, a description of how they work is provided here. Server-side image maps have four elements: An ordinary image file (.gif, .jpeg, or .png). HTML markup in the document: the ismap attribute within the img element and an anchor (a) element that links the image to the .map file on the server. A map definition file (.map) containing the pixel coordinate and URL information for each clickable area; the .map file resides on the server, usually in a directory called cgi-bin. The map file format is server-dependent and may be formatted as either "NCSA" or "CERN." A CGI script that runs on the server (or a built-in function of the server software) that interprets the .map file and sends the correct URL to the HTTP server.
Within the HTML file, the image map is set up as shown in this example: <a href="/cgi-bin/imagemap/spacey.map"><img src="/books/4/439/1/html/2/x.gif" ismap /></a>
|