Outlook Objects in Detail
In this section, I'll describe some of the objects, methods , properties, and events in Outlook that you can use in your own applications. Most of these objects are supported in Outlook 2002 and later. I'll cover new objects in Outlook 2003 later in the chapter. I'll assume that you have basic knowledge of the standard Outlook objects, such as the Application , Namespace , and MAPIFolder objects. (You can look at the sample applications included with this book to understand how to use these basic Outlook objects in an application.)
Outlook Events
Outlook supports 11 events that are called when users of an Outlook application use some of the built-in capabilities of Outlook. You can write code to handle these events as well as disable these events. We'll look next at how to add event-handling code to your application.
| Note | The events discussed in this section are not available in VBScript. You must use VBA, Visual Basic, Visual C#, or Visual C++ to use these events. In addition, some of the methods and properties trigger security dialog boxes. See Chapter 5 for more information on the security update for Outlook. |
Writing Event Handlers
The Outlook Script Editor makes adding event handlers to your VBScript code quite easy. In the Script Editor, choose Event Handler from the Script menu. Select the event you want to write a handler for, and then click Add. Outlook automatically adds a skeleton function with the correct parameters. All you need to do is fill in your specific code to handle the event. The Script Editor does not, however, provide the option to add skeleton code to handle the events your controls support. In this case, you must write your event handlers from scratch. In Outlook, the event names are preceded with the word Item . For example, the open event handler is named Item_Open .
Disabling Events
You can prevent events and their default behavior from occurring by setting the function value, or the name of the event, to False . You can then place your own code inside the event handler to replace the standard behavior. For example, if you write a custom Contact form that synchronizes contact information with a database, you can disable the Write event when the database is not available, preventing Outlook from saving the item and also preventing the two data sources, Outlook and the database, from being out of sync. The following code sample shows an example of this:
Function Item_Write() 'Call the CheckDatabase function boolIsOnline = CheckDatabase() If boolIsOnline = False Then 'No database. Do not save the item. Item_Write = False MsgBox "The database is offline" End If End Function Function CheckDatabase 'You would put your database connection code here CheckDatabase = False End Function
Events in Outlook Forms
Here is a list of the built-in Outlook events:
-
Item_AttachmentAdd
-
Item_AttachmentRead
-
Item_BeforeAttachmentSave
-
Item_BeforeCheckNames
-
Item_BeforeDelete
-
Item_Close
-
Item_CustomAction
-
Item_CustomPropertyChange
-
Item_Forward
-
Item_Open
-
Item_PropertyChange
-
Item_Read
-
Item_Reply
-
Item_ReplyAll
-
Item_Send
-
Item_Write
Outlook also includes another event, named Click , that you can use with your custom controls. The Click event is the only control event supported in Outlook. The following list describes the sequence of some of these events when you perform common Outlook tasks :
-
Creating a new item using a form or in- cell editing When a user attempts to create a new item in Outlook either by clicking the new mail icon to open a form or by starting to type information into a new item row in a view with in-cell editing enabled, Outlook fires the Item_Open event.
-
Sending an item When a user attempts to send an item in Outlook, the Item_Send event is fired first, followed by the Item_Write event and then the Item_Close event. If you disable any event in the sequence, the remaining events in that sequence will not fire.
Note Sometimes you'll want to open your Outlook form without executing the VBScript code contained in the form. To do this, hold down the Shift key while opening the form. This method of opening forms is useful while you're designing your applications because it prevents VBScript functions from adding undesired data into the form.
-
Posting an item When a user attempts to post an item, the Item_Write event is fired and then the Item_Close event is fired. If you disable any event in the sequence, the subsequent events in that sequence will not fire.
-
Saving an item When a user tries to save an item, the Item_Write event is fired.
-
Opening an item When a user opens an item, the Item_Read event is fired, followed by the Item_Open event.
-
Closing an item When a user attempts to close an item, the Item_Close event is fired.
Objects and Collections
Outlook contains some collections and objects that consist of item types that you can create, such as distribution lists, as well as user interface controls, such as custom property pages.
DistListItem Object
The DistListItem object represents a distribution list in a Contacts folder. A distribution list allows your users to do away with personal address books. The DistListItem object can hold multiple recipients, both those from the address list in Exchange Server as well as one-off addresses.
You can use the CreateItem method on the Application object to create a new DistListItem object, or you can add the DistListItem object to a Contacts folder by using the Add method of the Items collection for the folder. The following code shows how to use both methods to create a DistListItem object:
Dim oApp As Outlook.Application Dim oNS As Outlook.NameSpace Dim oExplorer As Outlook.Explorer Dim oContact As Outlook.MAPIFolder Dim oItems As Outlook.Items Dim oDistList As Outlook.DistListItem Dim oDistList2 As Outlook.DistListItem Set oApp = CreateObject("Outlook.Application") Set oNS = oApp.GetNamespace("MAPI") Set oExplorer = oApp.ActiveExplorer Set oContact = oNS.GetDefaultFolder(olFolderContacts) Set oItems = oContact.Items Set oDistList = oItems.Add(olDistributionListItem) oDistList.DLName = "My new distribution list" oDistList.Save Set oDistList2 = oApp.CreateItem(olDistributionListItem) oDistList2.DLName = "My other new distribution list" oDistList2.Save The DistListItem object inherits many of the same methods and properties that other Outlook items inherit, but it also has some methods and properties of its own, which I'll describe in the following sections.
Adding new members to the distribution list To add new members to your DistListItem object, you use the AddMembers method. Before you call this method, however, you must create a new Recipients collection to hold the names of the members you want to add to the distribution list. The easiest way to create a Recipients collection is to create a new mail item and use the Recipients collection available on the mail item. You can then populate the collection and create the new DistListItem object as shown here:
Dim oDistList As Outlook.DistListItem Dim oTempMail As Outlook.MailItem Dim oTempRecips As Outlook.Recipients Set oDistList = oItems("My new distribution list") Set oTempMail = oApp.CreateItem(olMailItem) Set oTempRecips = oTempMail.Recipients oTempRecips.Add "Thomas Rizzo" oTempRecips.Add "Aaron Con" oDistList.AddMembers oTempRecips oDistList.Display If you would rather add a single user to the distribution list, you should use the AddMember method (which is supported only in Outlook 2002 and later). This method takes the Recipient object of the user you want to add. It is different from the AddMembers method, which takes a Recipients collection object.
Removing members from a distribution list To remove members from your DistListItem object, use the RemoveMembers method. This method is similar to the AddMembers method; you must pass it to a valid Recipients collection object that contains the members you want to remove. The following code shows how to use this method:
Dim oDistList As Outlook.DistListItem Dim oTempMail As Outlook.MailItem Dim oTempRecips As Outlook.Recipients Set oDistList = oItems("My new distribution list") Set oTempMail = oApp.CreateItem(olMailItem) Set oTempRecips = oTempMail.Recipients oTempRecips.Add "Thomas Rizzo" oTempRecips.Add "Aaron Con" oDistList.RemoveMembers oTempRecips oDistList.Display If you would rather remove a single user from a distribution list, you should use the RemoveMember method (which is supported only in Outlook 2002 and later), which removes the specified Recipient object from a distribution list.
Retrieving the name of the distribution list The DistListItem object contains a property named DLName that you can use to set or return the name of the distribution list. The following code finds all the distribution lists in your Contacts folder and returns their names in a message box:
Dim oItem As Outlook.DistListItem RestrictString = "[Message Class] = 'IPM.DistList'" Set oRestrictedItems = oItems.Restrict(RestrictString) For Each oItem In oRestrictedItems strDLs = strDLs & vbLf & oItem.DLName Next MsgBox "You have " & oRestrictedItems.Count & " DL(s) in your " _ & "contacts folder. Names: " & strDLs
Counting the number of users in a distribution list Sometimes you'll want to know how many users a distribution list contains before you send items to it. To retrieve the count of the number of users on a distribution list, you must use the MemberCount property. Note that this count does not include the member count for distribution lists nested in the original list. For example, if you have a distribution list with 20 members and one of those members is a distribution list with 50 members, the MemberCount property will return 20, not 70. The following code finds all the distribution lists in your Contacts folder and returns a sum of all the MemberCount properties:
RestrictString = "[Message Class] = 'IPM.DistList'" Set oRestrictedItems = oItems.Restrict(RestrictString) For Each oItem In oRestrictedItems intCount = intCount + oItem.MemberCount Next MsgBox "Member count for all DLs is: " & intCount
SyncObject Object and SyncObjects Collection
Outlook allows users to set up quick synchronization folder groups. These synchronization groups, or profiles, allow users to configure different synchronization scenarios, such as which folders are synchronized off line and which filters apply to those folders. Users can then select the proper profile for their connection speed or synchronization preferences.
The Outlook SyncObjects collection contains the synchronization profiles set up for the current user. Your program can start or stop any of these synchronization profiles by using the methods of the SyncObject object. You can also monitor the progress of the synchronization by hooking into the events provided by the SyncObject object. These events are SyncStart , Progress , OnError , and SyncEnd . We'll look at how to use the SyncObjects collection and the SyncObject object next.
Finding a SyncObject in the SyncObjects collection The SyncObjects collection contains one property, named Count , and one method, named Item , that you can use to discover more information about the SyncObject objects in the collection. The Count property returns the number of SyncObject objects contained in the collection. The Item method allows you to identify an object in the collection by specifying a numeric or named index. By using the Item method, you can quickly retrieve a SyncObject object.
The next code example shows you how to use the Item method and the Count property. First the code finds a SyncObject object named slow modem , and then it displays the number of synchronization profiles the user has set up. You cannot create or delete SyncObject objects programmatically. Only the user can do this through the Outlook user interface.
Dim oSyncObjects As Outlook.SyncObjects Dim oSyncObject As Outlook.SyncObject Set oSyncObjects = oNS.SyncObjects Set oSyncObject = oSyncObjects("slow modem") MsgBox "You have " & oSyncObjects.Count & " SyncObjects!" strNames = vbLf For Each oSyncObject In oSyncObjects strNames = strNames & vbLf & oSyncObject.Name Next MsgBox "Names: " & strNames Starting and stopping synchronization After you find a SyncObject object, you might want to start or stop the synchronization process. You can do this by using the Start and Stop methods of the SyncObject object, respectively, as shown here:
Set oSyncObjects = oNS.SyncObjects Set oSyncObject = oSyncObjects("slow modem") oSyncObject.Start Monitoring the progress of synchronization In Visual Basic, to implement the events the SyncObject provides, you must first declare a SyncObject variable with the WithEvents keyword. The SyncStart event is fired when Outlook starts synchronizing using a particular SyncObject . The SyncEnd event is fired immediately after Outlook finishes synchronizing. The OnError event is fired if Outlook encounters an error when synchronizing. The OnError event procedure is passed both the error code and the description of the error as a string.
The final event, Progress , is fired periodically by Outlook to report on the progress of synchronization. Four parameters are passed to the Progress event procedure: State , Description , Value , and Max :
-
State is a Long data type that indicates the status of the synchronization. State can have the value olSyncStopped (0) or olSyncStarted (1) .
-
Description is a string that describes the current state of synchronization.
-
Value is a variable of the Long data type that indicates the current value in the synchronization process. Value can be the number of items synchronized in the folder.
-
Max is a Long parameter that indicates the maximum value for the third parameter. The ratio of the third parameter (the value) to the fourth parameter (the maximum) is the percentage of the synchronization process that is complete.
Private Sub oSyncObject_Progress( _ ByVal State As Outlook.OlSyncState, _ ByVal Description As String, ByVal Value As Long, _ ByVal Max As Long) strPercent = Description & Str(State / Max * 100) & "% " MsgBox strPercent & vbLf & "State: " & State & vbLf & _ "Max: " & Max End Sub
Outlook 2002 Objects
The objects described in the following sections are supported in Outlook 2002 and later.
ItemProperties Collection and the ItemProperty Object
The ItemProperties object is related to the UserProperties collection in that it contains all the items in the UserProperties collection in addition to the built-in Outlook properties. UserProperties returns only custom properties. The ItemProperties collection returns a collection of ItemProperty objects. When you use the Add or Remove method on the collection, you can add or remove custom properties only. The main purpose of the ItemProperties collection is to provide an easy way for your application to scroll through the properties on an Outlook item as a collection and not have to call each property individually by name.
The ItemProperty object has properties and methods that are quite similar to those of UserProperty . The main difference is that the ItemProperty object has the IsUserProperty property ”a Boolean that specifies whether the property is a custom property. Unfortunately, these objects do not solve the problem of gaining access to MAPI properties on items that might not be part of the built-in properties that Outlook returns or properties that you created. Also, these objects are not supported on AddressEntry objects, which means you still have to use Collaboration Data Objects (CDO) to access more detailed item and user information. The following code shows how to use these objects:
'Item Properties example Dim oApp As New Outlook.Application Dim oNS As Outlook.NameSpace Set oNS = oApp.GetNamespace("MAPI") 'Retrieve an Item that has custom and built-in properties Dim oFolder As Outlook.MAPIFolder Set oMailbox = oNS.Folders.Item("Mailbox - Thomas Rizzo") Set oFolder = oMailbox.Folders("SPS Sync") Dim oItem As Outlook.PostItem Set oItem = oFolder.Items.GetFirst 'ItemProperties is zero based Dim oItemProperties As Outlook.ItemProperties Set oItemProperties = oItem.ItemProperties Dim oItemProperty As Outlook.ItemProperty Debug.Print "There are " & oItemProperties.Count & _ " properties in the collection." 'Certain Address properties WILL trigger the security dialog box For x = 0 To oItemProperties.Count - 1 Set oItemProperty = oItemProperties.Item(x) On Error Resume Next Debug.Print oItemProperties(x).Name & " " & " " & _ oItemProperties(x).Type & " " & oItemProperties(x).Value & _ " " & oItemProperties(i).IsUserProperty Next Reminders Collection and Reminder Object
The Reminders collection is made up of Reminder objects. These objects were introduced in Outlook 2002 and provide a better means of working with reminders than that provided in earlier versions of Outlook. The key point about the Reminders collection and Reminder object is that the collection supports a number of events that you can use to track when reminders are fired, dismissed, snoozed, added, deleted, or changed. The Reminders collection is a property of the Outlook Application object. Table 6-1 lists the events that the Reminders collection supports.
| Event | Description |
|---|---|
| BeforeReminderShow | Fires before the new reminder dialog box is displayed in the user interface. This event can be canceled so that you can display your own user interface for reminders. |
| ReminderAdd | Fires when a new reminder is added to the collection. You are passed the reminder as a Reminder object. |
| ReminderChange | Fires when a reminder is changed. You are passed the reminder as a Reminder object. |
| ReminderFire | Fires just before a reminder is fired. You are passed the reminder as a Reminder object. You can use this event to forward the reminder to a cell phone or other device. |
| ReminderRemove | Fires when a reminder is removed from the collection ”for example, by a call to the Remove method on the Reminders collection, dismissal of a reminder programmatically or through the user interface, turning off of a meeting reminder, or deletion of an item with a reminder on it. You are not passed the reminder that is removed, so you must store the original reminders and then compare the original list to the list with the reminder removed. |
| Snooze | Fires when you call the Snooze method or a user clicks Snooze in the user interface. You are passed the reminder that is being snoozed as a Reminder object. |
The following example shows how to use these events. Notice that the Reminders collection is declared using the WithEvents keyword.
Dim WithEvents oReminders As Outlook.Reminders Private Sub Command2_Click() 'Outlook Reminders Example Dim oApp As New Outlook.Application Dim oNS As Outlook.NameSpace Set oNS = oApp.GetNamespace("MAPI") Set oReminders = oApp.Reminders End Sub Private Sub oReminders_BeforeReminderShow(Cancel As Boolean) 'You can add custom code to display your own reminder dialog box here 'by setting Cancel = True End Sub Private Sub oReminders_ReminderAdd( _ ByVal ReminderObject As Outlook.Reminder) 'Fired after a reminder is added to the collection MsgBox "You added a reminder to an item called " & _ ReminderObject.Item.Subject & _ " and the reminder will fire " & _ ReminderObject.NextReminderDate End Sub Private Sub oReminders_ReminderChange( _ ByVal ReminderObject As Outlook.Reminder) 'Fired after you change a reminder MsgBox "You changed a reminder on the item called " & _ ReminderObject.Item.Subject & _ " and the reminder will fire " & _ ReminderObject.NextReminderDate End Sub Private Sub oReminders_ReminderFire( _ ByVal ReminderObject As Outlook.Reminder) 'Fired when the reminder fires End Sub Private Sub oReminders_ReminderRemove() 'Fired when a reminder is removed 'You do not know which reminder was removed 'unless you scroll through the collection 'On startup you can set a variable to the reminders collection and 'then compare the original variable to the current reminders collection 'to see which one was removed End Sub Private Sub oReminders_Snooze(ByVal ReminderObject As Outlook.Reminder) 'Fired when snoozed MsgBox "You snoozed a reminder on the item called " & _ ReminderObject.Item.Subject & _ " and the reminder will fire " & _ ReminderObject.NextReminderDate End Sub The Reminder object has some unique methods and properties, which are listed in Table 6-2.
| Method or Property | Description |
|---|---|
| IsVisible | A Boolean that indicates whether the reminder is visible in the user interface and has not been dismissed or snoozed. |
| Item | Returns the Outlook item that the reminder is reminding the user about. |
| NextReminderDate | Contains the date when the reminder will fire again. |
| OriginalReminderDate | Returns the date the reminder was scheduled to fire (before the Snooze method is called or the user hits the Snooze button). |
Search Object
The Search object allows you to perform programmatic searches through your Outlook information. This object works hand in hand with the Results object, which allows you to scroll through and sort the results of your searches. The capabilities of the Search object correspond most closely to those of the Advanced Find feature. You can perform asynchronous or synchronous searches of multiple folders using the same SQL syntax that you use when querying Exchange or SharePoint Portal Server (SPS). The Search object has some unique properties and methods. You can also use this object in conjunction with the AdvancedSearch method on the Application object.
Most often, you will create a programmatic search of your Outlook data by first calling the AdvancedSearch method, which returns a Search object that contains a Results object. The AdvancedSearch method takes four parameters. The first parameter is the scope of the search; it uses the same scope qualifiers you create for Exchange or SPS searches, such as shallow traversal or http://server /folder . The difference here, however, is that instead of using http or file paths for scope, you use Outlook folder paths such as \\Mailbox “ UserName\Folder. Deep traversals are supported only in mailbox folders, not in public folders.
The second parameter, which is optional, is the SQL WHERE clause that you want to specify for your filter but without the WHERE keyword. This WHERE clause can be any clause supported by the standard Exchange query syntax. In this situation, you should take advantage of the query builder tab feature. This feature shows the SQL statement that is passed to Outlook to create filters for your views; you can copy and paste this statement to use as the filter for your searches. The key differences between the Exchange syntax and the Outlook search syntax are listed here:
-
No full-text indexing support. You can use the CONTAINS keyword, but Outlook converts the search text under the covers to a LIKE %searchterm% query. The FREETEXT predicate is not supported at all.
-
No need to CAST your non-string or non-Boolean variables , such as dates. Outlook can interpret these values automatically. The following query example shows how to query the multivalue Categories property:
(("urn:schemas-microsoft-com:office:office#Keywords" LIKE '%Outlook%' OR "urn:schemas-microsoft-com:office:office#Key words" LIKE '%Exchange%')) -
Outlook supports relative values in date fields, such as yesterday , today , this week , next week , next month , and this month . To implement these relative values in your queries, you must use a special format query. The following queries demonstrate how to use the relative date formats. The queries search for any items received within the relative date.
yesterday - (%yesterday("urn:schemas:httpmail:datereceived")%) today - (%today("urn:schemas:httpmail:datereceived")%) tomorrow - (%tomorrow("urn:schemas:httpmail:datereceived")%) last 7 - (%last7days("urn:schemas:httpmail:datereceived")%) next 7 - (%next7days("urn:schemas:httpmail:datereceived")%) last week - (%lastweek("urn:schemas:httpmail:datereceived")%) this week - (%thisweek("urn:schemas:httpmail:datereceived")%) next week - (%nextweek("urn:schemas:httpmail:datereceived")%) last month - (%lastmonth("urn:schemas:httpmail:datereceived")%) this month - (%thismonth("urn:schemas:httpmail:datereceived")%) next month - (%nextmonth("urn:schemas:httpmail:datereceived")%) on - ("urn:schemas:httpmail:datereceived" = '10/15/01') on or after - ("urn:schemas:httpmail:datereceived" >= '10/15/01') -
When you enter scopes into Outlook without the full SCOPE predicate ”for example, SCOPE('DEEP TRAVERSAL OF ""FolderPath""') ”you must enter any folder paths that have spaces, such as My Folder, using single quotes, as in 'My Folder'. Otherwise, you will receive an error.
-
Outlook can query MAPI and Exchange properties using the Exchange schema syntax. The following query searches for a Boolean property indicating whether the user requested a delivery receipt and whether the Do Not Archive flag is set on the item:
(("http://schemas.microsoft.com/exchange/deliveryreportrequested" = 0 AND "http://schemas.microsoft.com/mapi/id/{00062008-0000-0000- C000-000000000046}/850e000b" = 0)) -
You can specify multiple folders by using the DEEP traversal SCOPE parameter or by specifying multiple folders separated by commas, as in 'Inbox','Calendar','Tasks' . Outlook supports multiple folder and subfolder searching only in an individual person's mailbox.
The third optional parameter is a Boolean that specifies whether to search subfolders. You can search subfolders only in your mailbox and not in public folders. Do not specify a DEEP traversal scope, which means you want to search subfolders, and then use False for this parameter.
The final optional parameter is a string that is a unique tag for the search. Because you can have as many as 99 simultaneous searches in Outlook, this tag provides a way to uniquely identify your search when the event fires after the search is complete.
Once you define your parameters for the AdvancedSearch method and call that method, you should implement the AdvancedSearchComplete and AdvancedSearchStop events. These events are fired when the search is complete or when you programmatically stop the search. Their timing allows you to leverage asynchronous searches, which means that Outlook does not wait for the search results to return before continuing. This situation is unlike those in which you use the Find and Restrict methods in Outlook. Both of these methods are synchronous and must finish before your application can continue to run. Both events return a Search object that is the search that completed or was stopped . Both events are implemented by the Application object.
When you do an advanced search using the object model, what really happens behind the covers is that a new search folder is created in Outlook. The key point is that search folders support notifications so that as new items are added to the scope you specify, your search results are updated with these new results. As results are changed or deleted, your search results are updated as well.
The Search object includes a couple of new properties and a single method, as listed in Table 6-3.
| Property | Description |
|---|---|
| Filter | A read-only property that returns the filter used for the search. |
| IsSearchSynchronous | A property that returns a Boolean that specifies whether the search was synchronous or asynchronous. Synchronous searches are required only for public folders. You can still use the event notification technique with synchronous searches. |
| Results | Returns the Results object that contains any results obtained by the search. |
| Scope | A read-only property that returns the scope specified for the search. |
| SearchSubFolders | A Boolean property that returns whether subfolders were searched as part of the search. |
| Tag | A string property that allows you to tag your searches so that when AdvancedSearchComplete or AdvancedSearchStopped is fired, you can identify which search was completed or stopped. |
| Method | Description |
| Stop | Stops searching for an asynchronous search. Calling this method on a synchronous search does nothing. |
The following code shows how to use the Search object and events:
Dim WithEvents oApp1 As Outlook.Application Set oApp1 = CreateObject("Outlook.Application") Dim oNS As Outlook.NameSpace Set oNS = oApp1.GetNamespace("MAPI") Dim oSearch As Outlook.Search 'Single quote your search paths strScope = "'SPS Sync'" 'To search public folders you can use this path 'strScope = "'\Public Folders\All Public Folders\My Folder'" 'If you want to use a real scope statement you can, such as 'strScope = _ '"SCOPE ('DEEP TRAVERSAL OF ""\Mailbox - Thomas Rizzo\Add Subs\""')" oApp1.AdvancedSearch strScope, _ "(%today(""urn:schemas:httpmail:datereceived"")%)", , "My Search"
Results Collection Object
The Results collection object is used in conjunction with the Search object described in the previous section. The Results collection is simply a view into the search folder that is created by Outlook when you perform a search. This collection has some unique methods and properties as well as some events that you will want to make use of. Because the only interesting property on the object is the Count property, I won't describe the properties in detail. As you can guess, the Count property returns the number of items in the folder, which are the results of the search. Table 6-4 lists the unique methods for the Results collection.
| Method | Description |
|---|---|
| GetFirst | Gets the first item in the folder. The Results collection is dynamic; you can add new items to it. |
| GetLast | Gets the last item in the results. |
| GetNext | Gets the next item, if there is a next item. |
| GetPrevious | Gets the previous item, if it exists. |
| ResetColumns | Resets the columns that are cached with the SetColumns method. |
| SetColumns | Caches columns to make Outlook data access performance faster. You pass the set of columns, separated by commas, to this method. Outlook does not retrieve any other columns on the item except the ones specified. |
| Sort | Allows you to sort the results returned by a particular column, which you specify in either ascending or descending order. |
Table 6-5 lists the events implemented by the Results collection. You can use these events to determine when new items are added to the results, changed, or removed. These events are useful if you want your application to always be running a search and want to be notified when new items of interest meet your criteria. All of these events are fired after their counterpart events on the folder they live in are fired.
| Event | Description |
|---|---|
| ItemAdd | Fires when a new item is added to the collection. This event passes the item as part of the event. |
| ItemChange | Fires when the item changes. This event passes the item as part of the event. |
| ItemRemove | Fires when an item is removed. Because the item is not passed to the event, you must figure out which item was removed. The sample application (found in this book's companion content on the Web) that provides an example of SPS offline synchronization shows a technique for figuring out which item was removed from a folder with this event. |
Views Object
One of the first items you'll want to enable on either Outlook 2000 or Outlook 2002 is the querybuilder registry key. This key offers an unsupported but powerful way to work with views in Outlook. In addition, the querybuilder interface allows you to build views more intuitively and logically and see the actual query that is sent to the server to generate the view. Figure 6-5 shows the querybuilder interface in Outlook. The following steps show you how to enable the querybuilder in Outlook:
-
Open the Windows Registry Editor by entering Regedit in the Run dialog box.
-
In the Registry tree, navigate to HKEY_CURRENT_USER\Software\ Microsoft\Office\11.0\Outlook. (If you are running Outlook 2002, replace 11.0 with 10.0.)
-
Choose New from the Edit menu, and then select Key.
-
Name the key QueryBuilder.
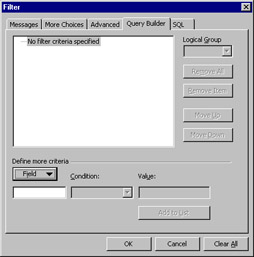
Figure 6-5: The QueryBuilder interface in Outlook
The Views collection, which is a collection of the MAPIFolder object, provides View objects that you can use to enumerate, add, change, or remove Outlook views programmatically. In previous versions of Outlook, there is no way to work with views cleanly. You can use CDO to access views because views are stored as hidden messages in a folder. But CDO cannot create new views because Outlook uses a proprietary format for its views.
The Views collection has two interesting methods and two interesting events. The methods are named Add and Remove . The Add method takes two required parameters and one optional parameter. The first required parameter is the name of the view, which must be a unique name. The second parameter is the view type. You can use one of five constants: olCalendarView , olCardView , olIconView , olTableView , and olTimelineView . The optional parameter specifies the save options for the view. You can have three constants for this parameter, such as olViewSaveOptionAllFoldersOfType , olViewSaveOptionThisFolderEveryOne , and olViewSaveOptionThisFolderOnlyMe . The names of these constants are self-explanatory.
The Remove method takes the index of the view that you want to remove. You can use this method to remove any views that you no longer need on the folder.
The two events are ViewAdd and ViewRemove . The ViewAdd event is called when a new view is added to the collection. This event passes the new view as a View object as part of the event.
The ViewRemove event is called when you remove a view from the collection. This event passes the view as a View object as part of the event.
The following code shows how to use the events. The methods of the Views collection are shown in the sample code for the View object, which we'll look at shortly. Keep in mind that if you make any changes to the View object passed to you, you should call the Save method to save your changes.
Dim WithEvents oViews As Outlook.Views Private Sub Command4_Click() 'View Example Dim oApp As New Outlook.Application Dim oNS As Outlook.NameSpace Set oNS = oApp.GetNamespace("MAPI") 'Get the views collection for a folder Dim oFolder As Outlook.MAPIFolder Set oMailbox = oNS.Folders.Item("Mailbox - Thomas Rizzo") Set oFolder = oMailbox.Folders("SPS Sync") Set oViews = oFolder.Views End Sub Private Sub oViews_ViewAdd(ByVal View As Outlook.View) MsgBox "You added the view called " & View.Name & _ " and the XML for the view is " & View.XML End Sub Private Sub oViews_ViewRemove(ByVal View As Outlook.View) MsgBox "You removed the view called " & View.Name End Sub View Object
The View object is the real meat of view creation. This is the object in which you actually specify the XML that makes up your view. The View object exposes the methods that allow you to copy, reset, and change your views. Table 6-6 lists the unique properties of the View object.
| Property | Description |
|---|---|
| Language | A string value that returns the language that the view should be used in, such as EN-US. If this property is blank or you set it to blank, the view should be used for all languages. |
| LockUserChanges | A Boolean read/write property that specifies whether the user can modify the settings contained in the view. You can use this property to lock your views. However, if users go to another version of Outlook or use CDO, they can get around this setting. |
| Name | Specifies the name of the view. |
| SaveOption | Returns the save option specified for the view. The following constants are the possible values for this read-only property: olViewSaveOptionAllFoldersOfType olViewSaveOptionThisFolderEveryone olViewSaveOptionThisFolderOnlyMe |
| Standard | A Boolean that returns True if this view is a standard, built-in Outlook view such as Messages, or False if the view is a custom view. |
| ViewType | Returns the type of view, using the constants olCalendarView , olCardView , olIconView , olTableView , and olTimelineView . |
| XML | Returns or sets the XML view descriptor for the view. This view descriptor maps to the WSS Forms view descriptor and adds some custom tags for Outlook. Included on the companion Web site is a white paper that lists all the XML tags that you can use in your Outlook views. |
Table 6-7 lists the methods of the View object.
| Method | Description |
|---|---|
| Apply | Changes the view in the user interface to the current View object. |
| Copy | Copies a view into a new View object so you can modify the original view and save a new copy. This method does not copy views between folders. You can add code that leverages MAPI (a sample is provided on the companion Web site) to copy views between folders. |
| Delete | Deletes the view. |
| GoToDate | Takes a date and jumps a calendar view to the date you specify. You should not use this method if your Outlook objects are late-bound . This method is known to hang Outlook in this situation. |
| Reset | Only for built-in Outlook views. This method resets the view to its original configuration. |
| Save | Saves the current view. |
The following code, used in the SPS Offline Synchronization application, shows how to create views. The code generates the XML string needed to describe the view and then adds the view to the folder. (The XML strings in the listing are long strings so the code is formatted for readability.)
Private Sub cmdFinish_Click() On Error Resume Next Err.Clear strViewHeaderText = _ "<?xml version=""1.0""?>" & _ "<view type=""table"">" & _ "<viewname>%%!!--ViewName--!!%%</viewname>" & _ "<viewstyle>table-layout:fixed;width:100%;" & _ "font-family:Tahoma;font-style:normal;" & _ "font-weight:normal;font-size:8pt;color:Black" & _ "</viewstyle>" & _ "<viewtime>210703620</viewtime>" & _ "<linecolor>8421504</linecolor>" & _ "<linestyle>0</linestyle>" & _ "<collapsestate></collapsestate>" & _ "<rowstyle>background-color:#ffffff</rowstyle>" & _ "<headerstyle>background-color:#d3d3d3</headerstyle>" & _ "<previewstyle>color:Blue</previewstyle>" strDAVHrefText = _ "<column>" & _ "<name>HREF</name>" & _ "<prop>DAV:href</prop>" & _ "<checkbox>1</checkbox>" & _ "</column>" strIconText = _ "<column>" & _ "<heading>Icon</heading>" & _ "<prop>" & _ "http://schemas.microsoft.com/mapi/proptag/0x0fff0102" & _ "</prop>" & _ "<bitmap>1</bitmap>" & _ "<width>18</width>" & _ "<style>padding-left:3px;;text-align:center</style>" & _ "</column>" strFromText = _ "<column>" & _ "<heading>From</heading>" & _ "<prop>urn:schemas:httpmail:fromname</prop>" & _ "<type>string</type>" & _ "<width>25</width>" & _ "<style>padding-left:3px;;text-align:left</style>" & _ "<displayformat>1</displayformat>" & _ "</column>" strSubjectText = _ "<column>" & _ "<heading>Subject</heading>" & _ "<prop>urn:schemas:httpmail:subject</prop>" & _ "<type>string</type>" & _ "<width>120</width>" & _ "<style>padding-left:3px;;text-align:left</style>" & _ "</column>" strApproversText = _ "<column>" & _ "<heading>SPSApprovers</heading>" & _ "<prop>" & _ "http://schemas.microsoft.com/mapi/string/" & _ "{00020329-0000-0000-C000-000000000046}/SPSApprovers" & _ "</prop>" & _ "<width>50</width>" & _ "<sortable>0</sortable>" & _ "<style>padding-left:3px;;text-align:left</style>" & _ "<userheading>Approvers</userheading>" & _ "</column>" strApproversLeftText = _ "<column>" & _ "<heading>SPSApproversLeft</heading>" & _ "<prop>" & _ "http://schemas.microsoft.com/mapi/string/" & _ "{00020329-0000-0000-C000-000000000046}/SPSApproversLeft" & _ "</prop>" & _ "<width>50</width>" & _ "<sortable>0</sortable>" & _ "<style>padding-left:3px;;text-align:left</style>" & _ "<userheading>Approvers Left</userheading>" & _ "</column>" strAuthorText = _ "<column>" & _ "<heading>Author</heading>" & _ "<prop>" & _ "http://schemas.microsoft.com/mapi/string/" & _ "{00020329-0000-0000-C000-000000000046}/SPSAuthor" & _ "</prop>" & _ "<type>string</type>" & _ "<width>50</width>" & _ "<style>padding-left:3px;;text-align:left</style>" & _ "<userheading>Author</userheading>" & _ "</column>" strCategoriesText = _ "<column>" & _ "<heading>SPSCategories</heading>" & _ "<prop>" & _ "http://schemas.microsoft.com/mapi/string/" & _ "{00020329-0000-0000-C000-000000000046}/SPSCategories" & _ "</prop>" & _ "<width>50</width>" & _ "<sortable>0</sortable>" & _ "<style>padding-left:3px;;text-align:left</style>" & _ "<userheading>Categories</userheading>" & _ "</column>" strCheckedOutText = _ "<column>" & _ "<format>boolicon</format>" & _ "<heading>Checked Out</heading>" & _ "<prop>" & _ "http://schemas.microsoft.com/mapi/string/" & _ "{00020329-0000-0000-C000-000000000046}/SPSCheckedOut" & _ "</prop>" & _ "<type>boolean</type>" & _ "<width>50</width>" & _ "<style>padding-left:3px;;text-align:center</style>" & _ "<displayformat>3</displayformat>" & _ "<userheading>Checked Out</userheading>" & _ "</column>" strCheckedOutByText = _ "<column>" & _ "<heading>Checked Out By</heading>" & _ "<prop>" & _ "http://schemas.microsoft.com/mapi/string/" & _ "{00020329-0000-0000-C000-000000000046}/SPSCheckedOutBy" & _ "</prop>" & _ "<type>string</type>" & _ "<width>50</width>" & _ "<style>padding-left:3px;;text-align:left</style>" & _ "<userheading>Checked Out By</userheading>" & _ "</column>" strCurrentApproversText = _ "<column>" & _ "<heading>SPSCurrentApprovers</heading>" & _ "<prop>" & _ "http://schemas.microsoft.com/mapi/string/" & _ "{00020329-0000-0000-C000-000000000046}/SPSCurrentApprovers" & _ "</prop>" & _ "<width>50</width>" & _ "<sortable>0</sortable>" & _ "<style>padding-left:3px;;text-align:left</style>" & _ "<userheading>Current Approvers</userheading>" & _ "</column>" strDescriptionText = _ "<column>" & _ "<heading>Description</heading>" & _ "<prop>" & _ "http://schemas.microsoft.com/mapi/string/" & _ "{00020329-0000-0000-C000-000000000046}/SPSDescription" & _ "</prop>" & _ "<type>string</type>" & _ "<width>50</width>" & _ "<style>padding-left:3px;;text-align:left</style>" & _ "<userheading>Description</userheading>" & _ "</column>" strDocProfileText = _ "<column>" & _ "<heading>Doc Profile</heading>" & _ "<prop>" & _ "http://schemas.microsoft.com/mapi/string/" & _ "{00020329-0000-0000-C000-000000000046}/SPSDocProfile" & _ "</prop>" & _ "<type>string</type>" & _ "<width>50</width>" & _ "<style>padding-left:3px;;text-align:left</style>" & _ "<userheading>Doc Profile</userheading>" & _ "</column>" strKeywordsText = _ "<column>" & _ "<heading>SPSKeywords</heading>" & _ "<prop>" & _ "http://schemas.microsoft.com/mapi/string/" & _ "{00020329-0000-0000-C000-000000000046}/SPSKeywords" & _ "</prop>" & _ "<width>50</width>" & _ "<sortable>0</sortable>" & _ "<style>padding-left:3px;;text-align:left</style>" & _ "<userheading>Keywords</userheading>" & _ "</column>" strLastModifiedText = _ "<column>" & _ "<heading>Last Modified</heading>" & _ "<prop>" & _ "http://schemas.microsoft.com/mapi/string/" & _ "{00020329-0000-0000-C000-000000000046}/SPSLastModified" & _ "</prop>" & _ "<type>datetime</type>" & _ "<width>50</width>" & _ "<style>padding-left:3px;;text-align:left</style>" & _ "<format>M/d/yyyyh:mm tt</format>" & _ "<displayformat>2</displayformat>" & _ "<userheading>Last Modified</userheading>" & _ "</column>" strTitleText = _ "<column>" & _ "<heading>Title</heading>" & _ "<prop>" & _ "http://schemas.microsoft.com/mapi/string/" & _ "{00020329-0000-0000-C000-000000000046}/SPSTitle" & _ "</prop>" & _ "<type>string</type>" & _ "<width>50</width>" & _ "<style>padding-left:3px;;text-align:left</style>" & _ "<userheading>Title</userheading>" & _ "</column>" strReceivedText = _ "<column>" & _ "<heading>Received</heading>" & _ "<prop>urn:schemas:httpmail:datereceived</prop>" & _ "<type>datetime</type>" & _ "<width>30</width>" & _ "<style>padding-left:3px;;text-align:left</style>" & _ "<format>M/d/yyyyh:mm tt</format>" & _ "<displayformat>2</displayformat>" & _ "</column>" strSizeText = _ "<column>" & _ "<heading>Size</heading>" & _ "<prop>" & _ "http://schemas.microsoft.com/mapi/id/" & _ "{00020328-0000-0000-C000-000000000046}/8ff00003" & _ "</prop>" & _ "<type>i4</type>" & _ "<width>15</width>" & _ "<style>padding-left:3px;;text-align:left</style>" & _ "<displayformat>3</displayformat>" & _ "</column>" strFooterText = _ "<orderby>" & _ "<order>" & _ "<heading>Subject</heading>" & _ "<prop>urn:schemas:httpmail:subject</prop>" & _ "<type>string</type>" & _ "<sort>asc</sort>" & _ "</order>" & _ "</orderby>" & _ "<groupbydefault>2</groupbydefault>" & _ "<previewpane>" & _ "<markasread>0</markasread>" & _ "<previewwidth>0</previewwidth>" & _ "<previewheight>500</previewheight>" & _ "</previewpane>" & _ "</view>" 'Check to make sure they put a name If txtViewName = "" Then MsgBox "You must enter a name for the view before continuing.", _ vbExclamation + vbOKOnly Exit Sub End If 'See if the view name already exists Dim otmpViews As Outlook.Views Set otmpFolder = oVWApp.ActiveExplorer.CurrentFolder Set otmpViews = otmpFolder.Views Dim oView As Outlook.View For Each oView In otmpViews If oView.Name = txtViewName.Text Then MsgBox "This view already exists in the folder. " & _ "Please select a different view name.", _ vbExclamation + vbOKOnly Exit Sub Exit For End If Next 'View doesn't exists, create it Dim oNewView As Outlook.View Set oNewView = otmpViews.Add(txtViewName.Text, olTableView, _ olViewSaveOptionThisFolderEveryone) If Err.Number = 0 Then 'Modify the view settings 'Add the fields to the view strViewXML = "" 'Find the view name in the view header and 'replace with the real name strViewHeaderText = Replace(strViewHeaderText, _ "%%!!--ViewName--!!%%", txtViewName.Text) strViewXML = strViewHeaderText 'See what properties they selected. 'Icon, Subject and received are always included. strViewXML = strViewXML & strDAVHrefText strViewXML = strViewXML & strIconText If checkAuthor.Value = vbChecked Then strViewXML = strViewXML & strAuthorText End If 'strViewXML = strViewXML & strFromText strViewXML = strViewXML & strSubjectText If checkApprovers.Value = vbChecked Then strViewXML = strViewXML & strApproversText End If If checkApproversLeft.Value = vbChecked Then strViewXML = strViewXML & strApproversLeftText End If If checkCategories.Value = vbChecked Then strViewXML = strViewXML & strCategoriesText End If If checkCheckedout.Value = vbChecked Then strViewXML = strViewXML & strCheckedOutText End If If checkCheckedOutBy.Value = vbChecked Then strViewXML = strViewXML & strCheckedOutByText End If If checkCurrentApprovers.Value = vbChecked Then strViewXML = strViewXML & strCurrentApproversText End If If checkDescription.Value = vbChecked Then strViewXML = strViewXML & strDescriptionText End If If checkDocProfile.Value = vbChecked Then strViewXML = strViewXML & strDocProfileText End If If checkKeywords.Value = vbChecked Then strViewXML = strViewXML & strKeywordsText End If If checkLastModified.Value = vbChecked Then strViewXML = strViewXML & strLastModifiedText End If If checkTitle.Value = vbChecked Then strViewXML = strViewXML & strTitleText End If strViewXML = strViewXML & strReceivedText If checkSize.Value = vbChecked Then strViewXML = strViewXML & strSizeText End If strViewXML = strViewXML & strFooterText oNewView.XML = strViewXML oNewView.Save iResponse = MsgBox("Your view - " & txtViewName.Text & _ " - was successfully created. " & _ "Would you like to switch to " & _ "this view right now?", vbYesNo + vbQuestion) If iResponse = vbYes Then 'Change the folder's view to the new view bChangeView = True strSwitchViewName = txtViewName.Text End If Else MsgBox "There was an error creating your new view. " & _ "Please try again later.", vbExclamation + vbOKOnly End If Unload Me End Sub Outlook Bar Object Model
Some of the most significant elements in the Outlook object model are the Outlook Bar objects, which allow you to manipulate the Outlook Bar shortcuts as well as the user interface. Outlook Bar shortcuts hold not only file and folder shortcuts but also URL shortcuts to Web pages. Let's take a look at the objects and collections for the Outlook Bar object model. Figure 6-6 shows how the objects in the Outlook Bar object model work together. Except for the SetIcon method, these objects are all supported by Outlook 2000 and later.
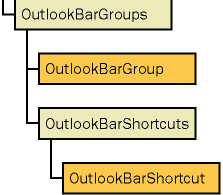
Figure 6-6: The relationship between the objects and collections in the Outlook Bar object model
Panes Collection
The Panes collection enables developers to access the available Outlook application window panes. Outlook supports three panes ”the OutlookBar , the FolderList, and the Preview pane ”but only the OutlookBar pane is accessible as an object in the Panes collection. If you try to access either of the other two panes, you will receive an error.
You retrieve the Panes collection from an Explorer object by using the new Pane property on that object. You can then use the Item method of the Pane object and pass in either the numeric index or the name of the Pane object you want. To retrieve the OutlookBarPane object, you should pass in the text OutlookBar to the Item method.
The Panes collection also supports the Count property, which you can use to retrieve the number of Pane objects in the collection.
OutlookBarPane Object
After you pass the text OutlookBar to the Item method of the Panes collection, Outlook returns an OutlookBarPane object. This object contains events and properties that let you control and monitor the Outlook Bar. Here are the four properties you will use:
-
Contents A read-only property that returns the OutlookBarStorage object for the current OutlookBarPane object. From the object returned, you can retrieve the shortcuts and groups for the Outlook Bar.
-
CurrentGroup Returns or sets the current group displayed in the Outlook Bar. You must pass a valid OutlookBarGroup object as the value for this property.
-
Name A read-only property that returns a string indicating the name of the current OutlookBarPane object.
-
Visible Returns or sets the visibility of the OutlookBarPane object. Visible takes a Boolean value that specifies whether you want to show the Outlook Bar in the user interface.
The following code shows how to use the OutlookBarPane object:
Dim oPanes As Outlook.Panes Dim oOutlookBarPane As Outlook.OutlookBarPane Set oPanes = oExplorer.Panes Set oOutlookBarPane = oPanes("OutlookBar") 'Flip whether the pane is visible oOutlookBarPane.Visible = Not (oOutlookBarPane.Visible) The OutlookBarPane object also provides two events that you can capture when users work with the Outlook Bar: BeforeGroupSwitch and BeforeNavigate . The BeforeGroupSwitch event is fired when the user or object model attempts to switch to a new visible group. The BeforeGroupSwitch event procedure takes two parameters, Group and Cancel . If you set the Cancel parameter to True , the switch is canceled. The Group parameter is an OutlookBarGroup object containing the Outlook group that the user is trying to navigate to. The following code shows how to use BeforeGroupSwitch and cancel it when a user tries to navigate to a specific Outlook group:
Dim WithEvents oOutlookBarPane As Outlook.OutlookBarPane Private Sub oOutlookBarPane_BeforeGroupSwitch( _ ByVal ToGroup As Outlook.OutlookBarGroup, _ Cancel As Boolean) If ToGroup.Name = "My Shortcuts" Then MsgBox "You cannot switch to the My Shortcuts group!" Cancel = True Else MsgBox "Now switching to the " & ToGroup.Name & " group." End If End Sub
The BeforeNavigate event fires when the user attempts to click on an Outlook Bar shortcut. The BeforeNavigate event procedure takes two parameters, Shortcut and Cancel . Shortcut is an OutlookBarShortcut object that is the Outlook Bar shortcut the user is trying to navigate to. Cancel is a Boolean that you can set to True to cancel the navigation. The following code example shows how to use BeforeNavigate :
Dim WithEvents oOutlookBarPane As Outlook.OutlookBarPane Private Sub oOutlookBarPane_BeforeNavigate( _ ByVal Shortcut As Outlook.OutlookBarShortcut, _ Cancel As Boolean) On Error Resume Next 'Need to watch out for file shortcuts! Err.Clear Set oTempFolder = Shortcut.Target strName = oTempFolder.Name If Err.Number = 0 Then If strName = "Inbox" Then MsgBox "Sorry, you can't switch to your Inbox." Cancel = True Else MsgBox "Now switching to the " & Shortcut.Name & " shortcut." End If End If End Sub
OutlookBarStorage Object
The OutlookBarStorage object is a container for the objects in an OutlookBarPane object. This object contains only one property ”the Groups property ”that you will use in your applications. The Groups property returns an OutlookBarGroups collection, which enables you to scroll through the groups on the Outlook Bar. The following code shows how to use the Groups property to retrieve the OutlookBarGroups collection and then scroll through each group in the collection:
Dim oOutlookBarStorage As Outlook.OutlookBarStorage Dim oOutlookBarGroups As Outlook.OutlookBarGroups Dim oOutlookBarGroup As Outlook.OutlookBarGroup Set oPanes = oExplorer.Panes Set oOutlookBarPane = oPanes("OutlookBar") Set oOutlookBarStorage = oOutlookBarPane.Contents Set oOutlookBarGroups = oOutlookBarStorage.Groups strGroups = vbLf For Each oOutlookBarGroup In oOutlookBarGroups strGroups = strGroups & vbLf & oOutlookBarGroup.Name Next MsgBox "The names of the groups on your Outlook Bar: " _ & strGroups OutlookBarGroups Collection
The OutlookBarGroups collection contains OutlookBarGroup objects that represent all the Outlook groups on your Outlook Bar. You use this collection to count and add new groups to the Outlook Bar. This collection supports one property, Count , which you can use to retrieve the number of groups in the collection, as shown in the following code:
Set oPanes = oExplorer.Panes Set oOutlookBarPane = oPanes("OutlookBar") Set oOutlookBarStorage = oOutlookBarPane.Contents Set oOutlookBarGroups = oOutlookBarStorage.Groups MsgBox "The number of Outlook groups on your Outlook Bar is: " _ & oOutlookBarGroups.Count This collection also supports three methods ” Add , Item , and Remove . The Add method adds an empty OutlookBarGroup object to the collection and returns a reference to this new OutlookBarGroup object. The Add method takes two parameters: the first is a string that specifies the name of the group to add; the second is optional and specifies a number indicating the insertion position for the new Outlook group. The top of the bar is at position 1.
The Item method allows you to retrieve an OutlookBarGroup object by name or by index. The Remove method allows you to delete an OutlookBarGroup object by specifying the index of the object you want to remove.
The following example uses all three of these methods. It creates a new OutlookBarGroup object, finds the object by using the Item method, and then deletes the object by using the Remove method.
'Create the new group at the top of the bar Set oNewOLBarGroup = oOutlookBarGroups.Add(""My New Group", 1) MsgBox "Added Group" Set oTempOLBarGroup = oOutlookBarGroups("My New Group") MsgBox "Got Group Named: " & oTempOLBarGroup.Name 'Since you have to remove a group by numeric index, we can loop 'through the collection, find the OutlookBarGroup by name, and 'get the corresponding index intCounter = 0 boolFound = 0 For Each oOutlookBarGroup In oOutlookBarGroups intCounter = intCounter + 1 If oOutlookBarGroup.Name = "My New Group" Then boolFound = intCounter End If Next If boolFound <> 0 Then oOutlookBarGroups.Remove boolFound MsgBox "Deleted Group" End If The OutlookBarGroups collection is interesting because it supports three events that you can hook into: BeforeGroupAdd , BeforeGroupRemove , and GroupAdd . These events enable you to trace when users try to add or remove certain Outlook groups and, if you want, cancel the user's action.
The BeforeGroupAdd event is fired before a new group is added to the Outlook Bar through the user interface or code. The BeforeGroupAdd event procedure is passed a Boolean parameter named Cancel that, if set to True , programmatically cancels the action, and prevents the group from being added to the Outlook Bar. The next code snippet shows how to use the BeforeGroupAdd event to cancel a user's attempt to add an Outlook group. Notice that because the group hasn't been created yet, a reference to the new group is not passed the BeforeGroupAdd event procedure, so you have no way of knowing which group the user is trying to add. However, because the GroupAdd event passes the group the user added, you can write code in that event procedure to remove the group if the user is not allowed to add it.
Dim WithEvents oOutlookBarGroups As Outlook.OutlookBarGroups Private Sub oOutlookBarGroups_BeforeGroupAdd(Cancel As Boolean) MsgBox "You are not allowed to add groups to your Outlook Bar!" Cancel = True End Sub
The BeforeGroupRemove event is fired before a group is removed from an Outlook Bar. You can hook into this event with your applications to prevent users from deleting Outlook groups you created programmatically. The BeforeGroupRemove event procedure is passed two parameters. The first is an OutlookBarGroup object that corresponds to the Outlook group that a program or user is trying to remove. The second is the Cancel Boolean parameter, which you can set to True to cancel the removal of the Outlook group. The following code checks to see whether the user is trying to remove her Outlook Shortcuts group. If she is, it cancels the action.
Private Sub oOutlookBarGroups_BeforeGroupRemove( _ ByVal Group As Outlook.OutlookBarGroup, _ Cancel As Boolean) If Group.Name = "Outlook Shortcuts" Then MsgBox "You cannot remove this group!" Cancel = True End If End Sub
The GroupAdd event fires when a new group has been added successfully to the Outlook Bar. The GroupAdd event procedure is passed an OutlookBarGroup object so that you know which group has been added. If the user adds the new group by using the Outlook user interface, the group will be named New Group because this name is the default for newly created Outlook groups. The following code displays a message box that shows the name of the Outlook group you added:
Private Sub oOutlookBarGroups_GroupAdd( _ ByVal NewGroup As Outlook.OutlookBarGroup) MsgBox "You added the " & NewGroup.Name & " group!" End Sub
OutlookBarGroup Object
The OutlookBarGroup object represents a group on your Outlook Bar. The OutlookBarGroup object supports three properties but no methods. You use these three properties to access information about the Outlook group and the shortcuts inside the Outlook group:
-
Name Returns or sets the name of the OutlookBarGroup by using a string.
-
Shortcuts Returns the set of Outlook shortcuts contained in the group as an OutlookBarShortcuts collection.
-
ViewType Returns or sets the way icons are displayed on the Outlook Bar. This property can have the value olLargeIcon (1) or olSmallIcon (2) .
The following example shows how to use these properties. It loops through the OutlookBarGroups collection and then retrieves each OutlookBarGroup object and displays information about it.
For Each oOutlookBarGroup In oOutlookBarGroups strName = oOutlookBarGroup.Name Set oOutlookBarShortcuts = oOutlookBarGroup.Shortcuts intShortcutCount = oOutlookBarShortcuts.Count strNames = vbLf For Each oOutlookBarShortcut In oOutlookBarShortcuts strNames = strNames & vbLf & oOutlookBarShortcut.Name Next Select Case oOutlookBarGroup.ViewType Case olLargeIcon: strViewType = "Large Icons" Case olSmallIcon: strViewType = "Small Icons" End Select MsgBox "The following information is for the " & strName & _ " group." & vbLf & "The ViewType is: " & strViewType & _ "vbLf & "The number of shortcuts in the group" & _ " is: " & intShortcutCount & vbLf & _ "The shortcuts are named:" & strNames & vbLf Next
OutlookBarShortcuts Collection
The OutlookBarShortcuts collection contains a set of OutlookBarShortcut objects and represents the shortcuts in an OutlookBarGroup object. This collection supports the Count property, which returns the number of OutlookBarShortcut objects in the collection.
This collection also supports three methods: Add , Item , and Remove . Add allows you to create a new shortcut in your Outlook group. The return value for Add is the new OutlookShortcut object. This method takes three parameters. The first parameter is a Variant that is the target for the shortcut. The target can be either a MAPIFolder object or a string that specifies a URL. Outlook supports placing URL shortcuts on your Outlook Bar. The second parameter is a string that specifies the name of the shortcut you are creating. The final parameter is optional; it specifies the position at which the new shortcut should be inserted. A value of 0 indicates that the shortcut should be inserted at the top of the Outlook group. The following code adds a folder and a URL shortcut to a newly created Outlook group using the Add method:
'Create the new group at the top of the bar Set oNewOLBarGroup = oOutlookBarGroups.Add("My New Group", 1) 'Get the shortcuts in the new group Set oOutlookBarShortcuts = oNewOLBarGroup.Shortcuts 'Now add a shortcut that points to a folder Set oFolder = oNS.GetDefaultFolder(olFolderInbox) 'Optionally, we can set a variable to retrieve the 'new shortcut. 0 at the end means add it to the 'top of the group. Set oNewShortcut = oOutlookBarShortcuts.Add(oFolder, "My Inbox", 0) 'Now let's create a new shortcut to a Web page strEXHTTP = "http://www.microsoft.com/exchange" oOutlookBarShortcuts.Add strEXHTTP, "Exchange Web site" You use the second method, Item , to specify the index number or the name of the shortcut you want to retrieve from the collection. The third method, Remove , takes the index of the OutlookBarShortcut object you want to remove from the collection. The following code shows how to find and remove all shortcuts that point to the Inbox:
On Error Resume Next For Each oOutlookBarGroup In oOutlookBarGroups Set oOutlookShortcuts = oOutlookBarGroup.Shortcuts intCounter = 1 For Each oOutlookShortcut In oOutlookShortcuts 'Watch out for File System shortcuts Err.Clear If oOutlookShortcut.Target.Name = "Inbox" Then If Err.Number = 0 Then oOutlookShortcuts.Remove intCounter End If End If intCounter = intCounter + 1 Next Next
The OutlookBarShortcuts collection supports the BeforeShortcutAdd , BeforeShorcutRemove , and ShortcutAdd events. The BeforeShortcutAdd event, which fires before a new shortcut is added to the Outlook Bar, is passed a parameter named Cancel that you can set to True to cancel the attempt to add the shortcut. The following code shows how to hook into this event and cancel the action of a user trying to add a new shortcut to her Outlook Shortcuts group. Notice that you are not passed the new Outlook shortcut object because the event is fired before the new shortcut is created.
The second event supported by the OutlookBarShortcuts collection is the BeforeShortcutRemove event, which fires before a shortcut is removed from a group in the Outlook Bar. The BeforeShortcutRemove event procedure is passed two parameters: an OutlookBarShortcut object that corresponds to the shortcut the user or program is trying to remove, and Cancel , which is a Boolean parameter that you can set to True to cancel the removal. The following code shows how to use this event to prevent a user from removing the Calendar shortcut from the Outlook Shortcuts group:
The third event supported by the OutlookBarShortcuts collection is ShortcutAdd . This event fires after a new Outlook shortcut has been added to the Outlook Bar. This event passes the newly added shortcut as an OutlookBarShortcut object. The following example shows how to hook into this event:
OutlookBarShortcut Object
The OutlookBarShortcut object represents an Outlook shortcut on your Outlook Bar. You use this object to inquire about the target that a shortcut points to. You make the inquiry by using the object's Target property, which returns a Variant object. The data type of this Variant is determined by the target for the shortcut. If the shortcut points to a folder, the data type is MAPIFolder . If the shortcut points to a file system folder, the data type is Object . If the shortcut points to a URL or a file system path, the data type is String . If you want to change the icon used by the shortcut, use the SetIcon method. This method replaces the icon in the shortcut with the icon that you specify to the method as a path to the icon file ”for example, c:\icons\myicon.ico. You can see how to use this object in the Account Tracking application in Chapter 8.
Selection Collection Object
To enable your applications to identify what the user has selected in an Explorer window in Outlook, the Outlook object model includes the Selection collection object, which contains the set of items that a user has selected in the user interface. For example, you can use this collection to validate that the user has selected the item required for your application to continue. You can also use it to dynamically add menu commands and toolbar buttons when a user selects a certain item.
You must use the Item method with the object's index as a parameter to retrieve a specific object in the collection. The object is returned to you as an Object variable, which means that if you want to call a specific method or property on the object, you should first cast the object to a specific data type.
This collection supports the Count property, which returns the number of items selected in a collection. You can use the Count property to determine the number of items the user has currently selected.
| Note | To see the Selection collection in action, see the Account Tracking application in Chapter 8. |
Explorers Collection
An Explorer object represents the window in which the contents of a folder are displayed. To make accessing these Explorer windows in your application easier, Outlook provides an Explorers collection below the Application object. The Explorers collection contains all the Explorer objects in your application, even those that are not visible.
The Explorers collection also contains a Count property, which you can use to determine how many Explorer objects are in the collection. You can use the Count property to identify open Explorer objects that need to be closed before your application exits. Making this determination is important because Outlook cannot terminate properly when Explorer objects are running.
The Explorers collection contains two methods, Add and Item . You can use the Add method to create a new Explorer object and specify the folder to display in that Explorer object's window. The Add method takes two parameters. The first parameter is either a MAPIFolder object or a string containing a path to the folder. The second parameter is an optional Long data type that specifies the display mode for the folder. This value can be olFolderDisplayNormal (0) , olFolderDisplayFolderOnly (1) , or olFolderDisplayNoNavigation (2) . The Add method returns the newly created Explorer object. This new Explorer object is initially hidden; you must call the Display method to reveal it. The following code shows how to use the Add method:
Dim oExplorers As Outlook.Explorers Dim oExplorer As Outlook.Explorer Set oFolder = oNS.GetDefaultFolder(olFolderContacts) Set oExplorers = oApp.Explorers Set oExplorer = oExplorers.Add(oFolder, olDisplayNormal) oExplorer.Display
By passing an individual Explorer object's index, you can use the Item method of the Explorers collection to access that object in the collection. The following example shows how to do this:
Set oFolder = oNS.GetDefaultFolder(olFolderContacts) Set oExplorers = oApp.Explorers Set oExplorer = oExplorers.Item(1) MsgBox oExplorer.Caption
The Explorers collection includes a single event, NewExplorer , which you can use to track a newly created Explorer object that has not yet been made visible. This event passes an Explorer object that is being opened or created. The following code shows how to use the NewExplorer event:
Dim WithEvents oExplorers As Outlook.Explorers Set oExplorers = oApp.Explorers Private Sub oExplorers_NewExplorer( _ ByVal Explorer As Outlook.Explorer) MsgBox "You opened or added a new Explorer with the caption: " & _ Explorer.Caption End Sub
Inspectors Collection
An Inspector object represents the window in which an Outlook item is displayed. To make it easier for you to find out which Inspector objects are available in your application, the Outlook object model includes an Inspectors collection, which contains Inspector objects that are not currently visible to the user as well as Inspector objects that are. The Inspectors collection is accessed from the Application object in Outlook.
The Inspectors collection contains one property, Count , which returns the number of Inspector objects in the collection.
The Inspectors collection also contains two methods, Add and Item . The Add method takes one parameter ”a valid Outlook Item object ”to display in the new Inspector . This method returns an Inspector object. You must call the Display method on the Inspector object that's returned in order to display the item. The following code shows how to use this method:
Set oFolder = oNS.GetDefaultFolder(olFolderTasks) Set oItem = oFolder.Items.GetFirst Set oInspectors = oApp.Inspectors Set oInspector = oInspectors.Add(oItem) oInspector.Display
The Item method allows you to access an Inspector object in the collection. You must pass the numeric index of the Inspector object you want to retrieve.
Links Collection and Link Object
To make group tracking activities possible, Outlook supports a feature named Activity Tracking. You use Activity Tracking to associate items and documents with a contact so Outlook can search folders that you specify for any linked items. To enable Activity Tracking, open a contact and click on the Activities tab. A sample Activities contact is shown in Figure 6-7.

Figure 6-7: The Activities tab for a specific contact
Outlook can search both private and public folders. To specify which folders Outlook should search, right-click on the Contacts folder and choose Properties. In the Contact Properties dialog box, click on the Activities tab. On this tab, you'll see a list of searchable folders you specified. You can also add new folders to the search criteria, as shown in Figure 6-8.
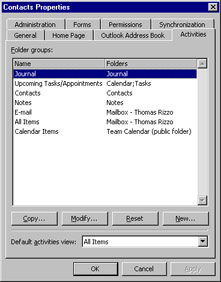
Figure 6-8: On the Activities tab for a folder, you can add new folders to the search criteria.
The use of Activity Tracking would be limited if the Outlook object model didn't support working with these links programmatically. The model includes a Links collection and a Link object. The Links collection contains a set of Link objects that comprise other items linked to a particular Outlook item. You can use the methods and properties of this collection to add, delete, or count the number of links to a particular item.
The Links collection contains three methods: Add , Item , and Remove . Add creates a new Link object in the collection. You must pass to this method the object you want to link to. Currently that object must be an Outlook Contact object. You use the Links collection and the Add method on message items, task items, and other types of Outlook items. The following example shows how to use the Add method:
Dim oLinks As Outlook.Links Dim oLink As Outlook.Link Dim oContact As Outlook.ContactItem Set oFolder = oNS.GetDefaultFolder(olFolderInbox) Set oMailItem = oFolder.Items.Find("[Message Class] = 'IPM.Note'") Set oLinks = oMailItem.Links Set oContactFldr = oNS.GetDefaultFolder(olFolderContacts) Set oItems = oContactFldr.Items Set oContact = oItems.GetFirst oLinks.Add oContact MsgBox "Added a link to the " & oContact.FullName & " contact on " & _ "the item " & oMailItem.Subject The Item method allows you to retrieve an item in the collection by using its index or its name. The following code shows how to retrieve a Link object in the collection by using the name of the contact that the link refers to:
Set oFolder = oNS.GetDefaultFolder(olFolderInbox) Set oMailItem = oFolder.Items.Find("[Message Class] = 'IPM.Note'") Set oLinks = oMailItem.Links Set oLink = oLinks.Item("Don Hall") MsgBox "The link refers to the " & oLink.Name & " contact on " & _ "the item " & oMailItem.Subject The third method supported in the Links collection is Remove , which you use to remove a link from the collection by specifying the index of the Link object to remove. The next bit of code shows how to find and remove a specific Link object in the collection. Keep in mind that a user or an application can associate an Outlook item with multiple contact items. This means that a single task can be linked to more than one contact.
Set oFolder = oNS.GetDefaultFolder(olFolderInbox) Set oMailItem = oFolder.Items.Find("[Message Class] = 'IPM.Note'") Set oLinks = oMailItem.Links Counter = 1 For Each oLink In oLinks If oLink.Name = "Don Hall" Then oLinks.Remove Counter oMailItem.Save End If Counter = Counter + 1 Next MsgBox "Removed the Don Hall link object." The Link object contains properties but no methods. Of all the properties, you will probably use only three in your applications: Item , Name , and Type . The Item property returns the Outlook item represented by the Link object. For Outlook, this property always returns an Outlook Contact item, which you can then manipulate in your code. The following example shows how to use the Item property:
Set oFolder = oNS.GetDefaultFolder(olFolderInbox) Set oMailItem = oFolder.Items.Find("[Message Class] = 'IPM.Note'") Set oLinks = oMailItem.Links Set oLink = oLinks.Item(1) Set oContact = oLink.Item MsgBox "The contact name is " & oContact.FullName The Name property returns the name of the contact that the Link object represents. This name is the display name for the contact. The Type property returns the Outlook item type represented by the Link object. As of this writing, the only valid type is olContact .
| Note | For information on the PropertyPages collection, the PropertyPage object, and the PropertyPageSite object, see the discussion of the Account Tracking application in Chapter 8. |
EAN: 2147483647
Pages: 227