| You put together shaders in a workspace called the Hypershade. It displays your shader network, which is a collection of nodes such as materials, textures, lights, and utilities. To build a shader, you connect textures and utilities to materials and then assign those materials to your models. A material is a node that contains many of the controls available to the surface. Materials also encapsulate data from other kinds of nodes and are the only kind of node that can be assigned to an object. The kind of material you use also affects the look of the object and which controls are available to it. The Hypershade provides ten kinds of material nodes: five basic materials and five special-case materials (Figure 14.4). Figure 14.4. These are the basic materials available in the Hypershade. 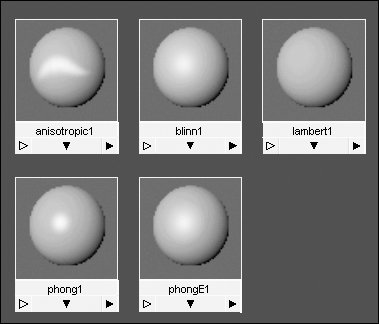
A texture is an image, either computer generated or bitmapped, like a .jpg or .psd file (Figure 14.5). A computer-generated texture is called a procedural texture. The use of textures allows for much more detailed control than a simple constant setting offers. The texture image can be mapped to the attributes of a material, and the value or color of the image is then used instead of the original setting. These images can control color, shininess, bump, transparency, and more. Figure 14.5. The sphere on the left has a fractal texture, which is a procedural texture. The sphere on the right has an image texture. 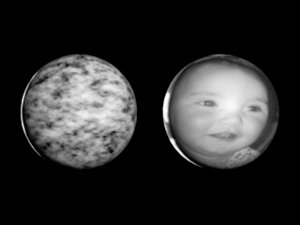
An object in Maya can have only one material assigned to it, but a network can consist of many materials and textures working together. To help keep track of these complicated relationships, Maya provides a third node type, called utilities. Utilities are nodes that take input from a texture or material and alter it in some way. Different Maya utilities adjust shaders in various ways. A couple of common utilities are the bump2d utility, which lets you create a bump map, and the 2D placement utility, which lets you position a texture on a surface. Using the Hypershade The Hypershade is split into three areas: the Create and Bins bars, the Hypershade node tabs, and the work-area tabs: - To use the Create bar, click the black triangle below the Create tab, and select Create Maya Nodes from the pull-down menu. This option reveals a long list of nodes you can use to create shaders (you can also use the Create menu to make any of these shaders) (Figure 14.6).
Figure 14.6. The Create bar, which is on the left side of the Hypershade, lets you easily create a variety of different nodes. 
The nodes you'll need most often are Surface, 2D Textures, 3D Textures, and Other Textures.
- Beside the Create tab is a Bins tab. Click it to reveal the Bins bar. Here you can create virtual folders to organize your project's shaders and other nodes. When you click a bin, the shaders or nodes stored within are displayed in the top part of the Hypershade under the relevant tab. Using bins to store your shaders makes it much easier to work with projects that require a large numbers of shaders.
- The Hypershade tabs let you see all your materials, textures, utilities, lights, or cameras. If you create any of these nodes, they show up under the appropriate tab. For example, if you create a material like blinn by clicking it in the Create bar, it shows up under the Materials tab (Figure 14.7). You can make custom tabs to display any node type you specify or even display related files on the hard drive.
Figure 14.7. The Hypershade tabs let you access all the different nodes, separated by category. 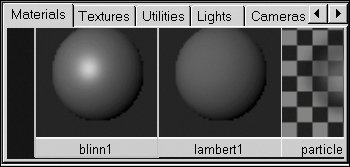
- The Work Area is a place to work on your materials and texture networks. You can navigate this window like any normal viewport. When you make a new node from the Create bar, it also shows up here. You can middle mouse button-drag nodes from the Hypershade tabs down to the Work Area. Once they're there, you can easily make and view connections (Figure 14.8). The networks in this area can be very complicated, so numerous options are available for rearranging the graph (discussed below).
Figure 14.8. In the Hypershade Work Area, you can drag other nodes to make connections. Here a ramp texture is connected to the color of a blinn material. 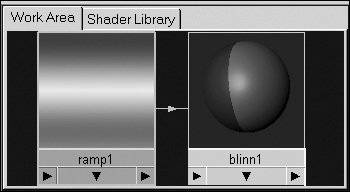
- The icons between the Create bar and the Hypershade tabs contains controls for displaying the nodes. This can be useful for improving performance and for quick navigation (Figure 14.9).
Figure 14.9. The node display options change the appearance of nodes in the Work Area and hypershade tabs. 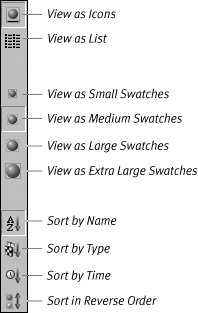
 The Text Filter button and accompanying input box let you limit what is displayed in the Hypershade tabs. The Text Filter button and accompanying input box let you limit what is displayed in the Hypershade tabs.
 The Toggle On/Off Create Bar button lets you hide or show the Create bar. Hiding it gives you more room to work with other nodes (see Figure 14.6). The Toggle On/Off Create Bar button lets you hide or show the Create bar. Hiding it gives you more room to work with other nodes (see Figure 14.6).
 The Clear Graph button clears out any nodes in the Work Area. It doesn't delete them; it just clears the area. The Clear Graph button clears out any nodes in the Work Area. It doesn't delete them; it just clears the area.
 The Rearrange Graph button cleans up the Work Area, which tends to get cluttered when you create new nodes. The Rearrange Graph button cleans up the Work Area, which tends to get cluttered when you create new nodes.
 The Graph Materials on Selected Objects button provides a quick way to find out what material is assigned to a specific object. Select the object, and then click this button, and the material and everything connected to it show up in the Work Area. The Graph Materials on Selected Objects button provides a quick way to find out what material is assigned to a specific object. Select the object, and then click this button, and the material and everything connected to it show up in the Work Area.
 The Show Input and Output Connections button shows everything connected to a node. For example, if you select a material and then click this button, the material shows up in the Work Area with all of its connected nodes. The Show Input and Output Connections button shows everything connected to a node. For example, if you select a material and then click this button, the material shows up in the Work Area with all of its connected nodes.
 These buttons let you isolate the Hypershade tabs or the Work Area. On the left is Show Top Tabs Only. In the middle is Show Bottom Tabs Only. On the right are Show Top and Bottom Tabs. These buttons let you isolate the Hypershade tabs or the Work Area. On the left is Show Top Tabs Only. In the middle is Show Bottom Tabs Only. On the right are Show Top and Bottom Tabs.
To create your own bins: 1. | Choose Window > Rendering Editors > Hypershade.
| 2. | Click the Create tab, and expand the Surface category (Figure 14.10).
Figure 14.10. The Create tab contains a categorized list of nodes to use in creating materials. 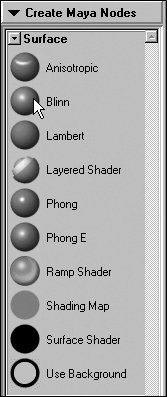
| 3. | Click the Blinn icon four times.
Four blinn shaders appear in the Work Area and in the Materials tab (Figure 14.11).
Figure 14.11. Four blinn shaders are displayed in the Work Area. 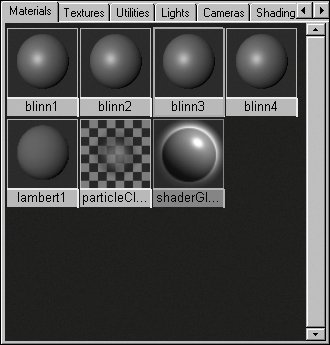
| 4. | Select Blinn1.
| 5. | Click the Bins tab to reveal the Bins bar (Figure 14.12).
Figure 14.12. Click the Bins tab to reveal the Bins bar. 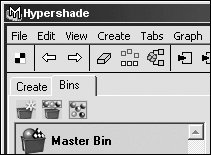
| | | 6. | Click the Create Bin from Selection icon  at the top of the Bins bar. at the top of the Bins bar.
The New Bin Name dialog box appears (Figure 14.13).
Figure 14.13. Enter a name for the custom bin using the New Bin Name dialog box. 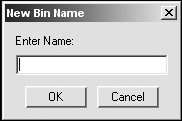
| 7. | Enter a name for the new bin (MyBin), and click OK.
A new bin called MyBin appears below the Master Bin (Figure 14.14).
Figure 14.14. A bin called MyBin appears below the Master Bin in the Bin bar. 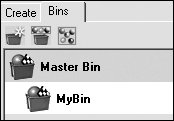
| 8. | Click MyBin.
The Materials tab displays blinn1 alone (Figure 14.15).
Figure 14.15. Clicking MyBin displays blinn1, which is currently the only node stored in MyBin. 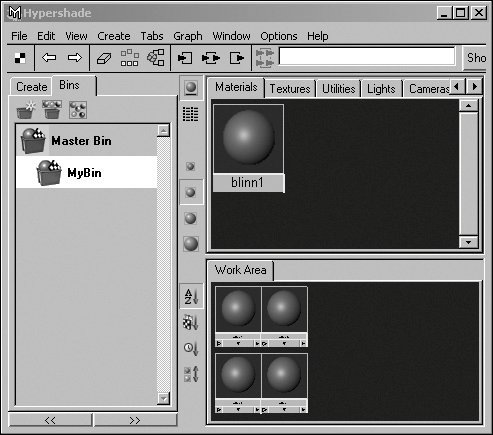
| 9. | From the Work Area, use the middle mouse button to click and drag blinn2 to MyBin.
Because blinn2 has been added to the bin, the Materials tab displays blinn1 and blinn2.
| 10. | Click Master Bin.
All the shaders are shown in the Materials tab (Figure 14.16).
Figure 14.16. Clicking the Master Bin displays all the shaders in the scene. 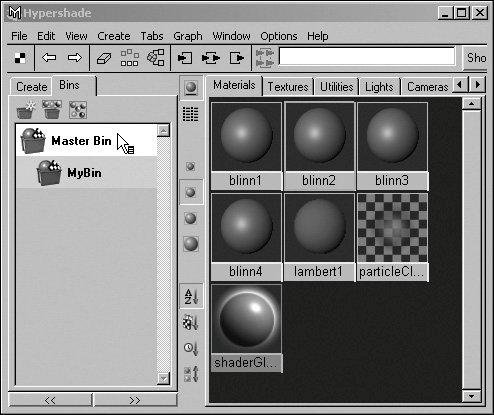
|
 Tips Tips
Right-clicking the bin provides a list of useful functions, including removing items and bins (Figure 14.17). Figure 14.17. Right-click MyBin to use functions like Delete and Remove Selected. 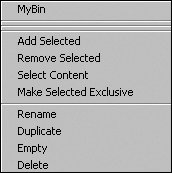 An object can be placed in as many bins as you want. Bins are just like sets of objects.
To create your own tabs: 1. | Open the Hypershade (Window > Rendering Editors > Hypershade).
| 2. | Choose Tabs > Create New Tab (Figure 14.18).
Figure 14.18. Select Create New Tab from the Tabs menu in the Hypershade to create a new tab. 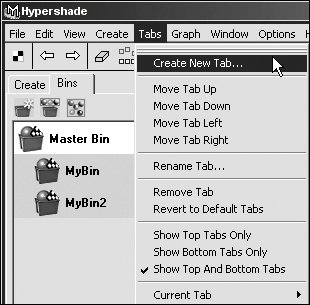
The Create New Tab dialog opens.
| 3. | For Tab Type, select Disk to display files on the hard drive (Figure 14.19).
Figure 14.19. Enter a name for the custom tab in the Create New Tab dialog box. 
| 4. | Click the folder icon next to Root Directory.
The Browse for Folder window opens (Figure 14.20).
Figure 14.20. The Browse for Folder window opens to the current project directory. 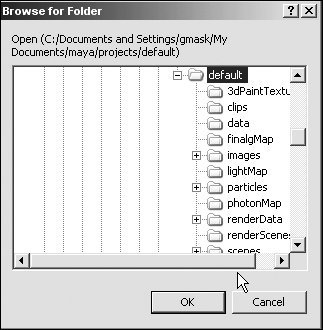
| | | 5. | Select a folder that contains images or folders of images, and click OK (Figure 14.21).
Figure 14.21. Select a folder that contains images or folders of images. 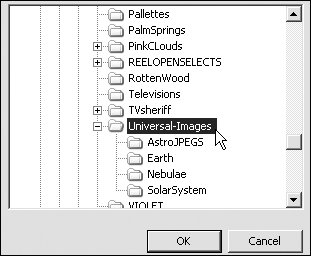
The path to the selected directory is displayed next to Root Directory.
| 6. | Enter the name Universal Images for the tab in New Tab Name field, and click Apply (Figure 14.22).
Figure 14.22. Type a name into the New Tab Name field. 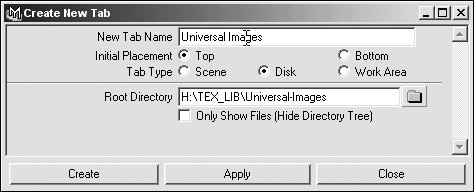
The new tab appears in the top half of the Hypershade (Figure 14.23).
Figure 14.23. The new tab appears in the top half of the Hypershade window. 
| 7. | Click one of the subfolders in your image directory, or click the folder icon next to the Root Directory path.
Icons of the images stored in the directory are created and displayed (Figure 14.24).
Figure 14.24. Clicking a folder in the new tab displays icons of images stored on the hard drive. 
|
|