Chapter 14. Shaders, Materials, and Mapping
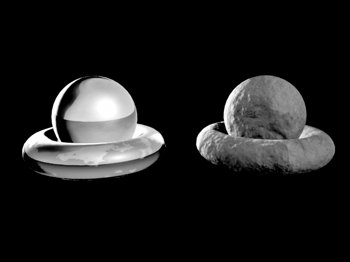
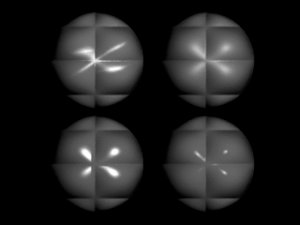
| By default, objects in Maya are a matte gray color. This appearance, like the appearance of all objects in Maya, is controlled by a shader. By changing the shader assigned to an object, you can control the object's appearance and surface behaviors. Shaders control more than just the color of the object: They can make a surface appear shiny and metallic, or rough and rocky (Figure 14.1). You can use shaders to make your objects glow, reflect and refract light, appear transparent, and more. Figure 14.1. The objects at left and the objects at right have the same geometry. However, they've been assigned different shaders, which makes them look like they're made from different substances Shaders consist of one or more materials or texture nodes linked together. A material controls a number of common attributes of a surface, as well as shininess. Shininess is a surface attribute that is determined by how light plays over the object. Maya includes several material types, and they differ primarily in their control over reflection and the specular highlight. The specular highlight is the hotspot (bright area) created on a surface by nearby lights. Choosing a material type allows you to change the appearance of the specular highlight: Hard glassy surfaces have tiny, bright highlights; rough surfaces like rubber and plastic have broad, indistinct highlights (Figure 14.2). Figure 14.2. Four of the basic materials are shown here (anisotropic, blinn, phong, and phong e). The white specular highlights indicate the difference in how they reflect light. In addition, Maya materials have other special attributes that provide even greater control with unusual surfaces. Features like incandescence, ambience, and glow all mimic complicated effects. For example, you can make a light bulb seem brighter by adding incandescence or add a soft glow by adding glow attributes (Figure 14.3). Figure 14.3. This light bulb looks lit up when its material is given some incandescence and glow. Because textures and images have two dimensions, and your object has three, it's important to tell Maya how to wrap your materials around your object. Placing shaders on an object is just as important as creating the correct shader. There are two primary ways to position a texture: projections and UV mapping. UVs, which are stored within an object, tell a texture where it needs to go. NURBs objects come with built in (and un-editable) UVs, but polygonal models don't. Maya provides a special editor for editing UV coordinates. Projections automate the process somewhat, distributing texture information to the appropriate UV areas. A projection can affect multiple surfaces, making it a good option for objects with many small parts. |

EAN: 2147483647
Pages: 185