| Unlike the other deformers we have discussed, jiggle deformers are dynamic, deforming geometry in reaction to motion. When a real object with a fleshy or rubbery surface stops moving, it jiggles back and forth before it eventually settles. Maya's jiggle deformer lets you simulate this effect. The jiggle deformer has several options. The most commonly used are Stiffness, Damping, and Motion Multiplier. Changing the Stiffness value affects the rigidity of the jiggle, making the object jittery at high values and fluid at low values. Changing the Damping value affects how long the jiggling surface takes to stop moving. The Motion Multiplier attribute scales the overall effect of the jiggle. Although you can apply a jiggle deformer to an entire object, it's usually more effective to apply it to a specific area, like a character's belly. To create a jiggle deformer: 1. | In component mode, select the CVs or vertices that you want to be affected by the jiggle deformer (Figure 13.38). You can switch to component mode by pressing  . .
Figure 13.38. When you apply a jiggle deformer to the upper portion of this cube, it appears to be gelatinous when animated. 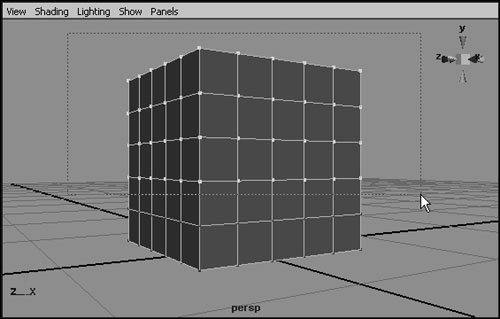
| 2. | Choose Deform > Create Jiggle Deformer.
| 3. | Switch to object mode by pressing .
| 4. | From the Deform menu, choose the box next to Paint Jiggle Weights.
The Paint Attributes tool settings are displayed.
| 5. | Under the Paint Attributes section, change the Paint Operation to Smooth, and click Flood several times (Figure 13.39).
Figure 13.39. You can use the Flood feature of the Paint Attributes tool to quickly smooth out deformer weights, creating a more natural effect. 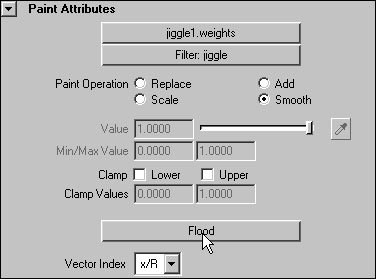
This smooths out the jiggle weights across the surface of the object (Figure 13.40). (See "About Deformer Weights," later in this chapter.)
Figure 13.40. While using the Paint Attributes tool, weights are displayed in shades from white to black on the surface of the selected object. 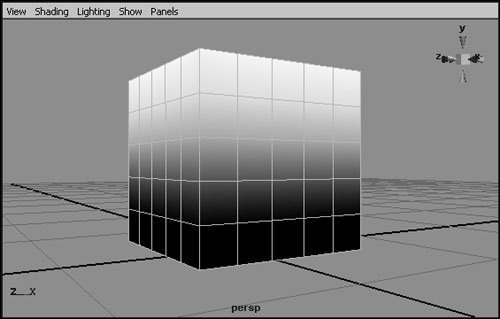
| | | 6. | Switch to the Channel Box by clicking its icon at the top right corner of the screen  . .
| 7. | Click the Enable field, and select Enable Only After Object Stops from the drop-down options (Figure 13.41).
Figure 13.41. Choosing Enable Only After Object Stops means that the jiggle deformer's effects aren't applied when the object is in motion. 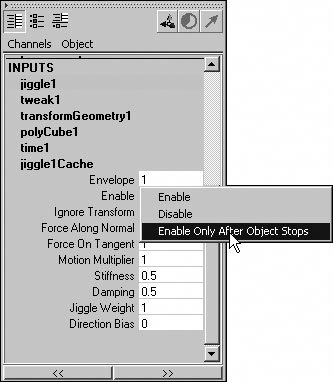
This option prevents the jiggle deformer from causing undesirable motion while the object is moving.
| 8. | Select the object, and create a keyframe for it (press  ) at frame 1. ) at frame 1.
| 9. | Go to frame 10 by clicking it in the Time Slider.
| 10. | Press  , and move the object. If Auto Key isn't on, press again to keyframe the object in its new position. , and move the object. If Auto Key isn't on, press again to keyframe the object in its new position.
| 11. | Make sure the Range Slider is set to display at least 24 frames, to allow enough time to see the full effect of the jiggle deformer.
| 12. | In the timeline, press Play  to view the animation. to view the animation.
The area affected by the jiggle deformer jiggles after the object comes to a stop at frame 10 (Figure 13.42). The jiggle gradually diminishes until the object returns to its normal position (Figure 13.43).
Figure 13.42. When the cube comes to a stop, the upper area of the cube jiggles to an extent determined by the jiggle deformer's weights. 
Figure 13.43. The object returns to its normal position once the jiggling subsides. 
|
|