Sculpt Deformers


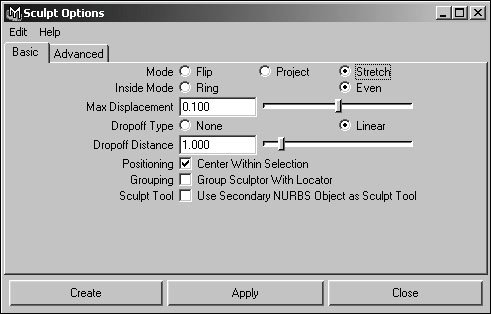
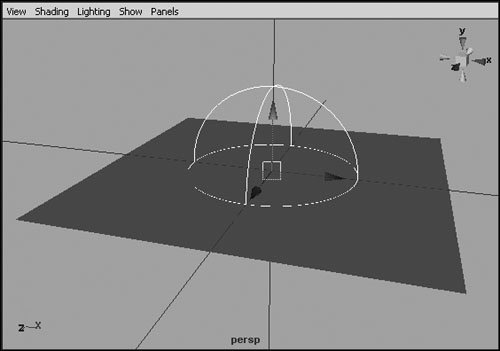
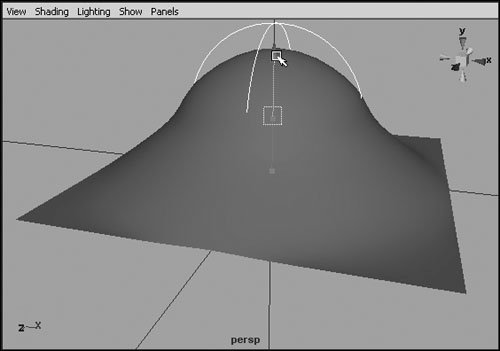
Sculpt deformers use a spherical influence object called a sculpt sphere to deform a surface. Sculpt deformers are useful for creating rounded surface effects when you're modeling. Switching the deformer's mode between flip, project, and stretch produces different surface effects.

To create a sculpt deformer:

1.

Select the surface to be deformed.

2.

From the Deform menu, click the box next to Create Sculpt Deformer.

The Sculpt Options window appears (Figure 13.35).

Figure 13.35. Unlike most deformer attributes, you can only change the mode of a sculpt deformer prior to creating the deformer.


3.

If necessary, choose a different Mode option.

In most cases, the default (Stretch) is fine.

4.

Click Create to create the deformer.

A sculpt sphere is added to your object (Figure 13.36).

Figure 13.36. By default, the sculpt deformer creates a sphere to control the deformation of the object.


5.

Select the sculpt sphere, and move it along the y axis.

The original geometry deforms with it (Figure 13.37).

Figure 13.37. Moving the sculpt sphere causes the surface to move with it, conforming to the sculpt sphere's shape.


Tips

  • You can select and move the locator (crosshairs) to move the geometry over the sculpt object.

  • You can substitute any NURBS object for the default sculpt when creating a sculpt deformation. To do so, -select it after the object to be deformed, and select the Use Secondary NURBS Object as Sculpt Tool check box in the Sculpt Options window.


Maya 7 for Windows and Macintosh(c) Visual Quickstart Guide
Maya 7 for Windows & Macintosh
ISBN: 0321348990
EAN: 2147483647
Year: 2006
Pages: 185

flylib.com © 2008-2017.
If you may any questions please contact us: flylib@qtcs.net