| Maya provides duplication shortcuts for modeling objects with repetitive geometryfor example, a staircase. To model a staircase, you could use one elongated cube and one duplicate action to produce the whole staircase in a minimum number of steps (Figure 5.31). Figure 5.31. This staircase was made with two objects and one duplication. 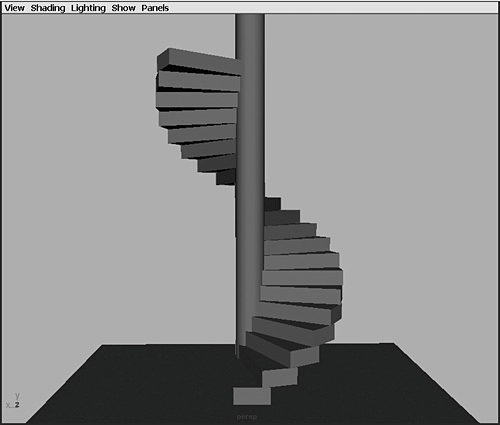
You can use the Duplicate tool for simple object duplications as well as for more complex duplications, including rotations, translations, and scales of an object. What's more, the Duplicate option includes additional valuable tools for mirroring and creating instances of objects. You can duplicate objects either with or without their Inputs, History nodes (Figure 5.32). (See Chapter 1, "Maya Basics," for more information on construction history.) It's important to note, however, that history duplication is set to off by default. Figure 5.32. The sphere's Inputs node holds its editable history attributes. 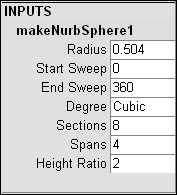
Mirroring and instancing objects In addition to translating objects, you can use the Duplication options to create a mirror image of an object (that is, a reversed copy of the original). Body parts make good candidates for mirroring because many (eyes, ears, arms, and legs) include near-identical versions on the other side of the body (Figure 5.33). If you mirror one of these objectssay an earyou can create a second object in the perfect mirrored position with just a click of your mouse. Figure 5.33. By mirroring an arm, you can save time in modeling a second arm. 
In addition to duplicating and mirroring objects, you can create instances of objectsduplicates that retain a connection to the shape of the original (Figure 5.34). The beauty of this is that you can then edit the original and have each of the instanced objects follow those edits interactively. For example, if you were creating a building with multiple identical pillars, you could create one pillar and then create a number of instances of it to get those additional pillars. If you later decide to change the look of the pillars, all you have to do is edit one, and the rest will be updated automatically. Figure 5.34. Instances of objects will mimic the edits of the first object interactively. 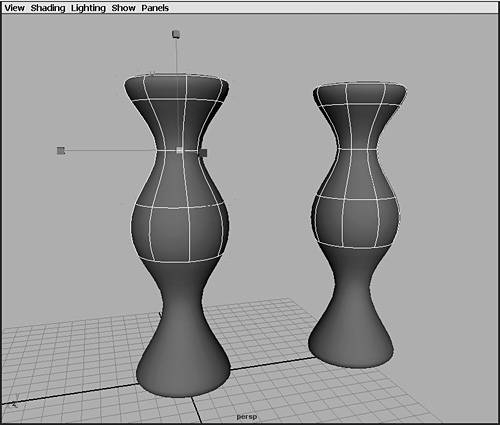
To duplicate an object: 1. | Click an object to select it.
| 2. | From the Edit menu, select the box next to Duplicate (Figure 5.35).
Figure 5.35. From the Edit menu select the box next to Duplicate to open the Duplicate Options dialog box. 
This opens the Duplicate Options dialog box.
| 3. | Enter the amount of duplicates desired in the Number of Copies field (Figure 5.36).
Figure 5.36. Enter the number of duplicates you desire in the Number of Copies field. 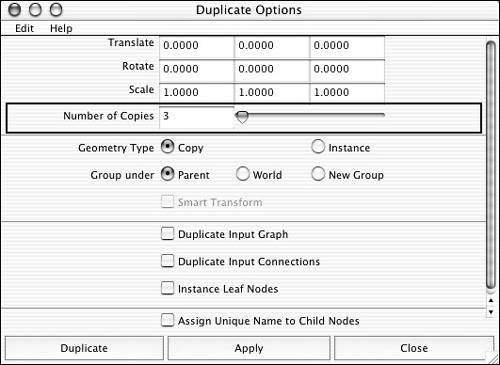
| 4. | Click Duplicate.
The specified number of copies are duplicated and placed on top of each other.
|
To duplicate an object with rotation: 1. | Select an object.
| 2. | From the Edit menu, select the box next to Duplicate.
This opens the Duplicate Options dialog box.
| 3. | Select a rotation amount for each additional copy, and type that amount in the Rotate field of the axis you want to rotate around (Figure 5.37). The fields are, left to right. X axis, Y axis, and Z axis.
Figure 5.37. Enter the amount of rotation desired in the first field of the Rotate attribute. The first field is the rotate X field. 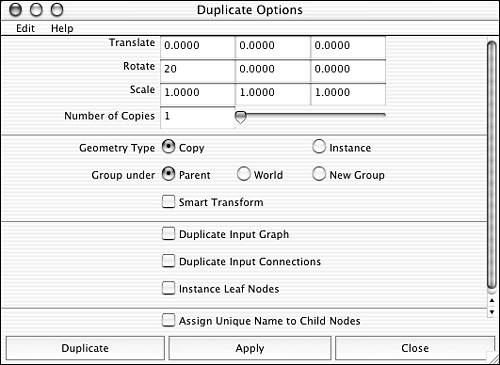
If you've used a sphere, you'll only notice a rotation in wireframe mode.
| 4. | Click the Duplicate button to duplicate the object.
|
 Tips Tips
Now that you have a general idea of how to duplicate an object, let's put the options into action and create a simple staircase. We'll use the same technique we employed to create a simple copy with rotation, but now we'll use the Translate, Rotate, and Scale options together. The key to successfully creating a duplicate with translation is placing the pivot point in the correct position for the objects to rotate around (Figure 5.38). Figure 5.38. The pivot point's placement determines the placement of a duplicated surface. 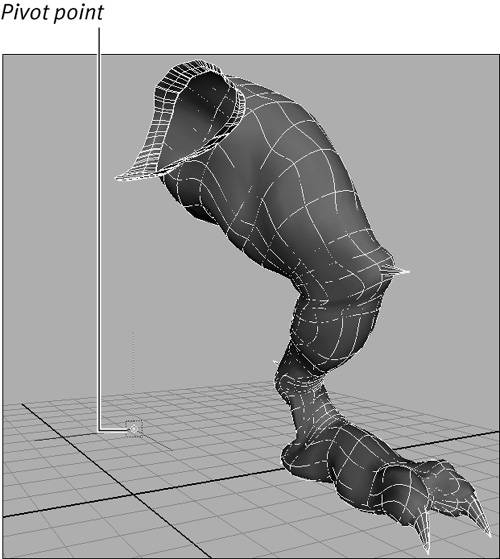
To create a simple staircase: 1. | From the Create menu, select Poly Primitive > Cube.
A cube is created at the origin.
| 2. | Type 0.5 in the Translate Y field in the Channel Box and press  (Figure 5.39). (Figure 5.39).
Figure 5.39. Type 0.5 in the Translate Y field to move the cube's bottom so that it sits on the grid. 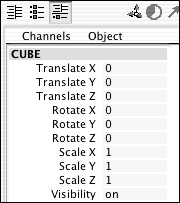
This moves the cube up so that its base sits on the grid.
| 3. | Type 6 in the Scale X field in the Channel Box and press (Figure 5.40).
Figure 5.40. Type 6 in the Scale X field to scale the X axis of the object by six units. 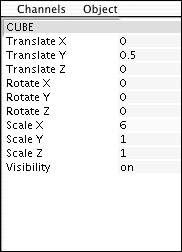
This widens the cube.
| 4. | Press  or click the Move tool icon or click the Move tool icon  in the toolbar. in the toolbar.
| 5. | Press  / / on the keyboard to go into pivot-point edit mode. on the keyboard to go into pivot-point edit mode.
| 6. | Move the pivot point to the far-left edge of the cube, using the X-axis manipulator (Figure 5.41).
Figure 5.41. The pivot point determines the point in space that the staircase will rotate around. 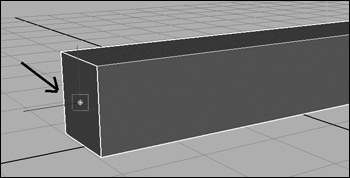
| 7. | Press / again to turn off pivot-point edit mode.
| 8. | From the Edit menu, select the box next to Duplicate to open the Duplicate Options window.
| 9. | Set the Duplicate options as follows (Figure 5.42):
- Translate: 0, 1, 0 This moves each new duplicate up the Y axis one unit. Our cube is one unit high, so each copy will sit on top of the previous one.
- Rotate: 0, 15, 0 This rotates each duplicate 15 degrees more than the previous one around the Y axis.
- Scale: .95, .95, .95 This scales each duplicate proportionately to 95 percent the size of the last. The staircase will get smaller as it goes higher.
Figure 5.42. Set the Duplicate options as shown to properly duplicate the cube. 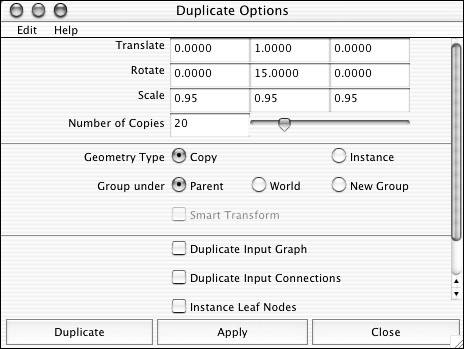
| 10. | Enter 20 in the Number of Copies field.
This will create 20 new steps.
| 11. | Select Duplicate.
The specified number of copies are made and placed on top of each other after being rotated and scaled (Figure 5.43).
Figure 5.43. A staircase can be built with the click of a button if the proper Duplicate options have been set. 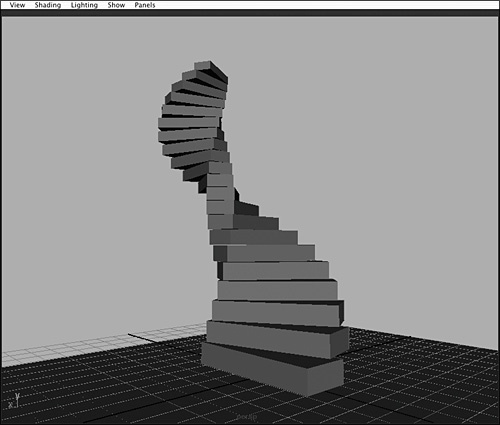
|
Tips It's a good idea to check your options before duplicating. The previous settings will be retained unless you reset them. To return the options to their default settings, with the Duplicate Options window open, select Edit > Reset Settings. Move the pivot point farther down the X axis before duplicating to make room for a pole in the center (Figure 5.44). Figure 5.44. Move the pivot point farther from the original object to vary the center of the staircase. 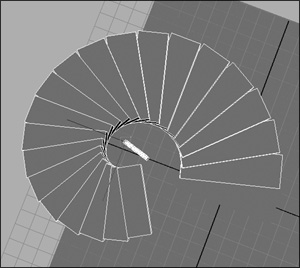
Mirroring an object produces a precise reverse copy of the object. This technique is great for creating one side of a face and then mirroring the face across an axis to complete it (Figure 5.45). The pivot point is used as the mirror axis, which means that the farther the pivot point is from the object, the farther the mirrored copy will be from the original. Often, this command is used in conjunction with instancing so that the user can continue to manipulate the original side of the face and have both sides of the face reflect those changes (Figure 5.46). (We'll take a closer look at instancing after the following task.) Figure 5.45. You can create half a face and then mirror it to complete the rest of the face. 
Figure 5.46. By combining instancing and mirroring, you can update both sides of the face with a single movement. 
You can also use instancing to place objects an equal distance away from an axis line, creating a mirrored copy perfectly placed (Figure 5.47). Figure 5.47. Body parts are ideal for mirroring because they have identical counterparts. The pivot point's placement in the scene determines how far apart the mirrored objects end up. 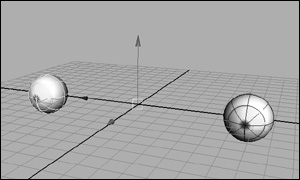
In the following example, we'll mirror a sphere across an axis, as if to create two eyes. To mirror an object: 1. | From the Create menu, select NURBS Primitives > Sphere, or select an object to mirror.
| 2. | Type -2 in the Translate X field in the Channel Box (Figure 5.48).
Figure 5.48. Type -2 in the Translate X field of the Channel Box to move the object two units in the negative X direction. 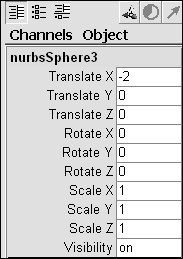
This moves the object two units down the negative X axis.
| 3. | Press or click the Move tool icon in the toolbar.
| 4. | Press / on the keyboard to go into pivot-point edit mode.
| 5. | Holding down  , move the pivot point to the origin (Figure 5.49). , move the pivot point to the origin (Figure 5.49).
Figure 5.49. Move the pivot point to the origin to send the copy an equal distance away from the origin. 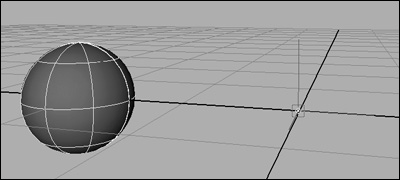
snaps to the grid, which ensures that the pivot point is precisely at the origin.
| 6. | Press / to get out of pivot-point edit mode.
| 7. | From the Edit menu, select the box beside Duplicate.
This opens the Duplicate Options window.
| 8. | Select Edit > Reset Settings in the Duplicate Options window to reset the settings, then set the Scale X field to 1.
| 9. | Select Duplicate.
A mirrored copy is duplicated an equal distance from the pivot point (Figure 5.50).
Figure 5.50. A mirrored copy is duplicated an equal distance from the pivot point. 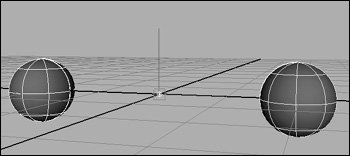
|
Instancing is a great way to save time, both in modeling and in rendering. An instanced object will follow the edits of the original, making instancing ideal for any object that will have identical copies anywhere else in the scene (Figure 5.51). You can still scale, rotate, and move the objects independently once they've been instanced. Figure 5.51. Oil drums are instanced to cut down on the amount of edits that need to be made. The objects are rotated to hide their similar attributes. 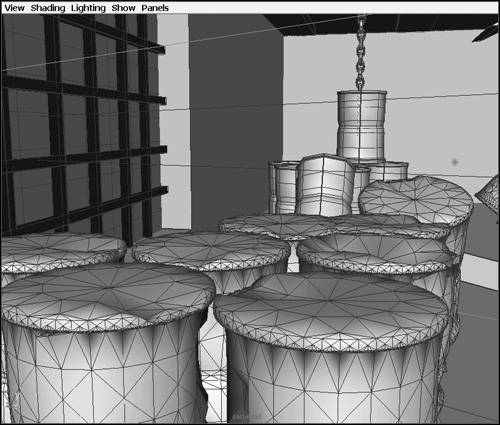
To make an instance of an object: 1. | Select an object by clicking it.
| 2. | From the Edit menu, select the box next to Duplicate.
This opens the Duplicate Options window.
| 3. | Set the Translate X field to 2 and the rest of the Translate and Rotate fields to 0 (Figure 5.52).
Figure 5.52. Set the Translate X field (the field on the left) to 2. 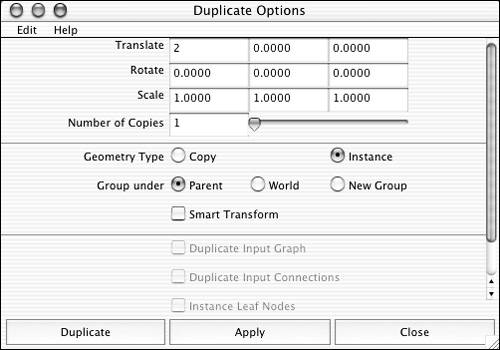
We add a translate here so the copy does not sit directly on top of the original.
| 4. | For Geometry Type, select Instance (Figure 5.53).
Figure 5.53. Selecting Copy simply duplicates the object; however, selecting Instance results in an additional connection to the original object. 
| 5. | Select Duplicate.
The duplicate is now an instance, or virtual copy, of the original.
| 6. | With one of the objects selected, press  to go into component-selection mode. to go into component-selection mode.
| 7. | Marquee-select across the top third of the object to select one of its components (Figure 5.54).
Figure 5.54. Marquee-select across the top third of the object to select CVs to manipulate. 
| 8. | Press , and translate the components in any direction.
Note that the other object follows the translation of the selected surface (Figure 5.55).
Figure 5.55. The other object follows the translation of the selected surface but in the opposite direction, like an object in a mirror. 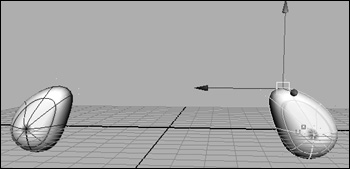
|
Tip
Often, you'll want the construction history to remain attached to an object when you create a copy of it. You can do this by selecting the Duplicate Input Connections check box in the Duplicate Options window. The objects will then share the same Input node, and both the original and the duplicates will be changed by it. To duplicate an object with its input connections: 1. | Select an object that has input connections attached to ita primitive sphere, for example (Figure 5.56).
Figure 5.56. A primitive sphere's Inputs node holds the editable history of the sphere. 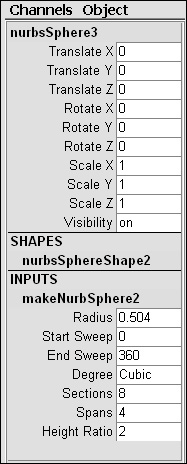
| 2. | From the Edit menu, select the box next to Duplicate.
This opens the Duplicate Options window.
| 3. | Check the box next to Duplicate Input Connections (Figure 5.57).
Figure 5.57. Check the Duplicate Input Connections check box in the Duplicate Options window to copy the input connections to the new object. 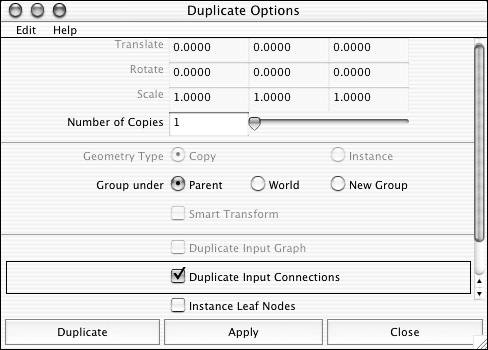
This connects the duplicated object to the Input node of the original. This way, if you alter the Input node of one, the duplicates will be affected as well.
| 4. | Type the number of duplicates you want to produce in the Number of Copies field (Figure 5.58).
Figure 5.58. The Number of Copies slider determines how many copies of the object will be produced. 
| 5. | Click Duplicate.
A copy of the object is made, and its connections are attached to it (Figure 5.59). The new object sits directly on top of the original.
Figure 5.59. When you retain the Inputs node on duplicated objects, you can continue to make individual changes to the surfaces. 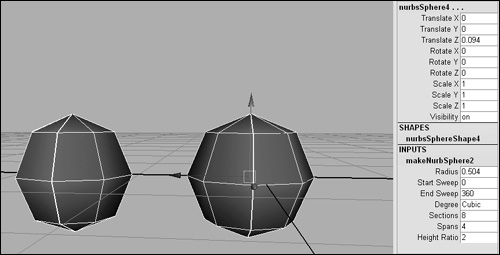
| 6. | Select the Move tool, and move the duplicated object away from the original.
| 7. | In the Channel Box select the End Sweep attribute name, and drag the middle mouse button in the View pane to confirm the connections.
The End Sweep is changed on both objects interactively.
|
The standard Duplication tool can be cumbersome for simple duplications since there are so many options to adjust, or reset, for even a simple duplication. The Duplicate with Translation tool, on the other hand, comes in handy when all you want to do is make a copy and move it down an axis, or if you only want to produce one or two copies. To duplicate an object with simple translation: 1. | Create a primitive sphere.
| 2. | From the Edit menu, select Duplicate with Transform (Figure 5.60).
Figure 5.60. The Edit > Duplicate with Transform menu. 
| 3. | Move the duplicated sphere a few units in the z direction (Figure 5.61).
Figure 5.61. Move the sphere the distance you would like your future duplications to copy. 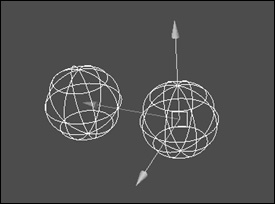
| 4. | From the Edit menu, select Duplicate with Transform.
A new Sphere is created the same distance from the second sphere as that one was from the original (Figure 5.62).
Figure 5.62. Duplicate the object again. 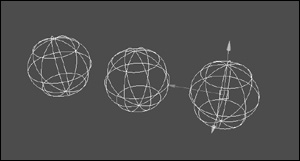
| 5. | Press  . .
Another duplicate is made, an equal distance from the last (Figure 5.63).
Figure 5.63. Each new copy moves down the axis the same amount as the original copy. 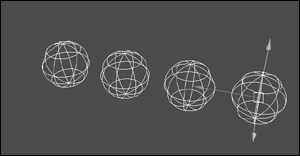
|
|