Using Crystal Reports for VS .NET
Using Crystal Reports for VS .NET
Crystal Reports for VS .NET (from Crystal Decisions, Inc.) is a fully functional reporting tool integrated into the VS .NET IDE. Using this reporting tool, you can programmatically expose your data to end users in virtually any reporting format. Whether your users want reports shown on their Web browser screen with navi gation bars and attractive graphs or exported as spreadsheets, Crystal Reports for VS .NET can fulfill your programmatic reporting needs.
| Note | At this time, Fujitsu Software's NetCOBOL for .NET product provides only limited support in VS .NET for Crystal Reports. Although the Crystal Reports Viewer is available from the VS .NET Toolbox, the Crystal Reports Template and Crystal Reports Gallery are currently not available in COBOL .NET (rather, NetCOBOL for .NET) to create a .NET project. You may want to investigate the alternative of creating Crystal Reports template (.rpt) files outside of your NetCOBOL project. This way, you can add the .rpt files to your NetCOBOL project and bind the .rpt files to your Crystal Reports Viewer control right inside NetCOBOL project. I expect that a later version of Fujitsu's NetCOBOL for .NET product will support the ability to create your Crystal Reports template (.rpt) files while working inside the VS .NET IDE. For now, you will exploit your bilingual abilities and practice using Crystal Reports with VB .NET only. |
A full-featured Crystal Reports product is available to users and developers to use outside the VS .NET IDE. Understand that the two versions of Crystal Reports (the version integrated into VS .NET and the stand-alone version outside of VS .NET) are essentially the same. For your purposes here, the biggest difference between the two versions relates to choosing which user interface you would use to design/create the report template. I limit this chapter's focus to the use of Crystal Reports via the VS .NET interface.
| Tip | You can use existing Crystal Reports templates previously built with the stand-alone Crystal Reports product in your VS .NET project. |
Currently, the Crystal Reports product provided with .NET is a special edition of Crystal Reports v8. It is optimized for .NET. For an extra fee, you can upgrade to the recently released Crystal Reports v9. Both v8 and v9 offer upgrade options that allow you to increase the number of concurrent licensed connections to higher levels that may be more appropriate for your production needs. Consider visiting the Crystal Decisions Web site for further licensing and upgrade details.
For now, the Crystal Reports v8 version provided with VS.NET is certainly ade quate for your training, prototyping, and small-scale production deployments. To help introduce you to this great .NET reporting feature, I discuss the following topics in the sections that follow:
-
The Crystal Reports class library
-
The Crystal Reports template
-
The Crystal Reports Viewers
| Note | You will often see the acronym CR used when you research the topic of Crystal Reports. Although I would love to tell you that this distinguished acronym stands for the initials of my name , Chris Richardson, I must admit that it really stands for Crystal Reports. |
The Crystal Reports Class Library
Once you start adding Crystal Reports assemblies into your Windows and Web applications, you will make available an entire additional class library. This section presents a brief introduction to this special class library. The next section covers one of the easiest ways to incorporate Crystal Reports assemblies into your application.
For now, it will help to be somewhat familiar with the Crystal Reports class library, as provided by Crystal Decisions. As shown in the following list, the Crystal Reports class library represents a handful of namespaces:
-
CrystalDecisions.CrystalReports.Engine: This namespace contains classes that collectively provide support to the Crystal Reports reporting engine. I further discuss this namespace in the section "The Crystal Reports Template."
-
CrystalDecisions.ReportSource: This namespace provides the ICachedReport interface. This interface provides caching support between either of the Crystal Reports Viewers (Web Forms Viewer or Windows Forms Viewer) and the Crystal Reports reporting engine.
-
CrystalDecisions.Shared: Using the collection of classes provided in this namespace, you are able to customize, configure, and control your Viewer and ReportDocument objects.
-
CrystalDecisions.Web: Specifically, the CrystalReportViewer and CrystalReportViewerBase classes are provided in this namespace. I discuss these two classes in the section "The Crystal Reports Viewer."
-
CrystalDecisions.Web.Services: This namespace provides one class, ServerFileReportManager , which you would use when you want to expose Crystal Reports as a Web service. I discuss this topic in the section "Electronic Report Delivery."
-
CrystalDecisions.Web.Services.Enterprise: This namespace provides one class, EnterpriseReportManager , which you would use when you want to consume a Crystal Reports report file (.rpt) that has been exposed as a Web service. I discuss this topic in the section "Electronic Report Delivery."
-
CrystalDecisions.Windows.Forms: The Windows Forms Viewer control is provided by this namespace. The CrystalReportViewer class in this namespace is virtually identical to the one that is used for a Web application. Using an ASP.NET Web application, I discuss the CrystalReportViewer class in the section "The Crystal Reports Viewers."
As the prefix of each Crystal Reports namespace indicates, this product (the group of assemblies, the class library, and so forth) is provided by Crystal Decisions. Hence, you will be prompted to register your Crystal Reports product the first time you attempt to use it. Do not worry, the Web-based registration is free and painless.
Let's now turn to look at one of the ways you can add the Crystal Reports assemblies into your application.
The Crystal Reports Template
A report built with the Crystal Report Engine is essentially a visual representation of one specific class: ReportDocument . This class is provided by the CrystalDecisions.CrystalReports.Engine namespace. Although you have a few ways to go about creating a Crystal Reports report (instantiating the ReportDocument class), you will use the design-time creation approach here. This technique results in a report file (.rpt) being saved in your application folder (visible in the VS .NET IDE Solution Explorer).
To begin, you will use the VS .NET IDE to create a new ASP.NET Web appli cation. Using VB .NET as your language choice, [2] name the project CrystalReportsExampleVB. Next, follow this series of steps to incorporate a Crystal Reports template into the CrystalReportsExampleVB project:
-
Add a new item to the project in any of the following three ways: press Ctrl-Shift-A; select Project Add New Item from the Standard toolbar; or select the CrystalReportsExampleVB project in the Solution Explorer window and access the pop-up context window by right-clicking and then selecting Add Add New Item. As shown in Figure 16-1, you will select the "Crystal Report" template from the Templates area of the Add New Item dialog box.
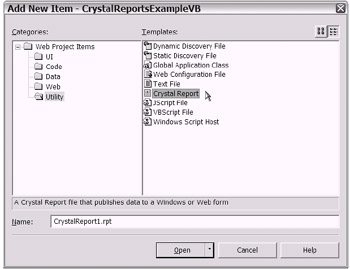
Figure 16-1: Selecting the Crystal Report template from the Add New Item dialog box -
Choose an "expert" from the Crystal Report Gallery (see Figure 16-2). Several Crystal Report experts are available. Experts are similar to what other software packages call "wizards" or "designers." For now, use the default setting of Standard. Click OK.
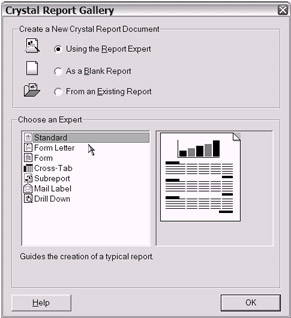
Figure 16-2: Selecting an "expert" from the Crystal Report Gallery dialog box -
Connect the report template to a data source. [3] You will use the Pubs sample SQL Server database. Choose the Data tab and select OLE DB (ADO). Then, follow the next few dialog box prompts to establish your connection to the Pubs sample SQL Server database. As shown in the following figures (Figures 16-3 and 16-4), the prompts are rather simple. Click Finish at the last Data tab prompt.
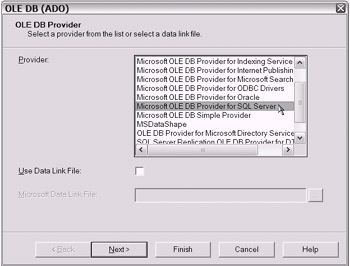
Figure 16-3: Selecting the Microsoft OLE DB Provider for SQL Server option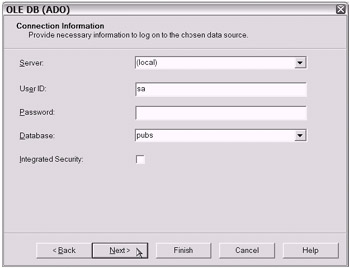
Figure 16-4: Entering the appropriate connection information to connect to the Pubs sample SQL Server databaseNote You can use databases other than the Pubs sample SQL Server database. Additionally, you can use nondatabase sources.
-
Insert table(s) from the data source. You will use the "sales" table from the Pubs sample database (see Figure 16-5). After you insert the sales table, click Next.
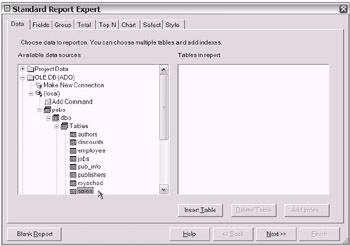
Figure 16-5: Inserting the sales table from the Pubs sample database -
On the Fields tab, select fields and modify the column headings. Click Add All to add all the available fields and modify the column headings (see Figure 16-6). Click Next.
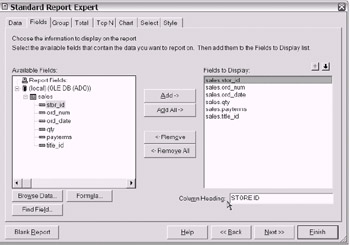
Figure 16-6: Adding all available fields and modifying the column headings -
On the Group tab, specify any grouping. For your sample application, add the stor_id field to the Group By box (see Figure 16-7). Click Next.
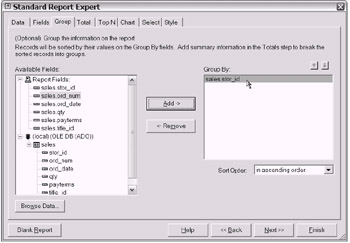
Figure 16-7: Adding the stor_id field to the Group By box -
On the Total tab, specify any fields to use for summarizing. You will use the "qty" field. Click Finish.
Once you have clicked Finish to complete the Crystal Report Expert steps, you will be returned to your open project in VS .NET. You will notice that a few things have changed:
-
The ReportDocument file (.rpt) and several "CrystalDecisions" references have been added to your project (as shown in Figure 16-8).
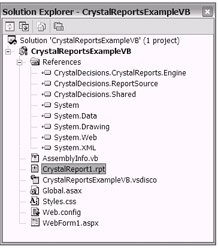
Figure 16-8: The VS .NET IDE Solution Explorer window showing the Report file and Crystal Decisions references -
The Field Explorer window will be displayed. You can use this window to further customize the fields settings (see Figure 16-9).
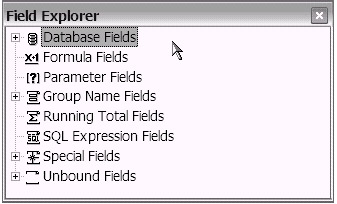
Figure 16-9: The VS .NET IDE Field Explorer window -
The ReportDocument file (.rpt) is displayed. You can use this page to adjust the placement, names , properties, and so forth of the fields (see Figure 16-10).
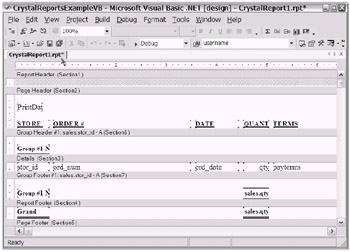
Figure 16-10: The ReportDocument file (.rpt)Note If you use Solution Explorer's Show All feature, you will be able to view the code-behind file (.vb) that is created for the ReportDocument file (.rpt).
That completes the steps of adding a Crystal Reports report template (or ReportDocument file) to your project. In the next section, you will walk through the steps needed to add a Crystal Reports Viewer to your sample project. Using the Viewer, you will be able to view the ReportDocument file during runtime, with data displayed.
| Tip | This is a good time to save your CrystalReportsExampleVB sample project. |
The Crystal Reports Viewers
It is easiest to describe the Crystal Reports Viewer as just another control existing in the VS .NET Toolbox that serves the specific purpose of displaying Crystal Reports's ReportDocument file. The Crystal Reports Viewer CrystalReportViewer class is first derived from the CrystalReportViewerBase class. The base class and namespace of the CrystalReportViewerBase class actually varies.
When used in a Windows application, the Crystal Reports Viewer (using the CrystalDecisions.Windows.Forms namespace) is a Windows control that inherits from the System.Windows.Forms.Control class as one of its base classes. On the other hand, when the Crystal Reports Viewer is used in a Web application (using the CrystalDecisions.Web namespace), it is a Web server control deriving from the System.Web.UI.WebControls.WebControl class.
Fortunately, both the Windows and Web versions of the Crystal Reports Viewer are basically identical. You simply need to learn one. For the discussion here, I refer to the Web version of the Crystal Reports Viewer used in a Web application.
You will add a Crystal Reports Viewer to the WebForm1.aspx file (in the CrystalReportsExampleVB project) to demonstrate its use. To accomplish this, perform the following three steps:
-
Add a CrystalReportViewer server control from the VS .NET Toolbox. As shown in Figure 16-11, the CrystalReportViewer control is available in the Web Forms tab of the VS .NET Toolbox.
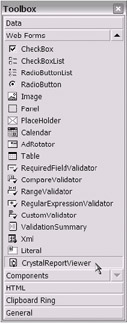
Figure 16-11: The CrystalReportViewer server control in the VS .NET Toolbox -
Once you've added the CrystalReportViewer server control to the Webform1.aspx file, you should observe the additional "Crystal" references that are added, as shown in the VS .NET Solution Explorer window in Figure 16-12.
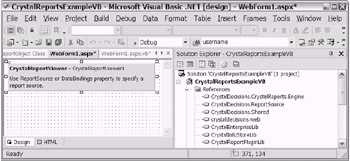
Figure 16-12: The CrystalReportViewer server control has been placed onto the Webform1.aspx file. -
Bind the CrystalReportViewer server control to the ReportDocument file. The following code snippet shows the few lines of code used to bind the Viewer to its "source." This code will be added to the PageLoad method in WebForm1.aspx's code-behind file:
With CrystalReportViewer1 .DisplayGroupTree = False .ReportSource = Server.MapPath("CrystalReport1.rpt") .DataBind() End With
Once you've added the preceding few lines of code, you can execute the CrystalReportsExampleVB sample project. If all went well, the report will be shown in your browser window (see Figure 16-13).
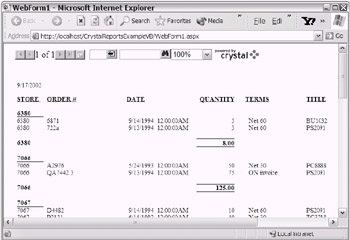
Figure 16-13: The report as shown in the browser window when executing the CrystalReportsExampleVB sample application
| Tip | There are many options available to customize the Crystal Reports Viewer. The Crystal Reports class library will be a helpful source when you want to know the additional options that are available to further customize the Viewer. Additionally, please take advantage of the references provided at the end of this chapter in the "To Learn More" section. |
Potential Exception Messages
During my initial development with Crystal Reports for VS .NET, I received a few exception messages. The exception messages were the result of both user (me) error and configuration concerns. Nevertheless, I was able to successfully address each exception. The following should prove helpful in the event that you have the same experience:
-
"LogOnException: Logon failed" message: After receiving this error message, I noticed that my SQL Server Service was not "started." Once I corrected that problem, this error message did not reappear.
-
"Access to the path C:\Program Files\Microsoft Visual Studio .NET\Crystal Reports\Viewers is denied " message: After receiving this error message, I researched the Crystal Decisions Knowledge Base Web site (see the "To Learn More" section at the end of this chapter for the URL) and located article c2010763. According to this article, "resetting" your VS .NET Toolbox (right-click the Toolbox and select Customize Toolbox Reset) "adds the ASPNET account with read and write permissions to the C:\Program Files\ Microsoft Visual Studio .NET\Crystal Reports\Viewers folder". I also experimented with my local Access Control List setup for the Viewers folder (trying a "shared" security setting) and had good results.
-
"LoadSaveReportException: Error in File . . . Access to report file denied" message: I received this error when I attempted to "load" the report file for export (see the section "Electronic Report Delivery" later in this chapter). Researching the Crystal Decisions Knowledge Base Web site brought me to article c2010773, which suggests "to resolve this error message, set the export destination folder to a different location or grant the ASPNET user full read/write access to the destination folder".
| Caution | One way to give the ASPNET user full read/write access is to modify your Machine.config file. However, do so with extreme caution. Make sure to back up your XML-based Machine.config file before attempting any updates. Generally speaking, this approach is acceptable for stand-alone, development-mode scenarios. Your XML-based Machine.config file is located at C:\WINNT\Microsoft.NET\ Framework\<version number>\CONFIG. In this file, the setting for ASPNET's userName="machine" setting can be changed to user- Name="SYSTEM". Again, this is generally acceptable in stand-alone, development-mode scenarios. A more appropriate solution for granting "permissions" to your assembly will require an introduction to the topic of code access security. I further discuss this security topic in Chapter 18. In the meantime, feel free to take advantage of the code access security Web reference provided at the end of this chapter in the "Web Sites" subsection of the "To Learn More" section. |
You have now seen how to create a Crystal Reports ReportDocument file and how to display that file using the Crystal Reports Viewer. I liken the HTML-based browser report display to a type of report delivery, perhaps electronic distribution. In the next section I expand on the topic of electronic report distribution (using Crystal Reports for VS .NET).
[2] As noted earlier, COBOL .NET currently does not provide full support for the Crystal Reports feature. I use VB .NET for the following sample application demonstration. Perhaps you can consider this to be one of the reasons why being bilingual is a good idea.
[3] In Chapter 11, I introduced the sample databases packaged with a typical SQL Server database installation. I used the Pubs sample SQL Server database in this demonstration. You can use other databases. In fact, you can even connect to nondatabase data sources.
EAN: 2147483647
Pages: 204