Task 3: Create User Accounts
|
|
When the OoB management network and its associated routing are confirmed to be operational, you will likely want to configure various user accounts. These accounts should make use of both local and remote authentication, and should also verify your ability to use allow and deny commands to provide local control of user authorization levels.
In the example shown in Table 1.1, the following accounts (and permissions) will be configured to demonstrate typical user account configuration and validation techniques.
| User | Password | Class/Permission | Notes |
|---|---|---|---|
| root | root | superuser | SSH with 1024-bit RSA public key authentication. Local password and RADIUS authentication criteria are the same as for user lab. |
| lab | lab | superuser | RADIUS/local password with automatic login in the event of RADIUS failure. RADIUS secret is jni. |
| ops | operator | Can view standard show interfaces output and conduct ping testing only. | RADIUS/local password, 5-minute inactivity time-out. |
Configuring the Root Account
As noted in Table 1.1, the root user's account must be configured for SSH public key and RADIUS/local password authentication. The following commands configure the root account with the required SSH version 1 RSA public key (version 2 RSA keys are not supported at the time of this writing so a version 1 key must be loaded). It is important to note that the operator must manually add the opening and closing quotes ("") so that white spaces in the key string do not cause syntax errors if the key is pasted from a terminal buffer. You could also choose to edit the ~/.ssh/authorized_keys file manually to add the public RSA key (by escaping to a shell and using vi), or you could transfer the key file to the router using the load-key-file option with an appropriate URL, such as ftp://user:password@hostname/file-name. However, the CLI paste approach demonstrated here is generally considered to be the most straightforward:
[edit system root-authentication] root@r1# set ssh-rsa "key-data-pasted-from-terminal"
And now, to enable the SSH service on the router, which by default will support both SSH version 1 and 2:
[edit system] root@r1# set system services ssh
Since the use of SSH public key authentication for the root account has no effect on local console-based logins, we also set the required root password:
[edit system] root@r1# set root-authentication plain-text-password New password: Retype new password:
The following is the resulting configuration for the root account and the SSH service:
[edit system] root@r1# show root-authentication encrypted-password "$1$n/lx3$RNtF9uDlCsMsAL8gi/qA31"; # SECRET-DATA ssh-rsa "1024 65537 14507521839282798432482521835023055326381401663452058669080886491465544700784392 81114055822376198290722320666268020211763429857348456378696103199986915461962494 35479692894437417780898017483440313841107367122670080439972894195679320796753410 731222833899141869327583231170906047985814682544941905107416839803283 root"; # SECRET-DATA lab@r2# show system services ssh; telnet;
Verify the Root Account
To confirm operation of the root account, you should test local authentication using the root password, and test SSH authentication using an appropriately configured session on your terminal emulator. The SSH session settings used in the SecureCRT application are shown in Figure 1.2; it should be noted that RSA (public key) has been selected as the authentication method (as opposed to password-based authentication).
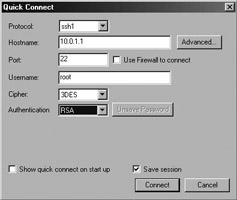
Figure 1.2: SSH session settings for the root account
Generating SSH Key Pairs
The method used to generate your own SSH public/private key pair will vary based on SSH version and the particular client software being used.
For a Unix-like operating system Generate a 1024-bit SSH version 1 RSA key pair using the ssh-keygen program with the -b flag set to 1024 and the -t flag set to rsa1. By default, the resulting public key will be written to $HOME/.ssh/identity.pub. The contents of this file would then be loaded into the router using the techniques described in the section "Configuring the Root Account" earlier in this chapter. Typical ssh-keygen output is shown here:
[harry@dr-data harry]$ ssh-keygen -b 1024 -t rsa1 Generating public/private rsa1 key pair. Enter file in which to save the key (/home/harry/.ssh/identity): Enter passphrase (empty for no passphrase): Enter same passphrase again: Your identification has been saved in /home/harry/.ssh/identity. Your public key has been saved in /home/harry/.ssh/identity.pub. The key fingerprint is: d1:ac:20:9b:f6:82:04:06:09:69:11:57:66:8d:17:be harry@dr-data.net
After loading the resulting public key into the router, SSH connectivity can be tested:
[harry@dr-data harry]$ ssh -l root -1 10.0.1.1 The authenticity of host '10.0.1.1 (10.0.1.1)' can't be established. RSA1 key fingerprint is 10:e1:82:2f:6b:c3:9c:5e:84:d5:6c: 0b:df:1c:3d:ea. Are you sure you want to continue connecting (yes/no)? yes Warning: Permanently added '10.0.1.1' (RSA1) to the list of known hosts. Enter passphrase for RSA key '/home/harry/.ssh/identity': Last login: Wed May 15 17:38:58 2002 from 10.0.1.201 --- JUNOS 5.2R2.3 built 2002-03-23 02:44:36 UTC root@r1%
In this example, the -l switch was needed to indicate that the remote login name should be root instead of the user's local Unix login name, which would be harry in this case. The -1 was also needed to indicate that SSH version 1 should be used, because the SSH configuration on this author's Linux machine causes it to first try SSH version 2.
For the SecureCRT application Generate a key pair by clicking the Advanced button in the SSH Quick Connect dialog box, followed by selecting the Create Identity File option in the resulting Advanced SSH Options dialog box, which will open the SecureCRT Key Generation Wizard. The wizard will guide you through the remaining key generation steps. When the Wizard completes, you will be prompted to enter the directory and key filenames for your newly generated secret and public keys. When using SecureCRT version 3.1.2, the default location and filename for the secret key is C:\Program Files\SecureCRT 3.0\identity. The public key will be stored in the same directory with a .pub file extension. As described in the previous "For a Unix-like Operating System" section, the contents of this public key file should be loaded into the router using the procedures outlined in the "Configuring the Root Account" section earlier in this chapter.
You will be asked to accept a 'new host key' when testing SSH connectivity to the router for the first time, as shown in Figure 1.3.
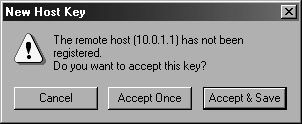
Figure 1.3: Accepting a new host key
After accepting the host key, you will be prompted to enter the pass phrase associated with the session's private key. When the correct pass phrase is entered, you should be logged in as the root user and presented with a shell prompt.
|
|
EAN: 2147483647
Pages: 132