Adding Dreamweaver Behaviors
Dreamweaver 8 also includes several prewritten JavaScript behaviors to supply a variety of different client-side interactions. These include routines to perform image rollovers and DHTML functions. There are two routines that are of particular interest to Flash developers: the Check Plugin behavior and the Control Shockwave or Flash behavior.
| Caution | Unfortunately, browser compatibility on the Mac side for JavaScript behaviors is not as robust as it is for Windows. For a complete list of features supported by specific browsers on Mac and Windows, visit www.macromedia.com/go/tn_14159. It is always a good idea to test any JavaScript on all the target browsers that you expect to support. |
Check Plugin Behavior
While this is not the most foolproof way of detecting Flash, it's quick and easy to implement.
-
Create a new Dreamweaver document or open an existing one.
-
Select an element on the page such as an image or a link. If you want to apply the behavior to the entire page, click the <body> tag in the tag selector at the bottom left of the Document window.
-
In the Behaviors tab of the Tag inspector panel (Window ð Tag inspector, or Alt+Shift+F9), click in the event column on the left-hand side to invoke a drop-down menu icon that you can use to select an event that will trigger the Check Plugin behavior (after it is added), as shown in Figure 38-18.
-
Next click the Add (+) button and select the Check Plugin behavior from the drop-down list, as shown in Figure 38-19.
-
The Check Plugin dialog box opens, as shown in Figure 38-20. Select Flash from the Plugin drop-down menu.
-
In the If found, Go to URL field, enter the path to the page that you want to load if the visitor has the Flash Player. This can be a relative or an absolute address.
-
In the Otherwise, go to URL field, specify an alternative page to go to if the visitor does not have the Flash Player. This can be a relative or an absolute address.
-
Click OK. The Behaviors panel should show the Check Plugin behavior and the event on which it happens, typically the onLoad event, as shown in Figure 38-21.
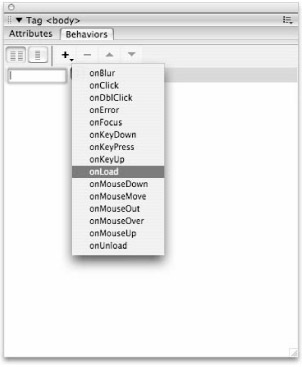 Figure 38-18: Select an event to associate with a behavior — the most common event for the Check Plugin behavior is onLoad.
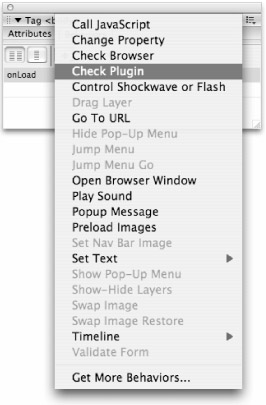
Figure 38-19: Click the Add button (+) in the Behaviors panel to select from a list of common JavaScript and DHTML functions.
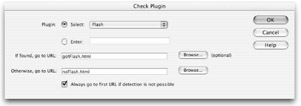
Figure 38-20: The Check Plugin behavior enables you to apply simple Flash detection easily.
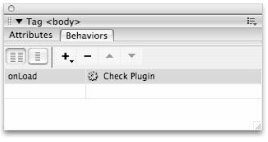
Figure 38-21: The event associated with the behavior can be changed, but onLoad is generally used for the Check Plugin behavior.
Should you need to modify the behavior settings, double-click the behavior text in the Tag inspector to reopen the Check Plugin dialog box. You can also click once in the event text area of the Tag inspector to activate the drop-down menu used to select a different trigger event for the behavior.
Control Shockwave or Flash Behavior
This enables simple JavaScript control of a Flash movie, telling the movie to Play, Stop, Rewind, or Go To a certain frame. You can apply these behaviors to regular HTML images or hyperlinks and use them to control the timeline of your Flash movie.
-
Add a Flash movie (.swf) to your Dreamweaver page.
Note This behavior is dimmed in the Behaviors panel if there is no Shockwave or Flash content in the current HTML document.
-
Add a name for the Flash movie in the Property inspector. Dreamweaver requires an instance name for the item that will be targeted with a behavior — if you don't add one now, you will be prompted to return to the Property inspector when you try to add the behavior (in Step 4).
-
Typically, you'd use images or hyperlinks to control the Flash movie. If you want to use images, select the image in your HTML layout. If you want to use text, make sure you at least have a number sign (#) in the link section of the Property inspector and that the text is selected in the Code or Design view of the Document window.
Note Behaviors cannot be added to plain text, but you can add a behavior to a link. The best way to attach a behavior to text is to add a null link (or a link that won't take the user to another document). Entering a number sign (#) in the Link field of the Property inspector will work to convert the text into a null link, but it is preferable to enter javascript:; (include the colon and the semicolon) because using a number sign will cause some browsers to jump to the top of the document when the user clicks the null link.
-
In the Behaviors tab of the Tag inspector panel (Window ð Behaviors), click the Add (+) button and choose Control Shockwave or Flash. The Control Shockwave or Flash dialog box appears, shown in Figure 38-22.
-
If you have more than one movie on your page, choose the correct one from the Movie drop-down list. Choose either Play, Stop, Rewind, or Go to frame. When choosing Go to frame, enter the frame number.
-
Click OK. Check that the event listed in the Behaviors panel is correct, or click in the event name field to access the drop-down menu and select a different event (as shown in Figure 38-23).
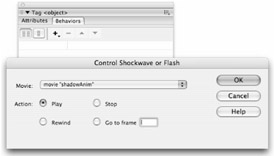
Figure 38-22: The Control Shockwave or Flash dialog box is used to set playback options that will be applied to the Flash timeline when the behavior is triggered.
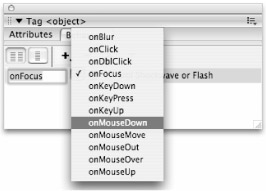
Figure 38-23: Use the drop-down menu in the Behavior panel as needed to change the event associated with the Control Shockwave or Flash behavior.
| Caution | These behaviors may not test successfully on a local drive because they are intended to work from a Web server. If you have not yet defined a testing server, upload your files to a temporary subfolder on any Web server that you have access to so that you can do live testing with different browsers. |
When you test your file in a browser, you may run into the Global Security Settings warning. Don't be alarmed. Simply follow the instructions for modifying your FlashPlayer Security settings with the panel on Macromedia's Web site, as shown in Figure 38-24.
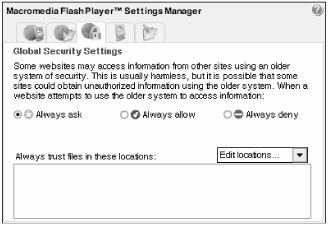
Figure 38-24: The FlashPlayer Settings Manager on Macromedia's site is used to set "trusted locations" on your system for testing purposes, which will enable JavaScript behaviors to control Flash content in your Dreamweaver pages without triggering a warning dialog box.
Another way of making sure that JavaScript will be able to control the Flash content is to set a Parameter for any Flash items that you want to target. Select the Flash preview in the Design window, then click the Parameters button in the Property inspector to launch the Parameters dialog box. As shown in Figure 38-25, enter the Parameter name allowScriptAccess in the left column and a Value of always in the right column. This will automatically add a new line of code to the existing parameters (defined in the Code window) for the selected Flash content.
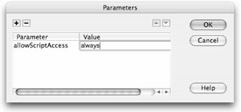
Figure 38-25: You can manually add an allowScriptAccess parameter in the Parameter dialog box to ensure JavaScript commands successfully target inserted Flash content.
| Web Resource | For more about JavaScript behaviors and events in Dreamweaver, check the Help documentation (search for "Using JavaScript Behaviors") and Macromedia's Dreamweaver support area at www.macromedia.com. Other behaviors are also available for download at the Macromedia Exchange at www.macromedia.com/cfusion/exchange/index.cfm. |
EAN: 2147483647
Pages: 395