Using Flash Elements
Dreamweaver 8 ships with only one example of a Flash element, but it is a preview of what designers building hybrid Flash-HTML applications can do with custom components. In this section, we go through the steps for using the Image Viewer Flash element (originally introduced with Flash MX 2004).
| Note | The topic of authoring custom Flash elements (also called components or objects) is beyond the scope of this chapter, but the API Reference in the Dreamweaver Help Center is a good place to start (Help ð Dreamweaver API Reference). Look under Utility APIs ð Flash Integration. |
| Web Resource | Visit the Macromedia Developer Center to find articles and tutorials on Flash integration, as well as many others related to expanding Dreamweaver and Flash, at www.macromedia.com/devnet. |
Inserting the Picture Viewer Flash Element
Inserting a Flash element is just as easy as inserting one of the Flash objects we described in the previous section; however, there is a separate category for elements in the Insert bar. Choose Flash Elements from the Category menu and you will see one lonely icon for the Image Viewer, as shown in Figure 38-13. The good news is that Image Viewer is a fun, functional example and there is plenty of room for you to add more Flash elements as they become available.
![]()
Figure 38-13: Image Viewer is the first Flash element available in Dreamweaver, but the menu system has been designed to support the addition of more custom components.
| Note | At the time of this writing, not many new Flash elements for Dreamweaver 8 were yet available, but keep an eye on the Dreamweaver Exchange. Hopefully, we can look forward to a whole range of new Flash elements from developers taking advantage of the tight integration between Flash 8 and Dreamweaver 8. |
When using a Flash element that interacts with multiple files (such as the bitmaps that you are going to load into the Image Viewer), the organization of your files becomes very important. To begin the example for this section, we actually defined a new site called Image Viewer so that we could specify the location for the HTML files, Flash file, and source image files. The HTML file and the .swf file generated by Dreamweaver can both be stored in our main directory, and the JPEGs are all stored in a subfolder called images. This is a simplified structure, and a realworld project might include many more files, but it is a good start for a logical system.
| On the CD-ROM | You can find all of the files for the Image Viewer example described in this section in the FlashElement subfolder in the ch38 folder on the CD-ROM. To view the final result, open flowerViewer.htm in a browser window. |
After you define a site (or specify a location for saving your various files), create a new HTML document as we described for the Flash object examples earlier in this chapter. To insert the Image Viewer Flash element, follow these steps:
-
Load the Flash Elements Category in the Insert bar and click the Image Viewer icon, or choose Insert ð Media ð Image Viewer from the application menu.
-
A Save Flash Element dialog box appears that enables you to specify a location and to enter a name for the .swf file that will be generated from the Image Viewer Flash element in Dreamweaver. We used the name flowerGallery for our example file. Click Save to insert the Flash Viewer element into your HTML page and close the dialog box.
-
A gray preview with a Flash element icon should appear in the Design view of your Dreamweaver document, and if you look at the Code view, you will notice that a chunk of HTML has been added to the file to define the various parameters of the Flash element.
Using the Tag Inspector to Define Flash Element Parameters
Although you can edit or modify the parameters for a Flash element manually in the Code window, it is much easier to use the integrated Tag inspector that was first introduced with Dreamweaver MX 2004:
-
Open the Tag inspector from the application menu (Window ð Tag Inspector) or use the shortcut keys (Shift+Option+F9 or Shift+Alt+F9).
-
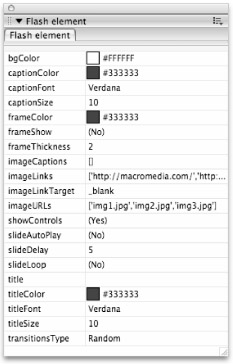
Select a placed Flash element in the Design view of your Document window to load the relevant editable parameters into the Tag inspector — the Flash element tab also becomes visible, replacing the various tabs related to HTML elements. When the Image Viewer element is selected, the default list of parameters in the Tag inspector can be set or modified, as shown in Figure 38-14.

Figure 38-14: The Tag inspector provides a quick interface for modifying the parameters of the Image Viewer Flash element.
The settings for the Image Viewer enable you to create an interactive slide presentation from a series of images and to choose a range of options for controlling the playback of the file and the animated transitions. These settings save an enormous amount of time and the end result is a clean, professional-looking slide presentation with cool transitions and a functioning UI. Aside from the standard Dreamweaver settings for fonts, colors, border elements, and links, there are pace, style, and playback options for the Flash SWF presentation generated by the Image Viewer Flash element. Although you can make choices for these settings before you load in a series of images, it makes sense to choose your images first so that you have something to look at when you test the file.
Working with Image Arrays
If you are a code-oriented designer (or a design-savvy coder), the title of this section will not sound intimidating, but if you are the type of person who usually runs from anything that sounds like "programming," don't give up yet. The real beauty of the simple interface-based architecture of Flash elements is that it makes it very easy for almost anyone to edit little pieces of the code used to generate an interactive Flash movie without having to get overwhelmed by a lot of syntax or a complicated menu system. All you need to know is that the imageURL line in the Tag inspector controls what images load in the Image Viewer and the order in which they appear.
-
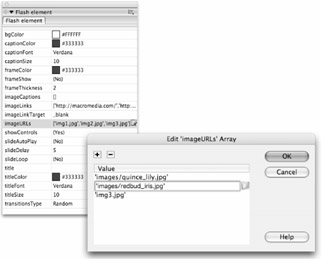
To specify the images that will be displayed in your Image Viewer presentation, click once in the text area to the right of the imageURLs parameter listing. This makes the text field active so that you can manually edit the array, but it also makes a very small icon visible at the far right of the text of the Tag inspector. This button invokes the Edit Array dialog box, as shown in Figure 38-15.
-
As each line of text in the dialog box is selected, a folder appears to the right that you can click to browse to a specific image that you want to load into the Image Viewer presentation.
-
By default, three items are listed in the array; to add or remove image URLs, simply click the small plus (+) or minus (-) buttons at the top of the dialog box.
-
After you have specified a list of images to load into your presentation, click OK to close the dialog box.

Figure 38-15: The Edit Array dialog box makes it possible to specify the display order for images you want to load in the presentation by typing the path to each image or by browsing to select them one by one from your file list.
The other two (optional) arrays that relate to the images you have added to the presentation are:
-
imageCaptions: Click in this parameter line to activate the text field. You can type in any name that you want for each of the images, but pay careful attention to the syntax of the array if you are typing directly in the Tag inspector. If you prefer to add captions in the Edit Array dialog box, click the small icon that appears to the right when the imageCaptions parameter line is active. Captions can be entered without array syntax and Dreamweaver will automatically add the syntax after you click OK to load the caption text into the imageCaptions array. The captions must be in the same order as the image names appear in the imageURLs array so that the correct text appears with each image.
-
imageLinks: The imageLinks array is used to add links to the images in your presentation. URLs and Links serve different purposes in these image arrays. Whereas imageURLs are used to specify the path to the image that is visible in the Image Viewer, imageLinks are used to specify a link to another HTML page or Web address that can be triggered by clicking one of the images. The imageLinks array can be edited in the same way as the imageURLs array, and the link addresses should also appear in the same order as the image names so that they are linked correctly.
Previewing Animated Flash Elements
After you have added some images — and perhaps some captions and links — to load into the Image Viewer, you can preview the animated presentation in the following two ways:
-
Get a live preview in the Dreamweaver authoring environment by selecting the preview in the Design Code and then clicking the Play button in the Property inspector. The Play button is actually a toggle that you can use to play and stop the preview.
-
Load the presentation into a browser window by choosing an available browser from the File ð Preview in Browser menu or use the F12 shortcut key to load the presentation into the current primary browser (defined in Dreamweaver Preferences).
Figure 38-16 shows how the published Picture Viewer looks in a browser window with the images and captions we have added.

Figure 38-16: The finished flowerViewer.html file with the Image Viewer Flash element file (FlowerGallery.swf) visible in a browser window
| On the CD-ROM | The animated version is more interesting than the screenshot! To view the final result, open flowerViewer.html in a browser window. (The file is located in the FlashElement subfolder in the ch38 folder of the CD-ROM.) |
Editing Flash Element Parameters
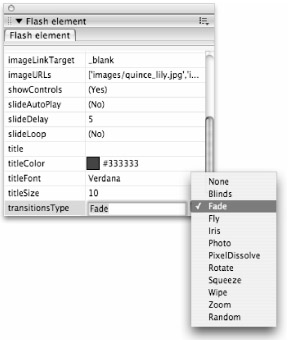
If you are not yet impressed by the functionality of the Image Viewer Flash element, you can adjust the transition animations or the other graphic elements in the presentation by changing settings in the Property inspector or by opening the Tag inspector to edit parameters until you are satisfied with the final result. Click the text line of any parameter in the Tag inspector to access available menu options or to edit the text directly. Some of the parameters are simple on/off toggles, but the transitionsType parameter can be set with a range of options available from a drop-down menu, as shown in Figure 38-17.

Figure 38-17: You can use the various transition styles available from the transitionsType drop-down menu in the Tag inspector to change the Flash animation in your Image Viewer presentation without ever touching a keyframe in Flash or typing a single line of code.
Try out a few of these transition styles and reflect for a moment on how long it might have taken to author the Flash animation manually. Then think about how much fun you could have with a whole library of Flash elements — smiling yet?
EAN: 2147483647
Pages: 395