Using Built-In Flash Objects
Dreamweaver includes some simple but useful options for adding Flash content without having to use the Flash authoring tool. These options can be found in the Media submenu of the Insert panel (refer to Figure 38-1).
| Note | A whole new category was added to the Insert bar in Flash MX 2004 to accommodate customizable Flash elements. Flash elements have lots of potential for development, but the basic Flash objects that ship with Dreamweaver are still a great option for adding interactive buttons or text — the most commonly needed interface items — as well as Flash Video and FlashPaper documents, which are great new options in Dreamweaver 8. |
Adding a Flash Button Object
Since version 4.0, Dreamweaver has had the capability to create Flash Button objects based on predetermined button styles. The styles available in Dreamweaver 8 look much like the Button Library that ships with Flash 8. In addition to choosing from a wide variety of styles for these buttons, you can easily edit the text labels and links in Dreamweaver. Dreamweaver creates a Flash movie file (.swf) based on your selections and stores it in the same directory as the current HTML document.
| Note | You must save your document before inserting a Flash Button or Text object. If you have not saved your document, Dreamweaver prompts you to do so. Dreamweaver needs to know where the HTML file resides before it can create the Flash movie file (.swf). |
To create a Flash Button object in Dreamweaver, follow these steps:
-
Select the Flash Button icon from the Media submenu of the Insert Panel, or choose Insert ð Media ð Flash Button from the application menu. Using either of these methods enables you to access the Insert Flash Button dialog box (shown in Figure 38-6).
-
Now select a button from the Style list provided. Dreamweaver displays a live preview of the currently selected button style in the Sample window and you can click and roll over the preview button to see how it behaves. However, you will not be able to preview any changes to the text or Bg color in this window.
-
Next, in the Button text field, type the text that you would like to add. This field doesn't work for every button style, as VCR-style Play and Stop buttons don't have text. If the button preview has the words Button Text on the button, then you will be able to type in your own text. Also, the amount of text is limited to the width of the button.
-
From the Font menu (optional), select a font for the text. Enter a font size in the Size text field or leave it at the default value — make sure this is not too small to be legible or too big to fit your button text.
-
For the Link field (optional), type a filename (or URL) or click the Browse button to locate the file to link to. The link can be either a document-relative or absolute link for the button.
-
The Target field (optional) enables you to choose a target frame or target window from the drop-down menu.
-
The Bg color chip and text field (optional) enable you to choose a background color to fill in the rectangular space around your Flash button. You can either type in a hexadecimal color value (for example, #0066FF) or use the pop-up color swatches to select a background color. Generally, the button Bg color should match the background color of the HTML page that the button appears in.
-
For the Save as field, enter a name for the new Flash movie file (.swf) that will be saved to store your button, or accept the default button name. You could also specify a different location for the Flash movie to be saved in by clicking the Browse button and locating or creating a new folder on your system.
-
If you can't find a button style that suits you, click the Get More Styles button to connect to the Macromedia Exchange site to download even more button styles.
-
Finally, click either Apply to see the button with the current settings displayed in the Design view of your Dreamweaver document or OK to insert the Flash button and close the Insert Flash Button dialog box.
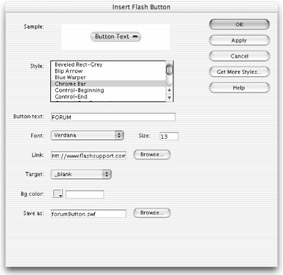
Figure 38-6: The Insert Flash Button dialog box
Editing a Flash Button
As shown in Figure 38-7, some editing options are available directly in the Property inspector when the button is selected.
![]()
Figure 38-7: These editing options become available in the Dreamweaver Property inspector when you select a Flash button.
If you need to access more editing options, there are two ways to reopen the Insert Flash Button dialog box so you can modify any of the original settings:
-
Double-click the Flash button in the Design view of the document window.
-
Select the Flash button in the Design view and click the Edit button in the Property inspector.
Inserting a Flash Text Object
The Flash Text object enables you to insert a body of Flash text with a simple rollover effect. The text renders correctly in the browser even if the font you specify is not available on a viewer's machine. Inserting the Flash Text object is very similar to inserting the Flash Button object. Simply select the Flash Text icon from the Media submenu of the Insert Panel, or choose Insert ð Media ð Flash Text from the application menu. Using either of these methods enables you to access the Insert Flash Text dialog box (shown in Figure 38-8).
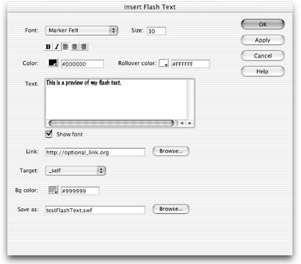
Figure 38-8: The Insert Flash Text dialog box enables you to place anti-aliased Flash text within an HTML document. Dreamweaver creates the necessary .swf file and saves it with your HTML document.
Using the Insert Flash Text dialog box, follow these steps to format and insert your text:
-
Select a font face from the Font drop-down menu. You can use specialized fonts in the Flash text object and not have to worry about how it displays. The font information is embedded in the .swf, so the text always appears as you designed it.
-
Enter a font size (in points) in the Size field.
-
Select style attributes by clicking the Bold, Italic, and Text Alignment buttons.
-
Choose a text Color by entering a hexadecimal color (for example, #0066FF) or by choosing a specific color from the color pop-up menu. You can also choose a separate rollover color for your text.
-
Type in your desired text in the Text field. The text is not constrained to the preview window size and it does not auto-wrap, so it continues on one long line unless you manually enter breaks with the Return (or Enter) key.
-
Add a document-relative or absolute HTML Link (optional).
-
Choose an HTML Target window or target frame (optional).
-
Choose a background color (optional) from the Bg color swatches. The background color for Flash Text objects fills in the rectangular text box around your type. Leave this setting at Default if you want it to match the background of your current HTML document.
-
Type in a filename for the Save as field or accept the default name (for example, text1.swf).
-
To preview all of your settings, click Apply to insert the Flash Text without leaving the dialog box.
-
To insert the Flash Text and exit the dialog box, click OK.
The static text is visible in the Design view window, but to see any animated rollover effects, you need to preview the document in a browser window (F12) or select the Flash Text and click the Play button in the Property inspector.
Editing a Flash Text Object
To modify the inserted Flash Text, use the settings in the Property inspector or reopen the Insert Flash Text dialog box in one of two ways:
-
Double-click the Flash Text object in the Design view window.
-
Select the Flash Text object and click the Edit button in the Property inspector.
Inserting a Flash Video Object
If you've been holding off on using Flash Video because you weren't sure how to implement it, this is the release that will help you do it. Dreamweaver 8 includes a set of prebuilt components for controlling Flash Video playback, and inserting video is as easy as inserting any other basic Flash object. All you need to follow these steps is a video clip that has been compiled in FLV format:
| Cross-Reference | For information on creating and compressing Flash Video, refer to Chapter 17, "Displaying Video." |
-
Select the Flash Video icon from the Media submenu of the Insert Panel, or choose Insert ð Media ð Flash Video from the application menu. Using either of these methods enables you to access the Insert Flash Video dialog box, shown in Figure 38-9.
-
Now use the Browse button to locate a Flash Video file (or manually enter a URL for your .flv file). File paths can be relative or absolute.
On the CD-ROM The sample file that we used for this example is stella_raw.flv; you can find it in the FlashVideo_example subfolder of the ch38 folder on the CD-ROM. To see the finished HTML file with the Dreamweaver playback component, open stella_live.HTML from the same location.
-
The default Video type (or playback) setting for imported .flv files is Progressive Download. Change the setting to Streaming only if you're using Flash Media Server to deliver video files that will buffer rather than download in increments.
-
Now, the fun part — pick a control bar style from the Skin menu. The prebuilt .swf files will automatically be added to your project folder and will load seamlessly over video files to provide viewers with standard video controls. You can choose any style, but take note that the components have varying minimum width requirements.
Tip If you don't see a control bar when you finally preview your HTML file in a browser window, don't panic. One of the slick features of the components is that they only display when a mouse pointer is over the video clip — that is, on rollOver.
-
The Detect Size button is a quick shortcut to load the existing Width and Height values for your .flv file. Although you can manually enter new values (in pixels) to shrink or stretch the dimensions of a video clip, it is best to work with the original size to avoid distortion. If you need to change the dimensions temporarily for placeholder content, make sure you go back and resize and recompress the original to suit your layout needs before you launch your site.
-
The check boxes for Auto play and Auto rewind enable you to set these options so you don't have to rely on the viewer using the control bar to start the video content. The control bar component will still work, but the auto options will run if the viewer doesn't click anything after the video loads.
-
Finally, the Prompt users to download Flash Player check box is selected by default with a text message loaded to notify visitors who have an older version of the Player to download the update. You can customize the Message and/or skip this option (deselect the check box) if you plan to build in your own detection.
-
When you are happy with the settings, click OK to load the .flv into your HTML file and close the dialog box.
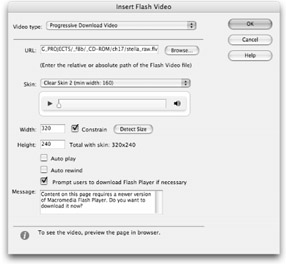
Figure 38-9: The Insert Flash Video dialog box makes it easy to set display options for .flv content in Dreamweaver.
And that's it! As shown in Figure 38-10, you should see a gray box that outlines the dimensions of your .flv clip; the basic settings for the file will be available in the Property inspector.
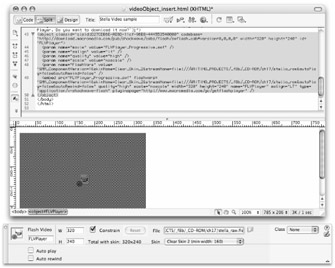
Figure 38-10: Flash Video doesn't play until it's previewed in a browser window, but the clip dimensions are outlined by a gray box in the Design view window and the settings are loaded in the Property inspector when it's selected.
You can continue editing the HTML file or you can use the Preview in browser command to see how the component looks when it's loaded on top of your video clip. You may also want to add a <CENTER> tag, as we described earlier, to align the clip within the browser window, as shown in Figure 38-11.
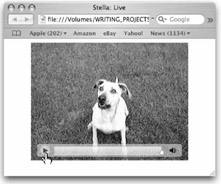
Figure 38-11: Flash Video clip previewed in Safari with the "Clear Skin 2" playback component activated by rollOver
So, with fewer steps than it takes to insert a Flash Text object, you can add a fully functional video clip and a skinned control bar. Your clients will love that you can offer customized playback controls right in the HTML window, rather than plain-vanilla QuickTime files or worse, overly complicated, branded player pop-ups.
Inserting a FlashPaper Object
The dialog box for importing a FlashPaper file (shown in Figure 38-12) has fewer options than any of the other Flash objects, but that's only because the whole point of FlashPaper is that content is consistent and self-contained. If you have text-heavy content that needs to be printer-friendly and easy for the client to update with images and custom text formatting, FlashPaper is a lifesaver. Like PDF files, FlashPaper files preserve content in a print-ready format that can also be viewed onscreen with handy built-in navigation controls that enable the viewer to customize the display at run time.

Figure 38-12: Import options for FlashPaper are limited because view options can be controlled at run time.
| Tip | If you leave the Width and Height value fields blank in the Import FlashPaper dialog box, the original dimensions of the document will be preserved when it loads into Dreamweaver. |
| Web Resource | To learn more about the benefits of FlashPaper, visit www.macromedia.com/software/flashpaper. |
EAN: 2147483647
Pages: 395