Modifying Multiframe Sequences
To control the pacing of your animation, you can add more frames (F5) between the keyframes (creating a span), or add more keyframed (F7) images to the sequence to extend its length. Adding more frames between keyframes will "hold" or pause the animation until the Playhead hits the next keyframe with changed content. In the example shown in Figure 11-2, the face holds on some frames while the butterfly continues to move in keyframed drawings on its own layer. To speed up (or shorten) animation, you can remove frames (Shift+F5) or keyframes (Shift+F6) to shorten the sequence. You can make changes in the length of a span by selecting a frame in the span that you want to modify and using the application menu commands (or shortcut keys), or you can simply drag the endframe of the span to change its position on the Timeline.
An underlying factor that will affect the playback of all animation is the project frame rate. The frame rate is displayed in the Document Properties dialog box (Modify ⇨ Document) or in the Property inspector if you click in the Document window of an open file without selecting any items on the Stage. The allowable frame rate range is between 0.01 and 120 fps — the default setting is 12 frames per second (fps). The most commonly used range is somewhere between 12 fps (for most Web sites and for low-bandwidth animation) and 24 fps (for subtle animation and complex effects intended for broadcast).
It might seem like a good idea to push the frame rate higher to get smoother-looking animation, but the reality of Web delivery is that you can't be sure that your audience will have the bandwidth or the processor speed to play back the animation as you intended. There is nothing worse than seeing your gorgeous animation stuttering and dropping frames. In most cases, 12 fps provides all the momentum you need to drive your animation and effects — you can create quick cuts, smooth fades, or anything in between just by adjusting your artwork and pacing your frames appropriately.
Although you can always change the frame rate after you've authored a file, it makes sense to decide on a final frame rate before you start designing and testing complex animation sequences. Re-timing animation by inserting or removing frames and changing the duration of tweens is always an option, but it is painful to go back and try to match the original pacing of a file that was created using a different frame rate.
| Tip | If you drag the endframe of a span to a new position, Flash will automatically insert a new keyframe to mark the new position. If you want to change the length of a span without adding more keyframes, hold down the Ctrl or z key while clicking and dragging the end-frame to a new position. |
Inserting more frames does work to slow down an animated sequence, but generally if you insert more than two frames between keyframes, the movement will be interrupted and the animation will start to look too choppy. Try adding more keyframes to the sequence with very subtle change to the content in each keyframe if you want to create a slower, smoother animation.
By default, Flash will loop the content on your Timeline, so if you want a sequence to be repeated, you don't need to draw it over and over again. If you notice that your animation disappears before it loops to play again, check to make sure that there are no extra empty frames at the end of the sequence, or that the endframe of one of your sequences is not further down the Timeline than the endframe of the element that disappears. Although you won't see anything on the Stage in these frames, Flash will still play those frames if they exist on the Timeline. Obviously, blank frames can be used in an animation whenever you want to empty the Stage — either as a pause between sequences or to create the illusion that your artwork has disappeared.
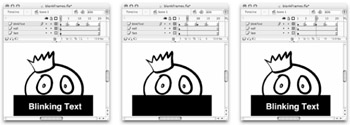
To illustrate how blank frames play back in an animation, we've created a silly example with a face and a rectangle that persist in every frame and some text that only exists on some frames (see Figure 11-3).

Figure 11-3: You can insert blank keyframes to clear artwork from the Stage. Remember that the Playhead will continue along the Timeline if there are frames on any one of the layers, even if the artwork on other layers is no longer present.
Onion Skinning
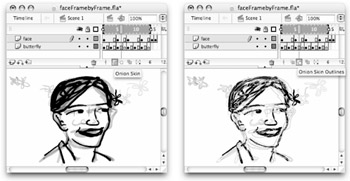
Traditional animators worked on layers of transparent cels using a light table. This made it possible for them to create consistent drawings and to plan the pacing of movement in a sequence of cels. As you move from keyframe to keyframe in Flash, you might feel that you are working blind because you can only see the artwork on the current frame. If you are creating artwork for a sequence of related keyframes, it is crucial to have some visual indication or "map" of the changes from frame to frame. Fortunately, Flash has an effective digital version of the traditional light table — this handy feature is called Onion skinning. In Flash, Onion skinning enables you to see several frames of your artwork displayed at one time. The Onion markers on the Timeline determine the number of frames that are visible. You can turn Onion skinning on or off whenever you need it using the toggle buttons at the bottom of the Timeline window. As shown in Figure 11-4, there are actually two options for Onion skinning: Onion Skin or Onion Skin Outlines.

Figure 11-4: Onion Skin will show grayed-out or ghosted artwork on multiple frames, while Onion Skin Outlines will show colored outlines of the artwork on multiple frames. It's hard to see the "color" here, but notice that the lines are thinner with Onion Skin Outlines (right).
| Tip | Layers that are locked will not be Onion skinned, even if there is artwork on multiple frames within the Onion Markers — this is helpful if you need to keep the view from getting too cluttered with multiple overlays. Generally, Onion skinning works best if all layers are locked except the layer that you plan to edit. |
The current frame (indicated by the position of the Playhead) is displayed at 100 percent opacity, while the other frames in the sequence are displayed at a slightly reduced opacity or as outlines, depending on the Onion Skin button you have selected.
| Tip | If you don't like the color of the outlines that display when you turn on Onion Skin Outlines, you can change the setting for Outline color in the Layer Properties dialog box. (Double-click the layer icon or choose Properties from the contextual menu.) |
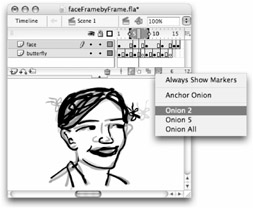
The number of frames that are included in the Onion skin display can be controlled either by choosing a setting from the Modify Onion Markers menu (shown in Figure 11-5), or by selecting the round marker handles with the Selection tool and sliding them to a new position on the Timeline. The number of frames that you select from the Modify menu will be shown before and after the current frame — so in our example with Onion 2 selected, the Onion markers actually span five frames (the current frame, plus two frames on each side).

Figure 11-5: You can control the number of frames visible when Onion skinning is turned on with the Modify Onion Markers menu, or by dragging the Onion skin markers to a new position on the Timeline.
Editing Multiple Frames
One of the drawbacks of manually creating unique artwork on every frame is that changes can be very time-consuming. If you decide to change the color or size of an element or perhaps edit out a feature of your artwork, repeating this edit on every frame of a sequence will be tedious and labor-intensive.
| Tip | The Find and Replace panel (Edit ð Find and Replace) makes it easy to replace colors and text in a Flash document, but erasing or moving an element that appears in a multiframe sequence can still be time-consuming. |
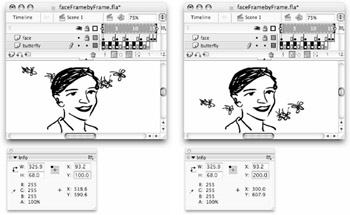
Fortunately, Flash provides a Timeline option that can make repeated edits on multiple frames much more efficient. Edit Multiple Frames enables you to see and select items on multiple frames for simultaneous modification. As shown in Figure 11-6, the Edit Multiple Frames option is turned on with the toggle button at the top of the Document window. When this feature is active, you can use any of the selection methods (Selection tool, Lasso, application menu, or shortcut keys) to select the parts of your artwork that you wish to move, modify, or delete. This feature is especially helpful for edits that need to be consistent from frame to frame, such as moving all of your artwork to a new position in your layout.

Figure 11-6: With Edit Multiple Frames toggled on, you can select elements on individual keyframes in a sequence (left) to be modified simultaneously (right).
| Tip | Using the Lock feature to protect layers that you don't want to edit makes it much easier to select and edit multiple elements on specific layers. If you use the Lasso tool or the Selection tool to drag-select items on the Stage, only items on unlocked layers will be included in your selection. The Select All command (Edit ð Select All) makes quick work of ensuring that all unlocked elements within the Edit handles will be selected before you apply a change. |
The frames visible and available for selection are marked by a gray span on the Timeline with start and end handles. You can adjust the number of frames included in the span with the Selection tool by clicking and dragging the round handles on the Timeline to a new position.
EAN: 2147483647
Pages: 395