Delivering over the Network
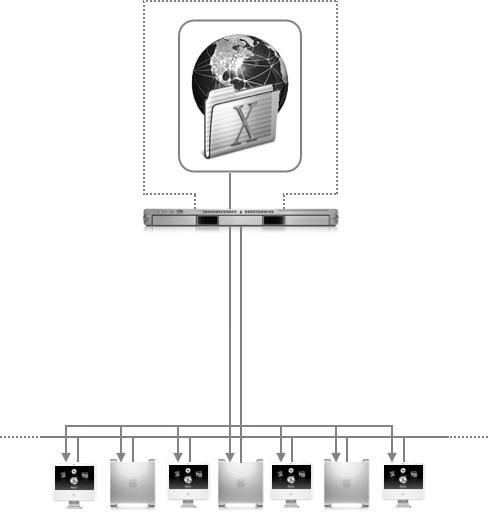
| Mac OS X v10.4 offers several options for network image delivery, eliminating the need to physically move from computer to computer to deliver images. You can store your master image and update packages on a server on the network. Then you can connect directly, remotely distribute your image to multiple computers simultaneously, or script the process so that your computers will automatically pull images and packages from your server. Using NetBootClient computers that start up from a NetBoot image get fresh system environments every time they start up, eliminating the overhead involved in maintaining local delivery of images, as seen below. The NetBoot service in Mac OS X Server v10.4 supports Mac OS X computers that have Macintosh firmware version 4.1.7 or later. To start up a computer into Mac OS X v10.3 or earlier using NetBoot or to use Network Install, the Mac OS X computer must have a minimum of 128 MB of RAM and 100Base-T Ethernet or faster network connections. To start up a computer into Mac OS X v10.4 using NetBoot, the client computer must have at least 256 MB of RAM. For NetBoot deployments of 10 to 50 clients, a 100Base-T switched network is required. Gigabit Ethernet is required for booting more than 50 clients (although Apple has no official test results for configurations beyond 50 clients). Apple does not support the use of AirPort wireless technology with NetBoot clients. NetBooting computers requires a solid network infrastructure. Note Mac OS X Server v10.4.4 supports Intel-based Mac OS X computers, but the server itself currently must still be a PowerPC-based computer. More Info Version v10.4.4, or later, of the System Admin Tools provides Universal applications for administering Mac OS X Server v10.4 from both Intel and PowerPC-based Macintosh computers. It also includes an updated System Image Utility application for creating NetBoot and NetInstall images of Intel-based Macs. For more information, refer to the AppleCare Knowledge Base article "About Server Admin Tools v10.4.4" (docs.info.apple.com/article.html?artnum=302923). When a client computer starts up from a NetBoot image, the following process takes place:
Note Previous versions of NetBoot server that used AFP to deliver network disk images could potentially run into AFP license restrictions. If you purchased the ten-client version of Mac OS X Server, your AFP license restricted you to supporting no more than ten AFP clients, limiting the number of Mac OS 9 NetBoot clients to less than ten. This would not affect your Mac OS X NetBoot clients, as they use NFS or HTTP and are unrestricted even with the ten-client version of Mac OS X Server. In order to configure NetBoot on your server, do the following:
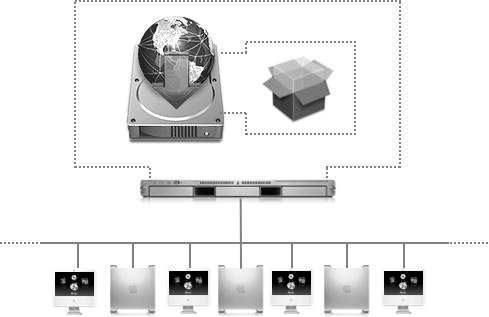
Using Network InstallYou can distribute and install software, including the Mac OS X operating system, with Network Install images. On Mac OS X Server, use the System Image Utility to create a Network Install image. Create the image by cloning a system that's already installed and set up, or by using a Mac OS X Install Disc. Network Install allows for the installation of packages and metapackages, similar to that of a DVD install, and can be automated to erase the volume set to receive the image or packages. (Note that if you choose to auto-install, you won't have to interact with each computer.) You can also set various ByHost files (specific to an individual computer) to match the receiving computer's MAC address. For example, when using a Mac OS X Install Disc (you can also use a Mac OS X Server Install Disc when doing a Network Install of Mac OS X Server), you have the option of removing certain packages within the install disc itself. You can also add other packages, such as updates and security updates, and scripts to a Network Install image or image downloaded using Apple Software Update. Note You cannot mix and match updates for PowerPC-based Macs and Intel-based Macs and add them to a Network Install image. Doing so may cause the installed operating system not to function. It is best to keep Intel-based Network Install (and for that matter NetBoot) images and PowerPC-based images totally separate. 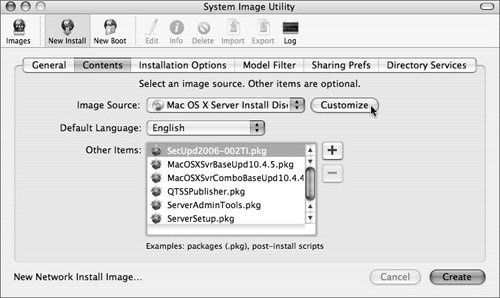 Exploring Other NetBoot/NetInstall OptionsNetBoot and NetInstall can be customized in a number of different ways to satisfy the needs of your environment. Network topology, firewall rules, quantities of computers, and other items may require you to make some adjustments to the NetBoot or NetInstall settings. Serving Your Image over HTTPNetBoot and NetInstall images are optimally served via NFS because of its speed and low overhead. However, your environment may not allow NFS servers for security reasons. In those cases, you can serve your image via HTTP instead of NFS. To set this option, simply select the radio button when you're setting up your image in the System Image Utility. However, many Web servers are unable to serve files larger than 2 GB. NetBooting from a Different SubnetYou may need to perform a NetBoot or NetInstall from a network other than the one that your server is on. If this will be a regular occurrence, you may want to have your network administrator forward your broadcast traffic from your network to the NetBoot server. This is commonly changed using DHCP or IP helper addresses. You also have the option of specifying a particular NetBoot server and image through a number of mechanisms:
Substitute your server's IP address and actual NBI path in the commands above. Once you set the new boot device, reboot the computer to initiate the connection. You can simplify this using a free application named, appropriately enough, NetBoot Across Subnets, from Mike Bombich (www.bombich.com/software/nbas.html). Making Advanced CustomizationsA number of advanced customizations can be made with NetBoot and NetInstall. The primary locations for making image customizations are the following:
The bootpd process (started by launchd) handles the reception of the NetBoot BSDP requests and generates the responses to each client. Most of the bootpd configuration is stored in the local NetInfo database. If needed, you can make alterations to this data using nicl. To see your current settings, type nicl . -read /config/dhcp This shows the logging level, any MAC address filtering, and the interfaces for which NetBoot is enabled. You should generally use only the approved NetBoot interfaces to make changes to your NetBoot configuration, including the Server Admin utility and the serveradmin command. More documentation for the serveradmin command is available in the Mac OS X Server Command-Line Administration guide. After you've made any changes to your NetBoot configuration, you'll likely have to restart your NetBoot server for the changes to take effect: sudo serveradmin stop netboot sudo serveradmin start netboot Further enhancements to the NetBoot server are also made in the local NetInfo database under the /config/NetBootServer entry. The following are some of the configuration options you may wish to use:
The NBImageInfo.plist file contains all of the details about your NetBoot or NetInstall image. All of the options in this file can be set from the System Image Utility when you create your image, but there may be times when you'd like to make quick changes to some of the options without re-creating your image. Just use a text editor to modify the file and restart your NetBoot service as outlined above. Some of the options you may wish to change include the following:
More details about all of these options can be found in the bootpd manual page: man bootpd Creating Utility NetBoot ImagesNetBoot doesn't necessarily need to boot into a fully operational Mac OS X system. Through some simple modifications of the /etc/rc files in your disk image, you can make your NetBoot image perform simple utility functions. Some examples of this might include the following:
Using NetRestoreNetRestore, by Mike Bombich (www.bombich.com), extends the features of ASR with a graphical user interface and scripting tools. You can use NetRestore to restore a master disk image to a target volume whether the disk image is hosted locally, on a network via AFP, or on the Internet via HTTP. NetRestore can also be used in conjunction with NetBoot to fully automate the deployment of a lab. NetRestore does the following:
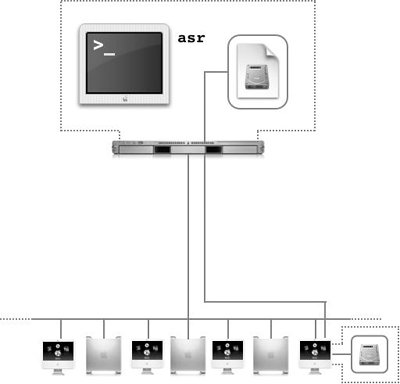
Using ASR over a NetworkASR provides features that allow restoration of a volume from an image located on a remote server. Through ASR via HTTP or ASR multicast, you can remotely store your master ASR-ready disk image on a file server, rather than copy it to several media devices or spend the time and resources necessary to set up NetBoot services. This solution greatly reduces the amount of disk space necessary for local restoration and allows you to have one centrally located master image that can be maintained with relative ease. Using ASR over the network is easier than setting up NetBoot, but it still requires a method of starting up your computer from a device other than the startup disk you wish to restore. This device could be a CD, a DVD, a FireWire drive, or a second hard drive or partition. Alternatively, use it in conjunction with NetBoot to provide a complete, network-based image-restoration process. One of the new features of NetRestore is the ability to create a bootable network image that will use ASR multicast to restore the target computer. With ASR multicast, you can share an ASR image over the network without setting up any other service. This feature allows several clients to connect to the server and simultaneously perform fast block copies of the image to their local volumes. Use the following command in Mac OS X or Mac OS X Server to set up the multicast: asr -source sourceimage -server configurationfile where sourceimage is the path to an image file. The -server option tells asr to multicast the source image over the network. The configurationfile parameter is the path to a configuration .plist file that contains the following information:
To create the .plist configuration file, you can use Property List Editor or run these commands from Terminal:
This will create the file /tmp/myconfig.plist. multicastaddr will be specific to your network and should be provided by your network administrator. Finding the correct data rate may take some experimenting. The best data rate depends a great deal on the network hardware you are using. If you're using a network dedicated to loading machines, you'll want to use a fast data rate. If, however, you're using a slow network that is shared by many users, you may want to keep the data rate down to avoid clogging it. You can also include the following optional keys in the configuration file:
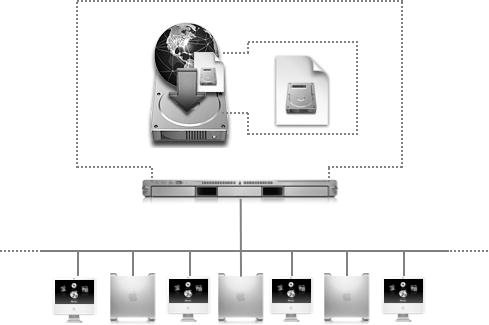
See the asr man pages for more information on server options. When the server is running, perform a software restore on any client connected to the network with the following command: asr -source asr://serveraddress -target targetvolume -erase where serveraddress is the address of the server running the asr multicast, and targetvolume is the volume you will be restoring. The -erase option is required for multicast restores. One way to take advantage of this feature is to configure a NetBoot image to be diskless, start up the client computer from that image, and run ASR over multicast. This method offers an exclusively network-based delivery solution that requires no media and can be performed efficiently on multiple computers simultaneously. To set up ASR over HTTP or HTTPS, simply prepare your ASR-ready disk image and upload it to a folder that is shared by a Web server. As shown in the following figure, ASR Multicast allows a one-to-many setup that is often easier to maintain. Be sure to do an imagescan before you upload your image: asr -imagescan master.dmg Once your image is uploaded, verify that it is available via HTTP by accessing the URL with a Web browser. For example, if your image is located on a Mac OS X v10.4 Web folder at /Library/WebServer/Documents/image/master.dmg, then type http://serveraddress/image/master.dmgin your Web browser where serveraddress is the address of the Web server where the ASR image is stored. This should result in a download of the image. Now, restore any volume on any computer connected to the network with the following command: asr -source http://serveraddress/image/master.dmg -target targetvolume [options] where serveraddress is the address of the Web server, and targetvolume is the volume you will be restoring. Apple is continuously revising its hardware offerings by releasing new computers and new versions of existing computers, which is great for the end user but presents a challenge to those who maintain disk images used to boot those systems. It is very common for a brand-new computer to be unable to boot from your existing image due to the lack of drivers for a new piece of hardware included in the computer. A good way to check this is to compare the build number of the OS on your image to that of the OS that shipped with the computer. You can use the sw_vers command to see the version information for the booted OS. For example, your image may be built off 8G32, while a new computer might ship with 8H12. A higher letter or number indicates that this is a newer build of the operating system, and you may need to rebuild your image from the newer OS to support the new hardware. |
EAN: 2147483647
Pages: 128