Using NetBoot Images


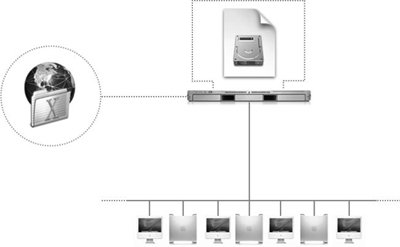
NetBoot is a service that allows you to start up supported Apple computers from various types of disk images located on a Mac OS X Server, as shown in the following figure. You can create disk images containing Mac OS 9, Mac OS X, and Mac OS X Server system software that can be used by multiple network clients at once Because you can store up to 50 NetBoot/Network Install images on a NetBoot server, NetBoot provides a centralized source for system software you use to configure, test, and deploy.

Note

PowerPC- and Intel-based systems each require separate images, thus doubling the amount of space required to host images.


NetBoot is most effective in computing situations where there is a high possibility of user turnover and a large number of computers being deployed with a common set of tasks. NetBoot can also be used effectively in university computer labs, public kiosks, high performance clusters, and computers that are provided for reporters, for example, at sporting events.

As with ASR, NetBoot requires a properly prepared and created disk image for the most efficient operation. This image can be created with the System Image Utility included with Mac OS X Server or by using NetRestore Helper. In this section, you will learn how to prepare and create a disk image to be used efficiently by the NetBoot service.

NetBoot allows you to deploy software in three distinct ways:

  • Network Boot (NetBoot) This method involves starting up the client computer from a disk image maintained on Mac OS X Server. Any changes made to the system by users are stored in a shadow file that by default is deleted when the computer is restarted. NetBoot allows you to quickly deploy an operating system and software to your client computers without installing any software on the actual hard drive. Because you maintain only one copy of the NetBoot disk image, maintenance of the operating system and software is much less time-consuming.

  • Network Install Using Network Install is exactly like starting up from a Mac OS X install disc, except that you are actually starting up the computer from a disk image on a NetBoot server. Network Install image sets are replicas of the installer media that you receive from Apple with the option to add your own packages and customizations.

  • Network Restore (Network Install plus block-level restore) Network Restore is similar to Network Install in terms of the startup method. However, instead of the Installer application using packages to install software, a master disk image is restored to the local volume using a block-level copy. Network Restore is faster and more efficient than Network Install and is, therefore, the fastest method of deploying a disk image to a large number of similar computers.

Tip

If using NetBoot or any full disk image restore to boot or load multiple machines running Mac OS X Server, you'll need to obtain a volume license key from your Apple sales representative. This is due to copy protection in place that prohibits multiple servers from using the same serial number. Similarly, if you have machines that came preinstalled with Mac OS X v10.3, you cannot install Mac OS X v10.4 without an upgrade license for each one of the machines set to receive the new image.


NetBoot Image Source

A NetBoot image can be created using the following sources:

  • Any volume with Mac OS X installed and configured

  • A CD or DVD that is capable of starting a computer, such as a Mac OS X Install DVD or an emergency CD containing some type of disk repair or checking utility.

  • A disk image (.dmg) file created from a volume with Mac OS X installed and configured, similar to one created for ASR

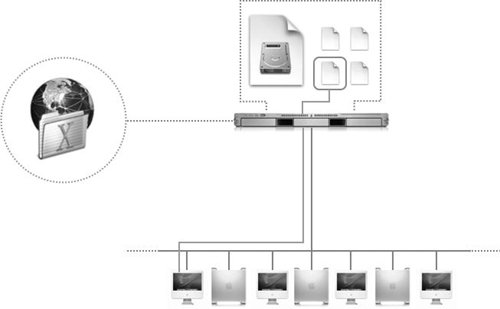
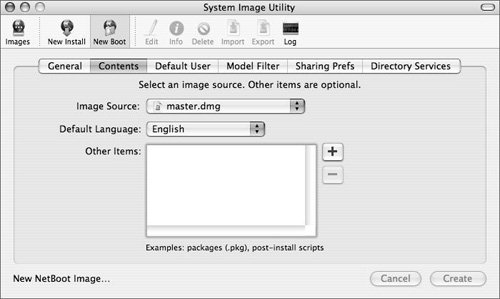
When you're creating a NetBoot image using a volume with an installed and configured Mac OS X system, the model computer on which you configure your image should be your newest and most powerful computer. Mac OS X is a highly portable operating system that will work with both newer hardware and older hardware; however, the move from the PowerPC to the Intel chipset will require separate NetBoot images, as neither system will recognize the other's bootable image.

As with ASR images, you should also choose a computer that has the most hardware options and peripherals. For example, if you have at least one computer with a SuperDrive and/or a backlit keyboard, use that computer to create your image, even if most other computers don't have that option.

Diskless NetBoot and the Role of the Local Volume

With NetBoot, many clients can read from the same bootable image, but when a client needs to write anything back to its startup volume (such as print jobs and other temporary files), NetBoot automatically redirects the written data to shadow files on the client computer's file system, as shown in the following figure.

The shadow files preserve the unique identity of each client during the entire time it is started up from a NetBoot image. NetBoot transparently maintains changed user data in the shadow files and reads unchanged data from the shared system image. The shadow files are re-created at startup, so any changes made by the user to his or her startup volume are lost at restart. For example, if a user saves a document to the startup volume, after a restart that document will be gone. This behavior preserves the condition of the environment that the administrator set up. To allow users to save documents, provide accounts on a file server via Open Directory on Mac OS X Server using network accounts and network mounts.

Shadow files are stored on the local startup volume unless the NetBoot image is designated as diskless. In this case, the shadow files are stored on the server. Designating a diskless NetBoot image is necessary if a local hard drive either doesn't exist or must remain untouched by system operationsfor instance, if you don't want your users to save any sensitive data to a local hard drive.

Because the shadow files are frequently accessed, system performance can be affected when diskless NetBoot images are used. For this reason, shadow files should be stored on the local hard drive, except where diskless operation is necessary.

Using System Image Utility

The System Image Utility tool allows you to customize your NetBoot or Network Install images. This means that you can open an existing image, make changes, and re-create the image. System Image Utility replaces the older Network Image Utility of previous releases. Located in /Applications/Server in Mac OS X Server or on any computer with Server Administration tools installed, System Image Utility uses any one of the previously described image sources to create NetBoot images.

Each tab of System Image Utility handles a different aspect of the image-creation manipulation process. The following are the tabs for both NetBoot and NetInstall images:

  • General: Used to enter the image name, ID, description, location, and deployment protocol (NFS or HTTP). The image name you supply provides the volume name to be listed in the Startup Disk pane of System Preferences. The optional Description text area for administrative notes is a good place to store information that details differences between this and other images stored on your server. The text you type here is visible in the Server Admin application when configuring your NetBoot service.

    Note

    You can also deliver images over https; however, both the server and the client NetBoot image must contain the certificates being used.


  • Contents: Contains image source (disk image, volume, DVD/CD), language to be used, and additional installation or boot packages or scripts.

  • Model Filter: Restricts ability to boot or install from the selected image to specific Macintosh computer models.

  • Sharing Prefs: Offers the ability to use unique names for the sharing name, derived from a file chosen by you. By default, if the text areas in this tab are left blank, all computers receive the same computer name, -AUTOMATIC-. When imaged computers start up for the first time and find that they have identical names, Mac OS X resolves the issue by creating unique computer names and .local host names automatically. When text is entered in the Computer Name field, a unique name is given to each client based on that name and the client's MAC address. For more explicit names, create a tab-delimited file with the names of the computers and their corresponding MAC Addresses so that the booted computer receives the name that is associated with each computer's MAC address. Any remaining clients are given names based on the contents of Computer Name and their Ethernet (MAC) address. If the field is blank, clients are given the -AUTOMATIC- computer name.

  • Directory Services: Applies binding from a local machine running System Image Utility to any computers using selected image.

  • Default User (NetBoot only): Lets you choose a default long name, short name, and password for the initial login.

  • Installation Options (NetInstall only): Offers Update ByHost preference files (files based on the MAC address of each machine), enables destination verification, and enables automated installationincluding selecting, erasing, and restarting specific volumes.

To create a new image with System Image Utility, do the following:

1.

Launch System Image Utility located in /Applications/Server.

2.

Click New Install for a new Network Install image, or New Boot for a NetBoot image.

You may want to configure the NetBoot service first. In particular, configure the volumes that will be used to store the images and shadow files. This process creates a NetBootSPn folder in /Library/NetBoot/ and allows you to select that as a destination when creating images.

3.

Click each tab (described above) and supply the necessary information.

4.

Click Create to create the image.

You will be prompted to specify where to store it. For the NetBoot service to recognize the image, it must be stored in /Library/NetBoot/NetBootSPn/imagename.nbi/, where n is the volume number and imagename is the name of the image you entered when creating it in System Image Utility.

5.

If you have already configured NetBoot service, the Save dialog includes a pop-up menu listing the available volumes.

6.

If you choose a volume from that menu, the save location changes to the NetBootSPn share point on that volume.

Note

In early versions of Mac OS X v10.4, files and folders that are normally invisible appear when an image is deployed. To remedy this situation, mount the master image as read/write and insert the Mac OS X Install DVD. In the command line, navigate to the following directory

[View full width]

cd /Volumes/Mac\ OS\ X\ Install\ DVD/System/Installation/Packages/OSInstall.mpkg/Contents /Resources/


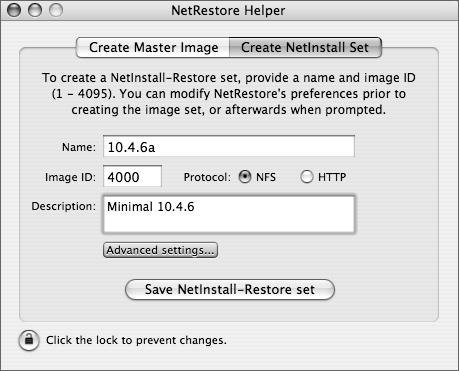
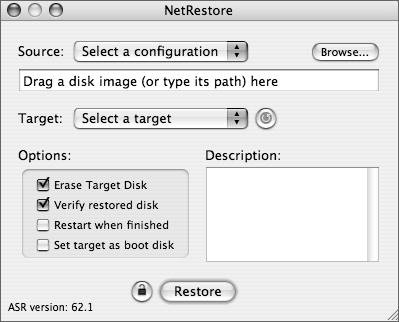
Then type

 sudo ./SetHidden /Volumes/mounted_master_disk_image_name hidden_MacOS9 


Unmount the image,convert back to read-only, and rescan it for restore.


Using NetRestore Helper

In addition to creating a master ASR disk image with NetRestore Helper, you can create Network Install images that are automatically set up to run NetRestore on startup. Use this to restore your target volume on your computers with your master image.

To begin creating a Network Install image with NetRestore, do the following:

1.

Click Create NetInstall Set.

2.

Enter a name, image ID, and description on the fields provided. These fields are similar to those in System Image Utility's General tab.

3.

Click Save NetInstall-Restore set.

4.

When NetRestore Helper finishes creating the image set, you can choose to configure NetRestore.

This launches the copy of NetRestore that has been installed in the Utilities folder of the Network Install-Restore image set, and you are prompted to edit the preferences and configurations.

5.

In NetRestore, choose Edit Configurations from the NetRestore menu.

Here, you create a configuration that references a master disk image file. The master disk image can be any ASR-ready disk image created with NetRestore or Disk Utility and placed on a file or Web server.

6.

Select the configuration in the list of configurations and click Restore.

If the image mounts, then you have set up the configuration correctly.

7.

Copy the image set to /Library/NetBoot/NetBootSPn on your NetBoot server, and enable the image in Server Admin.

8.

Reboot your client computer from the server, and restore your master image set.

We've primarily discussed why these methods are a convenient way to administer computers. However, some of them also provide significant security protection for your computers. By using NetBoot or Radmind (see the Appendix, "Using Radmind") in your environment, you ensure that every time your computer is booted, the files in your operating system have not been tampered with and are the original files provided by your image. This significantly reduces the likelihood of malicious software living on your computer, and also protects against unauthorized user changes on public workstations.


Apple Training Series(c) Mac OS X v10. 4 System Administration Reference
Apple Training Series: Mac OS X v10.4 System Administration Reference, Volume 2
ISBN: 0321423151
EAN: 2147483647
Year: 2006
Pages: 128

flylib.com © 2008-2017.
If you may any questions please contact us: flylib@qtcs.net