Using Apple Software Restore
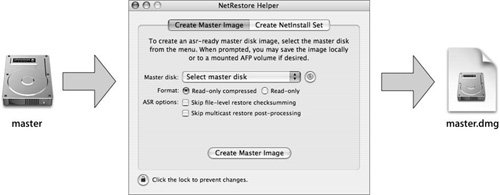
| ASR is a native Mac OS X application that efficiently copies disk images onto volumes. It is also capable of accurately cloning volumes, although PowerPC- and Intel-based architectures currently each require their own separate images. In Mac OS X, ASR is provided as a command-line tool (asr) with some features accessible through the Disk Utility graphical interface. This feature makes ASR especially efficient and easy to script for mass or repetitive deployment. As shown in the following figure, ASR requires a properly prepared and created disk image for most efficient operation. This image can be created with the Image from Folder command in Disk Utility or by using Mike Bombich's utility NetRestore Helper (www.bombich.com). These tools can be used to take a volume and create a disk image from that volume and store it on yet a third volume (for later deployment). 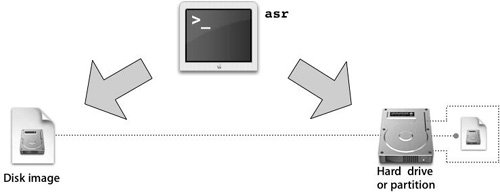 Creating Disk Images with Disk UtilityOnce your initial model volume is set up, configured, and clean, you create a disk image of that volume that can be used by ASR. The word model is used to support the fact that the image will be used on several computers. Before you create your image, it's a good idea to understand the Disk Utility vernacular: Volumes, drive, partitions, devices are all often used interchangeably. When you define a folder, you seldom mean a volume or drive. Disk Utility has two ways to create images from items: one from devices, one from folders. At first glance, this seems to make sense. However, when creating a disk image for imaging and deployment, the best option is to use the create image from a folder menu option and then select the volume that you wish to image. This will not copy the free space. Creating an image from a device will actually capture every image, including a device that has been partitioned into several logical volumes, whether it is block-used or not, so it is not incredibly useful when creating model images. Also, if you create an image from a device, you won't be able to perform a block-restore to any volume larger than the one on which you created the image. Creating an image from a folder is slower, but it gives a better (stretchable, defragmented) result. 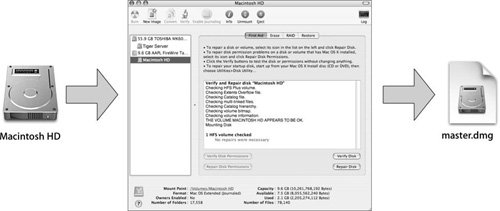 There are four Image Format options: read/write, read-only, compressed, and DVD/CD master. ASR doesn't scan read/write images, so you should save as either read-only or compressed. Compressed images create smaller files that use less disk space and network bandwidth but take longer to decompress, especially on G3-based computers. In general, uncompressed, read-only images are faster for local delivery, but compressed images are faster for network delivery. You'll want to save the image on your production computer (or volume) if you have it set up at this point (you can always transfer it later if necessary). Note This operation requires twice as much free space on the volume to which you are saving the image as you have data on the source. Disk Utility, as well as the command-line tool hdiutil, removes caches and swap files that would take up extra space on a disk image automatically. This information is unnecessary to restore, since it is dynamic and specific to users or computers. The asr man page explains when and what files are removed. In addition, you might want to remove ssh keys and known hosts if you have used the model computer to make ssh connections. Once the image is created, run imagescan using the command-line tool asr or by selecting Images > Scan Image for Restore in Disk Utility. imagescan adds checksum information to the image and ASR won't perform a restore operation with a disk image that hasn't had the checksum information added by imagescan. To scan the disk image master.dmg using the command line, type the following command (make sure you are in the same directory as the image or provide the path): sudo asr -imagescan master.dmg Creating Disk Images with NetRestore HelperNetRestore is an open-source tool (www.bombich.com) that allows you to complete multiple imaging tasks simultaneously. It is based on the Mac OS Xnative version of ASR, automating many of the tasks that might otherwise require the command line. NetRestore is not, however, a product that Apple provides support for. NetRestore is bundled with NetRestore Helper, an application that allows you to create, clean up, and scan an ASR-ready disk image in a single step. To create an image using NetRestore Helper, follow these steps (as shown in the figure below):
|
EAN: 2147483647
Pages: 128