Configuring Network Security
| So far in this lesson, you learned about security concepts and basic configuration. In this section, you will learn configuration guidelines for using the firewall to lock down traffic to the server and through the server, and for setting up VPN services. When locking down traffic to the server, it's important to consider remote administration. For example, which computers should be allowed to access the server via various remote management ports? It's also important to consider which computers should be allowed access to the services running on the server, which can include Web, e-mail, file, print, and other services. When locking down traffic through the server, the goal is to control the traffic that your inside users are allowed to send. Locking Down Remote AdministrationBefore locking down remote administration of the server, determine which computers should be allowed to remotely administer the server and which applications they use. Once you have identified the applications in use, you should also determine whether the applications run on TCP or UDP and which port numbers they access. In general, you probably will be working with the following TCP port numbers when configuring remote administration:
Note You may also work with UDP ports 161 and 162 for SNMP. The TCP port for Telnet (23) isn't in this list because you shouldn't use it. It sends the user's password and all other data in clear text (unencrypted). A sniffer user could snoop the commands being sent to the server and gather useful information. The Telnet service is not enabled by default on the server, but for extra precaution, if no other rule is already covering Telnet, then you should add the following rule: deny tcp from any to any dst-port 23 To configure rules that allow legitimate computers to remotely administer the server, use the Advanced pane in Server Admin. The Advanced pane lets you add specific, low-numbered rules to your list that override higher-numbered general-purpose rules. Carefully plan the order of your rules to avoid logic mistakes. For example, it's easy to end up with a low-numbered rule allowing all traffic from 192.168.3.0/24 that precedes a higher-numbered rule that allows Server Admin (port 311) traffic from the network manager at address 192.168.3.2. The first rule allows other users on the private network access to 311 also, which is probably not what you intended. Another possible logic mistake is to deny all users on network 192.168.3.0/24 access to port 311 before allowing the network manager at address 192.168.3.2 access to port 311. The first rule overrides the second rule. Your network manager never gets to port 311 because the first rule blocks the network traffic. So, how would you allow only the network manager at 192.168.3.2 access to port 311? The first step is to set up an address group for the 192.168.3.2 address and call it something like "Network manager." To create the address group:
Next, follow these steps to create a rule for the network manager that allows the manager access to port 311 (Server Admin):
The following output from sudo ipfw show displays the firewall rule list after rules were successfully added to allow only a local manager (192.168.3.2) and a remote manager (17.17.17.17) access to port 311. Similar rules could be configured to allow other types of remote management, such as Timbuktu or ARD.
Notice from the sudo ipfw show output that logging has been enabled. For example, rule 01050 denies users on network 192.168.3.0/24 (other than 192.168.3.2, which is permitted by rule 01040) access to port 311 and logs their attempts up to 1000 packets. Note also that this output has two columns past the rule number column that weren't shown before. The first of these columns is a count of the number of packets that have matched the rule. The second is the number of bytes for those packets. For example, notice that 16,641 packets and about 6.2 MB bytes have been denied by rule 65534. Note It may surprise you to see that any packets have been allowed by the default rule 65535, since rule 65534 should override it. Packets allowed by rule 65535 were allowed before rule 65534 was configured. Locking Down Access to Public ServersBefore locking down any services on a server, you must complete a network security design that will help you know which services to lock down and for whom to lock them. You need to know if the server is a public server that outsiders can reach or a private server only for internal users. You also must find out which specific services are public. Typically Web and e-mail services are public, whereas file and print services are not. On the other hand, you may have outside business partners who need to reach files on the server. In that case, you need to know if they use Apple Filing Protocol (AFP), network file system (NFS), or the Windows standard Server Message Block (SMB) and Common Internet File System (CIFS) protocols. Locking down Windows file protocols is especially important because they are vulnerable to viruses, worms, and Trojan horses. A public server usually allows incoming Web traffic that uses the Hypertext Transfer Protocol (HTTP), port 80. If the public server is an e-mail server, it should also allow SMTP, port 25. A mail server should accept mail from its internal users as well as any public servers. SMTP is used between Internet mail servers as well as between mail clients and servers. You can't predict which Internet e-mail servers will need to send SMTP traffic, so you should allow traffic from any server. (You can configure mail services for protection from junk mail with tools such as SpamAssassin. Usually this isn't done with a firewall rule, although if necessary you could configure rules to deny SMTP from known spammer IP addresses. Spammers can move to a different address, however, and thwart that measure.) To support a public Web and mail server, configure rules to allow all traffic from any to ports 80 and 25, as follows:
All other ports are locked down because of the default rule 65534, which says to deny IP from any to any. To support users reading e-mail, you should allow Post Office Protocol version 3 (POP3, port 110). Usually, you don't need to allow access from any address. POP users are generally local. However, if you want to allow mobile users to read e-mail from anywhere, than you might want to open up POP3 to any address. Note Mail protocols other than SMTP and POP are possible, such as the Internet Message Access Protocol (IMAP, port 143). Follow the directions mentioned for SMTP, except choose a different protocol from the Services menu or enter the appropriate port number. Locking Down Access to Services From a Private NetworkIf you use the Gateway Assistant Setup, your private, internal network will be allowed to send traffic to all addresses and services. Traffic will also be allowed back in because the assistant adds a firewall rule with the keep-state keyword. For example, if the private network is 192.168.30.0/24 and it's reachable via en1, the assistant adds the following rule: allow ip from 192.168.3.0/24 to any via en1 keep-state If you want better control of which services your internal users can reach, you can add an address group for the internal network and then enable only the services you really want in the Services pane. The following rules run on a typical server that allows access to only specific, commonly-used services from the private 192.168.3.0/24 network. SMTP, DNS, HTTP, POP, and DHCP are allowed. 00010 divert 8668 ip from any to any via en0 01000 allow ip from any to any via lo0 12307 allow tcp from 192.168.3.0/24 to any established 12308 allow udp from 192.168.3.0/24 to any out keep-state 12310 allow tcp from 192.168.3.0/24 to any dst-port 25 12310 allow udp from 192.168.3.0/24 to any dst-port 25 12311 allow tcp from 192.168.3.0/24 to any dst-port 53 out keep-state 12311 allow udp from 192.168.3.0/24 to any dst-port 53 out keep-state 12312 allow tcp from 192.168.3.0/24 to any dst-port 80 12313 allow tcp from 192.168.3.0/24 to any dst-port 53 12313 allow udp from 192.168.3.0/24 to any dst-port 53 12314 allow udp from 192.168.3.0/24 to any dst-port 67 12315 allow tcp from 192.168.3.0/24 to any dst-port 110 12315 allow udp from 192.168.3.0/24 to any dst-port 110 65534 deny log logamount 1000 ip from any to any 65535 allow ip from any to any Locking Down and Logging Traffic Through the Server From a Private NetworkNotice from the rules displayed in the previous section that locking down services for an internal network controls access to servers at any address. (See the "any" in this rule; for example, 12310 allow tcp from 192.168.3.0/24 to any dst-port 25). In other words, the rules allow access to services on the Mac OS X server as well as services running on other servers. Since the Mac OS X server is also acting as a router and forwarding traffic, if you allow traffic from the internal network to a service (TCP or UDP port number), the server can either accept the traffic for itself or forward it out its external interface to an external server. The choice depends on the destination IP address in the packets. If you want to be more precise, you must use the Advanced pane in the Server Admin firewall configuration. First make sure you aren't allowing all traffic in the Services pane. Instead you should allow only established TCP traffic (traffic with the ACK or RST bits setin other words, return packets for traffic initiated locally). While still in the Services pane, also be sure to allow outgoing TCP and UDP traffic from the server so it can send replies. In the Advanced pane, configure precise rules to allow traffic to the server. Follow this with rules that allow traffic to any for the services you want to allow users to reach on any server. To log traffic, be sure to click the log button. For example, you might want to log all traffic to HTTP so you can record the IP addresses for websites that your users go to. The following rules resulted from a typical policy that allows only SMTP and POP3 traffic into the server from the internal network, and allows and logs only DNS, HTTP, and HTTP over Secure Socket Layer (HTTPS, port 443) traffic to external sites:
SMTP and POP3 are allowed from the internal 192.168.30.0/24 network into the server's internal 192.168.3.1 address. SMTP is also allowed into the external address of the server, 17.17.17.1, so that Internet mail servers can send messages to the server. These rules were configured in the Services and Advanced panes, using the steps mentioned in this section and in "Locking Down Access to Services From a Private Network," above. Locking Down DNS Zone TransfersA DNS zone is a database of all name-to-address and address-to-name mappings that a DNS server controls. DNS supports both a primary and a secondary server. All changes to the database records for a zone are made in the primary server. The secondary server can acquire the zone data by setting up a TCP connection and transferring the data using TCP packets destined to TCP port 53. In the DNS server configuration (in Server Admin), you can enable or disable zone transfers. Disabling zone transfers breaks the ability of DNS to have a secondary (backup) server: It makes the secondary server unable to acquire the zone data. So, if you have a legitimate secondary server but you don't want to transfer zones to just anyone, you can set up firewall rules rather than selecting the Server Admin box to completely disable zone transfers. For example, to allow only the secondary server at address 192.168.3.5 to acquire zone data from your server whose address is 192.168.3.1, use the following rules: allow tcp from 192.168.3.5 to 192.168.3.1 dst-port 53 deny tcp from any to 192.168.3.1 dst-port 53 Note Normal client/server DNS transactions use UDP, so these rules don't break typical DNS usage. These rules do, however, give you some protection from server mining, which is a type of reconnaissance attack in which an attacker pretends to be a secondary server and requests a copy of the primary server's records. With a copy of the primary zone data, the attacker can learn the IP addresses of named devices. The attacker can then try specific attacks on those devices. Locking Down Pings and Ping RepliesOne type of DoS attack involves an attacker sending a flood of ICMP echo messages, commonly known as pings. Another, less common type involves a server receiving a flood of echo replies (ping replies). This can happen if an attacker is spoofing the server's address and sending a flood of pings. The replies are routed to the legitimate owner of the address: the server. (IP address spoofing is rare these days, because most firewalls are set up to allow out only traffic that uses a legitimate address, which hampers an attacker's ability to use a spoofed address.) To mitigate the effects of a ping DoS attack, you can configure the firewall to deny echo requests or echo replies:
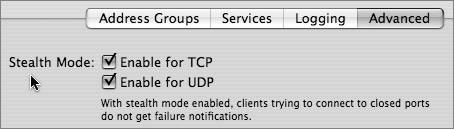
If you prefer, you can use the Advanced pane to enable the default rule: 63200 deny log logamount 1000 icmp from any to any in icmptypes 0,8 Tip Ping-based DoS attacks are somewhat rare, so you should deny ICMP echoes and echo replies only if you think your server may be vulnerable to an attack. If you deny ICMP echo messages, network managers can't ping the server to tests its reachability, which is a problem. Also, services that use ping to locate network services will be unable to detect the server. Enabling Stealth ModeStealth mode makes a server less visible to attacks, especially reconnaissance attacks. You can configure stealth mode for both UDP and TCP. In the case of UDP, stealth mode causes a server not to send back an ICMP Destination Unreachable, Port Unreachable message (ICMP message type 3, code 3) when a sender tries to reach a closed UDP port on the server. Although a determined attacker can still learn a lot about a server in other ways, stealth mode offers some deterrence. For example, if the attacker uses nmap, the nmap software takes a long time to time out and declare that UDP ports are filtered. An impatient attacker might give up. Note from the following output that nmap took 163 seconds when stealth mode was configured (whereas usually it takes only a few seconds): Pretendcos-Computer:~ Pretendco$ sudo nmap -sU 192.168.3.1 Starting nmap V. 3.00 (www.insecure.org/nmap/) All 1468 scanned ports on (192.168.3.1) are: filtered Nmap run completed -- 1 IP address (1 host up) scanned in 163 seconds In the case of TCP, stealth mode causes the server not to send back an RST message when a sender tries to reach a closed port. Note that Mac OS X Server doesn't send back an RST message anyway if you have a deny rule to deny traffic to the port. The underlying ipfw software prevents the sender's SYN packet from ever getting to the protocol stack, which is responsible for sending back a RST. The ipfw deny rule is designed to avoid RST messages, whereas the ipfw reset rule sends back resets. Normally reset rules aren't used, and Mac OS X Server doesn't use them when you configure rules with Server Admin. TCP traffic that ipfw allows, on the other hand, is passed to the protocol stack, which sends back a RST if the port is closed, unless you enable stealth mode. To enable stealth mode:
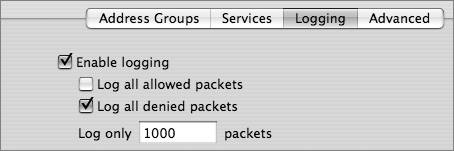
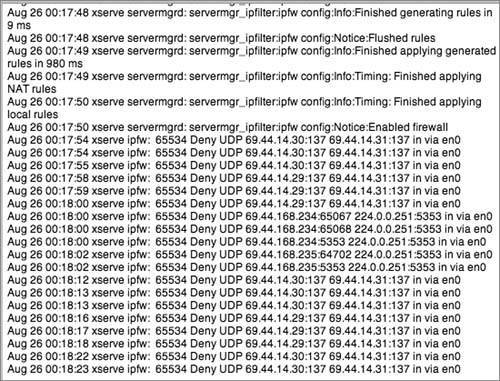
Logging Firewall ActivityLogging firewall activity is an essential component of network security. You should establish policies and procedures that specify how much data is logged and how it is stored and analyzed. For enterprise networks, you should err on the side of logging too much data rather than too little. This will ensure that network managers and security analysts have sufficient data to catch attacks as they occur, analyze trends, and conduct forensics analysis for use in criminal or civil court cases. For small and home offices, it's not as imperative to log lots of data, but it's still important. During the network security design process, decisions should be made about the tradeoffs associated with logging a huge volume of data. Is there disk space available to save the data? (Huge hard drives are inexpensive these days, though, so that's generally not a good reason to limit the amount of log data.) Is it possible an attacker could conduct a DoS attack by causing a server to fail because it has filled a hard drive with log data? Good server software helps avoid such a problem. With the exception of a busy Web server, where allowing all traffic to port 80 would result in an unmanageable volume of data, logging all allowed and denied packets is recommended. Tip Save firewall logs in a protected place that attackers can't reach. Attackers can gather useful data from firewall logs and use that data in future attacks. With Mac OS X Server Admin, you can enable logging for individual rules in the Advanced pane. You can also control logging in a more general sense in the Logging pane. You can log only the packets that are allowed by the rules you set, only the packets that are denied, or both. By default, Mac OS X Server logs only 1000 packets for each rule. This isn't sufficient if you plan to use the data for trend analysis or forensics. A server can easily receive 1000 packets in just a few minutes. Because it's difficult to predict the exact number of packets that a server will handle (and because hard drive capacity is inexpensive these days), you should log all packets by entering 0 in the "Log only N packets" field in the Logging pane. Doing so removes the logamount 1000 words from the ipfw rules that you create. Mac OS X Server saves the log in the /var/log/ipfw.log file. Every 7 days, the server archives the log and starts a new log. The server saves only four archives and deletes older ones. To ensure that data doesn't disappear, use scripts or third-party software to save older log data to a different directory than /var/log. Studying the firewall log is as important as setting it up. You should check the log regularly. You can view the current log within Server Admin. You also can view the log and the log archives using UNIX commands or third-party software. If the number of entries is overwhelming, you can filter which entries are displayed using the Server Admin text filter box. For example, to view denied packets to help you identify attack attempts and troubleshoot your firewall rules:
Enabling and Configuring the VPN ServerThe easiest way to get VPN going is to use the Gateway Setup Assistant. The assistant asks if you want to allow VPN and, if you say yes, configures VPN to use L2TP with IPSec. The assistant also asks you to enter a shared secret. The assistant automatically divides internal IP addresses so that half are used for users who physically reside on the internal network and the other half are used for the virtual users connecting in from external networks, including the Internet. These virtual users can now appear as if they are on the internal network, and use the resources of that network and any networks it connects to, assuming no firewall rules deny them access. If you don't use the Gateway Setup Assistant, you can still configure VPN services from Server Admin. In that case, you have the option of using L2TP or PPTP. PPTP is appropriate for older Windows clients and Mac OS X v10.2 clients. To configure VPN:
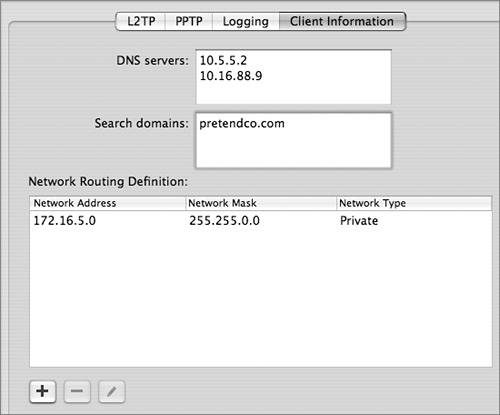
When configuring VPN with Server Admin, be sure to first release some addresses from the DHCP pool for VPN to use. If you don't, Server Admin displays an error message stating the address ranges are not valid. In the Client Information tab, you should also configure a DNS server that the VPN clients can use. The Client Information tab is also useful for specifying that users can reach some networks using the routing that's available where they are currently, rather than the routing they would use as virtual clients of the internal network. For example, perhaps a traveling salesperson needs to access nonsensitive data on the Internet while visiting customers. Assuming the customer can provide the salesperson with Internet access, there's no need for the salesperson to use the VPN tunnel to reach public websites. You can improve performance for the salesperson if nonsensitive network traffic relies on the customer's network, and only traffic back to the headquarters (HQ) private network is encrypted over the VPN tunnel. This makes more sense than requiring nonsensitive traffic to travel from the customer site, over the Internet in an encrypted tunnel to the VPN server at HQ, back out the server across any networks to the HQ Internet connection, and out to the Internet. To configure which traffic uses the tunnel and which doesn't, you can set up VPN network routing definitions using the Client Information tab. Any routes you specify as private go over the VPN connection; any routes you specify as public do not go over the VPN connection, nor do all others not specified. |
EAN: 2147483647
Pages: 258