Apple Filing Protocol
The Apple Filing Protocol (implemented as "AppleShare") provides the bread and butter of Mac OS X file sharing. Sharing between client computers or between clients and Mac OS X Server almost certainly takes place with AFP.
AFP Security History
Traditionally, AFP has been relatively low on the radar of attackers . Running over ethernet and LocalTalk cables, it was easily sniffable, but did not use TCP/IP as a transport, making sniffing a somewhat specialized activity. In the mid/late 90s, Apple introduced AppleShare IP, which enabled AFP to run over TCP/IP, and thus the Internet ”opening it to all the problems of any other Internet protocol.
As you'll see demonstrated shortly, a huge failing in AFP is content encryption. With the data stream passed as cleartext, AFP becomes extremely susceptible to content injection and other hijacking attacks. In a security-conscious environment, AppleShare should never be used to securely transfer data unless it is either tunneled through SSH or via IPSec.
As of early 2003, there are no known local or remote exploits for the AppleFileServer daemon in Mac OS X.
Authentication
AFP provides an extensible user authentication architecture, and includes several default UAMs ( User Authentication Mechanisms), listed in Table 16.1. Additional modules can be installed in /Library/Filesystems/AppleShare/Authentication , but must be present on all machines involved in a connection.
Mac OS X does warn the user when making an insecure connection. But, by default, it will very happily send your username and password in cleartext. This very likely means sending your system account password unsecured.
NOTEI say " very likely" because it is certainly possible to have a system login dissimilar from an AppleShare username. This isn't the default behavior for Mac OS X-based servers, but isn't uncommon. |
Table 16.1. Default UAMs for Mac OS X
| UAM String | Name | AFP Client Description |
|---|---|---|
| No User Authent | No user authentication | Guest |
| Cleartxt Passwrd | Cleartext (unencrypted) password | Cleartext Password |
| Randnum Exchange | Random Number Exchange | ??? |
| 2-Way Randnum | Two-Way Random Number Exchange | Two-Way Encrypted Password |
| DHCAST128 | Diffie-Hellman Exchange | Encrypted Password Transport |
| DHX2 | Diffie-Hellman Exchange 2 | Encrypted Password Transport v2 |
| Client Krb v2 | Kerberos | Kerberos Authentication v4/v5 |
| Apple documents the inner workings of the UAMs at http://developer.apple.com/techpubs/macosx/Networking/AFP/Chapter_1/AFP_Login.html. | ||
What UAM will be used is determined by a request from the AFP client, but is ultimately enforced by the server. If the server does not support a given UAM, the other options are attempted. To view the UAM that will be used for your connection, click the Options button on the server login screen after making the initial connection in the Finder. For example, in Figure 16.1, Two-Way Encrypted Password Transport is being used.
Figure 16.1. View the UAM being used for the login.
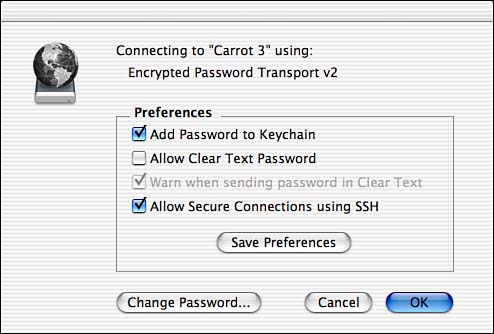
Also included on the connection screen are preferences for password handling:
-
Add Password to Keychain . Store the connection password in the Keychain for quick future access to the resource.
-
Allow Clear Text Password . Allow passwords to be transmitted without any encryption.
-
Warn When Sending Password in Clear Text . This should always be checked. Mac OS X will display a warning dialog if the login will use an unencrypted password.
-
Allow Secure Connections Using SSH . Enable content encryption (if supported by the remote server). This will be covered directly.
Be absolutely certain that, at the least, the cleartext warning is enabled, or, at best, cleartext is disabled altogether. Click the Save Preferences button to store the settings.
Mounting with mount_afp
To force the use of a specific UAM, use the command-line mount_afp utility along with an AFP URL formatted like mount_afp afp:// <username> [;AUTH= <UAM string> ][: <password> ]@] <hostname> [: <port> ]/ <volume name>
You can use any of the UAM strings in Table 16.1, but you must URL-encode them. For these particular strings, all you really need to do is make sure that spaces are replaced with %20 .
Content Encryption
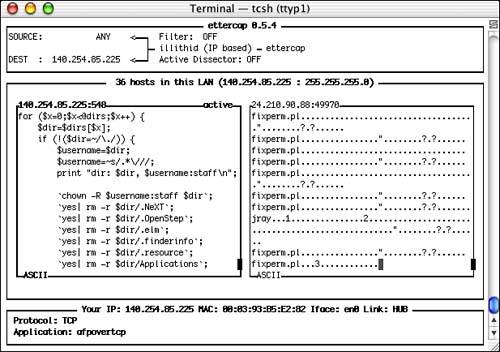
Although the initial password conversation with an AppleShare server can be performed securely, there is no encryption of the subsequent network traffic. If an attacker wants data, AppleShare transfers will play right into their hands. For example, Figure 16.2 displays the output of the sniffer ettercap (see Chapter 7, "Eavesdropping and Snooping for Information: Sniffers and Scanners," for details) as I open a file named fixperm.pl over a basic Mac OS X AppleShare connection. The display of the transmitted data (the pane on the left side of the window) clearly shows the contents of the file while in transit.
Figure 16.2. Appleshare transfers ”clear as can be.
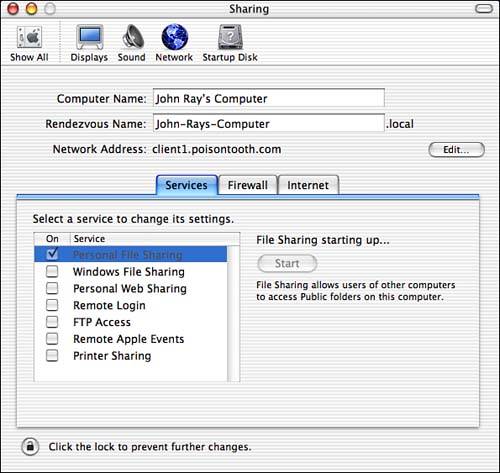
Starting in Mac OS X 10.2, AppleShare connections can be automatically tunneled via SSL, providing full encryption of the traffic. Unfortunately, this feature is "reserved" for Mac OS X Server users; client users have no more control over AppleShare serving than the simple Start/Stop button, shown in Figure 16.3.
Figure 16.3. Start and stop file sharing: easy, friendly, and insecure.
You toggle SSL tunneling on by setting the NetInfo property /config/AppleFileServer/ssh_tunnel equal to 1.
Unfortunately, this is a bit of a problem with using the Apple encryption: The tunneling is very poorly documented, and offers no assurances that it is working. In the course of writing this chapter, I worked with four Mac OS X Server machines, and a number of clients. In almost every case, SSH-tunneled connections were not created, despite the dialog box saying that a secure connection was being established. The data copied over the connection was still easily sniffable with ettercap (see Chapter 7).
Using SSH directly, however, you can create a tunnel that works regardless of whether the point-and-click solution is functioning. SSH is covered in depth in Chapter 14, "Remote Access: Secure Shell, VNC, Timbuktu, Apple Remote Desktop," but creating a tunnel is easy enough to discuss directly here.
To manually tunnel AFP via SSH, use the following syntax:
ssh <username> @ <afp server> -L 10548:127.0.0.1:548
Assuming the remote AFP server is running SSH and you have a username and password for the server, this will tunnel AppleShare traffic from port 548 on the server to port 10548 on your local machine.
You can subsequently connect to afp://127.0.0.1:10548 from the Finder and securely access your files.
TIPYou may want to add sleep <seconds> to the end of the ssh command to provide a "login window" during which you can create the secure connection. Otherwise you'll remain at a command prompt on the remote server ”which represents a potential risk. |
This trick will work with SSL-enabled AppleShare servers (such as Mac OS X), but is not an out-of-the box solution for Windows NT or third-party Windows 2000 Server add-ons.
If you need a secure tunnel, this is an effective solution ”and one that is verifiably secure, unlike the current Apple interface to SSH tunneling.
TIPThe software product "Vapor" (http://www.afp548.com/Software/Vapor/index.html) can be used to create SSH tunnels without using the command line ”if typing isn't your bag. |
Guest Access and Public Shares
If you enabled Personal File Sharing in Mac OS X, you've just allowed anyone with network access to your computer to connect. By default, Mac OS X will accept guest connections and allow mounting, browsing, and storing files to your system. Yes, guest access provides unrestricted file writes to your computer ”while this isn't a security risk in and of itself, an attacker could potentially fill up your entire drive without needing to "hack" your system.
To remove guest access altogether, modify the NetInfo property /config/AppleFileServer/guest_access to equal (the default is 1 ).
Alternatively, you can get rid of the Drop Box folder in each user's Public directory. A drop box is nothing but a folder with write and execute permission for the "dropees" ( chmod 733 <folder> ). To remove the Public directory share altogether, just delete the value for the NetInfo sharedDir property within each user's NetInfo account path . For example, my account name is jray , so I would delete the value for /users/jray/sharedDir .
NOTEDon't just change the sharedDir property, delete it! Otherwise the file server will attempt to share whatever value you've provided. |
TIPNot covered here is access logging. By default, Apple has disabled all logging of the AFP server. This is discussed in depth in Chapter 19, "Logs and User Activity Accounting." |
Service Advertisement via SLP
A somewhat annoying feature of Mac OS X is its insistence on registering the servers that are running on your computer with SLP (Service Location Protocol, http://www.faqs.org/rfcs/rfc2608.html). In Mac OS X server, this includes advertisements for the remote admin server, Web server, AppleShare server, and so on. The client restricts itself to AFP servers only.
Services are registered in the file /private/var/slp.regfile ”each on a single line:
# initial reg file automatically generated afp://10.0.1.250/?NAME=File%20Server&ZONE=,en,10800,afp scopes=DEFAULT radminx://10.0.1.250,en,10800,radminx scopes=DEFAULT servermgr://10.0.1.250?NAME=File%20Server,en,10800,servermgr scopes=DEFAULT http://10.0.1.250:80,en,10800,http scopes=DEFAULT
In early versions of Mac OS X, service lines would often be repeated. When a machine received a new IP address (via DHCP, for example), the service would be reregistered and subsequently appear multiple times when browsed remotely. Although solved around Mac OS X 10.1, this remains one of the most frequently asked questions from readers of Mac OS X Unleashed , and a very simple way that a user can throw a Mac OS X network into disarray. Manually forcing multiple registrations of phantom services can make the Finder's network browser almost useless by flooding it with duplicate server names and making browsing a guessing game. The slp.regfile can be safely removed if it becomes corrupted; it will be rebuilt automatically the next time your machine reboots.
To block SLP, you'll need to manually firewall TCP port 427 on your computer. Apple automatically opens port 427 if file sharing is turned on and the firewall is activated, so be sure that you don't end up with conflicting rules.
| |
| Top |
EAN: 2147483647
Pages: 158
- Chapter III Two Models of Online Patronage: Why Do Consumers Shop on the Internet?
- Chapter VIII Personalization Systems and Their Deployment as Web Site Interface Design Decisions
- Chapter IX Extrinsic Plus Intrinsic Human Factors Influencing the Web Usage
- Chapter XIV Product Catalog and Shopping Cart Effective Design
- Chapter XV Customer Trust in Online Commerce