Terminal Preferences and Configuration As with most Mac OS X GUI tools, a number of things about Terminal can be customized. Because you're probably familiar with configuring GUI apps by now, we'll just hit the highlights and give you an overview of what is configured where. In Preferences under Terminal, shown in Figure 9.1, you configure the shell to use for interaction in the terminal. Because the default shell from Apple is in bash, it's probably best to keep the default setting, Execute the default login shell using /usr/bin/login, rather than specifying another shell, unless you really want something else. If you do decide to specify another shell, you need to set it, close the Terminal Preferences, and open a new terminal window. In the past we've seen this preference take longer than expected to take effect, so you might quit Terminal and re-launch it if you keep landing in the previous shell. Also, here you can set Terminal to open a saved terminal settings file upon launching. You can also configure the type of (hardware) terminal that Terminal claims to be. If you remember, we said that Terminal is a software version of what used to be hardware devices used to talk to machines. There were many different hardware terminal types, and they all spoke their own hardware-specific languages. This setting in the Terminal's preferences enables you to tell Terminal what type of hardware appliance to claim to be, in case the software at the other end of the communications pipe wants to take advantage of special features that a given hardware terminal appliance might have had. We recommend that you leave this with Apple's default setting unless you meet a system that claims to not know how to speak to your Terminal. A setting of VT100 or VT52 is also likely to be widely compatible. Figure 9.1. The shell is configured in the Terminal Preferences, located under Preferences under the Application (Terminal) menu. 
Additional preferences can be chosen by selecting Window Settings under the Terminal menu, or by selecting File, Show Info under the File menu. This brings up the Terminal Inspector, where you can set the following settings via a pop-up menu: Shell, shown in Figure 9.2, enables you to configure the behavior of the terminal window when the shell or application running in it exits. You can choose to close the window, not close the window, or close the window only if the shell exited cleanly. If you change your shell in Terminal Preferences, you see that shell listed rather than bash. Figure 9.2. Under the Shell pop-up of the Terminal Inspector, the terminal's behavior upon exiting is specified. 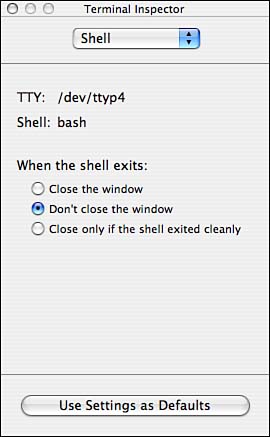
Processes, shown in Figure 9.3, shows you any current processes that that terminal is the parent of. As you'll learn later in this chapter, Unix commands run "in" terminals. If you were to run ls, which we will also see later in this chapter, ls would be added to the current process listing for that terminal window. Here you can also specify the behavior of a terminal window upon closing it. Because Unix commands run "in" terminals, closing a terminal when an application running "in" it is still active can have undesirable results. You can choose to have Terminal prompt you always, never, or only if commands other than the ones listed are running. You can also modify that command list. Figure 9.3. The Processes section of the Terminal Inspector. 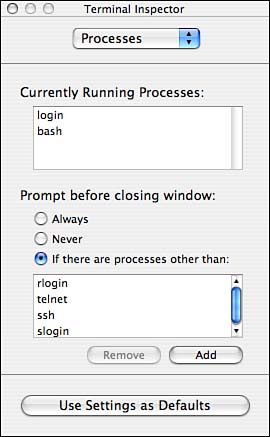
Emulation, shown in Figure 9.4, allows you to configure input and output options. You can configure a number of input options. Here you can translate between Unix newline only and Macintosh carriage return when pasting between Terminal and other applications, as well as configure several other features of the way that the Terminal emulates hardware devices. If your text gets pasted as all one line rather than multiple lines, you probably need to change the newline pasting setting. Another input option is to use Escape Non-ASCII Characters in the stream, which is to say, cause the Terminal to specially mark nonprinting characters. Whether you need to enable or disable this depends on the applications you're trying to run in the Terminal. If weird characters are being displayed instead of formatted text, or your Terminal output is positioned oddly around the screen instead of some characters appearing, try toggling this setting. Reverse Linewrap enables you to travel back up a wrapped line, instead of backspace stopping at the left edge of the window. Strict VT-100 Keypad Behavior emulation configures whether your numeric keypad behaves as defined for the VT-100 terminal, or whether it makes some common, but nonconforming changes in the behavior. Again, the setting you need depends on the software you run. If you get odd behavior from your keypad keys in the software you need, toggle this setting. The Audible Bell setting, as you might expect, causes "bell" events in the terminal to make a sound. The visual bell flashes the terminal when the terminal bell would ring. Figure 9.4. The Emulation section enables you to configure input and output options. 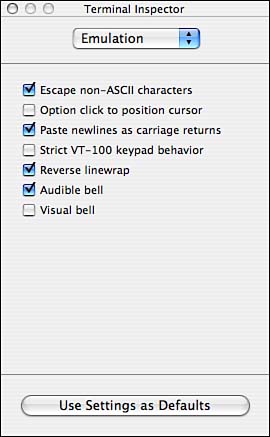
The Buffer section of the Terminal Inspector, shown in Figure 9.5, lets you disable the scrollback buffer, or set how many lines to keep in the buffer. We suggest you use many, many lines! We couldn't live with a scrollback buffer of fewer than 3,000 lines. As memory and disk space become cheaper every day, you'll probably find that you want, and can use, even more. Whether to wrap lines is your choice, as is whether you want the terminal to scroll to the bottom when you enter data into it. You can also choose whether to rewrap lines when resizing a window. Figure 9.5. The Buffer section allows you to configure the scrollback buffer. 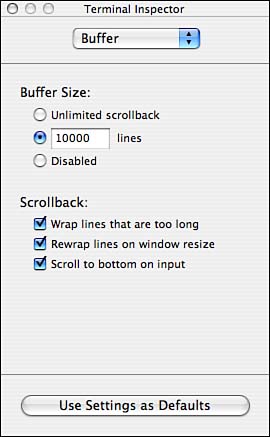
The Display section of the Terminal Inspector, shown in Figure 9.6, lets you specify the type of cursor you want and whether it blinks. Additionally, you can configure the font. Be sure to pick a monospace font, such as Monaco or Courier, because the formatting you see in the terminal is typically based on spaces. Output, documentation, and so on will look better in the terminal. Proportional fonts are better suited for applications such as word processors. Character set encoding is also configured here. We recommend you leave it at Unicode (UTF-8) because some applications require it. With the Unicode setting, however, you might see some characters translated as question marks in a diamond. For those applications, you might want to experiment with other character encoding sets. Drag and drop copy/pasting allows the terminal to interact conveniently with more traditional Macintosh programs but causes some interesting effects if you drop in text that you couldn't have typed in the Terminal. Figure 9.6. In the Display section, you can set the cursor style, text, and character set encoding. 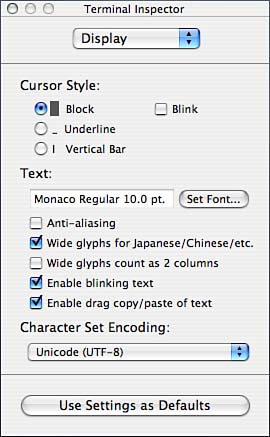
The Color section, shown in Figure 9.7, lets you configure the colors of many features of the terminal, including the background and selection. Additionally, you can set a transparency level for the background and/or an image to use as the terminal background. If you find the colors that some command-line software chooses to use for its text to be annoying or unreadable, you can disable the color and force it all to nice clean black by disabling ANSI color here. Figure 9.7. The Color section of the Terminal Inspector. 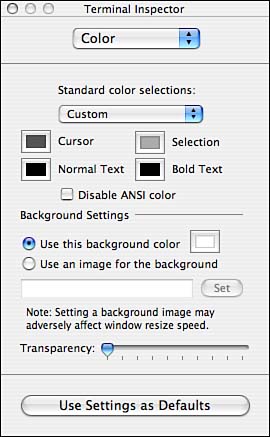
If you want to quickly change colors in the terminal, in addition to the custom option, preset options are available: black on white, white on black, green on black, black on light yellow, white on blue, or blue on white. One of those preset color selections might bring back fond memories of your Apple IIe, or other computer. The Window section, shown in Figure 9.8, lets you configure the window's dimensions by specifying the number of columns and rows displayed. You can also customize what is displayed in the title bar by giving a custom name and checking boxes for what additional data you want to have displayed, such as the shell command name, the window's dimensions, or the current process running in the terminal window. Selecting the current process is particularly useful if you minimize terminals into the dock because this will let you quickly scan through many minimized terminals to find the one you want, instead of needing to open each one to figure out what it's doing. Figure 9.8. In the Window section, you can set window dimensions and the title bar display. 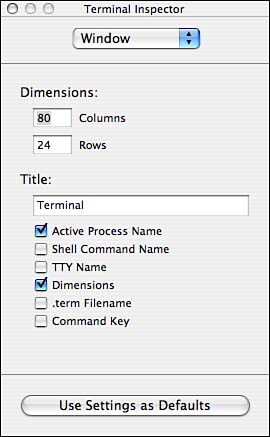
The Keyboard section, shown in Figure 9.9, lets you configure the actual data sent when you press almost any key or key combination on the keyboard. This can be handy both for customizing the keyboard to work with your software, and for finding out just what the keyboard is doing for certain key combinations when you're trying to customize other software to match it. You can also configure whether the Delete key sends backspace (in Unix, backspace typically deletes to the left of the cursor) or delete (which typically deletes to the right of the cursor). If you have software that requires a meta key (a virtually obsolete keyboard key once popular on some terminals), you can set the option to send the meta sequence. Typically this is not needed because almost all software that expected to see meta as a character sent from the keyboard now uses the escape key instead. Figure 9.9. In the Keyboard section, you can set keyboard mappings and the behavior of Delete and Option keys in the Terminal. 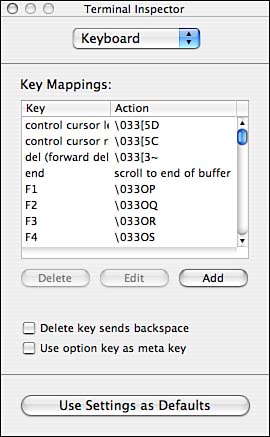
The Use Settings as Default button that appears at the bottom of each item in the Terminal Inspector allows you to save those settings as your default settings, so that whenever you open a terminal, it opens with those saved settings. The Save and Save As items are accessible from the File menu. These allow you to save the preferences of a Terminal window or window set. This can be useful, for example, for saving different colored terminals that you use for different purposes, or terminals that are preconfigured to open running a particular command. Open allows you to open a terminal window using settings that you saved to a .term file. Also accessible are the Save Text As and Save Selected Text As items. These allow you to save the complete text buffer of the terminal, or whatever text you have selected in the terminal. The New Command item of the File menu produces a dialog box in which you can enter a command to run in a new terminal window. If the command doesn't produce an interactive environment, the new window just tells you that the command ran, which isn't very useful. If the command is an interactive one such as emacs (emacs is a powerful text editor that you'll learn about in Chapter 13, "Using Common Command-Line Applications and Application Suites"), it produces a new window and runs the specified command in that window. TIP Although the New Command item might not sound particularly useful at first, it is actually a powerful tool. The point isn't to give you yet another way of running a program in a terminal, but rather to give you a way to save a preference for what program is running in a terminal. If you use the New Command to start a program in a terminal, and then Save that terminal from the File menu, you'll get a Terminal document that you can double-click, and have that command executed for you. If you're constantly using a terminal to log in to another system, or to run an editor, and so forth, you can save Terminal documents for each, and just double-click the saved document to launch each application in its own terminal as necessary. This becomes a real time-saver when the commands you run have a large number of command line options, and take a long time to type without errors. |
The File menu item Set Title is another way to bring up the Terminal Inspector. Of course, the Terminal Inspector comes up with the pop-up menu set to Window, but you can still navigate through the inspector. Additionally, the File menu includes the option to send a Break signal to the terminal, which can be invaluable for stopping a program that has gone awry without taking the drastic step of closing the terminal. Most of the items in the Edit menu are familiar. The Find item, however, leads to an option to bring up the Find panel, from which you can search for data in the Terminal's buffer. The Font and Windows menus have the properties you already expect. Each terminal window itself has an option to view it as a split window. Click on the icon (little square with a squiggle in it) at the upper right of the terminal window. You can adjust the vertical height of the resulting split window sections by dragging the bar. The top section stores your buffer, and the lower window generally contains your current activity. The split window may be especially useful for running an editor and using the scrollback buffer for items to copy and paste into the editor. Figure 9.10 shows an example of the split window. Figure 9.10. The Terminal window includes an option to be displayed as a split window. 
|