Connecting to a VPN
| < Day Day Up > |
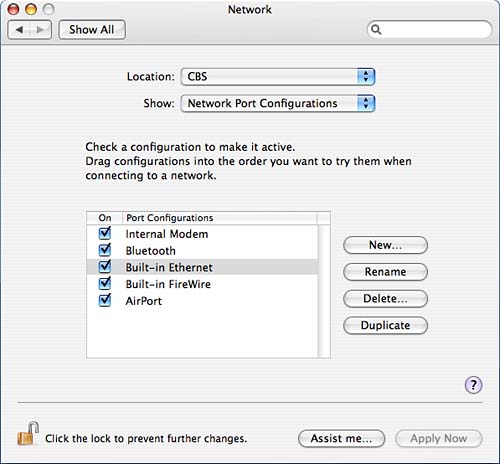
Configuring Network ConnectionsThe Network preferences pane is the GUI brain center of the OS X interface to TCP/IP. This pane, in actuality, just provides a series of hints to the underlying Unix TCP/IP control software, but it does so in a much prettier and often more convenient fashion than twiddling configuration parameters at the command line. The primary control with which you should familiarize yourself is the Configuration menu. In previous versions of Mac OS, various portions of the networking software were configured by separate control panels, and each panel was controlled by its own independent saved configuration setting. Mac OS X has instead placed all network configurations under a single parent control pane, with an umbrella configuration setting that covers TCP/IP, modem control, AppleTalk, and location settings. The two main options in this pane are the Location and Show options. Location can be set to Automatic, New Location, Edit Locations, and any locations that you've already created. What appears by default under the Show menu varies with your system's hardware. Options include Network Status, Internal Modem (dial-up connection, if you have a modem), IrDA modem (infrared port, if you have this interface), Built-in Ethernet, AirPort (if your machine has an AirPort), and Network Port Configurations. The collection of these that are visible to you may also be modified by enabling and disabling each connection type on a per-location basis. Available to each subpane are Assist Me and Apply Now options as well as the Help Viewer. The Assist Me option takes you directly to the Network Assistant. Note that this System Preference requires administrative access to change. Viewing Network Connection StatusTo view your network connection status, select Network Status in the Show option of the Network preferences pane. This subpane shows you the status of your network ports. For an active network port, you can see such information as your machine's current IP address. Additionally, you can select a network port here, and configure it or connect using it. Figure 7.2 shows the Network Status subpane for a PowerBook. The appearance of this subpane varies with your hardware and what hardware you have disabled and whether you have any virtual private networks (VPNs) configured. Figure 7.2. The Network Status subpane of the Network preferences pane.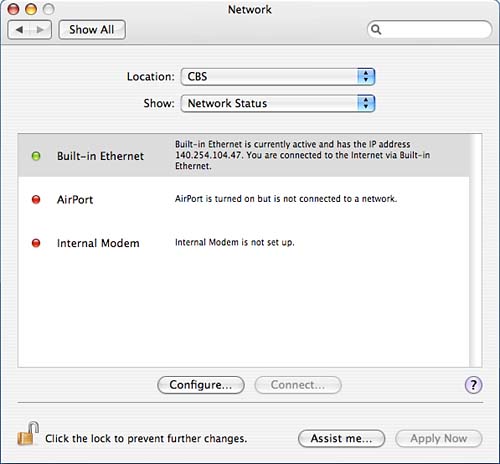 Network Port ConfigurationsMost of the available selections in the Show menu switch between subpane groups specifying configurations for particular network interfaces. The Network Port Configurations subpane doesn't provide network configuration but allows you to enable and disable already existing configurations for the interfaces and create new configuration sets. Figure 7.3 shows the Network Port Configurations subpane of the Network control pane. To make network configuration as easy as possible, Mac OS X attempts to automatically detect and select the correct network configuration for any given situation. This convenience comes at a slight cost in startup time, so unless you actually intend to use all the available configurations, we don't recommend leaving all the configurations enabled as shown in Figure 7.3. Figure 7.3. The Network Port Configurations subpane of the Network preferences pane.
If you've already experimented enough to find the location settings and mastered the ability to switch between them, the capability to save multiple configurations for a single interface assigned to the same "location" might seem redundant. It becomes useful, however, in situations in which you have multiple IP addresses at the same conceptual location on a single network interface. Without requiring you to iterate through different location settings, setting up several different configurations would allow the system to automatically search through each until it found a working set of parameters. This might occur if you have multiple in-building networks with different IP ranges on each, but with each connected to share resources. Another possible use is if you have a number of different dial-up service providers and want your machine to try each until it finds an open one. Setting Up Network InterfacesThe available network interfaces you may configure varies with your hardware and whether you have configured any VPNs. We will briefly look at setting up the built-in ethernet, built-in FireWire, internal modem, Bluetooth modem and AirPort interfaces. The available subpanes under each interface vary, but the interfaces tend to use some subset of the same subpanes. Table 7.1 details which subpanes and interfaces go together by sorting on the subpane. Because the table is based on the G4 PowerBook, you might not necessarily see an interface that is on your system listed in the table. The TCP/IP Network subpane is listed twice at the end of Table 7.2 to show that the options are the same for different groups of network interfaces. Table 7.2 details the same information by sorting on the network interface. Table 7.2 reflects the experience you have as you use the Network preferences pane. This section details the information by Network subpane in the expectation that as you are configuring your interfaces, it will be easier to look for each subpane, rather than to look for an interface whose description might contain one or more comments to see another section.
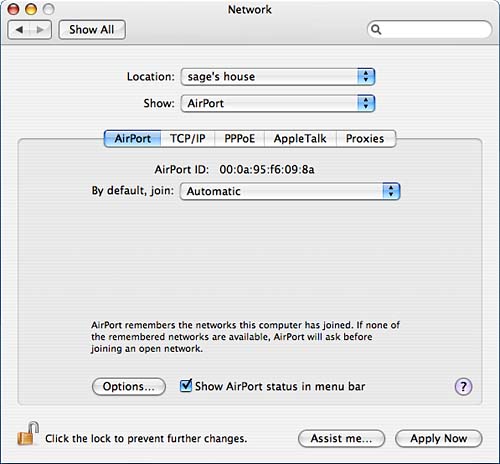
AirPortThe AirPort subpane, available only for the AirPort interface, is shown in Figure 7.4. In this subpane, you can choose your default AirPort network either automatically or by specifying one, and enter your network password if one is required. Note that when there is a preferred list of networks, the subpane says that the AirPort will connect to the first wireless network in the list. This subpane also displays your AirPort ID. Figure 7.4. The AirPort subpane of the AirPort interface in the Network preferences pane.
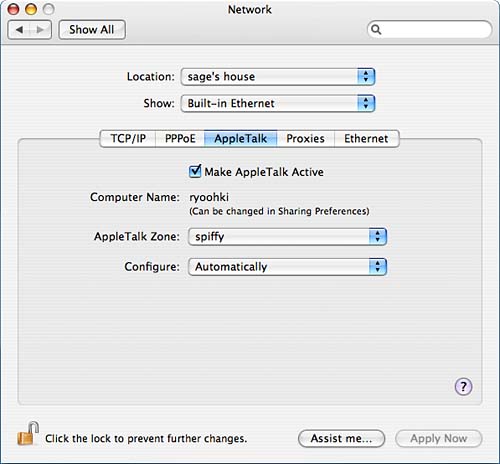
The Options section contains a variety of options you can configure. If the AirPort finds no preferred network, you can specify whether it should ask before joining an open network, automatically join an open network, or whether it should keep looking for recent networks. Here you can also set whether an administrative password should be required to change wireless networks and to create computer-to-computer networks. Additionally, you can set the AirPort to automatically add new networks to the preferred network list, disconnect from the wireless network when you log out, and enable interference robustness. You can also choose to show AirPort status in the menu. This is a recommended convenience, particularly because it allows you to see at a glance what your AirPort signal is like and which network you are connected to. From the menu, you can also turn the AirPort on or off, create networks, use interference robustness or open the Internet Connect application. AppleTalkAppleTalk is a communications protocol pioneered by Apple in the era of the Macintosh Plus. This protocol was designed for networking small collections of computers on relatively small networks. Because it was designed to facilitate network-building by people with no interest in being network designers or administrators, AppleTalk is a rather chatty and inefficient protocol. Because of its ease of use, it has survived the transition to a mostly ethernet-based world and prospered in environments where its inefficiencies do not impair other network services. Because of its intimate association with Apple's printing and file-sharing software, AppleTalk is sometimes thought of as actually being disk services and print services. In reality, it's a communications protocol, over which disk, print, and other services can be delivered. Because of this, like TCP/IP, AppleTalk connectivity is configured from the Network control pane, and services that need to use AppleTalk are configured elsewhere. AppleTalk is enabled and configured from the AppleTalk subpanes of the Built-in Ethernet and AirPort configuration sets.
Figure 7.5 shows the AppleTalk subpane for the Built-in Ethernet configuration (the AirPort version looks identical). The AppleTalk settings configured here are specific for the interface configuration set that you're editing. You can choose to configure AppleTalk automatically or manually. Unless otherwise directed, automatic is probably sufficient. Figure 7.5. The AppleTalk subpane of the Network pane.
In the AppleTalk subpane, the following options can be configured:
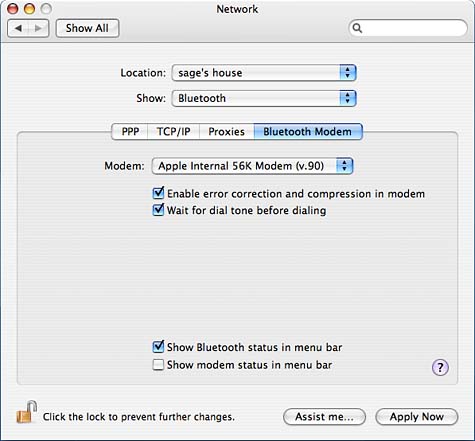
Bluetooth ModemThe Bluetooth Modem subpane, shown in Figure 7.6, is available only for the Bluetooth network interface. In this subpane, you configure which modem you have. You can also specify whether to enable error correction and compression in the modem and whether to wait for the dial tone before dialing. Finally, you can specify whether to show Bluetooth status in the menu bar and whether to show modem status in the menu bar. Figure 7.6. The Bluetooth Modem subpane of the Bluetooth interface in the Network preferences pane.
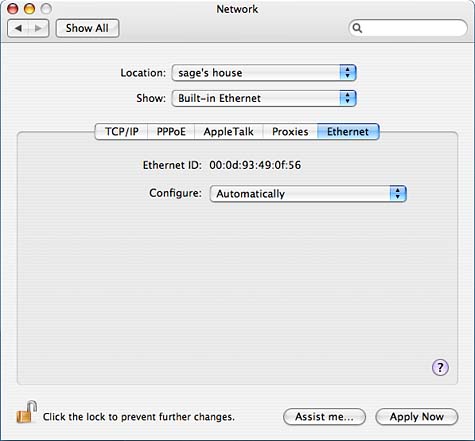
EthernetShown in Figure 7.7 is the Ethernet subpane, available only for the Built-in Ethernet interface. It displays your machine's ethernet ID and allows you to configure the hardware either automatically or manually. Unless told otherwise by your network administrator, always choose automatically. Choosing the wrong settings manually can cause a lot of unnecessary headaches for you. Figure 7.7. The Ethernet subpane of the Built-in Ethernet interface in the Network preferences pane.
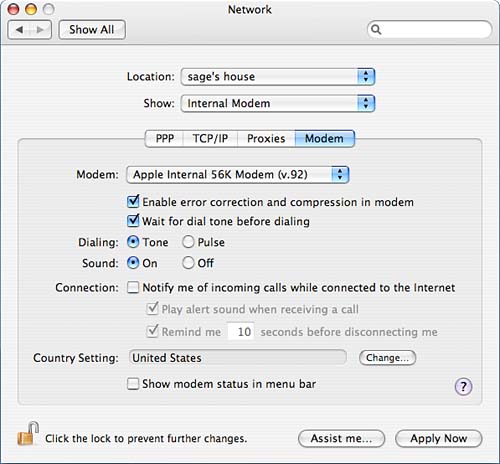
ModemThe Modem subpane, shown in Figure 7.8, allows you to select your modem, configure the dialing type, determine whether you want to hear your connections as they progress, and indicate whether you want to be notified of incoming calls while you are connected to the Internet. Additionally, here you can choose to display modem status in the menu bar. Figure 7.8. The Modem subpane of the Internal Modem interface in the Network preferences pane.
PPPThe PPP (Point-to-Point Protocol, carried over a dial-up connection) subpane is available for the Bluetooth and Internal Modem interfaces. Figure 7.9 shows the PPP subpane for the Internal Modem interface; however, the Bluetooth interface uses and identical PPP subpane. Under this subpane, you can configure how to connect to your ISP. Almost all ISPs use PPP to provide TCP/IP over dial-up connections. If yours does not, you will need to follow its instructions, which will probably include installation of some custom software. Figure 7.9. The PPP subpane of the Internal Modem and Bluetooth configurations allows you to specify your dial-up account information.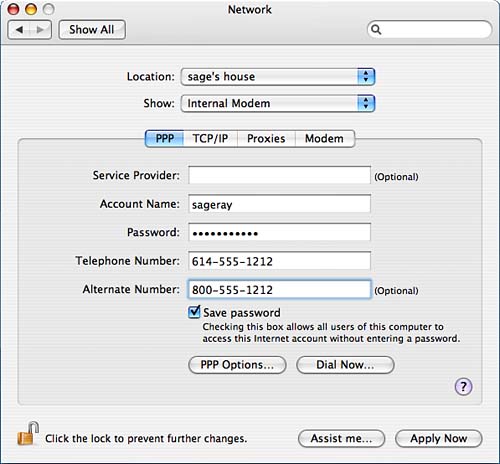 The PPP subpane has the following fields:
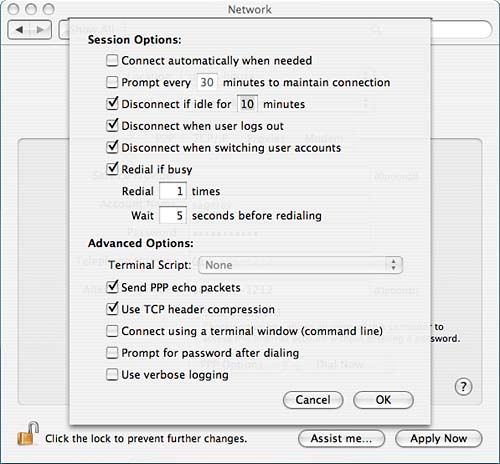
The PPP subpane also has a PPP Options button and corresponding sheet that enables you to configure several other options with respect to the dial-up connection, as shown in Figure 7.10. This figure is shown for the Internal Modem interface, but an identical Options sheet appears for the Bluetooth interface. Figure 7.10. The Session and Advanced options drop-down pane for dial-up connections.
The sheet enables you to configure the following:
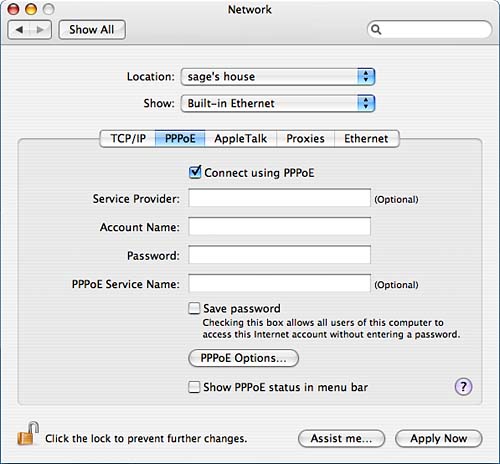
PPPoEAs mentioned earlier, TCP/IP is just one of a number of communications protocols. It's actually possible to run multiple communications protocols over the same piece of wire at the same time. In a clever use of this capability, it's possible to establish a PPP connection via ethernet wiring rather than a phone line; hence the name PPP over ethernet or simply PPPoE. If your service provider gives you this option, you can configure it with the subpane shown in Figure 7.11. This subpane is available for the Built-in Ethernet and AirPort interfaces. The options available in this subpane are exactly analogous to the options under the dial-in PPP configuration. Here you can also choose to show the PPPoE status in the menu bar. Figure 7.11. The PPPoE subpane of the Built-in Ethernet configuration set.
In this subpane, you have the following fields to fill in:
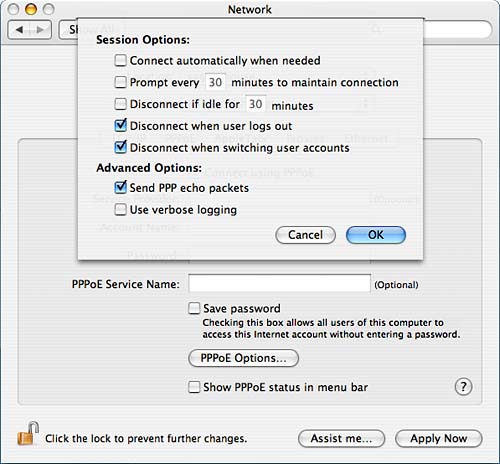
The PPPoE subpane has a number of advanced options that can be configured from a sheet that appears when the PPPoE Options button is clicked. Shown in Figure 7.12, these options allow you to configure the behavior of your PPPoE connection. Figure 7.12. The PPPoE Session and Advanced options sheet for the PPPoE subpane.
The pane enables you to configure the following:
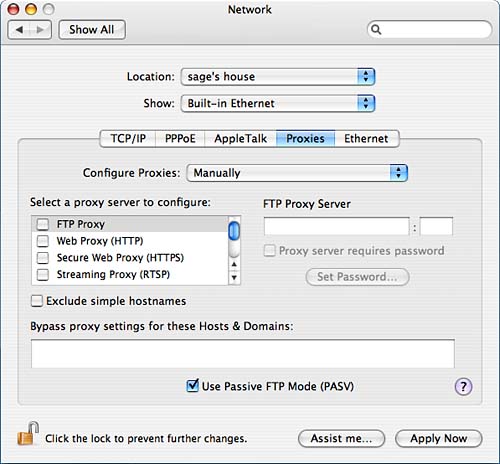
ProxiesIf you're on a network segment where you must connect to proxy servers instead of directly to outside services such as FTP and web servers, the Proxies subpane is the place to tell the system about the proxies. Shown in Figure 7.13, the Proxies subpane, available for all the network interfaces, allows you to select what is needed and how to contact the proxy types. Figure 7.13. The Proxies subpane of the Built-in Ethernet configuration option.
Under the Proxies submenu, you can choose to configure your proxies using a PAC (Proxy Auto Configuration) file, and point the system to it, or you can configure your proxies manually. The Proxies submenu proxy types are
Here you can also set whether to exclude simple hostnames. Additionally, you can configure your machine to use PASV (passive) FTP mode for transferring data, an option that will probably be required if you are behind a firewall or on a NAT (network address translation) private local network. Finally, you can configure hosts and domains in which the proxy settings should be ignored. If you contact servers both inside and outside your local firewall, you might want to provide your local network information for this option. Therefore, your machine doesn't need to contact the proxy and then reconnect inside your local network for interior connections. TCP/IPIf you are connected to your network via an ethernet connection (a physical chunk of wire, typically twisted pair, which looks like a bulky phone cable), you need to configure your connection under the Ethernet configuration option. Because switching from one physical transport to another requires changing only a little bit in a few protocol layers, it's similar to dial-up configurations you've already seen. Under the TCP/IP subpane, by default, you have the option to configure IPv4 and/or IPv6. Generally, you have the option of providing manual configuration settings or of getting your configuration parameters from a server. For IPv4, which you will most likely be using, you can configure your Ethernet port manually, using DHCP with a manual address, using DHCP, or using BOOTP, or you can turn it off. For IPv6, you can configure automatically or manually, or you can turn it off. Under the TCP/IP subpane, shown in Figure 7.14, you can configure how your TCP/IP stack gets its control and configuration information. The manual configuration settings for IPv4, shown in the figure, allow you to configure individual options by hand. Figure 7.14. The TCP/IP subpane, showing available options for the Built-in Ethernet configuration set.
If you need to provide manual configuration information for IPv4, you need to know and fill in the following information you should be able to get this information from your network administrator:
This section automatically displays an IPv6 address for your machine, but you can choose to automatically or manually configure it. If you need to provide manual information for IPv6, you need to be able to manually fill in the IP address, the router, and the prefix. Get this information from your network administrator and write it down carefully.
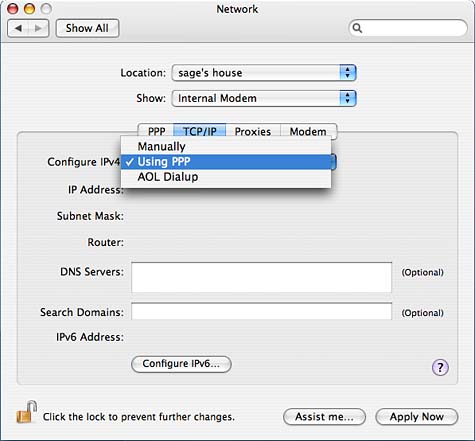
For modem TCP/IP configuration, you have essentially the same options available as you do for ethernet. Figure 7.15 shows the options available for TCP/IP setup under a modem connection. Most dial-up Internet service providers use PPP to service connections, so you'll probably be selecting the Using PPP option. Under this pane, you have partial manual configuration of the network parameters, but it would be unusual if an ISP did not provide the information for these settings automatically, by using PPP. Figure 7.15. The TCP/IP options for the modem configuration sets are essentially identical to those for the Built-in Ethernet configuration.
Using the Location ManagerWith Mac OS X, Apple has made location management considerably easier than it was with previous versions of the Macintosh operating system (although somewhat less powerful). Instead of managing configurations for each protocol in its own pane and then switching between different collections of the configurations with the Location Manager tool, interface configurations in Mac OS X are accessed directly under the location setting. Figure 7.16 shows the entirety of the location management interface in Mac OS X. Selecting a location from this menu switches between location-specific settings in the subpanes below it. From this menu, locations can be chosen, duplicated, and edited. Figure 7.16. The location management menu in the Network preferences pane.
Each location in the Locations menu carries with it settings for the Configure menu and the subpanes that it switches through. That is, when you are entering information into the specific interface configuration panes, it is assigned to the currently displayed location. If you switch to a new location, you get new information and configurations in the interface configuration panes. If you set the location setting to Automatic, the system attempts to guess the correct location information and switches between locations, based on what it can determine regarding its network environment.
|


| < Day Day Up > |
EAN: 2147483647
Pages: 251