The CUPS System Interface Despite its ubiquitous presence, printing, as a process, is not a simple or conveniently packaged application. The interfaces need to be universally available, flexible, and extendable, without that flexibility jeopardizing the software that relies on it. It needs to seamlessly operate over group of devices that range in sophistication from knowing how find a particular point on a sheet of paper and place a black dot, to having complete operating systems and internal programming languages, and it needs to present all of these to the user with a cohesive, consistent interface. This calls for a considerable amount of programming glue, in the form of little programs that live between larger applications, and between parts of the operating system itself, and which handle the job of ironing out printing process details so that everything thinks it's talking to a single, cohesive interface. Most of the software acting as glue between the Print Center interface, the command line, and GUI applications is based on or related to CUPS. CUPS is a general printing solution that's been being developed on other Unix variants for several years, and now is available on Mac OS X. Because one of the goals of CUPS is to bring AppleTalk-like printing simplicity to Unix, and because the other Unix systems don't have the Print Center built in, CUPS itself has a nice configuration and control system of its own. This system is accessed through a web page interface that you should be able to find via the URL http://127.0.0.1:631/. As the Print Center/Printer Setup Utility matures, this interface becomes more and more redundant. It still, however, presents a few capabilities not available through the Print Center. Perhaps more interestingly, it allows GUI-based remote configuration and administration of printers via a web browser, so it's worth being familiar with, even if you don't use it regularly. As mentioned previously, one really nice feature of CUPS is the availability of an enormous number of printer drivers through a range of sources. Installation and configuration aren't exactly as friendly as Mac users will prefer, but the steps necessary to install an incredible number of printing devices under Mac OS X should be comfortable actions to you by the time you're halfway through this book. Here, we'll show you how to extend the range of your system's printing capabilities by using some of the publicly available tools, and how to configure the CUPS printing system through the web interface. Specifically, we'll carry out some of the one-time setup necessary to use the full power of CUPS. (Apple leaves out a few important bits, apparently assuming that all you're interested in printing with is relatively recent printers.) The following procedure really isn't overly complex even without reading ahead, so if you're mildly adventurous and have a printer that you can't configure through the Print Center and you want to see it printing, have at it. In the following example, I'll install the components necessary to get a 1984 Apple ImageWriter I dot-matrix, serial-interface printer to function as a USB-connected PostScript printer on a brand-new Mac Mini. Yes, this is a ludicrous printing combination. The printer reaches somewhere around a roaring four pages per hour, and if you can find ribbons for it, they probably cost more than a new "disposable brand" ink-jet at your local Wally World, but it demonstrates just how flexible CUPS really is as a printing environment, and it covers each of the steps necessary to get any other CUPS-supported printer up and running on your system. If you have a different model printer, the only substantial change in the following instructions is to substitute your printer type at the step where you create the PPD file describing the printer to the system. If you just want to use the web interface for controlling your printer setup, you can skip all of this installation business and skip ahead to the section on configuring printers with CUPS. The installation details here are important to you only if you want to use one of the several thousand printer models that are supported only through the efforts of the CUPS user community and the custom/open-source printing solutions that they have created. Installing CUPS foomatic Drivers and Support Software To install the underlying drivers to tie new (or old) community-supported printer types into the system, download the foomatic-rip filter set from http://www.linuxprinting.org/foomatic.html. The current version as we're writing lives at http://www.linuxprinting.org/download/foomatic/foomatic-filters-3.0.2.tar.gz. The goal is to get a script that lives in this file (foomatic-rip) into the directory /usr/libexec/cups/filter/. At this point, the authors haven't made this exactly Mac Standard easy. Hopefully, that'll change eventually, but if it doesn't, you can always follow these instructions: 1. | Install Ghostscript. Ghostscript is a software PostScript and PDF interpreter that also contains an amazing number of output drivers for assorted printers. Apple includes many bits of the Ghostscript suite by necessity because the rest of CUPS depends on it, but for reasons we haven't been able to fathom, Apple has so far omitted the critical gs command-line driver that almost every other Ghostscript-compatible application expects to be able to use.
For many printers, Ghostscript can convert directly from PostScript to the printer's natural binary language. For others, it can be used to convert from PostScript into a generic intermediate image format that can be used as input by a printer-specific driver. Ghostscript, compiled with almost every supported printer type enabled, as well as some special printer-driver software is available from the GIMP-Print project at http://gimp-print.sourceforge.net/MacOSX.php3. With 10.3, Apple even started providing most of the GIMP-Print software, but even as of this writing, it doesn't provide the crucial Ghostscript module. From the looks of things, Apple is convincing the GIMP-Print folks to mutate their software to work without Ghostscript when run on Mac OS X, rather than the GIMP-Print project convincing Apple to include the industry-wide standard solution, so don't expect this omission to change any time soon.
Download and install the most recent version of EPS Ghostscript that the GIMP-Print folks have listed even though they say it isn't necessary for GIMP-Print under Panther or newer versions of Mac OS X, it's still necessary just to have Ghostscript functionality.
| 2. | Open a Terminal window (that's the Terminal program in Applications/Utilities, if you haven't worked with it before). You're about to use the command line, but you don't need to know what any of this means right now; you'll learn about it all in a few chapters. Type the following command at the prompt that appears, and then press the Return key:
curl -O http://www.linuxprinting.org/download/foomatic/foomatic-filters-3.0.2.tar.gz
(All on one line, no returns in it, despite the fact that we can't get Sams to print it properly in the book.)
If this complains that the file's not found, check your typing very carefully. If that's not the problem, point Safari at http://www.linuxprinting.org/download/foomatic/ and check to see whether the version number has changed. If so, make the appropriate change in the Terminal and try again.
| 3. | In the Terminal window, type gunzip foomatic-filters-3.0.2.tar.gz and press the Return key (if the version has changed, replace foomatic-filters-3.0.2.tar.gz with the name of the foomatic-filters file you've downloaded).
| 4. | Type tar -xf foomatic-filters-3.0.2.tar and press the Return key.
| 5. | In the Terminal window, type cd foomatic-filters-3.0.2 and press the Return key. Now type ls and press the Return key. You should see a list of files that looks something like this:
COPYING config.cache foomatic-rip CVS config.log foomatic-rip.1 ChangeLog config.status foomatic-rip.1.in Makefile configure foomatic-rip.in Makefile.in configure.in install-sh README filter.conf makeMan TODO foomatic-gswrapper makeMan.in USAGE foomatic-gswrapper.1 make_configure acinclude.m4 foomatic-gswrapper.1.in aclocal.m4 foomatic-gswrapper.in
In the Terminal window, type ./configure and press the Return key. Next type make and press Return, and finally type sudo make install and press the Return key. (You've just built a piece of Unix software from scratch a subject you'll learn much more about in the chapters to come.)
To finish up, type cd /usr/libexec/cups/filter/ into the terminal and press Return. Then type sudo ln -s /usr/local/bin/foomatic-rip ./ and press Return. You're now finished with the terminal for a while.
|
The base software necessary to support the community-written and other specialty drivers for CUPS is now installed. Now it's time to install a PPD (PostScript Printer Description) to tell CUPS specifically how to speak to your printer. In my case, again, I'm going to find one that will let me treat my ancient tractor-feed dot-matrix Imagewriter as a PostScript printer. Amazingly, enough code can be stuffed into a PPD to allow even this transformation to take place. 1. | Point your browser to http://www.linuxprinting.org/printer_list.cgi. Select an appropriate PPD file for your printer. This PPD contains not only information on the details of printer capabilities but also the information necessary to have CUPS translate into the language that this printer understands.
For example, http://www.linuxprinting.org/show_printer.cgi?recnum=Apple-ImageWrite points to a page with printer definitions to feed into CUPS and the foomatic-rip driver to allow you to print PostScript to the ancient but indestructible Apple ImageWriter I dot-matrix printer. If you were installing this, you'd follow the link, for example, to the iwhi driver, and select the Download PPD file option from the Recommended driver section of the page.
| 2. | Wherever this file lands on your machine, you need to copy it to /usr/share/cups/model/<filename>, where <filename> is the PPD file that you downloaded. In my case (for the ImageWriter I), the file is Apple-ImageWriter-iwhi.ppd. After you have the PPD file in the /usr/share/cups/model directory, you're almost finished with the installation.
| 3. | Some printers require a separate, printer-specific filter installation in addition to the foomatic-rip filter and the PPD. The same page that points to the PPD contains instructions on downloading and installing this filter. Follow these if necessary for your printer.
| 4. | If your system does not include back-end files named serial and file in /usr/libexec/cups/backend/, download the serial and file CUPS drivers from http://www.macosxunleashed.com/downloads/ and install them in this location. Make sure that the files have execute permission (chmod 755 /usr/libexec/cups/backend/file; chmod 755 /usr/libexec/cups/backend/serial, or use the Finder's Get Info permissions dialog). If we've gotten a working parallel driver by the time you read this, it will be available from the same location.
To enable file-type output, you need to edit /etc/cups/cupsd.conf and change the line that reads
#FileDevice No
so that it reads
FileDevice Yes
CAUTION This change could incur some security problems. For example, it potentially allows users to write into any file that the CUPS system can write into. It's the most debuggable of the interfaces, however, and we're going to show you how to write your own basic printer driver, so if you're inclined to hack at your system or want to get a freaky old printer to work, you might need to temporarily enable it. Unfortunately, the pipe-output back-end type, which is almost as nice for debugging, doesn't seem to currently be supported, or as straightforward to hack into working condition. |
| 6. | All that now remains to do is restart the cups daemon (sudo killall -HUP cupsd, or just restart your machine if that doesn't make sense), and you should be able to add a printer using this new information.
|
CAUTION You might find it necessary to restart your machine regardless of whether you're comfortable restarting the daemon. We've experienced some erratic behavior when restarting the CUPS daemon both through the simple kill statement and through the StartupItems script. |
Now you have CUPS installed and printer drivers for a number of printers available as well. If you need additional drivers for other printers, you can continue creating PPDs at http://www.linuxprinting.org/ and installing them on your system or you can wait until later; you can always add others whenever you need them. Configuring Printers Through the CUPS Administrative Web Interface After the cupsomatic/foomatic-rip drivers and support software have been installed and a proper driver for your printer is available, setting up the printer requires a number of steps through the CUPS administration web interface, accessed through http://127.0.0.1:631/: 1. | The first is adding a few identifying bits of information to the system. Figure 6.10 shows the first step reached under the CUPS Add Printer item. This item is linked from a number of places in the CUPS administrative web pages. The easiest to access is under the Do Administration Tasks item from the main http://127.0.0.1:631/ page. You will need to enter your user name and password to use the administrative settings.
Figure 6.10. The first step of setting up a printer under CUPS is defining a name, location, and description. 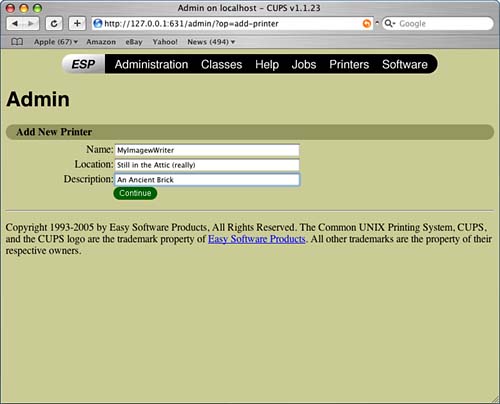
| 2. | The next step is selecting the type of connection, as shown in Figure 6.11. This is moderately cryptic because several connection types seem to overlap. For my printer, I'm going to use the file connection type. On Unix systems, serial devices just look like files that you can write data into. I have a serial device that appears to be working, and the latest CUPS also appears to directly detect /dev/ directory devices as potential print targets, so I probably don't need to use this less secure way of running the printer. However, by using the file device, I can conveniently point the output at a different file if I choose, and that will let me debug; or, if I'm feeling hackish, add additional processing to the print pipeline without needing to significantly modify the printer. If you really just want to get an older printer working, using either the serial or direct-device drivers would be a smarter long-term choice. The point of making an over 20-year-old printer pretend it's a modern PostScript device, however, is rarely rooted in practicality!
Figure 6.11. The second step in configuring the printer is selecting the type of connection being used. 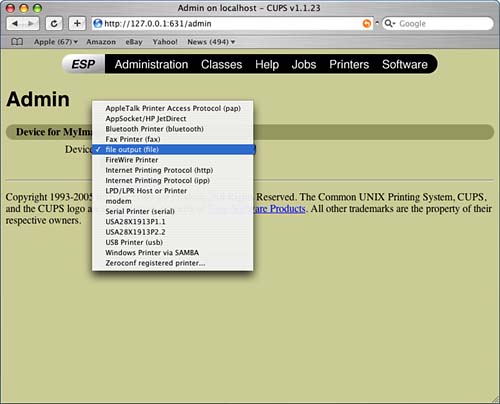
The following list details the known printer connection types that CUPS can use. Not all of these might be available on your system, and what you can use will depend on a number of configuration choices you make, and optional software that you might have installed.
AppleTalk Printer Access Protocol is standard AppleTalk printing, which should also include LaserWriter printers. Most of these can probably also be added through the Print Center. AppSocket/HP JetDirect is an option to talk to HP JetDirect servers. Most of these support AppleTalk or LPR printing, so there's little reason to use this option. Bluetooth Printer is an option for Bluetooth linked printing devices. There is no provision for creating a link in the CUPS web interface, so this will be useful only for already linked printers. Internet Printing Protocol (HTTP) is for IPP printers accessible via HTTP. Currently, CUPS is about the only system you'll see using IPP, and your local CUPS printers will appear in the Print Center. You can configure remote printers here using this option. Internet Printing Protocol (IPP) is for IPP printers accessible through IPP's own protocol. Again, CUPS will be hosting most of these, and you can access them through the Print Center if they're local, or set them up here if you need to provide a remote address. LPD/LPR Host or Printer is for Line Printer Daemon printers accessible via TCP/IP. You can configure these in the Print Center, or, if you're running an Mac OS X Server environment, this information can be pushed over the NetInfo database. USB Printer covers directly connected USB devices. FireWire Printer covers directly connected FireWire printing devices. Serial is for printers attached to serial ports. You might not have this option unless you've downloaded the serial driver from http://www.macosxunleashed.com/downloads/ or Apple's started including it in the distribution again. In some versions of Mac OS X, it's there; in some, it's missing. This driver should work with real serial ports and with USB-adapter serial ports, if your USB port reports the existence of a serial port in a syntax that the driver understands. The Serial interface option will add itself to the list of connection types, as well as add items for each serial port that it discovers. These will have cryptic names like USA28X1913P1.1. Although not documented, it looks like you can either select the serial interface, and then enter a serial:// device URI for the driver or select the direct USA28X... name, and get slightly more automated control and a friendlier interface to the driver. Parallel is for printers attached to parallel ports. This is the choice if you have a USB-to-parallel adapter being used to hook up your printer. FAX and Modem are a CUPS interface into the Mac OS X print-to-fax system. Depending on the version of Mac OS X you're running, you might have an option labeled either Zeroconf or Rendezvous, which configures the system to automatically discover available printers being shared by other Zeroconf-capable systems. Windows Printer via Samba is for network printers attached to Microsoft Windows machines and served via the Samba resource sharing protocol. Zeroconf Registered Printer is for network-available printers that are being shared out using the Zeroconf protocol. Zeroconf is the technology that Apple adopted and rebranded as Rendezvous in earlier versions of Mac OS X, and that is now apparently being called Bonjour. Printers served from Tiger, and from other flavors of Unix using Zeroconf, should be able to interoperate seamlessly from all platform's points of view. File is a catch-all last-ditch option to be used for printing to printers that can be accessed by writing data to a named file (this isn't as weird as it sounds most peripherals in Unix can be accessed by reading from, or writing to, specific files in the /dev/ directory. When the operating system recognizes the existence of a peripheral a printer, for example a special file is created in /dev/ that is connected to the printer. Read from the file, and you'll get any status information the printer cares to share. Write to it, and what you put in it gets printed. You won't have the File device unless you install the file driver as shown earlier in this chapter.
| 3. | Next you need to provide distinct connection information for the printer. In my case, I'm using a USB serial adapter, which appears as /dev/tty.USA28X1913P1.1 and /dev/tty.USA28X1913P2.2. (try checking your network pane to see what your serial ports are named. If you're trying to install a serial printer, you might need to quit and restart your System Preferences utility to get it to detect the adapter, and the name might be incomplete missing the information after the second decimal as shown in the Network Interfaces pane.) These can be selected in the web interface several different ways. I'm using the file interface with the URIs file:/dev/tty.USA28X1913P1.1 and file:/dev/tty.USA28X1913P2.2, but they can also be used directly through the serial interface, and, not surprisingly, through the USB interface.
Figure 6.12 shows this configuration page, including some syntax examples for printers connected via other methods. I could also select them as serial devices using the serial connection mode, or raw pipe devices. From the end user's perspective, there's little difference between these options, but from someone inclined to poke at the system's guts, the ability to treat the printer either as a file that can be written to, a "pipe" into which data can be pumped, or as a serial communications device, gives great power and flexibility for sophisticated control.
Figure 6.12. The third step is providing a rather cryptic definition of how the software can contact and interact with the printer description. In this case, it's an URI for a file, where the Unix side of Mac OS X can write directly to the serial interface. 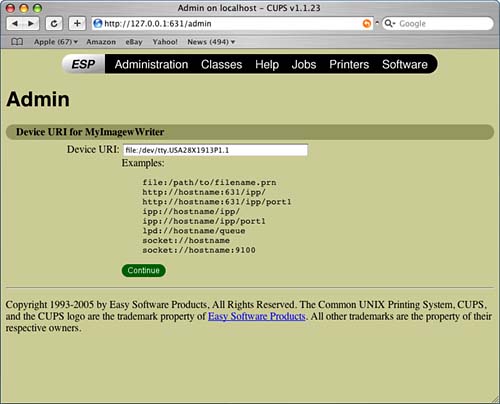
| 4. | The fourth step is selecting the printer's manufacturer, as shown in Figure 6.13. If the manufacturer of your printer isn't shown, either you haven't downloaded and installed the PPD properly or your PPD doesn't report the correct information to CUPS.
Figure 6.13. The fourth step is selecting the printer's manufacturer. This selection modifies the list of printers available on the next page. 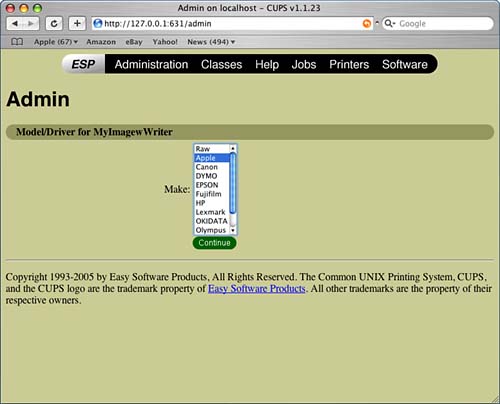
NOTE Don't expect your list of available manufacturers or printers to look like mine. The PPDs that you configure and install from linuxprinting.org, or from GIMP-Print, control the options you see on your system. |
| 5. | Given a manufacturer, the interface constructs a list of printers, from which you can choose your specific printer, as shown in Figure 6.14. Hopefully, after you click Continue at this step, you'll get a page saying your printer has been installed and configured properly. At this point, your printer should be available in the Print Center for printing in both GUI and command-line applications.
Figure 6.14. Finally, you can select the specific printer type you're installing. The Foomatic part of the name is generated by the Foomatic PPD generator. 
|
After you have configured a printer, you can visit its configuration page to make modifications to the printer's connection, location, and description; turn the queue for it on and off; and manage jobs on it. Figure 6.15 shows the web interface to this functionality. The Print Center can make most of these modifications as well, when the printer is visible to it. Figure 6.15. The printer status page for MyImageWriter, under the CUPS web interface. You can start and stop the printer queue, send test pages, reconfigure the printer's connection, and make some modifications to the printer's behavior from this page. 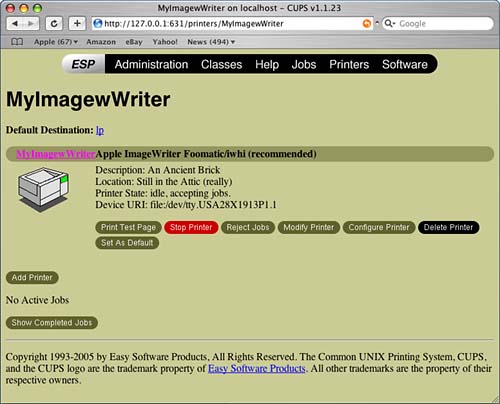
Under the Configure Printer option shown in the previous Admin page, you have control over a number of simple options regarding the printer. For the ImageWriter, a page like that shown in Figure 6.16 appears, with settings to control the default printing resolution, default page size, and whether to print banners or trailer pages for each job. The banners and footers are contained in PostScript files stored in the directory /usr/share/cups/banners. Figure 6.16. Some of the printing options that can be configured for an ImageWriter type printer, according to the PPD-O-Matic PPD. 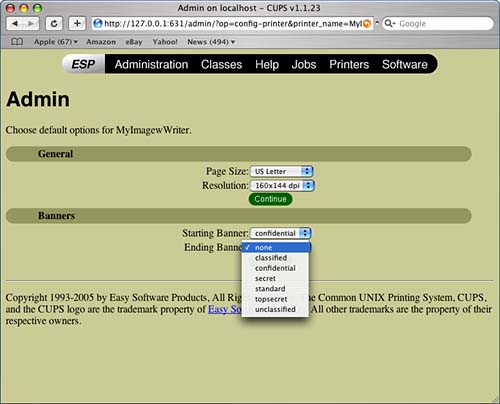
A printer with 120x144 resolution and dot-gain approaching 100%, is not the most beautiful output device for printing PostScript data. However, it does work. Other, more capable printers work better and there is active development in the GIMP-Print community of quite high-quality drivers for a number of high-resolution ink-jet devices. With CUPS, PostScript printing support for the modern photo-quality ink-jet printers is only a few open-source mouse-clicks away. NOTE Most of the same configuration options for CUPS printers specified by URI connection are also available under a hidden Advanced dialog option in the Print Center. If you hold down the Option key while clicking Add to add a new printer, you have the option of choosing Advanced from the list of printer connection types. The dialog that appears gives you access to the same installation and configuration options as adding a printer through the CUPS administrative interface, although it provides much less hinting as to what valid responses are. These same options, and a few more, are available via the command-line interface to CUPS administration, which is covered in Chapter 13. |
Administering CUPS Printers from Remote Locations One of the nice things about having a web-based interface to the CUPS printing system is that if you configure the server to allow it, you can check on your printers and perform any administration tasks from any place you can find a web browser (such as a web-enabled cell-phone) just as easily as you can from the console of your machine. All that is required to enable remote administration is to modify the CUPS configuration file that tells it what machines it should allow to connect to the administrative web interface. This file lives in /etc/cups/ and is named cupsd.conf. The syntax is identical to normal Apache web server configuration syntax, so you'll learn considerably more about things you can do to customize its operation when Apache is covered in Chapter 23. For now, the options you're interested in examining are the Listen option (by default set to 127.0.0.1:631), the BrowseAllow option (by default set to 127.0.0.1), and the Allow From option, which is also 127.0.0.1 by default. If you want to allow another specific machine to connect, you can extend the access to the administrative web interface by adding <your ip address>:631 as an additional Listen option, and adding BrowseAllow and Allow From lines for the IP address of the specific machine you want to allow to connect. You can set up considerably more sophisticated access restrictions and allowances, such as password-restricted access, and selective access to different parts of the web interface, if you explore the full options available for Apache web server configuration. CAUTION Changes to this file can break printing if you move your machine from network to network! If you enter your machine's real IP as an IP to Listen at, and your machine's IP address changes, the cupsd server won't be able to bind that network address and it will quit. This will leave your machine without printing services. Usually though, there's little reason to want to enable remote printer administration on a machine that's moved from place to place, so this is likely to be a problem only for the experimenter and not a practical limitation. |
|