Basic Image and PDF Manipulation: Preview
| < Day Day Up > |
Creating Calendars, Events, and To Do Lists: iCalThe iCal calendaring solution is Apple's first in-house calendar for the Macintosh and one of the only available standards-based scheduling applications for the Macintosh. iCal supports network calendar publishing and subscribing, event notifications and invitations, and, of course, a lovely Aqua interface. Understanding the iCal/vCal StandardiCal gets its name from both Apple's i marketing department and the calendar standard it supports iCalendar. The iCalendar standard is defined in RFC 2445: http://www.ietf.org/rfc/rfc2445.txt. For a change, we can blame someone else for adding the i in front of an otherwise perfectly usable title. The iCalendar format is an object-oriented description language that can define a series of event objects within a calendar object, and a series of alarms within each event. For example, a single one-calendar, one-event, one-alarm iCal file looks like this: BEGIN:VCALENDAR CALSCALE:GREGORIAN X-WR-TIMEZONE;VALUE=TEXT:US/Pacific VERSION:2.0 BEGIN:VEVENT SEQUENCE:1 UID:1380303474 DTSTAMP:20050910 SUMMARY:MS PACMAN Auction DESCRIPTION: A Classic Ms. Pacman Arcade Game. Mint Condition DTSTART;TZID=US/Pacific:20050917T121631 DURATION:PT1H00M BEGIN:VALARM TRIGGER;VALUE=DURATION:-PT15M ACTION:DISPLAY DESCRIPTION:Event reminder END:VALARM END:VEVENT END:VCALENDAR The BEGIN and END statements mark the start and end of an iCal object definition. In this example, a calendar object in the Pacific time zone is created; then an event is defined for a Ms. Pac-Man arcade game auction that starts on 09/17/2005 at 12:16:31AM and lasts for 1 hour and 00 minutes. Within that event, an alarm is defined that displays a warning when the current time is equal to the auction time minus 15 minutes. By basing iCal on a standard, Apple has opened up the door to integration with enterprise calendaring solutions (including MS Exchange) and the exchange of information to and from a wide variety of platforms such as the Windows Outlook client. Managing Calendars and Calendar ViewsiCal's strength is in its simplicity. If you can use a personal organizer, you can use iCal. Almost all iCal activities take place in a single window, shown in Figure 2.13. Figure 2.13. The iCal workspace gives you complete control over your schedule.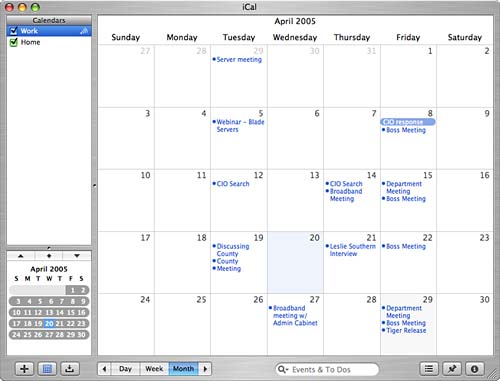 Adding and Removing CalendarsThe upper-left corner of the iCal workspace is the Calendars list. Each calendar that you've added or subscribed to is displayed here. By default, iCal comes with two Calendars Home and Work. These can be used or deleted; it's up to you.
To add a calendar, click the + button under the Calendar pane, or by choose File, New Calendar (Option-Command-N). Calendars can be deleted by highlighting them in the list and pressing the Delete key, or by choosing Edit, Delete from the menu. To reorder calendars, simply drag them up and down within the list. Navigating Calendar ViewsTo the right of the calendar list is the calendar viewing area. Calendars with the check box in front of them selected are active and are displayed in the main calendar view to the right of the Calendars list. Multiple active calendars are superimposed over one another to allow them to be viewed simultaneously. The Day, Week, and Month buttons beneath the viewing area determine the style of the main calendar whether you're looking at a single day, week, or month. The arrows to either side of these buttons move forward and back to the next appropriate calendar unit (day, week, or month). A Month calendar view looks like a traditional wall or desk calendar. The Day and Week views divide each day up by hours, enabling you to see event start and stop times easily, as shown in Figure 2.14. Figure 2.14. Day and Week views show your workdays broken up by hour.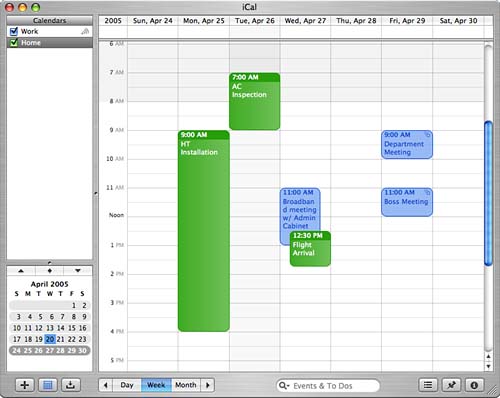
When using the day or week views, a separate All Day area is displayed at the top of the calendar events that fall within this division do not have a specific start or stop time; instead, they occur "that day." You might, for example, enter in birthdays or anniversaries as all-day events. We'll cover adding events shortly. Directly beneath the Calendars list is a mini-month view. Move through the months using the three icons (up arrow, diamond, and down arrow) to move back, to the current day in the calendar view, or to the next month, respectively. Clicking a date within one of the mini-months jumps the main calendar view to that day. You can shrink this view dragging the divider line between the Calendars list and the by-month view, or click the small calendar icon below the Calendar list. Setting Calendar Notes and ColorsThe Color of the check box beside a calendar is the color used to display events in the viewing area. You can choose the color of your calendar as well as enter notes for it using the Information pane. iCal's Information pane, accessed by clicking the i button in the lower-right corner of the window, opens a window drawer that provides customization of a selected object. When a calendar in the calendar list is highlighted, the information drawer gives you access color and notes for the calendar, as shown in Figure 2.15. Figure 2.15. Enter colors and notes for your calendar.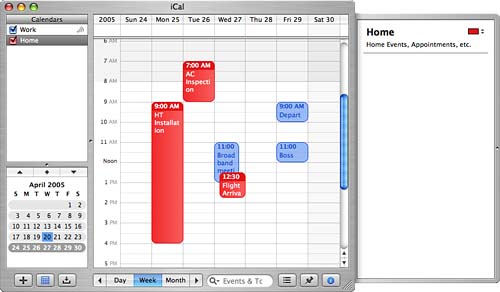
Grouping CalendarsNew to Tiger's iCal are calendar groups. You might, for example, want to maintain a personal calendar, but also want to divide your person entries into doctor appointments, family gatherings, and such. With calendar groups, this is as simple as creating separate calendars for each of these event types, and then organizing them all under a Personal group similar to putting files in a folder. To create a group, choose File, New Calendar Group (Command+Shift+N). A hierarchical group will be added to the calendar list. You can name the group just as you would a calendar, and then drag existing calendars onto the name to file them within the group. The group can be expanded by using the disclosure arrow in front of the name. You can use the group's check box to turn on and off all the contained calendars, or expand the group and use the check boxes for each individual calendar for more granular control. Like calendars, you can select a calendar group and open the Information panel. The only available settings, however, are the calendar name and a brief description field. Managing EventsWhen you understand how to navigate calendars, your next step will be creating events. Events are the content of your calendar. At the most simplistic level, they are defined by a title and a time. More complex event scenarios including repeating events, attendees, and event invitations can also be handled by iCal. Adding and Editing EventsAdding an event is easiest within the Day and Week calendar views. Highlight the calendar that should hold the event, navigate in the calendar view to the day where you want to create an event, and then click and drag from the start time to the end time. As you drag, the event end time will be displayed near your cursor. A New Event box is drawn that covers the selected time, and, when you release the mouse button, the subject (title) is highlighted. Start typing immediately to enter a new subject (title), or double-click the event subject to edit it after it has been deselected. Figure 2.16 shows a day view with a new event (Meeting with Annican) added. Figure 2.16. Add new events by clicking and dragging to cover the desired time span. After an event has been added, it can be dragged between different time slots or days. The event duration can be changed by putting the cursor at the bottom edge or top edge of the event block and dragging it to resize the box. You can also add new events using File, New Event (Command-N). This creates a new one-hour event starting one hour after the current time but on the selected day. Use the editing techniques discussed previously to position and change its duration.
If you prefer working within the Month view, you can add new events in this view by double-clicking on the calendar cell of a given day. This creates a new event and extends the Infor mation drawer, which provides convenient access to the time/duration values for the event.
To remove any event, highlight it in any of the three calendar views; then press your Delete key, or choose Edit, Delete.
Setting Event Alarms, Locations, and Other AttributesEvents can store quite a bit more information than just a start and end time. To access the additional fields, highlight an event and click the information button in the lower right corner of the iCal window. Information can be entered in any or all of the following fields:
Working with Event Attendees and InvitationsEvents don't usually happen in a vacuum. If you're planning a party and no one else is invited, you might have a problem. iCal supports the notion of event invitations and acceptance. After creating an event, you can invite other people listed in your address book to the event, and they, in turn, can accept or decline. All without having to type a thing or interpret someone's cryptic response. Adding Event AttendeesTo add attendees to an event, switch to the Day or Week calendar view so that the event is visible. Next, open the Information drawer. You should see a field called Attendees. Here, start typing email addresses or names. If they are recognized as an Address Book entry, they will be automatically completed. Press the Return key between multiple addresses. After an address is added and recognized, it becomes an object in iCal. You can use the small pull-down menu attached to each attendee to choose between multiple email addresses stored for them, or to remove them or manually edit their email addresses. An easier method of adding attendees is to invite people directly from your Address Book. Open the Address Panel window by selected Window, Address Panel from the menu (Option-Command-A). The Address Panel is just a "lite" interface to Address Book. To add an attendee or attendees, dragging their vCard or a group vCard onto the Attendees field or even the event itself. An icon of a person appears in the upper-right corner of the event in Day or Week view mode. Sending Event InvitationsAfter you've added attendees to an event, you've officially told iCal that you want to invite the listed people, but you haven't yet sent invitations. To do this, click the Send button at the bottom of the Information drawer for the event. When you click the Send Invitations button, iCal works with Mail to send an invitation file to the people on the list. You'll also notice the attendees are displayed with an arrow icon in front of their names. This indicates that they have not yet responded to an event invitation. Confirmed attendees are displayed with a check mark, whereas declined attendees show an X and tentative attendees are shown with a ?. If an event changes, or you alter any of the information within an event, you can send the updated event data to all the attendees by clicking the Send button in the information drawer again. Receiving Responses and NotificationsWhen an attendee responds to an invitation, you will receive the response as an iCal email attachment. Tiger's Mail application recognizes and automatically adds the response information to iCal and also triggers an iCal notification that describes the response. Notifications are stored in the Notifications box, which can be made visible by clicking the inbox icon third from the left at the bottom-left side of the iCal window. This is demonstrated in Figure 2.17. Figure 2.17. The Notifications area displays information about event responses and invitations.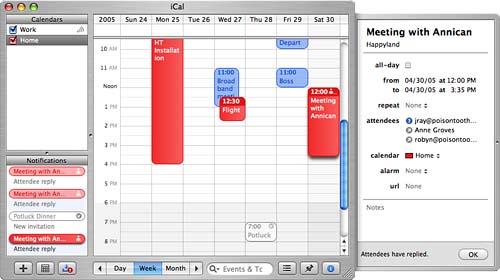 The status of an event's invitations and status is reflected by icons in the upper right corners of the event boxes (in Day or Week views). Events with a crossed circle in the corner have been canceled, those with an ellipsis (…) have received mixed responses from the attendees (some have declined, whereas others accepted), and, finally, an exclamation point indicates that the event has changed and needs updating. A count of active notifications is also added as a count overlaid on the iCal dock icon, letting you know whether there are either responses or incoming event invitations that you need to deal with. Responding to Event InvitationsThe recipient of an invitation, assuming that he has iCal installed, will automatically have the event added to iCal when it arrives in his Mail Inbox.
Even though event invitations are automatically added to iCal, they are not stored in any active calendar. Instead, they appear within the Notifications pane and are overlaid in gray on the calendar so you can better visualize how the event fits your schedule. To view event details and send a response, either double-click the notification or the gray event within your calendar. iCal opens the Information drawer for the invitation as seen in Figure 2.18. Figure 2.18. An invitation is in progress. Here you can choose to accept, tentatively accept, or decline the invite, what calendar to add it to, and whether an alarm should be set for the event. To send a response, choose your status settings, and then click the Reply button. Another automatically generated message is sent back to the event creator, which will update their calendar with your response.
Creating To Do ListsA To Do item differs from an event in that it doesn't take place at a certain time but often must be completed by a given date. iCal can track your To Do items using the To Do List. Click the pushpin icon in the lower-right corner of the iCal window to display the To Do List, shown in Figure 2.19. Figure 2.19. The To Do List contains a list of things to do.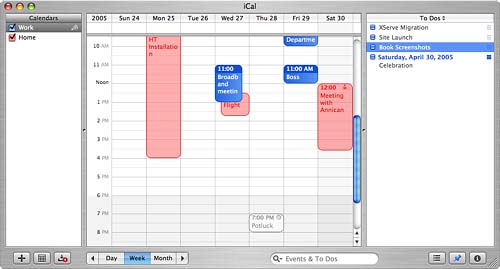 To add a new item to the list, highlight the calendar that should contain the To Do, and then double-click within the To Do List pane, or choose File, New To Do (Command-K). A new item is added to the list. By default, new To Dos have no deadline; they can be flagged as "finished" by clicking the check boxes in front of them. To the right of each To Do is a small three-line icon. Click and hold on the icon to choose a priority for the item. If, after you've entered a To Do, you decide that it is better suited to be an event, just drag the item from the To Do list to the calendar and it will become an event. This same transformation can also work in the other direction moving events to To Dos. Setting Additional To Do AttributesTo add additional notes about a To Do entry and set a deadline, highlight the item in the To Do List and then open the Information Window drawer. The To Do Info window allows you to enter extended text information about the item, choose whether it has been completed, pick a due date, assign it a priority, activate an alarm, pick the calendar it should be a part of, and assign an appropriate URL for extended information.
Searching for CalendarsApple's new search technology allows you to locate events and To Do items from anywhere in the system using the Spotlight menu (refer to Chapter 1, "Managing the Tiger Workspace," for details). iCal also has built-in searching capabilities accessed through the search field at the bottom of the iCal window. Before starting a search, click and hold the magnifying glass icon in the search field and choose the target of your search To Dos, Events, Attendees, and so on. Next, just start typing. As you type in the field, iCal's display changes to provide a list of entries that match the string you've entered. Figure 2.20 shows a calendar search in progress. Figure 2.20. Search across all of your calendars to find events, to dos, locations, and more.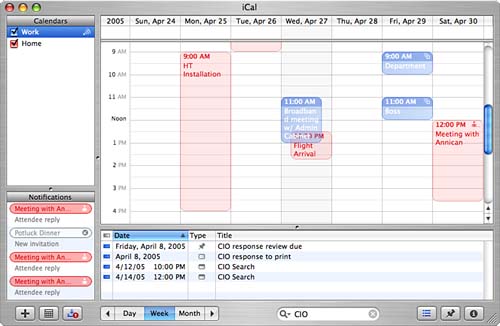 Click an item in the search results and it will be highlighted in the calendar viewing area or To Do list. Open the Information drawer to display all of the available information about the result. To hide the search results, click the search list icon (three horizontal lines) directly to the right of the search field.
Sharing Calendar InformationOne of the most useful features of iCal is the capability to publish calendars to a .Mac account or WebDAV share (see Chapter 23, "Creating a Web Server," for information about setting up WebDAV on your computer) and for others to subscribe to your calendar. Publishing to .Mac and WebDAV ServersTo publish an existing calendar to the Internet, highlight the calendar within your calendar list and then choose Calendar, Publish from the menu. The dialog box shown in Figure 2.21 appears. Figure 2.21. Publish your calendar to a .Mac account or WebDAV share.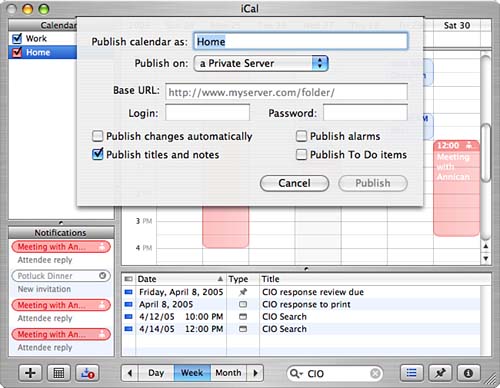 First, choose whether you're using a .Mac account or a Private Server (WebDAV). If you're using .Mac, iCal automatically uses the account information contained in the .Mac System Preferences pane. Otherwise, it prompts for the WebDAV Base URL, login, and password. Next, choose the information you want to be published:
Click the Publish button to send your calendar to the remote server. Published calendars are denoted by a transmission icon appearing after their name in the Calendar list. After publishing, you are prompted with the option to Send Mail with your calendar information to those who might be interested in subscribing. You can also choose Visit Page to see a web view of your Calendar. The Visit Page option is available only to .Mac subscribers for the purpose of publishing and provides a fully interactive Web view of your calendar; users who are not Mac.com members can still visit the web page just to see the calendar but cannot update it.
To update a published calendar with the latest local changes choose Calendar, Refresh (Command-R) or Calendar, Refresh All (Shift-Command-R) to refresh all published calendars. To completely remove a Published calendar, use Calendar, Unpublish.
Subscribing to a CalendarTo manually enter a subscription, choose Calendar, Subscribe (Option-Command-S) from the menu. The subscription dialog appears, as shown in Figure 2.22. Figure 2.22. Enter a URL to subscribe to a calendar.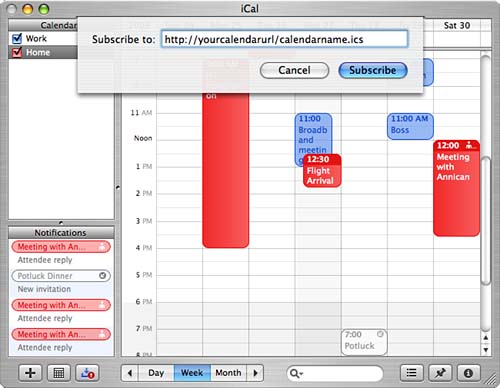 Enter the URL of an appropriately prepared iCal source and then click Subscribe. If the calendar is protected, you will be prompted for a username and password. Enter your information, and then click OK. Next, iCal will all you to choose how often the calendar should automatically refresh, and choose whether to remove the creator's alarms and To Do items from the calendar. (You can change these settings at any time in the Information drawer.) Configure the subscription to suit your needs, and then click Subscribe. After a few seconds, the subscribed calendar appears in your calendar list (differentiated from local calendars by the shortcut arrow following its name). To refresh a subscribed calendar, use the Calendar, Refresh (Command-R) or Calendar, Refresh All (Shift-Command-R) menu selections.
Syncing Calendars Through .MacPublishing and subscribing to your own calendars is a somewhat effective means of taking your event information wherever you go. An even better approach is to use .Mac to automatically synchronize your calendars wherever you go. This means you'll see the same calendars at each machine you sit down at, and you can add and edit events that will automatically be synced across all of your machines. To use this feature, you'll need a .Mac account, of course. Open the General application preference pane and click Synchronize My Calendars with Other Computers Using .Mac. Any other computers that are registered with your .Mac account will automatically be kept up to date. See Chapter 3 for more information about .Mac. Importing, Exporting, and Backing Up Event DataiCal, being the friendly plays-nice-with-others application it is, can easily import existing calendars from vCal, iCal, or Entourage data files as well as export entire calendars in the iCal format. To import calendar data, select an existing calendar that will hold the incoming information, and then choose File, Import, from the menu. iCal will prompt for one of the three supported calendar types and allow you to choose the import file. Within a few seconds, the events will be imported and added to your calendar. An even easier way to import calendar data in .ics files is to drag the file from the desktop into the calendar list or the viewing area. These actions will create a new calendar with the stored events or add the events to the existing active calendar, respectively. To reverse the process and export an iCal file, first choose the calendar you wish to export, and then select File, Export from the menu bar. Enter a filename and click Export; your iCal file will be created. Alternatively, to export an event to an .ics file, drag it to the desktop. A final method getting data into and out of iCal is via an iCal backup. The purpose of the backup is to protect you in the event of data loss, or to completely move all of your iCal data from one machine to another. To create a full backup file, choose File, Backup Database and provide a filename when prompted. To restore from a backup database, use File, Revert to Backup Database. Printing CalendarsThe iCal application that ships with Tiger introduces a whole new range of calendar printing options. Calendars can now be output in any of the standard iCal views (reformatted for printing, of course) along with a new List view that provides a quick reference to upcoming events and deadlines. To print a calendar, choose File, Print. The iCal print dialog is demonstrated in Figure 2.23. Figure 2.23. Print your calendars any way you'd like.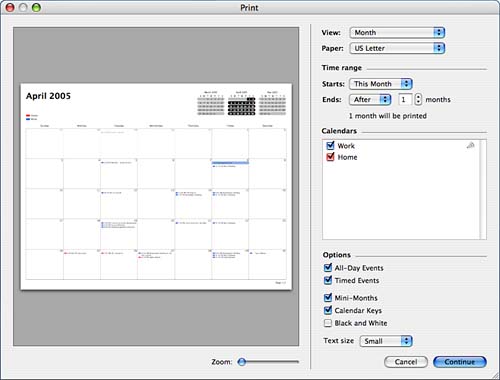 Use the View pop-up menu to choose between the four available layouts, set a time range to be printed, select the calendars to include, pick the additional elements to include in the printout, and, finally, click Print. You can even change the settings and use the preview and zoom control to make sure that what you see is what you want. |
| < Day Day Up > |
EAN: 2147483647
Pages: 251
- Challenging the Unpredictable: Changeable Order Management Systems
- ERP System Acquisition: A Process Model and Results From an Austrian Survey
- Distributed Data Warehouse for Geo-spatial Services
- Intrinsic and Contextual Data Quality: The Effect of Media and Personal Involvement
- Development of Interactive Web Sites to Enhance Police/Community Relations