Creating Calendars, Events, and To Do Lists: iCal
| < Day Day Up > |
Storing Contact Information: Address BookThe Tiger Address Book (path: /Applications/Address Book) is more than a simple contact manager or a mailing label printer. It is a systemwide database that stores all your contact information and is accessible from other applications that require you to "contact people." So, you, ask, what are these other applications; email is the only place where it could be useful, right? Wrong. Address Book data is available in Safari, Mail, Sherlock, iCal, Fax, iChat AV, Dashboard, and more! A properly maintained Address Book can organize your data and streamline how you use your computer. Understanding the Address Book StandardsWith the LDAP protocol (Lightweight Directory Access Protocol) and vCard 3.0 Personal Data Interchange format, the Address Book is based entirely on open standards and can be used in a cross-platform environment. vCardsThe most common way to send contact information with an email is by adding a signature. Unfortunately, there is no standard for signatures, so picking up contact information from one is an exercise in futility. The vCard (.vcf) format attempts to change this by defining a simple cross-platform MIME standard for an electronic business card. vCards can be used on PDAs such as the Palm Pilot, and then copied to your system and used directly within the Address Book application. Tiger uses version 3.0 of the vCard standard, developed by the Internet Mail Consortium and documented in RFC2426 (http://www.ietf.org/rfc/rfc2426.txt). A sample vCard, generated by Michael Heydasch's vCard CGI (http://www.vicintl.com/vcf/) is shown here. BEGIN:VCARD FN:Mr. John P. Smith, Jr. TITLE:General Manager ORG:XYZ Corp.;North American Division;Manufacturing ADR;POSTAL;WORK:;;P.O. Box 10010;AnyCity;AnyState;00000;U.S.A. LABEL;POSTAL;WORK;ENCODING=QUOTED-PRINTABLE:P.O. Box 10010=0D=0A= Anywhere, TN 37849=0D=0A= U.S.A. ADR;PARCEL;WORK:;133 Anywhere St.;Suite 360;AnyCity;AnyState;00000;U.S.A. LABEL;POSTAL;WORK;ENCODING=QUOTED-PRINTABLE:133 Anywhere St.=0D=0A= Anywhere, TN 37849=0D=0A= U.S.A. TEL;Work;VOICE;MESG;PREF:+1-234-456-7891 x56473 TEL;Home:+1-234-456-7891 TEL;Pager:+1-234-456-7891 TEL;Cell:+1-234-456-7891 TEL;Modem;FAX:+1-234-456-7891,,*3 EMAIL;Internet:webmaster@anywhere.com URL:http://www.anywhere.com/mrh.vcf UID:http://www.anywhere.com/mrh.vcf TZ:-0500 BDAY:1997-11-29 REV:20010510T104344 VERSION:2.1 END:VCARD The vCard defines a person object based on X.520 and X.521 directory services standards implemented on a large scale in enterprise directory systems. Even encoded images can be included in vCards! After a vCard has been generated, it can be attached to email messages for easy importing into remote address books. In Tiger, you can drag the vCard from an Email message window into the Address Book, and it will be added to your contact list. To attach your own vCard, you can drag from the Address Book into a message Compose window. LDAPThe Lightweight Directory Access Protocol defines a means of querying remote directory systems that contain personnel data. Linux, Windows, and Mac OS X computers all have the capability to poll LDAP servers for account information, such as login and password. The Address Book uses LDAP server connectivity to retrieve contact information from network servers. You can add your own LDAP server to the mix as long as you know the name or IP address of the server, and the search base. The search base defines a starting point in the LDAP hierarchy to begin looking for information. Companies might have their LDAP directories built based on a per-department schema or other arrangement. Unless you are the LDAP administrator, it is impossible to guess the appropriate search base. Your best bet is not to use a search base, or to contact your network administrator for the correct value. Bases are specified in the following format: <key name>=<base string> My internal search base for my small poisontooth.com domain is just cn=poisontooth.com but the complexity varies from server to server. Finding Your Way Around the Address BookThe main Address Book window, shown in Figure 2.1, has two viewing styles: Card and Column view and Card Only view. To toggle between them, use the View buttons at the upper left. You will do most of your work with Address Book in Card and Column view. The Card view displays only a single contact at a time, making its usefulness questionable, although you can use the arrows at the bottom right to move between cards. Figure 2.1. The Address Book, shown here in Card and Column view, keeps track of your contact information with a simple uncluttered interface.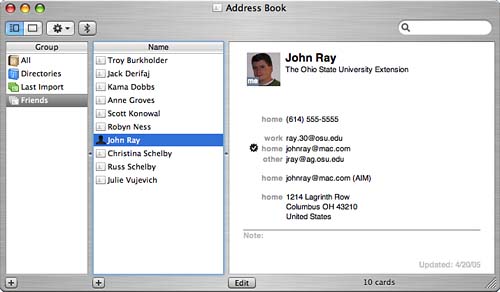 The Card and Column view displays a three-column view with these elements:
At the bottom of the Group and Name columns are + buttons that add new Groups and Contacts to the system. Under the Contact Card pane is an Edit button that switches the current contact to Edit mode. You can browse through your contacts much like using the Finder's column view. Choose a group and then a contact within the group, and view that contact's information in the Contact pane. The Search field at the top of the Address Book window searches the currently selected group for a string of your choice. Working with Address Book CardsBecause Address Book maintains contact information, the base unit of information is a single person stored in an Address Book card. Address cards can store multiple addresses, phone numbers, and contact information for an individual, making it unnecessary to maintain multiple cards for a single person. Adding and Editing ContactsTo add a card, select a group that should contain the contact. If this is your first time using Address Book, you'll have only the All group this is fine, you can organize your contacts into groups at any time. Next, click the + button under the Name column; this opens a blank card in the right column where you can type the information you want to save. There are fields for name, work and mobile phone, email address, names of friends/assistants, AIM handle, and address as well as a space at the bottom for notes. You can Tab between fields or click into the ones you want to insert. You can add as much or as little information as you want, but an email address is required if you plan to use the card with Mail, and an AIM handle is required for iChat AV.
If the label to the left of the field doesn't match the information you want to add, you can adjust it by clicking the up/down arrow icon. This opens a pop-up menu with several common labels as well as an option to customize. In some cases, such as adding a phone number, you may want (or need) to add multiple values. When you're editing a field that supports multiple entries, plus and minus buttons appear to the left of the field. Clicking the plus button adds a new field of the same type; minus removes the field. To add completely new fields, choose Card, Add Field; then pick from any of the available fields.
In the upper-left corner of the Card column is the card image well (a drop point for images). If you want to add a custom picture, you can paste it into the well, double-click the picture well, or select Card, Choose Custom Image from the menu to open a window where you can drag an image file and zoom/crop the image, or even take a video snapshot. This process is identical to setting your Buddy icon in iChat, which is covered in detail in Chapter 3, "Using the Tiger Internet Application Suite." To clear a custom image, select Card, Clear Custom Image. When you've finished adding information, click the Edit button again to deselect it, and the unfilled fields disappear. To edit a card you've already created, select the name of the individual from the Name column and click the Edit button below the Card column, or choose Edit, Edit Card (Command-L) from the menu. To delete a card, select it and press the Delete key on your keyboard or choose Edit, Delete Card. You are asked to confirm the action before it is carried out. Setting Your Owner CardBesides contact information for other people, Address Book also holds your personal address card. By telling the system who and where you are, it can simplifying processes in other applications such as drawing a map to an address or finding movies that are nearby (Sherlock). When you create a Tiger account, it automatically adds a card for you, the owner. This card, unlike others, is represented with a "head" icon in the Address Book listings. In the event you enter a new card for yourself, you can tell Address Book which card it is by selecting the card, and then choose Card, Make This My Card from the menus. You can jump to your own card at any time by choosing Card, Go to My Card. Choosing Name and Company Information OrderingWhen storing information about a company, it is often desirable to display the card with a company name first, followed by a personal contact within the company. Address Book can accommodate this preference by choosing Card, This Is a Company (Command+\) from the menu bar, or by clicking the Company check box when in edit mode. The card icon will also change to three small buildings. Another common display preference is to view cards as lastname, firstname rather than the more casual firstname lastname default ordering. To make this change, choose Card, Swap First/Last Name. To reset to the default ordering, choose Card, Reset First/Last Name to Default.
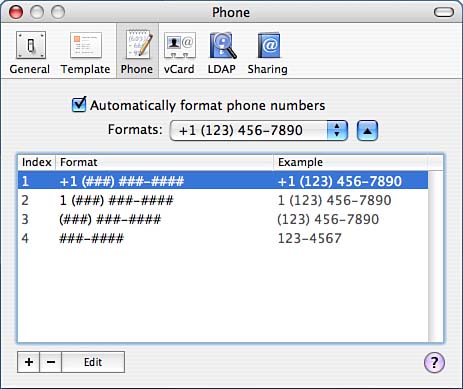
Setting Custom Telephone FormatsTo create and choose custom phone layouts and activate/deactivate automatic formatting of phone numbers, open the Phone application preferences, shown in Figure 2.2. Note that auto-formatting must be enabled for you to use the custom defined layouts. Figure 2.2. Create custom phone number formats.
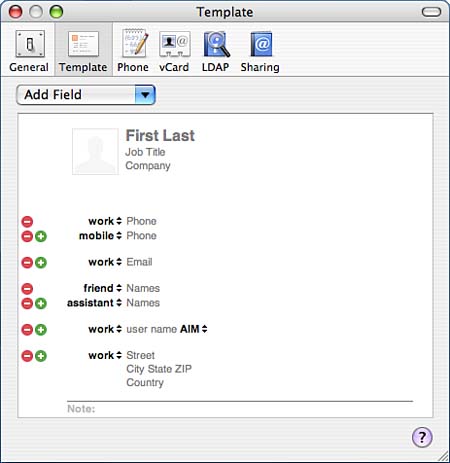
Use the Formats menu to choose from one of the predefined formats, or click the disclosure button to display the format editor. To use the format editor, click the + button to add a new format and type the number format as you want it to appear, substituting the pound (#) sign for the actual phone number digits. Creating Custom Address Card TemplatesIf you find that the default Address Card format doesn't suit your needs, you can create an entirely new default template with the Template application preferences pane. Using the same controls available when creating a card entry, you can create your own custom template, as shown in Figure 2.3. Figure 2.3. Create your own custom Address Book templates.
Use the Add Field pop-up menu to add additional fields to the template. After closing the preference pane, the new template will be active. Merging Duplicate CardsAs you use applications like Mail and iChat AV, you're likely to end up with duplicates of many of your contacts. You might have friends with multiple AIM accounts and so forth that are added twice. Address Book's Merge Selected Cards function (Command+|) found under the Card menu can take multiple contact cards and merge them into a single card removing any redundant data in the process. Tiger also adds a duplicate card "finder" that will automatically locate duplicates and merge them, if desired. To use this feature, choose Cards, Look for Duplicate Entries Address Book will scan your contacts and, if duplicates are found, prompt to merge them. Viewing CardsWhen a card is not in Edit mode, the Action button (Gear icon) and many of the card labels provide links to useful functions. Clicking a friend/relation name, for example, displays the option to jump to that person's contact card, if it exists. Another unique feature is the capability to display a web-based map of any street address in your address book. Click the label to the right of any address field and choose Map Of from the pop-up menu. Your web browser opens to a map of the location. You can also choose to copy the URL of the map, or copy an address-label form of the address to the Clipboard.
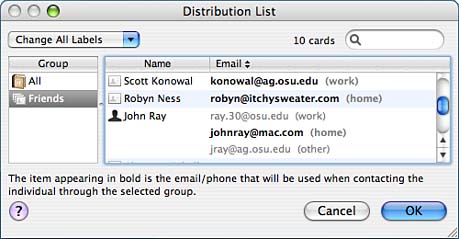
If you have the Apple Bluetooth adapter, you can click the button in the Address Book to locate paired Bluetooth phones within range. You can then click a phone number within an address card and choose Dial from the pop-up menu to dial your phone. In addition, Bluetooth-paired phones automatically trigger Address Book to display the Address card (if available) for incoming calls, and provide the capability to answer the call or send the call to voicemail. Organizing Contacts into GroupsYou can arrange your cards into your own custom groups, which, in addition to creating organization, can be used to send email to a collection of people for example, a simple mailing list. Creating GroupsTo create a group, click the + button under the Group column and type a name for it (Shift+Command+N). You can add contacts to the group by selecting another contact group (such as All or a Directory group) and dragging the contact card icons from the Name column to the new group. Hold down the Command key to select more than one addressee at a time. If you already know who is going to be in a new group, you can create a group based on an initial selection of contacts. To do this, first select all the contacts you want in the group, and then choose File, New Group from Selection. Setting Up Distribution GroupsAn Address Book group can be used with Mail to send messages to a group of people simultaneously by dragging the group into the Address field in Mail, or by Control- clicking the group name and choosing Mail To. When used in this manner, the group is considered a distribution group. All Address Book groups can be used as distribution groups, but before using them, you might want to choose which email address each contact in the group uses when the message is sent. Because many people have multiple addresses, it is likely that some addresses are more appropriate to use than others. To choose the addresses for a distribution list, highlight your group in Address Book; then choose Edit, Edit Distribution List. A window similar to that shown in Figure 2.4 appears. Figure 2.4. Choose the address to use if a group is used to send email.
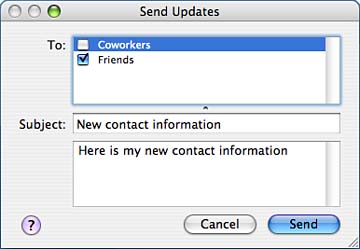
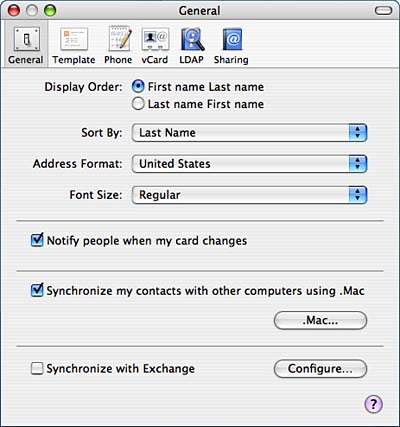
Use the pop-up menu in the upper right-left of the Distribution List window to switch all contacts in the group to their work, home, or other addresses. To switch on a person-by-person basis, click the correct contact address in the list to highlight it. When all the correct addresses are selected, click OK. You can now use your Address Book group as a mailing distribution list. Creating Smart GroupsAfter using Tiger for awhile, you'll begin to wonder if your previous versions of the operating system were, well, stupid. Smart Folders in the Finder, Smart Mailboxes in Mail, and now, Smart Group in Address Book Tiger is very, very smart. A Smart Group is a virtual address book group whose members are based on search criteria rather than specific cards. For example, you might create a smart group for Columbus, OH based on phone numbers beginning with 614 (or a city of Columbus and state of Ohio). The Smart Group doesn't require that you rearrange any of your existing groups; if a contact matches, it is included it's as simple as that. To add a Smart Group, choose File, New Smart Group (Option+Command+N). The Smart Group creation dialog is displayed, as seen in Figure 2.5. Figure 2.5. Choose the criteria for your Smart Address Book Group.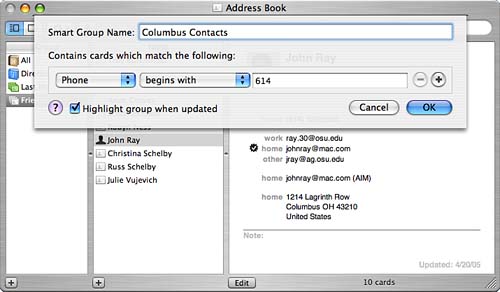 Provide a name for the group, and then use the pop-up menus and search fields to create the search criteria. Click the + button to add additional search fields, or the - button to remove unneeded criteria. Because you won't manually be adding anything to the Smart Groups, Address Book will automatically highlight Smart Groups when a new contact has matched their criteria. If you find this distracting, uncheck the Highlight Group When Updated check box. Click OK to create your new Smart Group. To edit the group, select it and then use the Edit menu or Control-Click the group name and choose Edit Smart Group. Sending Owner Card UpdatesIf you happen to update your personal contact information frequently (or infrequently, for that matter), you can configure Address Book to automatically notify an Address Book group of the changes. Open the General application preference pane and click the Notify People When My Card Changes check box. When you change any piece of information in your card, you are prompted whether you want to email the update to your contacts. You can choose the groups to send email to, and type a brief message to them, as shown in Figure 2.6. Figure 2.6. Provide a brief message notifying your friends/family/coworkers of your contact changes.
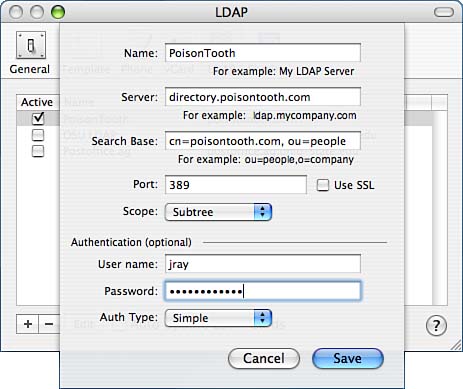
To force a notification to go out manually, choose File, Send Updates from the menu. Setting Up Directory ServersMany companies and organizations maintain their personnel information on certain directory servers. LDAP, as discussed earlier, is a common method for retrieving information from a directory server. To set up Address Book for LDAP queries, open the LDAP pane in the application preferences. The LDAP pane allows you to configure multiple LDAP servers to query. The + button opens a sheet for configuring your server, as shown in Figure 2.7. Figure 2.7. Set up your LDAP server in the LDAP preferences pane.
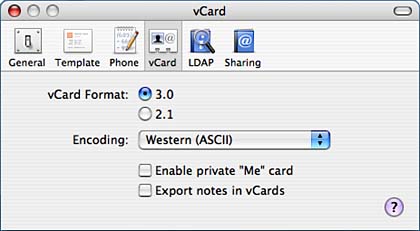
Add a name for the server that will be displayed in the Address Book, along with the necessary information for querying the directory. Click Save to save the LDAP server. You can use the +, -, and Edit buttons in the LDAP tab to manage your LDAP servers. To automatically inherit changes to contact information made on the central server, be sure the Auto-Update LDAP Cards check box is selected. Searching an LDAP ServerAfter adding an LDAP server, you can choose the Directories group in the Address Book window and then select the directory server you added. Finally, type a query string in the Search field and press the Return key. The results are displayed in a list, as shown in Figure 2.8. Figure 2.8. Search an LDAP directory for contact information.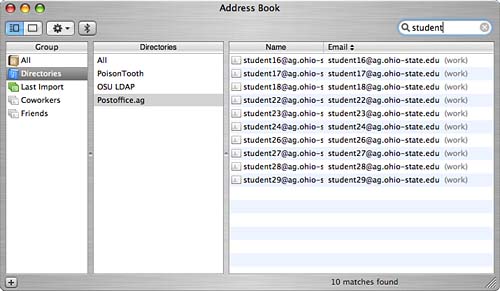 You can drag any entry in the result list to the All group or one of your personally defined groups. It will be added and can be edited like any other address card. Printing Envelopes, Mailing Lists, and LabelsBuilt into Tiger's Address Book is the capability to easily print labels. To print labels, first select the group you want to print and then Choose File, Print. Address Book displays the dialog box shown in Figure 2.9. Figure 2.9. Print lists, labels, and envelopes with ease.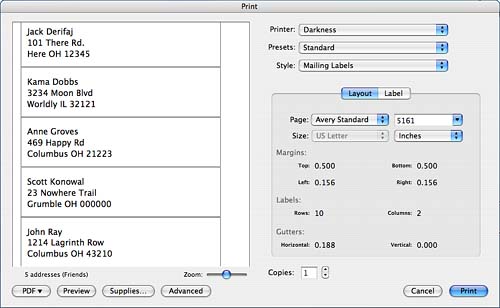 Use the Style pop-up menu to choose between envelopes, a mailing label layout, a "cute" pocket mailing list, and a simple list of names. When printing lists, you are given the option of choosing which attributes are printed in the list and what font to use. Mailing labels (the style chosen in Figure 2.9) provide settings for controlling your paper layout under the Layout button bar option and include several label standards, such as Avery. The Label button displays settings for choosing between which Address Book addresses are printed (Home or Work), sorting, font options, and an image that can be printed beside each address. Make your setting choices and view the results in the preview on the left side of the window; then click Print to start printing. Importing and Exporting vCard DataThe easiest way to import or export cards from the Address Book is to drag the contacts in and out of the application. You can also export and import vCards and groups directly from the File, Import and Export menus. Use the vCard application preference pane, shown in Figure 2.10, to choose the default format of your address card exports (2.1 or 3.0). Figure 2.10. Choose your vCard export options.
You can also ensure the privacy of your personal card by enabling the Enable Private 'Me' Card option. This keeps everything but your work contact data from being exported with your card. By default, the Notes field is not included in any export to include notes, check the Export Notes check box.
Sharing and Synchronizing Contacts Through .MacAddress Book provides two additional features for .Mac users the ability to synchronize contact information between computers and share address books with other .Mac members. To turn on Contact synchronization, open the General application preference pane and choose Synchronize My Contacts with Other Computers Using .Mac, as shown in Figure 2.11. Figure 2.11. Activate Contact syncing with .Mac.
When they're active, all computers registered with your .Mac account will automatically sync their contact information; changes on one machine will be reflected on another. To learn more about managing your .Mac synchronization, refer to Chapter 3.
The second .Mac feature is the ability to publish contact information through .Mac and subscribe to other .Mac users' data. To share your information, open the Sharing pane in the application preferences, as shown in Figure 2.12. Figure 2.12. Configure who can subscribe to and (if desired) edit your contacts.
Click the Share Your Address Book check box to enable sharing. Next, use the + button to add a user that can access your shared information. Address Book with display a list of contacts. Choose one or more .Mac members, and then click OK to add them to your access list. If you want to permit a user to edit your contacts, click the Allow Editing check box beside that user's name. After setting up users and permissions, click Send Invite to invite the members to subscribe to your shared address book. To subscribe to a shared address book, choose File, Subscribe to Address Book and provide the full .Mac address of the published address book owner when prompted. After a few seconds, a new Address Book group labeled with the publisher's name will be added to the bottom of the contact group listings. You can interact with this group as you would any other even editing entries if the publisher granted you permission. |

| < Day Day Up > |
EAN: 2147483647
Pages: 251