Section 8.3. iPod and iTunes
8.3. iPod and iTunesComing from the Apple side of the country, iTunes and the iPod can feel strange to those living in PC Land. After all, don't Apple and Microsoft represent opposing world views, a kind of red state vs. blue state technological battle? Not so much, as it happens, anymore. The truth is, Apple's done a pretty decent job in its first major foray into Windows software. All you have to do now is sit back and enjoy the music. Warning: Resist the urge to plug your iPod into your PC the moment you liberate the player from its box. If you do so, Windows' Media Player will greet your iPod; Media Player even copies music files to your iPod, if you choose. But since those tunes didn't enter the iPod via iTunes, your iPod treats the songs as data , not songs. That's a handy way to move song files from one PC to another, but you won't be able to listen to them from your iPod. The simple solution: follow the instructions that came with your iPod and first install Apple's free iTunes software (www.apple.com/itunes), as well as the software that controls your iPod, before plugging in your new toy. The rest of this section gives you an overview of how to stock iTunes with your PC's existing songs; add new songs by buying them from iTunes Music Store; copy songs from CDs or from your PC's folders; and transfer data, contacts, appointments, and notes to your iPod. Note: If you're interested in learning all the ins and outs of life as an iPod owner, pick up a copy of iPod & iTunes: The Missing Manual .
8.3.1. Adding Music to Your iTunes LibraryiTunes works as a sort of "mirror image" of your iPod's songs. When you add or delete songs from iTunes, you're automatically adding or deleting those same songs from your iPod: iTunes takes care of that the next time you plug in your iPod's little white cable and connect the music player to your PC. So, the first step in stocking your iPod is to start filling iTunes' digital shelves with your music. You add music to iTunes in two ways: by importing songs already on your PC or on your CDsa natural first step for nearly every new iPod ownerand by buying music online from iTunes' built-in music store. The next two sections explain each method. 8.3.1.1. Importing your PC's existing musicAdding all your PC's existing music to iTunes doesn't entail making a copy of all your music. Instead, all you need to do is make iTunes aware of where you've stored your songs on your PC. That lets iTunes catalog the songs, list them, and send copies to your iPod. When you first install it, iTunes offers to find all the songs in your My Music folder and add them to its database; it's a great way to stock iTunes quickly. If iTunes stumbles across any WMA files (Section 7.3.2) while gathering your PC's files, it automatically converts them to an iPod-friendly formatsave any copy-protected WMA files you may have purchased from other online stores. After iTunes scoops up the music in your My Music folder, fill in any areas iTunes missed:
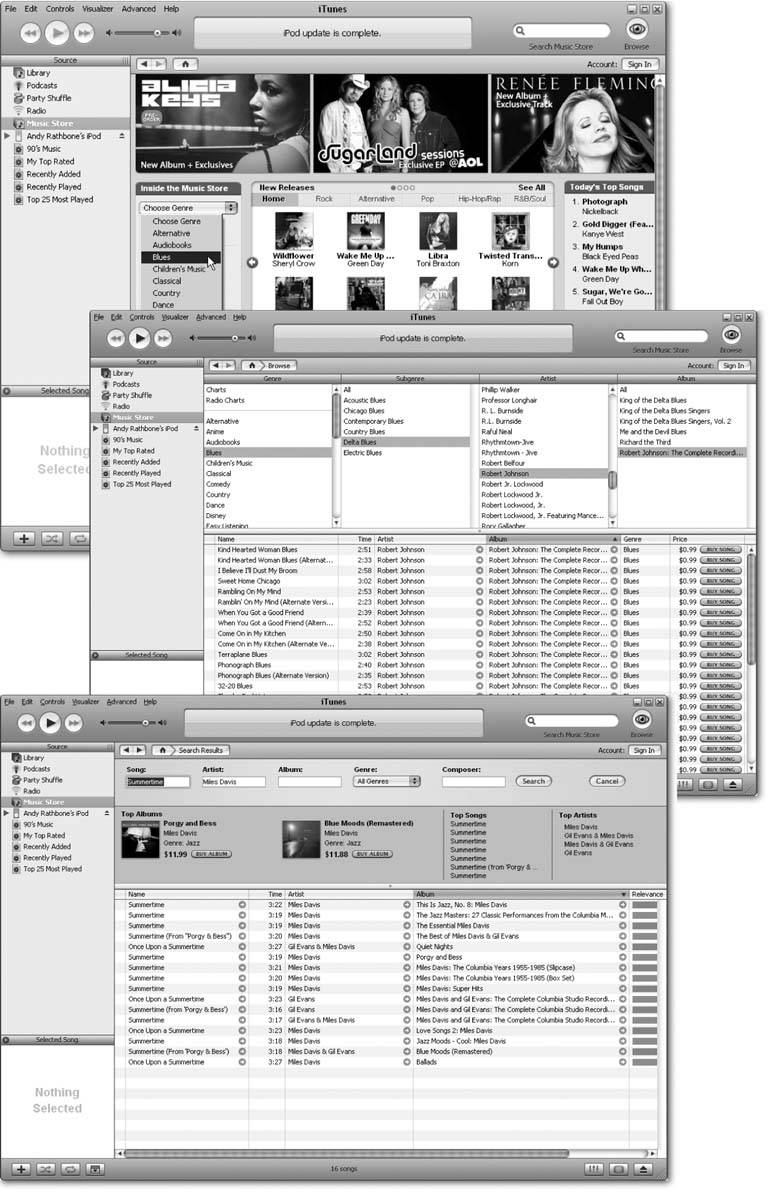
Note: iTunes can rip CDs in several different file formats (Section 7.3.1), including the most popular: MP3 and AAC. To see or change iTunes' file-ripping format, choose Edit  Preferences, click the Advanced tab, and then click the Importing tab. There, you can also control the files naming system. For instance, to make sure your songs play in the same order as the album, turn on that page's "Create filenames with track number" option. That tells iTunes to names them "01 Name," "02 Name," and so on. Preferences, click the Advanced tab, and then click the Importing tab. There, you can also control the files naming system. For instance, to make sure your songs play in the same order as the album, turn on that page's "Create filenames with track number" option. That tells iTunes to names them "01 Name," "02 Name," and so on. 8.3.1.2. Buying music onlineWalking into the iTunes Music Store is as simple as clicking the Music Store icon in the iTunes Source list. Once the music store appears, as shown in Figure 8-4, you can start browsing immediately by artist, genre , or album title. Unlike traditional music stores, iTunes lets you purchase individual songs rather than entire albums. But if you want the entire album, that's usually available as well. (In fact, some songs are available only when purchased as part of an album.) Figure 8-4. Top: To wander the aisles at the iTunes Music Store, choose your favorite genre from the main menu's drop-down box. The store displays photos of featured items from that genre, a list of that genre's classics and favorites, and lets you work down to albums or songs you ind interesting. |
| UP TO SPEED Podcasts |
| Only the rich can afford radio stations , but anybody with a microphone can create and distribute their own podcast : a regularly scheduled "talk-show" recording intended for playback on an iPod or other MP3 player. iTunes offers more than 15,000 free podcasts for downloading, ranging from CNN's hourly news updates to "Matt's Guitar Lick of the Week." When you subscribe to a podcast, iTunes automatically places each subsequent edition onto your iPod for listening at your leisure. To subscribe to a podcast, head for the iTunes Music Store and choose Podcasts from the "Inside the Music Store" section. The store lets you browse through the top 100 podcasts, browse podcast categories from Arts and Entertainment to Travel, or search for specific podcasts by title, subject, or author. The latest iPod software, available from Apple's iPod Updater (www.apple.com/ipod/download) places Podcasts on your iPod's menu. |
8.3.2. Transferring Songs to an iPod Automatically
iTunes sticks with Apple's philosophy of trying to make everything forehead-smackingly simple. When you first install it, iTunes automatically grabs all the music in your My Music folder and lists it in the iTunes library, as shown in Figure 8-5.
Figure 8-5. iTunes' left pane lists your music "sources" places where music lives on your PC, including your hard drives , your iPod, online radio stations, playlists, and the iTunes Music Store. Here, the PC's Library is selected as the Source, so iTunes lists music stored on your PC. To switch the view to your iPod's music, in the Source list, click iPod. To view your files sorted by genre, artist, and album, click the Browse button; iTunes adds a Browse area above the display window.
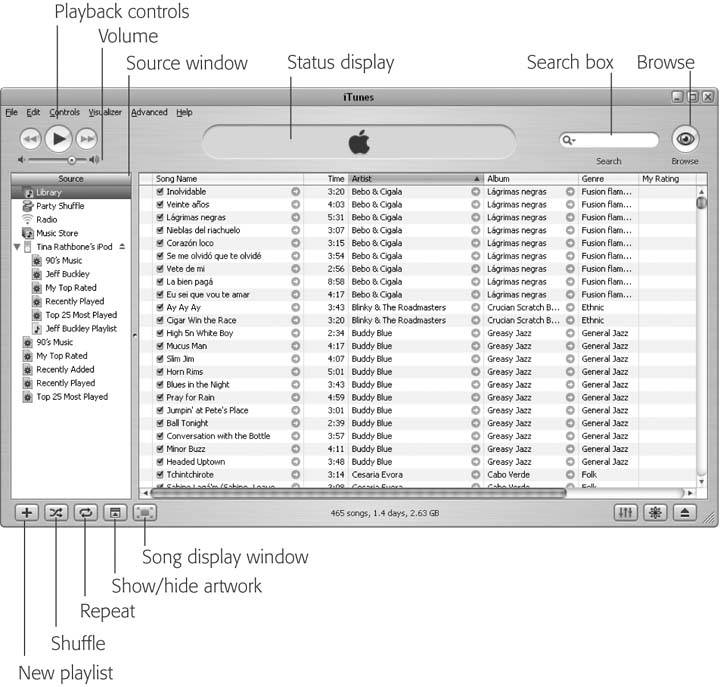
After importing all your PC's songs to its library, iTunes copies those songs to your iPod the next time you plug it in. That's it. Any song you add to the iTunes library ends up on your iPod the next time you plug it in.
8.3.3. Transferring Songs to an iPod Manually
Things become a little trickier if you sway from Apple's simple Automatic Sync path and choose to add songs to your iPod manually , a dance step required in these situations:
-
Your music library's grown too large to fit on your iPod . When all your songs won't fit, iTunes automatically switches from Automatic to Manual mode, forcing you to decide which songs should live on your iPod and which should stay at home on the PC.
-
You're not particularly attached to any music library . You want the freedom to copy some music from the libraries on your work PC, your home PC, and your friend's PCall without deleting your iPod's existing stash of music.
-
You own several iPods (you lucky dog) and want to keep different songs on each . A jazz iPod for work, for instance, a Phish iPod for your car, and a general purpose iPod for everyday use.
-
You're at a friend's house and want to connect your iPod to his PC and play your iPod's music through the PC's speakers .
To turn your iPod into a roving, free agent, letting you control when and where the songs move into it, switch your iPod to manual synchronization. Here's how: connect it to iTunes, choose Edit Preferences, and click the iPod tab. Then turn on the "Manually manage songs and playlists option.
Note: When you set your iPod to Manual, iTunes cautions you that "Disabling automatic update requires manually unmounting the iPod before each disconnect." This technospeak means that when you're done copying music, you need to right-click your iPod in the iTunes Source area, and then choose Eject from the shortcut menu. That tells iTunes to let go, so you can safely disconnect your iPod.
You'll notice one visual difference when you set your iPod to manual sync. When you click your iPod's name in the iTunes source pane, the iPod's list of songs are no longer "grayed out." That lets you delete songs directly from your iPod by right-clicking them and choosing Clear, something you can't do with autosync.
Manually transferring songs to your iPod gives you more freedom over what lives on your iPod, but it also requires more work on your part. Specifically, copying songs to your iPod requires these three steps.
-
In iTunes, select the tunes you want to transfer to your iPod .
The iTunes Library places a tiny checkbox next to each tune, as shown in Figure 8-5. To select a song for transfer, turn on its checkbox. Sometimes it's easiest to turn off all the checkboxes, and then handpick the few songs you want by turning on their checkboxes; other times, you'll want to do just the opposite , turning off checkboxes for the few songs you don't want. Here are a few shortcuts for doing just that:
-
Grab all but a few tunes . Select every tune in the library by pressing Ctrl+A. Then right-click the library and choose Check Selection from the shortcut menu. That turns on the checkbox of every tune, letting you go through and turn off the boxes of those few tunes you don't want to copy this time.
-
Grab just a few tunes . Select all your tunes (press Ctrl+A), right-click the selected tunes, and choose Uncheck Selection. That unchecks every song, letting you check the few you do want.
iTunes comes with several premade playlists lists of songs that play in a certain order. Feel free to turn any playlist's checkbox on or off, as well as use any playlists you've created. (Create playlists by choosing File
New Playlist.) Selecting a playlist tells iTunes to copy all that playlists tunes, as well as the playlist itself, adding its name to your iPod's Playlists menu for quick access. -
-
Drag your selected songs from the iTunes window to the iPod icon in the Source list .
When you drop the selected songs onto the iPod, iTunes dutifully copies them to the deviceunless there's no room left, in which case it stops cold, telling you your iPod just ran out of room.
That leaves you with the unenviable problem of deciding which tunes to delete from your iPod. Of course, your tunes always stay safely ensconced on the PC that you copied them from; you're just deciding which tunes will live on your iPod for that particular session.
Tip: To delete items from your iPod, start by viewing its songs. Click your iPod's icon in iTunes' Source list. Then select any songs, albums, or artists you want to delete, right-click the selected items, and then choose Clear.
-
In the iTunes source list, click the Eject button next to the iPod .
When you're through copying files, click the Eject icon to remove the iPod's "Do not disconnect" message, leaving you free to unplug your iPod.
8.3.4. Transferring Data to Your iPod
Since your iPod contains a hard drive (or a capacious stick of flash memory), Windows XP treats it like any other portable storage device, albeit one with a more stylish case. That means you can use your iPod to transport any large stash of non-music filesPowerPoint presentations, your novel -in-progress, and so onwhenever you need a handy portable digital container. To copy data to your iPod, follow the steps desscribed next.
Note: To make sure you're able to use your iPod as a hard drive, open iTunes, choose Edit
Preferences, and click the iPod tab. Click that pages Music tab, and turn on "Enable disk use." The tradeoff is that you now need to eject your iPod manually before disconnecting it; you can perform this manual procedure either from within iTunes (right-click the iPod and choose Eject) or from your taskbar (right-click the little hard drive icon and choose to "Safely eject" your iPod). -
Open My Computer and double-click your iPod's icon .
Microsoft's disdain for iPods shows through here, as My Computer identifies your iPod only by its drive letter and the first 11 letters of its nameusually your name. (Players compatible with Media Player, like the Dell Digital Jukebox shown in Figure 8-6, top, usually show their real name.) When you spot your iPod's icon, double-click it to see your iPod's contents, shown in Figure 8-6.
Figure 8-6. Top: Your iPod can do double-duty as a portable hard drive, letting you transport large files from one PC to another. To store your vacation photos on your iPod, for instance, double-click the iPod's icon in My Computer.
Bottom: When My Computer shows the folders inside your iPod, drag your vacation photos inside. While spelunking through your iPod via My Computer, you'll notice your music files are noticeably absent. Actually, they're living inside a hidden folder called iPod_ Control. Several programs can give you access to those music files (Section 8.3.6) for backup purposes should your PC crash.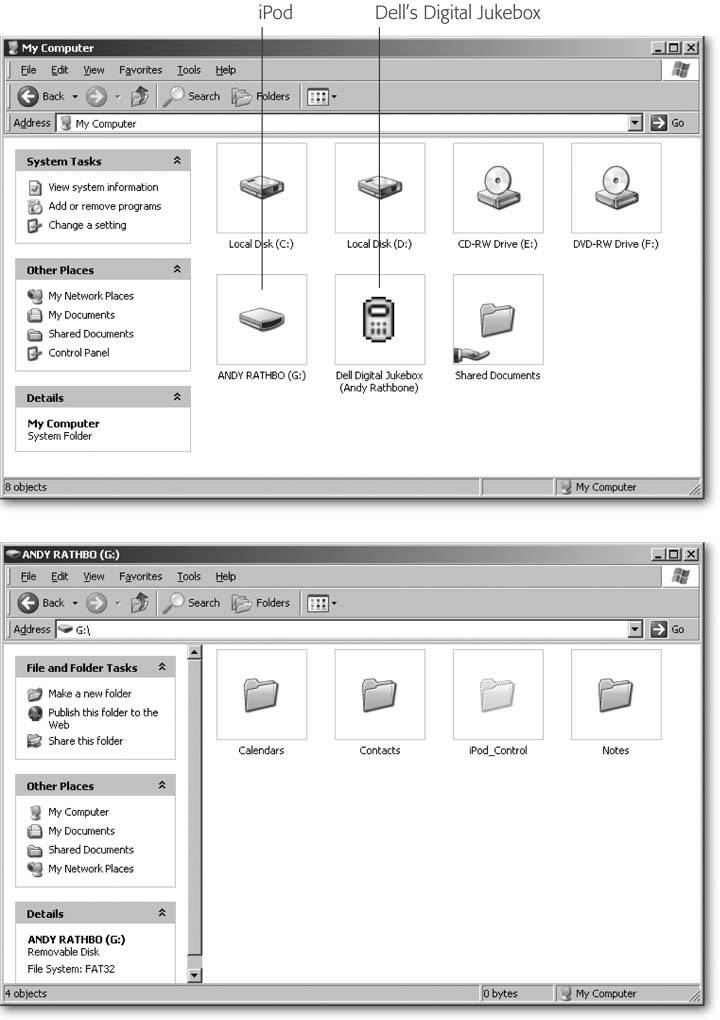
-
Drag the data files and/or folders that you want to move onto your iPod .
When you drag the items, take care not to place them in the iPod's existing Contacts, Calendar, or Notes folders. Your PC copies your data to the iPod's hard drive or flash memory card, provided there's enough room.
If there's not enough room for your data, delete some songs from your iPod. Head back to iTunes' Library, and remove some of the checkmarks next to the songs. Right-click your iPod in the iTunes Source pane, choose Update, and iTunes then deletes the unchecked songs from your iPod, freeing up room for your incoming data.
Note: If you've set your iPod to manual sync instead of automatic sync, described in the previous section, you'll need to manually delete unwanted songs from your iPod. Click your iPod in the iTunes' Source pane, right-click any of your iPod's listed files, and then choose Clear.
-
When you and your iPod arrive at the other PC, plug it in, open My Computer, and then drag the iPod's data folders onto the other PC .
8.3.5. Transferring Your Contacts and Calendar to Your iPod
iTunes 5 adds a feature particularly welcome to the Windows camp: It automatically updates your iPod with your contact information and your social calendar. iTunes 5 syncs with the Address Book in both Outlook Express (see Section 12.1.1) and Microsoft Outlook 2003 or later. Since Outlook Express lacks a calendar program, iTunes can transfer calendar information only from Outlook 2003 or later.
Here's how to transfer contacts and appointments from both programs:
-
Connect your iPod to your PC .
-
In iTunes, choose Edit
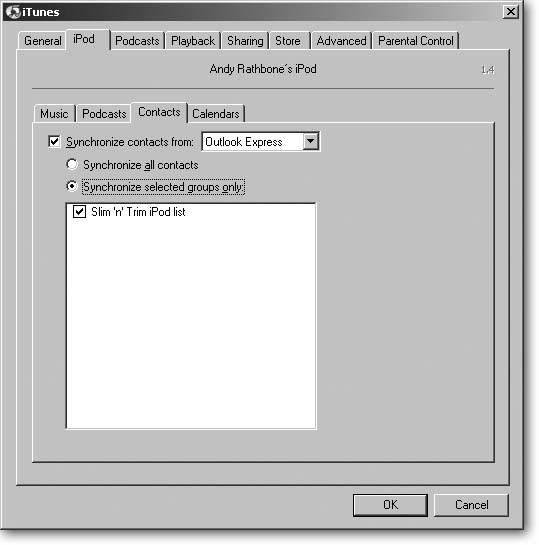
Preferences, click the iPod tab, and then click that pages Contacts tab . -
Choose whether to synchronize Contacts with Outlook Express or Outlook .
Turn on "Synchronize contacts from," as shown in Figure 8-7, and then from the drop-down menu, choose your current email program: Outlook or Outlook Express.
-
Choose which contacts to transfer .
To carry around your complete address book, choose "Synchronize all contacts" and move to the next step. You're through. That works fine for a few hundred contacts, as your iPod can scroll through them fairly quickly. But your iPod slows to a crawl when opening more than a few hundred contacts. To speed things up in Outlook Express, the box on Section 8.3.6 tells you how to create a special, whittled-down group containing your closest friends , the AAA towing number, and other must-haves.
-
Tell iTunes to transfer your appointments from Outlook, and then click OK .
iTunes 5 supports only Outlook 2003 or newer . If you have that program, click the Calendars tab on the iTunes Preferences window, and then click "Synchronize calendars from Microsoft Outlook." There's no option to slim the information down to the current month or two, unfortunately .
Figure 8-7. Your iPod can carry all of your Outlook Express contacts, or a specific groupa smaller list of contactswhich it can open much more quickly when you're standing by the phone booth . Each contact lists the name, address, and phone number of the person or business, but leaves out any information you've added in the contact's notes field or other fields. Although iTunes supports groups in Outlook Express, it doesn't support Outlook's "categories," a more powerful grouping feature.
| WORKAROUND WORKSHOP Creating a Pint- sized Contact List |
| You can transfer your whole address book to your iPod, but if it contains more than a few hundred contacts, it's going to run verrrry sloooowly on your device. To create a subset of essential contacts that you want to carry around, open Outlook Express' Address Book (choose Tools Then click Select Members to add people, using the same box you use when sending an email to several people (Section 12.3). Click OK to close the window, and then close your Address Book window. You newly created, iPod-sized group's name is waiting in iTunes, just like in Figure 8-7. |
Your iPod starts sending the information as soon as you click OK, although it may take a minute or two to transfer everything. To see the information on the road, press your iPod's Menu button until you return to the main menu; choose Extras, and then choose Contacts or Calendar.
8.3.6. Transferring Notes
Your iPod's Notes area lets you view text files on its tiny screen, which is a great way to save directions to a friend's house, as long as you don't try to read them while driving.
Putting items in your iPod's Notes section's a no-brainer; just copy a text file to your iPod's Notes folder in My Computer. The challenge comes when you have to start contending with the iPod's restrictions in displaying your text files.
-
Formatting . The iPod displays text files without using any formatting whatsoever. This works fine for grocery lists, but not so well for metric conversion tables. Stick to copying plain text that doesn't use bold, italics, underline, or fancy fonts.
-
Size limit . The iPod displays individual notes up to 4 KB in size. That's about 700 words or 2 pagesplenty for poetry, but it makes for an awfully short, short story. If you drop a longer file into the folder, iPod simply displays its first 4 KB and ignores the rest.
| POWER USERS' CLINIC iPod Without iTunes |
| Apple naturally wants to play the role of media gatekeeper, controlling everything that moves in and out of your iPod. But you can easily hire somebody else for the job. Several third-party programs offer a more Windows-flavored look for moving information in and out of your iPod. These programs also include features iTunes left out: a way to move your iPod's tunes back onto your own PCessential for backups in case your PC crashes and takes your music down with it. These are the most popular third-party programs for the iPod.
|
To break larger text files into something readable by your iPod, check out the online iPod eBooks Creator (www.ambience.sk/ipod-ebook-creator/ipod-book-notes-text-conversion.php). Give the program your large text filesome Shakespeare, perhaps, or any other free classic from Project Gutenberg (www.gutenberg.org/catalog). The program breaks the text into a string of sequentially numbered files for easy Notes browsing, and puts the files in a single zip file for you to download.
Note: To extract any zip file's contents, right-click the file and, from the shortcut menu, choose Extract All. Windows copies the files into an adjacent folder with the same name as the zip file.