5.2. Moving Pictures from Camera to Computer Don't bother installing the software packaged with your digital camera; it's generally of mediocre quality, and you don't need it to see your photos. But do hang onto that little cable that comes with your camera. That's the tube for pouring your photos from your camera into your PC. Connect the cable between them, and Windows XP automatically welcomes your digital camera and shuttles your photos into your new digital shoebox: your PC's My Pictures folder. Follow these steps to move the photos out of your camera and into your PC.
Tip: Lost your camera's connection cable? Most cameras use standard USB cables, available at any camera or computer store. Bring your camera when cable shopping; the camera may use any one of three different USB ports (Section 1.8.1). For even faster photo transfers, buy a card reader instead; card readers are covered in the next section (Section 5.3).
-
Connect the smaller connector on your camera's cable to your camera and turn on your camera . Find a tiny port on your camera. Sometimes named "Digital" or "USB," it's occasionally hidden underneath a little cover, and it's usually near the port that connects your camera to the TV for viewing photos. Plug the cable's small end into your camera's port. With some cameras, you need to set them to View or Cable Connection mode before they'll start talking to your PC.
Note: Some really old digital cameras connect through the serial port (Section 1.8.8). These oldsters force you to wade through their own, original software. If this program somehow slipped from your grasp, visit the downloads area of the manufacturer's Web site. Sometimes a special Archive area still offers original software for obsolete electronics.
-
Plug the cable's larger, rectangular end into your PC's USB port . USB ports sprout from all but the oldest PCs (see Section 1.8.2.1 for a quick visual reminder). Start looking for the little rectangular port on the case's front, and then move to the backside of your PC if there's nothing on the front. For added convenience, some keyboards and monitors offer little ports along their sides. Windows XP recognizes your camera and displays a brief "New Hardware Found" message in the lower-right corner of your screen. -
Choose a program to move your photos onto your computer, and then click OK . Windows lists your PC's photo editing software and lets you choose your favorite to handle the incoming photos (see Figure 5-1). Select one, and Windows assigns it the job of transferring your photos. If your PC doesn't have any photo-editing software, Windows XP's built-in Scanner and Camera Wizard automatically steps in to handle the job. Figure 5-1. Once you connect your camera to your PC, Windows XP lists all the software on your PC that can talk to cameras. To skip this menu in the future, turn on the checkbox marked "Always use this program for this action." Then choose the program Windows XP should automatically summon the next time you plug in your camera. 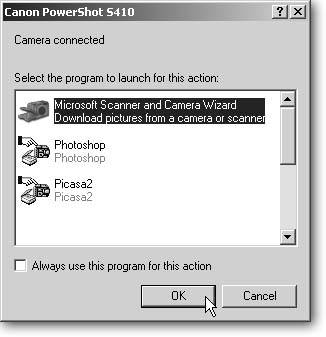 -
Start the Scanner and Camera Wizard . Windows XP's friendly wizard pops up with a greeting, ready to handle your photo-moving chores, step by step.
Tip: If you're already a whiz at moving files, dump the wizard. When the wizard opens, click Cancel and the wizard disappears. Then navigate directly to your camera (My Computer  [Your cameras name ]), where you can drag, cut, or copy your files to other folders on your hard drive. This trick comes in especially handy when your camera holds several separate photo sessions, and you'd rather sort them into separate folders for each session. [Your cameras name ]), where you can drag, cut, or copy your files to other folders on your hard drive. This trick comes in especially handy when your camera holds several separate photo sessions, and you'd rather sort them into separate folders for each session.
-
Choose the photos you want to copy to your PC . The wizard shows you a contact sheet of your camera's photos (Figure 5-2); each photo has a checkmark in its upper-right corner. Click Next to move them all onto your PC. On the rare occasion you want to keep some photos on your cameraperhaps you want to move those to a different computerremove the checkmarks from those photos. TROUBLESHOOTING MOMENT
When the Wizard Is Missing | | If the wizard doesn't materialize when you plug in your camera, tighten the cables and make sure the camera's turned on. Also, some cameras don't attract the wizard until you flip their switch from Shoot Pictures to Review Pictures mode. If the wizard still hides, run down the following list. -
Reactivate the USB port . Unplug the camera's cord, wait 10 seconds, and plug it in again. That gives Windows XP another chance to recognize your camera at the USB port (Section 1.8.1). -
Check My Computer . See if the camera's already waiting for you in My Computer (Start My Computer). The camera may appear as an icon nestled among the hard drives . If you spot it, double-click the icon to see a folder featuring all your cameras pictures. You can then drag or copy the images into your PC's My Pictures folder. -
Install the camera's drivers . Sometimes installing the camera's drivers (the utility program that lets your PC talk to your camera) adds support for Microsoft XP's WIA (Windows Image Acquisition) system. WIA lets Windows XP recognize your camera when you plug it in. -
Install the camera's software . Installing the digital camera's softwarebut not actually using itsometimes installs WIA, letting Windows XP finally recognize the camera and grab its photos. -
Give up and use the camera's software . This isn't the best option, as it bypasses Windows XP's built-in transfer system, but it works in a pinch . -
Buy a flash card reader . To upgrade to faster photo transfers, buy a flash card reader (Section 5.3) for your PC. Available for less than $25, these handy gadgets add "mini-drives" that let you slip in your camera's flash card just like slipping in a CD. When Windows XP recognizes the files, drag and drop them to an appropriate folder inside your My Pictures folder. | -
Choose a descriptive name for the photos and select a folder to store them in . The name DSC03612.JPG doesn't help much when searching for your carnivorous plant photos next month. To help you relocate your pix, type a descriptive name in this dialog box (Figure 5-3), like "Venus Flytraps." Windows creates a folder with that name inside your My Pictures folder, tosses your photos into the folder, and renames each photo in sequence: Venus Flytraps001, Venus Flytraps002, and so on. Click Next. -
Choose "Nothing. I'm finished working with these pictures" to exit the wizard . Although Windows XP offers three choices here, opt for the third choiceNothingbecause the other two are so abysmal: Figure 5-2. Click Next to move all your photos off your camera quickly, freeing up room to take more shots. Don't stop here and rotate your photos to "right side up." The rotate feature works more quickly if you wait for the pictures to move onto your hard drive.  Figure 5-3. Windows XP creates a folder with the name you entered here, and then renames all the photos in sequence with that name, making it easy for you to find photos later. Be sure to turn on the "Delete pictures from my device after copying them" checkbox. Otherwise, Windows XP copies, rather than moves the camera's photos, leaving them to hog precious storage space. 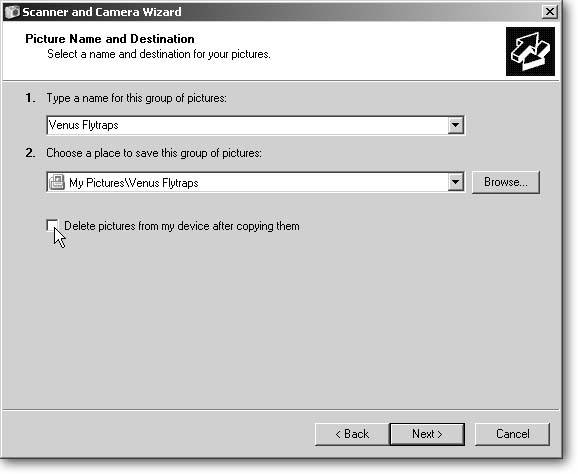 -
Publish photos to a Web site . This offer certainly sounds gracious, but the wizard isn't offering to publish your photos to your blog, your own Web site, or even your choice of photo-sharing sites (Section 5.5.2). This option simply sends your photos to Microsoft's own MSN Groupsif you have an existing account or want to set one up. Competing sites (which you can learn about in the online appendix, "Other Cool Things You Can Do Online," available on the "Missing CD" page at www.missingmanuals.com) allow more free photo storage space, easier photo transfers, and simpler menus . -
Order Prints . This emails your photos to an online photo developer, which mails back your prints less than a week later. It's convenient , but certainly not the fastest , best, or cheapest way to print photos (Section 4.7 shows you some better options). -
Nothing . The Wizard vanishes, but not before opening your newly created folder where you can ogle your new photos.  |