Section 15.1. Backing Up Your Computer
15.1. Backing Up Your ComputerThe most important step you can take to secure your computer is to regularly back up your data. Once you've put a reliable backup system in place, you're prepared for just about anything that can happen. Without one, you stand to lose family photos, tax records, home movies, years of correspondence, music collections, and other valuables that have slowly migrated from bookshelves and closets onto your computer. There's one bright spot: you don't need to back up any of your programs that came on their own CDs. You can always reinstall these programs should your hard drive melt down. If you've downloaded software online, be sure to copy those programs onto a CD and keep the CD with the others for safekeeping. But you must back up all your data by copying it out of your PC and onto something else: a CD, DVD, portable hard drive, USB flash drive, or even a second PC. Backing up to a different folder on your hard drive won't help; a crashed hard drive takes down everything with it, including duplicates of files you've stored there. The next two sections describe quick ways to find and back up a selection of important files, as well as a sure-fire savior: backing up everythingautomatically. Tip: As you work in any program, frequently press Ctrl+Sthe universal "Save this file now" shortcut. Doing so immediately moves your current work from your PC's memory (its temporary storage repository) to its hard drive (its permanent safe haven). That way, even if you lose power, or your PC crashes, you'll have an up-to-date version of the file you're working on. 15.1.1. Backing Up Individual ItemsSometimes you just need to back up a few precious items: your novel -in-progress, your list of Internet Explorer favorite sites, or the Loch Ness monster photo you just downloaded. The backing up part's actually pretty easy (see the list below for reminders on what you need to do). Tip: To back up important files quickly, email them to your own Web-based email account, like Gmail (www.gmail.com) or Hotmail (www.hotmail.com). For details about setting up a Web-based email account, see Section 12.1.4. For many people, the big challenge lies in simply finding their data, especially when some program's stashed it away in the deep recesses of the PC. The rest of this section explains where to find, and how to back up, some common, yet irreplaceable, items. Once you've found your data, copy it to a CD (Section 10.5.1), an external hard drive (Section 9.6.3), a shared network drive (Section 14.8.5), or a USB keychain drive.
15.1.2. Backing Up with Microsoft BackupMicrosoft's built-in Backup program makes it fairly easy to back up your data automatically, every night. The biggest problem is finding a place to store all your stuff. The Backup program takes the files you've chosen to back up and packages them inside one huge file that's almost always too big to fit on anything but another hard drive. Manufacturers have rapidly lowered prices on external hard drives (see Section 9.6.3), letting more people plug them into their PC's USB or FireWire ports for a backup solution. Sure, it's an extra expense. But when your hard drive crashes, the 100 bucks or so that you've forked over may seem like the best money you've ever spent. Tip: For the ultimate in backup safety, buy a program like Norton Ghost (www. symantec .com) or Acronis TrueImage Backup (www.acronis.com). These programs automatically send a mirror image of your hard drive to an external hard drive. If your hard drive crashes, that mirror image can get you back up and running in the least amount of time. Follow these steps to back up your data automatically with Windows Backup. 15.1.2.1. Start the Backup program Launch the Backup program from its perch on a long limb of the Start menu (Start Tip: When the Backup wizard appears, make sure the "Always start in wizard mode" option is turned on. The Backup program's advanced menus are terse and frightening; you don't want to walk down this path unaccompanied. If the Backup program somehow slips into Advanced mode, choose Tools  Switch to Wizard Mode to put the wizard back in charge. Switch to Wizard Mode to put the wizard back in charge. |
| LAPTOP LIFIE Backing Up Your Laptop |
| Laptops network with desktop PCs fairly easily (see Section 14.10); sometimes a 10-dollar cable does the trick. If your PC has enough empty space on its hard drive (see Section 9.4 for details on how to check), feel free to store your laptop's backup file on your PC. Microsoft's Backup program lets you back up to a networked drive just as easily as to any other hard drive. Since your laptop probably won't remain constantly tethered to your PC, making these backups will never be an automatic affair. But if you can remember to periodically network your laptop and your PC, your laptop's data will be much safer. |
15.1.2.2. Choose Backup or Restore
Making no assumptions, the wizard first asks whether you want to back up your data or restore it. Choose Backup, of course, because you're preparing for the impending catastrophe. If you're returning here post-catastrophe, choose Restore (see Section 15.1.3). After choosing, click Next.
15.1.2.3. Decide what to back up
Instead of presenting you with a list of several thousand files, the wizard simplifies matters by presenting you with four scenarios, each described below.
-
My documents and settings . The natural choice when you're the only person working on the PC. This option grabs everything within your local user profile : your My Documents folder, Desktop files and shortcuts, Start menu, Outlook Express email, Windows Address Book, some program settings, and some program data.
To see exactly what this option backs upand what it leaves behindopen My Computer (Start
My Computer) and browse to C:\Documents and Settings\ Username, substituting your own user account name for "Username." (If you cant recall your user name, take a peek at the top of your Start menu.)
Note: Windows normally makes some of the files and folders in your Username folder invisible in order to protect you from accidentally deleting them. To see any of these ghosts when browsing in My Computer, open any folder and choose Tools Folder Options View tab. Turn on "Show hidden files and folders and turn off "Hide protected operating system files." The Backup program then backs up all of a folder's files, whether they're hidden or not. But turning off the hidden files mode when you're spelunking through folders gives you a reassuring glimpse of all the items inside a folder that are being backed up.
-
Everyone's documents and settings . Designed for families that share one PC, this option grabs the local user profile of everybody with a user account; it also saves a copy of the Shared Documents folder. (Specifically, this option backs up the entire C:\Documents and Settings folder including the folders inside it.)
-
All information on this computer . This backs up everything on your PC. Although it seems the natural choice when preparing for future emergencies, it's rarely the best choice. For one, you need a backup drive as large as your PC's hard drive. And since it's backing up everything , it's also going to waste time and space grabbing things you don't really need: Windows XP itself, for instance, as well as all of your programs. Your operating system and programs come on CDs, in most cases, which you can reinstall.
If you're worried about a disk-obliterating catastrophe, you're better off buying a hard diskimaging program for backups (see Section 15.1.2). That will put your PC back on track faster than Windows XP's sparse (and not especially customizable) Backup program.
-
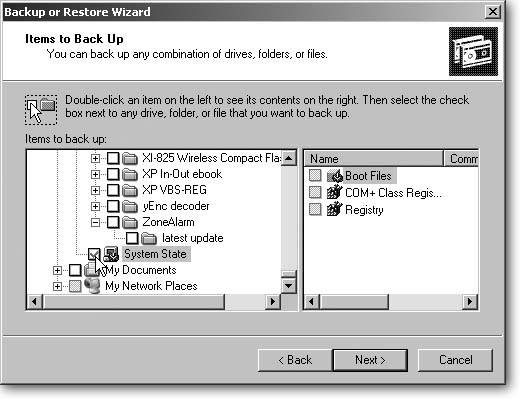
Let me choose what to back up . Designed for the pickers and choosers , this option brings up a Windows Explorer-like box, shown in Figure 15-1, where you turn on checkboxes of the files and folders you want to save. There, you can grab your account's Documents and Settings folder, for instance, just like the first option. You can also tack on a few other folders with important data.
This option also lets you turn off some checkboxes to remove unnecessary items from the backup. (Internet Explorer's wastefully large Temporary Internet Folder, found in your Local Settings area, is a prime candidate.)
Choose your option, and then click Next.
15.1.2.4. Choose a backup type, destination, and name
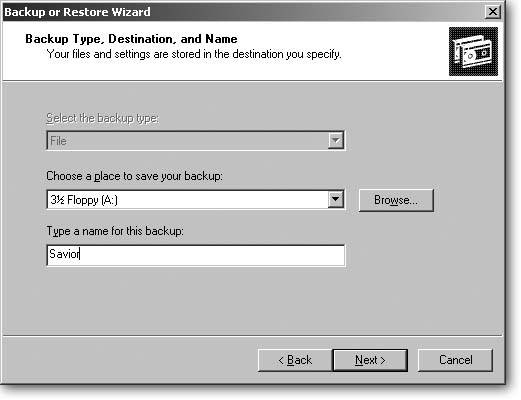
The wizard packs your entire backup into one enormous file, and it needs to know where to stash your precious goods. Oddly enough, the wizard starts by suggesting the smallest storage area on your PC: a floppy disk (Figure 15-2), which works fine if you have a roomful of floppies and a week's worth of take-out food. Instead, click Browse to gently guide the wizard to a better solution. Unfortunately, the choices aren't great:
-
External Hard Drive . By far the best option. This little hard drive in a box (see Section 9.6.3) has several things going for it. First, it's external, living outside of your PC and often coming with its own power supply. That lets it survive when your PC goes up in smoke. Second, it's easy to grab and run in emergencies. Third, external hard drives are fairly inexpensive: an 80 GB drive costs about $100; smaller drives cost less.
Figure 15-1. Microsoft Backup lets you pick and choose which files to backup or restore. To make your choices, click the plus sign to expand any category. While you're browsing, be sure to select System State. This backs up many of the same settings as System Restore (Section 16.3), making it easier to put your PC back into working shape.
Best of all, external hard drives allow for completely unattended backups. Your automatic backups can take place automatically each night, so you don't need to remember that time-consuming backup chore.
Figure 15-2. The wizard asks you to make three decisions: what type of backup to make, where to store the backup, and what to name the backup file. Your PC actually makes your first decision for you. If your PC's attached to a tape backup drive, your PC chooses that in the top box. If you don't own a tape backup drive, the program "grays out" that box and lists the name "File." Although the wizard, amusingly, suggests storing your backup file on a floppy disk, click that box's dropdown menu to choose an external hard drive ( assuming you have one). In the bottom box, type a distinctive name for your backup so you'll recognize it on sight when searching for it later.
-
CD or DVDs . Astonishingly, the Backup program can't save files to CDs or DVDs. If you select one of your CD or DVD drives, the wizard responds with a curt "The backup file name could not be used."
-
Your Own PC . The wizard lets you save the backup on your PC's own hard drive, but don't fall for it. Inside every hard drive, a little metal head coasts atop platters that spin more than 80 times each second. A crash often pushes that head scratching across your platters. Instead of leaving an annoying click through your Rolling Stones album, that scratch wipes out large chunks of your data. Always keep your backup outside of the potential destruction zone.
-
Tape Backup Drive . If you're one of the rare breed with a tape backup drive in the house, choose that. Even better, backtrack a bit: most tape backup drives include their own backup software that's much more versatile than Windows XP's Backup program.
-
Iomega Cartridge . Some people still own those old Zip and Jaz external drives cartridges, which will work in a pinch . If you choose this option, hopefully you own the newer cartridges that hold at least 750 MB; the older 100 MB and 250 MB ones fill up much too quickly. Plus, opting for a cartridge requires you to hang around during the backup, feeding your PC new cartridges.
-
Network Drive . A choice only if you've got a house full of networked PCs (see Chapter 14). This option lets you save your data on a second PC's hard drive. You can back up your laptop to your PC's hard drive, for instance. It's a money saver, but only if you're on a network and the receiving PC has enough room on its hard drive.
If you're like most people, the wizard automatically chooses File in the "Select a backup type" box, as explained in Figure 15-2.
The wizard chooses the name "Backup" for your saved file, but you should change that name (in the "Type a name for this backup" box) to something more descriptive. People with two or more PCs should name each backup after the PC that they're backing up, which makes it easy to find the correct file later on. The standard file naming rules apply here; don't try to name your backup file anything you wouldn't name a folder.
After selecting the file's storage area and name, click Next; then click Finish to start backing up immediately (see the following Tip for advice on when you may want to click Advanced rather than Finish). When the wizard finishes, it displays a final window reporting its accomplishments. If it complains of an error, click Report to find out what went wrong.
Tip: For the ultimate in backup convenience, however, don't start backing up immediately. Instead, click Advanced to make your backups automatic, described next.
15.1.2.5. Automate your backup
Although a few people on each continent possess the discipline to run the Backup program every evening, everybody else should take the wizard one step further by automating the backup. If you're backing up to a drive that's always connected to your PCan external hard drive, for instance, or a network drivefollow these steps to let the wizard automatically back up your files every day at a chosen time. (If you're one of the poor souls backing up to floppies or cartridges, you can't automate the Backup program unless you own a particularly well-trained robotic dog.)
-
At the Backup wizard's closing window, click Advanced rather than Finish .
-
Choose Normal, and then click Next .
Normal creates a complete backup of your chosen files. The other options, Copy, Incremental, Differential, and Daily, offer more advanced, space-saving options for large-scale backups.
-
Turn on any needed options, and then click Next .
The wizard offers three options:
-
Verify data after backup . Turn this on; it tells Backup to double-check that each copied file safely arrives at its new destination. Since you won't be hand-feeding your PC floppies or cartridges, let the program take that little extra time.
-
Use hardware compression, if available . Available for tape drive owners . Turn this setting on only if you see it. When this option's available, it means that the Backup program recognizes your tape drive's brand and model, so it knows how to pack more data onto less tape by turning on the drive's compression option.
-
Disable volume shadow copy . Always leave this option turned off. When turned off, your PC can copy files and programs even when the files are open or in use. That way, Backup can back up Chapter 13 of your autobiography while you're still rewording the third paragraph.
-
-
Choose "Replace the existing backups," and then click Next .
This tells Backup to replace yesterday 's backup file with the one it's creating right now. That saves space, preventing it from piling a second backup into the same ever-growing file.
-
Schedule the backup time and add your password .
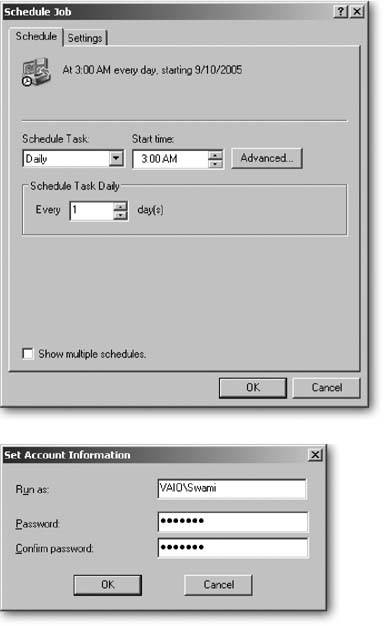
Here's where everything comes together. Choose Later instead of Now, and type in a Job Name Automated Backup , for instance. Then click the Set Schedule button and choose a date and time for your automatic backup (Figure 15-3).
At the appointed hour , Backup packs your selected files into one huge file and places it in your chosen location for safekeeping. At least that's what it's supposed to do. Be sure to check the date and time of your first backup, making sure it matches what you've chosen. Then restore a few files, described in the next section, to get a feel for how the restore feature worksand to make sure it's actually working.
Figure 15-3. Top: The Backup wizard's advanced settings let you schedule automatic backups whenever you like. To schedule a daily backup every morning at 3 a.m., for instance, click the Schedule Task drop-down menu and choose Daily. From the Start time drop-down menu, choose 3 a.m., and then click OK.
Bottom: Enter your User Account password to give the wizard permission to back up your files and add your backup plan to Windows XP's Scheduled Tasks list. If you need to tweak the settings of your backup schedule later on, head to the Control Panel's Scheduled Tasks area and open the Backup entry.
Remember to leave your PC turned on and awakenot hibernatingall evening if you choose to back up your PC automatically at night. To turn off hibernation, choose Start Settings Control Panel Power Options and then choose Never for these three settings: "Turn off hard disks," "System Standby," and "Turn off hard disks." Then click the Hibernate tab, and turn off Enable Hibernation. Click OK when youre done. (Screen savers are fine, and you can even turn off your monitor; the Backup program will still run.)
If you prefer to turn off your PC at night, choose a time when you know your PC will be on. Backup can run in the background while you're working.
Note: If your scheduled Backup never takes place, rerun the Backup wizard, but be sure to add your user account password when setting up the automated backup. In fact, if you haven't yet password-protected your user account (see Section 15.3), now's the time to do it. Scheduled tasks run only on user accounts that have a password.
| WORKAROUND WORKSHOP Windows XP Home's Missing Backup Program |
| Microsoft places its Backup program on Windows XP Professional's menu (Start Windows XP Home owners lack that luxury. To install the Backup program, XP Home owners must dig out their Windows XP CD and follow these steps:
|
