| When you imported the sonic.ai file into your project at the start of this chapter, a new composition was automatically created with a layer for each layer in the original Illustrator file. The composition contains the word sonic, with two layers for each letter: a stroked version of the letter and a filled version of the letter. The composition's default settings are based on the dimensions of the original file, so your first task will be to change those to fit the current project. Then you'll animate the text onto the screen: 1. | Open sonic Comp 1, change its composition settings to use the NTSC D1 Square Pix, 720x540 preset, and set its Duration to 4;26. The composition contains ten layers.
| 2. | Select all the layers, and then turn on each layer's 3D switch in the Timeline.
| 3. | Deselect only the c4 and c1 layers by pressing Ctrl (Windows) or Command (Mac OS) as you click them. Turn on the Shy switch next to all the other selected layers, and then turn on the Shy button at the top of the Timeline to display only the c4 and c1 layers.
Hiding all layers but two by using the Shy switch 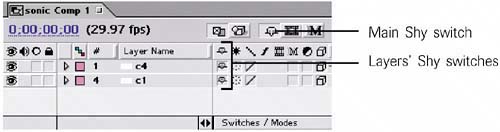
| 4. | Create a Position keyframe for layer c4 at time 0;00 seconds with the values 415, 274, -700. The negative Z value moves the layer closer to the viewer so it appears much larger than the other letters.
| 5. | Go to time 0;10, and change the position to 542, 282, 0.
| 6. | At time 1;00, change the layer's Position to 669, 282, 700. If you scrub the Timeline from time 0;00 to 1;00, you'll see an outline of the letter C start at a really large size and then scale to a smaller size.
| 7. | At time 0;15, add a 100% Opacity keyframe to the c4 layer, and then go to time 1;00 and change the layer's Opacity to 0%.
| 8. | Go to time 0;14, and add a 0% Opacity keyframe to the c1 layer. Go one frame forward to time 0;15, and change layer c1's Opacity to 100%.
| 9. | Turn off the Timeline's Shy button to display all the layers.
| 10. | At time 0;00, add a Position keyframe to each of the following layers with the values listed:
i4: 392, 263, -700 n4: 369, 282, -700 o4: 336, 273.2, -700 s4: 304, 274, -700
Now the letter outlines appear very large in the composition, with the filled letters behind them at their original size.
| 11. | To animate the scale of the letter outlines, go to time 0;10 and change the Position value for each of the following layers:
i4: 468, 263, 0 n4: 392, 282, 0 o4: 281, 282, 0 s4: 175, 282, 0
| 12. | To scale the letter outlines even smaller, go to time 1;00, and change the layers' Positions as follows:
i4: 544, 263, 700 n4: 409, 282, 700 o4: 226, 291.2, 700 s4: 44, 282, 700
| 13. | Select the c4 layer's Opacity property name, and then choose Edit > Copy to copy all of the property's keyframes.
| 14. | Go to time 0;15, select the i4, n4, o4, and s4 layers, and then paste the keyframes you copied in the previous step.
| 15. | Select the c1 layer's Opacity property, and copy the property's keyframes.
| 16. | Go to time 0;14, select the i1, n1, o1, and s1 layers, and paste the keyframes.
| 17. | Pre-comp (Layer > Pre-Compose) each pair of layers that share the same letter in their name, and name them letter_precomp (c_precomp, i_precomp, and so on).
The sonic Comp 1 layers after pre-comping them 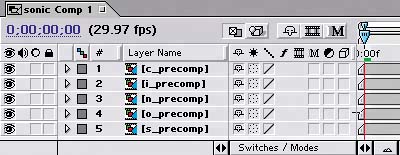
| 18. | To fade the letters into the scene, select all five layers and press T to display their Opacity. To each layer, add a 0% Opacity keyframe at time 0;00 and a 100% Opacity keyframe at time 0;07.
| 19. | To fade out the letters s, n, i, and c, go to time 4;10 and add a 100% Opacity keyframe to all the layers except o_precomp. Then go to time 4;25 and add a 0% Opacity keyframe to all the layers except o_precomp.
| 20. | To fade out the o_precomp layer, go to time 1;15 and add a 100% Opacity keyframe; then go to time 1;20, and change the layer's Opacity to 0.You've faded out the letter o sooner than the others because it will be replaced by the pulsing speaker you'll add in later steps.
The sonic Comp 1 Timeline with all fades added 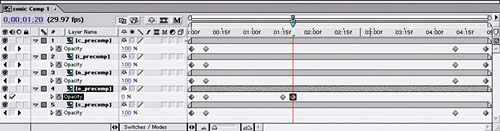 |
If you preview sonic Comp 1, you should see the letter outlines scaling from large to small and the filled letters appearing midway through the sequence. |