Section 14.5. The Document Object Model
14.5. The Document Object ModelWeb browsers maintain the state of the page that you're viewing in something called the Document Object Model (DOM). The DOM is such an important part of how browsers operate and are scripted that it is specified in an actual World Wide Web Consortium (W3C) standard. Unfortunately, the DOM is not always easy to work with and, despite it being a standard, you're not always going to get the behavior you want when moving between browsers. The MochiKit.DOM and MochiKit.Style modules will help you deal with unruly DOMs. As with the rest of JavaScript, plenty can be written about the DOM. This section focuses on working with the DOM using MochiKit, which is a far more pleasant experience than using the functions you get with the browser. 14.5.1. Retrieving ElementsHere's a simple example: One of the most common things you'll want to do is grab a specific element (sometimes called a node) from the document and do something to it. You'll typically do this by setting an id attribute on the node and then calling document.getElementById(id_to_find). That wouldn't be so bad, except for the fact that you use that all the time. MochiKit replaces that common idiom with the much simpler getElement(id_to_find) or, if you want to really reduce typing, $(id_to_find). Even better, however, is that just about any function that takes a DOM node can take either a DOM node or a string with the ID of the node. In many cases, you won't need to use getElement() or $()! Then MochiKit builds on even higher-level constructs such as: getElementsByTagAndClassName(tagName, className, parent=document). In one call, this hunts down all the elements that match the tag or CSS class you specify. You can pass in null for tag if you only care about the class and vice versa. This function can come in handy often and replaces more than just a few characters of work. 14.5.2. Working with StyleAs you sit at your computer, wearing a tuxedo (or evening gown, as the case may be), sipping a martini, you may think to yourself, "Now I'm working with style." However, because this is a programming book, this section is not about fashion. It's about manipulating the styles that are applied to the objects in your web pages. The most basic bit of style that you can apply to a DOM element is whether that element is visible. No need to worry about fonts if the user can't even see the element, right? There are times when you need to hide an element and display it again when the user performs some action. This is common in web applications, and it's easy to do with MochiKit. hideElement(e1[, e2, ...]) and showElement(e1[, e2, ...]) toggle the display style of an element. As mentioned in the previous section, you can pass an element object in or pass in the ID of the element you want to change. Note, however, that these functions require that the element in question uses the "block" display style. showElement simply sets display: block on the element, so if it didn't start off with that display style, it will end up with it! The MochiKit.Style documentation provides another solution that works reliably in all cases: <style type="text/css"> .invisible { display: none; } </style> <script type="text/javascript"> function toggleVisible(elem) { toggleElementClass("invisible", elem); } function makeVisible(elem) { removeElementClass(elem, "invisible"); } function makeInvisible(elem) { addElementClass(elem, "invisible"); } function isVisible(elem) { // you may also want to check for // getElement(elem).style.display == "none" return !hasElementClass(elem, "invisible"); }; </script>This solution requires the use of CSS, which is why MochiKit doesn't include these functions directly. Current browsers don't provide a reliable, portable mechanism for adding CSS rules to the document. The four simple functions above introduce four more MochiKit functions: addElementClass, removeElementClass, toggleElementClass, and hasElementClass. These are used for setting and inspecting the CSS classes of an element. These functions might seem style related, but they are really just manipulating the DOM. With functions such as these, you don't need to remember exactly how objects in the DOM are set up, and it's easy to alter the appearance of an element as the page dynamics require. One other function that's available but not used here is swapElementClass(element, fromClass, toClass). If fromClass is set on element, it will be replaced with toClass. If you want to get more granular in what you're looking up about an element, MochiKit has a function for getting one specific style property from an element: computedStyle(element, cssSelector). computedStyle('foo', 'font-size') will find out the current font size of the element with the ID of foo. MochiKit.Style includes two object prototypes: Dimensions and Coordinates. Dimensions includes w and h attributes for the width and height, and Coordinates includes x and y attributes to represent the position of an element. getElementDimensions(element) returns a Dimensions object with the inner width and height of an element, and setElementDimensions(element, dimensions, units='px') is used to set them. The default for units is px, but you can use any legal values from CSS (in, cm, and so on). You'll need to add in the padding, border, and margin to get the total amount of page space that is occupied by the element. As of this writing, there isn't a function to get that total value for you, but there may be by the time you read this. getElementPosition(element[, relativeTo={'x':0, 'y':0}]) returns the absolute pixel position of the given element. relativeTo can be an element (or element ID) or a Coordinates object. Here is a simple demo page to allow you to see these functions in action:
Figure 14.1 is a screenshot of this HTML page. Figure 14.1. MochiKit.Style Demo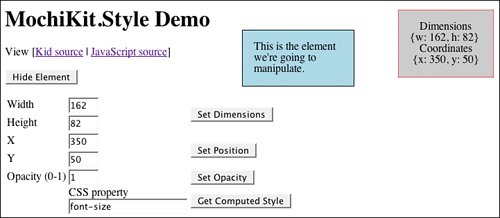 This page is a Kid template that is available with the code samples from this book and is part of the "mochiexamples" project. It can be used standalone by adding a script tag pointing to MochiKit.js in the <HEAD> section. The page provides a number of controls for manipulating a <DIV> element that is displayed, and it also shows a status display with the current coordinates and size of the element. The page itself isn't where the MochiKit use shows up, however. We see that in the JavaScript: // getElementDimensions, getElementPosition function updateStatus() { var e = getElement("thetestelem"); var dim = getElementDimensions(e); var pos = getElementPosition(e); getElement("dimensions").innerHTML = repr(dim); getElement("coordinates").innerHTML = repr(pos); getElement("width").value = dim.w; getElement("height").value = dim.h; getElement("x").value = pos.x; getElement("y").value = pos.y; } // showElement and hideElement function hideTheTestElem() { // Toggles our guinea testelem element var button = getElement("hidebutton"); if (button.value == "Hide Element") { hideElement("thetestelem"); button.value = "Show Element"; } else { showElement("thetestelem"); button.value = "Hide Element"; } updateStatus(); } // setElementDimensions function setTestElemDimensions() { var e = getElement("thetestelem"); var dim = new Dimensions(getElement("width").value, getElement("height").value); setElementDimensions(e, dim); updateStatus(); } // setElementPosition function setTestElemPosition() { var e = getElement("thetestelem"); var pos = new Coordinates(getElement("x").value, getElement("y").value); setElementPosition(e, pos); updateStatus(); } // setOpacity function setTestElemOpacity() { setOpacity("thetestelem", getElement("opacity").value); } // computedStyle function getTestElemStyle() { var prop = getElement("testelemprop").value; var style = computedStyle("thetestelem", prop); getElement("testelemstyle").innerHTML = style; } As you can see from the preceding example, it doesn't take much code to manipulate elements using MochiKit.Style's functions. Other functions available for working with DOM object styles are as follows:
14.5.3. Creating DOM NodesMochiKit.DOM makes it easy to create new DOM nodes. One use of this is to make an Ajax request for some information that comes back in JSON format and then format the result completely within the browser. Doing this kind of formatting by creating DOM nodes without MochiKit would be painful indeed. With MochiKit, however, it's easy and very readable. Dynamically creating DOM nodes for new content seems like a clean way to update the page, and it is. However, it's not the best performing way to do it. Setting innerHTML on a DOM node performs better than creating a bunch of nodes in Java-Script and attaching them to that node. If you are displaying a lot of information, you might want to use innerHTML. That said, when you are working with a relatively small set of information, MochiKit.DOM really helps out. Let's start with an example that you can run in the interpreter: >>> writeln(DIV({"id" : "empty"})); >>> row_display = function(num) { return TR(null, TD(null, num)); } >>> new_contents = TABLE({"width" : "100"}, TBODY(null, map(row_display, range(10)))); >>> replaceChildNodes("empty", new_contents);When you go through these commands, you start off with an empty <DIV> that magically gets filled with a table of numbers at the end. There's a lot going on in this sample, so let's break it down: >>> writeln(DIV({"id" : "empty"}));writeln() is used to write to the interpreter window. It is able to write strings, but it is also able to write out new DOM nodes. And that's exactly, what's happening. The DIV() function comes from MochiKit.DOM. You probably won't be surprised to learn that it creates a new <div> element. The parameter we're passing in is a mapping of attributes. In this case, we're setting the id attribute to "empty." >>> row_display = function(num) { return TR(null, TD(null, num)); }This line creates a function that takes in a number, or anything for that matter, and puts it into a table row with a single table data cell. MochiKit provides functions for all the HTML DOM nodes you're likely to create. Note how the calls to tr() and td() have null for the first parameter. That means that there are no attributes needed for those nodes. The call to td() has an additional parameter of num. All these functions that create DOM nodes have a signature like this: TAG(attributes[, childNode1, childNode2, ...]). In this case, we're passing num as a child node. That will just become the text of the table cell. Note also that the <td> that is created is a child node of the <tr>. This is easy and concise syntax for building up a tree of output. td() and the others are all partially applied forms of createDOM(tag[, attrs[, node, ...]]). If you find that there is a tag that you need that MochiKit hasn't covered, you can make the function yourself using partial. Or, it turns out, you can use the convenience function createDOMFunc(tag[, attrs[, node, ...]]) to do that for you. MochiKit will generally just do the right thing with the objects you throw at it when creating DOM nodes. Sometimes, however, you need to customize the behavior, and there are several ways to do that. Here are the rules that MochiKit uses when setting up the elements:
So, we created a function. Now we should use it somewhere: >>> new_contents = TABLE({"width" : "100"}, TBODY(null, map(row_display, range(10))));By now, you can probably guess that this gives us a <table>. Note the use of TBODY(). Internet Explorer requires a <tbody> element when you're creating DOM nodes. Then, we use the map() function described earlier in the chapter to call our row_display function for each number from 0 to 9. With that, we have built our table of DOM nodes. But, we still need to display it: >>> replaceChildNodes("empty", new_contents);We introduce a new function now, replaceChildNodes(element, childnode1[, childnode2, ...]). This call replaces everything inside of the <div> that we had created with the id of "empty," plugging our new_contents table in there. Along those same lines, there is appendChildNodes(element, childnode1 [, childnode2, ...]), which adds additional child nodes instead of replacing all of them. 14.5.4. Simple EventsMochiKit provides a complete and powerful event handling system in the MochiKit.Signal module. It also provides a few functions that you can use for simple, but common, event needs. Note, however, that the functions here are not compatible with MochiKit.Signal. When you start using Signal, you'll need to switch over entirely. These functions predate Signal and might not even exist had Signal been there. MochiKit provides three functions for simple event handling: addLoadEvent, focus-OnLoad, and addToCallStack. These functions are easy to use, but their use is highly discouraged for new applications, given the superiority of the Signal module. Rather than using addLoadEvent to take care of tasks when the page is done loading, you should use connect(window, "onload", <your function>). Check out Chapter 15 for more information about MochiKit.Signal. 14.5.5. Other DOM FunctionsMochiKit provides the following useful additional functions for working with the DOM. These functions are straightforward to use and are not covered elsewhere in this chapter.
|
EAN: 2147483647
Pages: 202
- Chapter VII Objective and Perceived Complexity and Their Impacts on Internet Communication
- Chapter IX Extrinsic Plus Intrinsic Human Factors Influencing the Web Usage
- Chapter XIII Shopping Agent Web Sites: A Comparative Shopping Environment
- Chapter XIV Product Catalog and Shopping Cart Effective Design
- Chapter XVI Turning Web Surfers into Loyal Customers: Cognitive Lock-In Through Interface Design and Web Site Usability