Using Filters to Manage Your Messages
| The Filter option is a quick way to filter the items that are displayed in whatever folder you are in. An example of using the filter would be that you know you have received a message that indicated SPAM in the subject line. By typing SPAM into the Filter box, you can instantly see all items in the folder you have selected that have SPAM as a part of the subject. There are two methods of using filters in GroupWise 7. The first is to begin typing what you are looking for in the Filter box. This method of using a filter is considered a basic filter operation. It is applied dynamically as you type the characters and will search most of the available columns for information that matches the filter. It will not search the message body or attachment fields of messages. To apply a filter, begin typing characters and then press Enter or pause momentarily to see the results. Pressing Esc clears the filter. Figure 5.13 shows an example of filtering for the word Agenda. Figure 5.13. The Filter option allows you to quickly filter for items.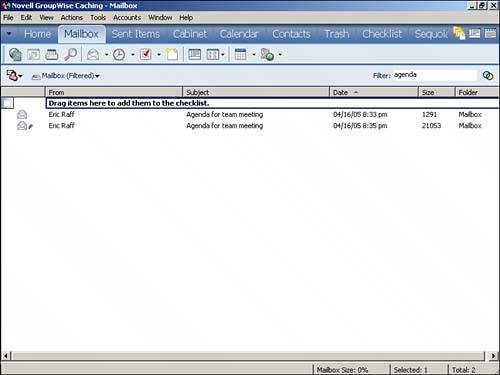 TIP When using the filter, you can type a few characters and then pause to see the results. This feature allows you to search for Agen and get all email with the word Agenda, agent, and so on, in them. If you continue typing, the filter is applied immediately. Also note that the Filter option is not case sensitive. Using the quick filter option will be the most common method you use to filter for items. Here are some situations in which a quick filter can be very useful:
TIP You can use filters to locate messages. For example, if you know that John Smith sent you a message, but you can't find it among your many messages, simply type John Smith in the quick filter window, and the filter will screen out all messages except those from John Smith. This technique works only if you know what folder the message is in. Otherwise, you are going to be better served with a Find operation that allows you to look across all folders. The second method of using filters allows you to create a filter that is much more advanced and can be active on any folder you select in GroupWise. Think of this type of a filter as a more advanced filter with numerous options that you may filter on. You access this filter feature by clicking on the two interlocking circles next to the Filter box in the upper-right corner of your mailbox. You can use the advanced filter to screen out certain messages when viewing them in any GroupWise folder. For example, you can apply a filter to your mailbox that displays only your mail and phone messages, or a filter that displays only your unopened messages. You can save the filters you create and use them again later. Here are some situations in which an advanced filter can be very useful:
A filter does not remove messages from your mailbox; it only determines which messages are displayed. When you close a filtered display, the filter is automatically removed. The next time you open the same folder, all the messages appear again. The exception is if you used a filter from the predefined list of filters. In such a case, the filter stays active. NOTE Remember, a filter limits the messages displayed in a folder based on your criteria. Find uses a filter to generate a list (Find Results) of messages that meet the criteria. Filter TerminologyYou should understand five key terms before you begin working with advanced filters:
Each is discussed in the following sections. FILTER TOPICThe filter topic is the part (or parts) of a message you want considered when GroupWise determines which messages to display. The following list shows the various filter topics from which you can choose:
FILTER QUALIFIERThe filter qualifier is the logic component of a filter; it indicates the selections to be made. Each filter topic has a different list of available qualifiers. For example, Less Than applies to the filter topic Size, whereas Begins With is applicable to the filter topic From, but not to Size. The following list shows the different filter qualifiers:
FILTER VARIABLE/CONSTANTA filter variable is the input on which GroupWise bases message filtering, such as a user's name. A filter constant sets the parameters of the filter topic. For example, High is a filter constant for the filter topic Priority; Phone Message is a filter constant for the filter topic Item Type. FILTER GROUPA filter group is a single, complete decision line in one filter. The formula for filter groups is explained in the section "Building a Filter," later in this chapter. FILTER TERMINATORThe filter terminator determines what kind of action GroupWise takes after it has made the proper selections. Table 5.2 explains the different filter terminators available.
Building a FilterWhen you build a filter, you specify the criteria GroupWise uses to determine which messages to display. The formula for this decision appears in the Advanced Filter dialog box, as shown in Figure 5.14. Figure 5.14. The Advanced Filter dialog box allows you to build filter scenarios.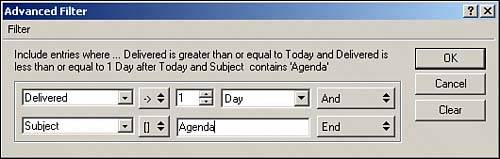 The formula for building a filter is as follows:
Here's an example:
This filter displays only phone messages in the folder. A simple filter is a single-decision filter. A complex filter is one in which multiple decisions can be evaluated. The Filter Terminator field on the far-right side of the Advanced Filter dialog box enables you to add more than one decision. The filter in Figure 5.15 displays only high-priority messages received from Eric. Figure 5.15. This is a more complex filter with multiple conditions.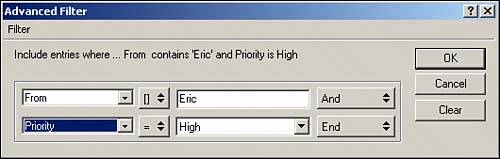 To apply a filter to a folder, follow these steps:
If you want to use a previously created filter, follow these steps:
To return to your normal, unfiltered view, right-click in the filtered folder and choose Clear Filter from the QuickMenu. |
EAN: 2147483647
Pages: 213