Managing the Address Book
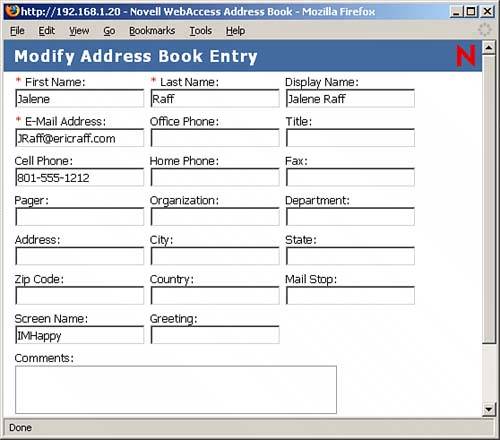
| The WebAccess Address Book interface provides access to the system address book, any personal address books in your account, as well as any LDAP address books that your administrator may have defined. It functions slightly differently than the Windows client in that you search for users rather than see all users by default. This speeds up access to the Address Book for large organizations. To open the Address Book, click the Address Book icon on the Toolbar. Figure 13.5 displays the default Address Book interface. Figure 13.5. The GroupWise WebAccess Address Book.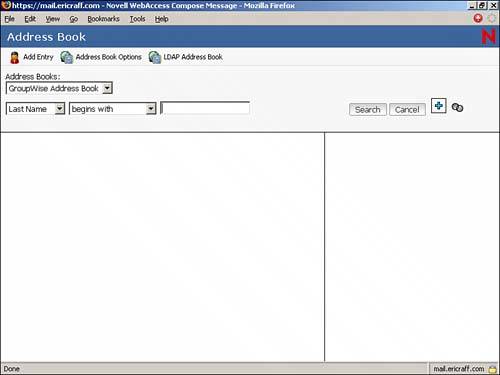 You can search for users, resources, or groups through the Address Book interface. If you don't define any search criteria, clicking the Search button lists the first 15 users, resources, and groups in the drop-down list at the top of your screen. In large GroupWise systems, this means you would have to click the Display Next button to see the next page of matches. You will usually be better served by searching for specific users, resources, or groups to narrow down the matches. Additionally, the more characters you use in the Search field, the more the search is narrowed. The default interface allows you to quickly search for a user based on Name, Last Name, First Name, or Department information. To the right of the Address Book interface, you will see two graphics that provide additional search options. They are the Entry Filter options, and they act as toggle buttons to display or hide additional search options. These options allow you to perform a more comprehensive and specific search. Figure 13.6 displays the two entry filters activated, allowing a search for a Person (user) with a last name that begins with Nellis AND a Department name that begins with ICS. You could also use this feature to search for resources or group entry types. Figure 13.6. Searching for users in the GroupWise Address book.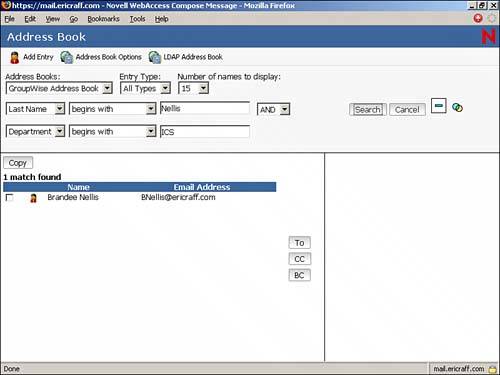 TIP You can increase the number of displayed names from 15 up to 200 by clicking the interlocking circles icon to the right of the Search button. You will then see the option for the Number of names to display. If you are not sure how to spell a user's name, you can simply enter the first character or characters of his or her first and last name and use the Begins With option. For example, if you were looking for a user named Ric Smyth, you could enter Sm in the Last Name AND Ri in the First Name field. Figure 13.7 shows an example of this type of search query and the listed results. Figure 13.7. Searching for a name when you are not sure of the proper spelling.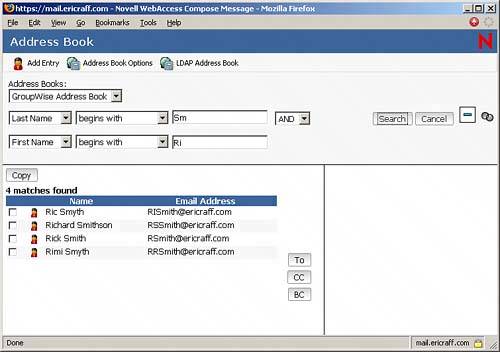 TIP You can click each name that is returned from a search to see all the information about the user. This is a quick way to get the user's phone or department information. This is also the way you edit personal contacts. When you locate the name or names you want to send mail to, select them by checking the check box for each user. Then click the To, CC, or BC button to place the name on the right, where you can see who the message will be sent to. After you have listed all users that the message will be sent to, click the Mail button to bring up the compose window with your list of recipients. You can also click the Save Group button to save the list of users as a personal group in any of your address books. The WebAccess client allows you to create, delete, and modify entries in any of your personal or shared address books, just as the desktop client does. Managing the Address Book EntriesYou can manage the information on your personal address books through the Address Book interface. Remember that personal address books can contain users, resources, groups, or organizations (companies). To update information about any of these item types, you must first search for the desired item type (user, group, resource, or organization). After you have located the desired item(s), you can move or copy it to a different address book, delete it, or modify it. To move, copy, or delete an address book item, select the item(s) and then click the desired button. To modify an existing item, click on the name of the item, and a new window will open displaying all the information about that particular item. From this window, you can modify any of the displayed fields. Figure 13.8 shows the interface used to modify a personal contact. Figure 13.8. Modifying the properties of a personal contact.
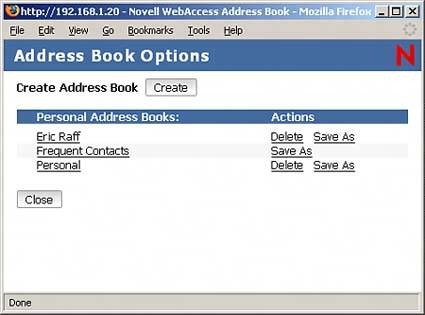
To add a contact, resource, or group to any of your personal address books, you use the Add Entry button on the Toolbar. The Add Entry interface allows you to quickly and easily add a person, resource, or organization to a personal address book. Managing the Address BooksWhen you click the Address Book Options button, you see the screen shown in Figure 13.9. You use this screen to manage the Address Book itself (not the entries). Figure 13.9. This screen allows you to manage the Address Book.
Select the Personal Address Books entry from the list and then choose from the following options:
To modify an address book, click on the name of the address book. You can then rename the address book or update the description. These options enable you to manage (modify and perform other tasks) an entire personal address book at a time. |
EAN: 2147483647
Pages: 213