Creating Task and Package Logging Steps
Adding task and package logging steps to your packages enables you to create in a single location an execution audit trail for each task and package in the data movement application rather than having information distributed throughout several logging locations.
Creating an Audit Table in SQL Server
In the following procedure, you will create an audit table in SQL Server. In subsequent procedures, you will add tasks in each package that will write entries to this table whenever a package step succeeds or fails. Using this audit trail, you will be able to quickly determine the branch of a package that executed and whether any steps failed.
Create the audit table
-
On the SQL Query Analyzer toolbar, click Load SQL Script.
-
In the Look In list, navigate to C:\Microsoft Press\SQL DTS SBS\Ch8\ChapterFiles and then open the CreateAuditEventsTable.sql script.
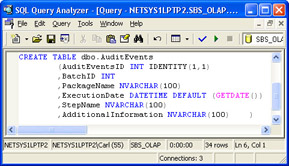
This script creates a six-column table for recording audit events. It enables you to record the batch ID, package name, date and time the step executed, step name , and additional information regarding events that you choose to capture.
Tip In your production environment, you might want to create additional columns to enable you to capture additional information, such as start and finish times for each step and each package.
-
Execute the CreateAuditEventsTable script to create the AuditEvents table.
Now that you have created the AuditEvents table, you are ready to modify the package in the data movement application to write execution information to this table.
Creating Logging Steps in the MasterUpdate Package
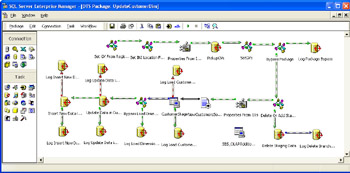
In the following procedures, you will create a number of Execute SQL tasks in the MasterUpdate package that will write an entry to the AuditEvents table you just created each time a new BatchID value is generated and when all dimension subpackages complete their execution.
Log information about the Generate BatchID step by creating an Execute SQL task in the MasterUpdate package
-
Switch to SQL Server Enterprise Manager console tree, and then right-click Data Transformation Services in your local instance.
-
Click Open Package and then open the most recent version of the MasterUpdate package in the C:\Microsoft Press\SQL DTS SBS\ DataMovementApplication folder using a password of mypassword .
-
On the Task menu, click Execute SQL Task.
-
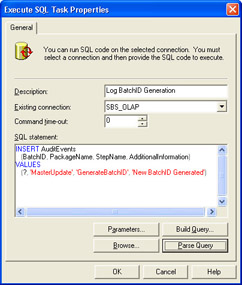
Type Log BatchID Generation in the Description box, and then click Browse.
-
In the Look In list, navigate to C:\Microsoft Press\SQL DTS SBS\Ch8\ChapterFiles, and then double-click LogBatchIDGeneration.sql.
This script inserts logging information about the Generate BatchID step into the AuditEvents table.
-
Click Parameters, select giBatchID in the Input Global Variables list, and then click OK.
-
Click OK to save this Execute SQL task.
You will configure the Log BatchID Generation step to execute after the Generate BatchID step succeeds.
-
On the design sheet, click the Generate BatchID step, and then hold down the Ctrl key and click the Log BatchID Generation step.
-
On the Workflow menu, click On Success.
Now that you have added a step to log information about the generation of a new BatchID value for each execution of the data movement application, you will add a step that logs the successful completion of all the dimension update steps in the MasterUpdate package.
Log information about the completion of all dimension update subpackage steps by creating an Execute SQL task in the MasterUpdate package
-
On the Task menu, click Execute SQL Task.
-
Type Log Dimensions Updated in the Description box, and then click Browse.
-
In the Look In list, navigate to C:\Microsoft Press\SQL DTS SBS\Ch8\ChapterFiles, and then double-click LogUpdateDimensionsComplete.sql.
This script inserts information into the AuditEvents table that documents that all dimension update steps have completed. You will configure this step to execute after the completion of all the dimension update subpackages.
-
Click Parameters, select giBatchID in the Input Global Variables list, and then click OK.
-
Click OK to save this Execute SQL task.
-
On the design sheet, click the Call UpdateProductDim Subpackage step, and then hold down the Ctrl key and click the Log Dimensions Updated step.
-
On the Workflow menu, click On Completion.
Remember that a subpackage completes reporting success even if a task in the subpackage reports a failure. Therefore, using an On Completion constraint more accurately reflects when the subsequent step will execute.
-
On the design sheet, click Call UpdateCustomerDim Subpackage step, and then hold down the Ctrl key and click the Log Dimensions Updated step.
-
On the Workflow menu, click On Completion.
Because two precedence constraints are configured to the Log Dimensions Updated step, this logging step will not execute until both dimension update packages have completed. The Call UpdateSalesFact Subpackage step, which you will add in the next chapter, requires that all dimension update subpackages complete before it executes. This Log Dimensions Updated step creates an entry in the AuditEvents table that documents that these predecessor steps completed, and when.
-
On the toolbar, click Save, and then close the MasterUpdate subpackage.
Now that you created these logging steps in the MasterUpdate package, you are ready to create logging steps in the UpdateProductDim and UpdateCustomerDim subpackages.
| Note | In a production environment, you should create success and failure logging steps for each step in this package to provide a complete audit log in the audit table. |
Creating Logging Steps in the UpdateCustomerDim Package
In the following procedures, you will create a number of Execute SQL tasks in the UpdateCustomerDim package that will write an entry to the AuditEvents table whenever the step associated with the Execute SQL task succeed, fail, or execute.
Log the bypass of the UpdateCustomerDim package by modifying the Log Package Bypass step
-
In the SQL Server Enterprise Manager console tree, right-click Data Transformation Services in your local instance.
-
Click Open Package and then open the most recent version of the UpdateCustomerDim package in the C:\Microsoft Press\SQL DTS SBS\DataMovementApplication folder using a password of mypassword .
-
On the design sheet, double-click the Log Package Bypass step.
-
Click Browse.
-
In the Look In list, navigate to C:\Microsoft Press\SQL DTS SBS\Ch8\ChapterFiles, and then double-click LogUpdateCustomerDimPackageBypassed.sql.
This script inserts logging information into the AuditEvents table to log the bypass of the UpdateCustomerDim package. This step executes if the Bypass Package step enables the Log Package Bypass step and disables the Delete Or Add Staging Data step, which disables the remaining steps in the UpdateCustomerDim package.
-
Click Parameters, select giBatchID in the Input Global Variables list, and then click OK.
-
Click OK to save the modifications to this Execute SQL task.
Now that you can log the bypass of this package if it occurs, you will create a logging step to log whether the delete branch or the add staging data branch of the UpdateCustomerDim package executes.
Log the execution of the delete branch of the UpdateCustomerDim package by creating an Execute SQL task
-
On the Task menu, click Execute SQL Task.
-
Type Log Delete Branch Executed in the Description box, select SBS_OLAPAdditionalConnection in the Existing Connection list, and then click Browse.
-
In the Look In list, navigate to C:\Microsoft Press\SQL DTS SBS\Ch8\ChapterFiles, and then double-click LogUpdateCustomerDimDeleteBranchExecuted.sql.
This script inserts logging information into the AuditEvents table to document that the delete branch of the UpdateCustomerDim package executed. You will configure this step to execute after the completion of the Delete Staging Data step.
-
Click Parameters, select giBatchID in the Input Global Variables list, and then click OK.
-
Click OK to save this Execute SQL task.
-
Right-click an open area of the design sheet, and click Disconnected Edit.
-
In the left pane, expand the Steps node and then click DTSStep_DTSExecuteSQLTask_1.
-
In the right pane, double-click Name and then type LogDeleteBranchExecuted in the Value box in place of DTSStep_DTSExecuteSQLTask_1.
-
Click OK and then click Close.
-
On the design sheet, click the Delete Staging Data step, and then hold down the Ctrl key and click the Log Delete Branch Executed step.
-
On the Workflow menu, click On Completion.
You are using an On Completion precedence constraint because you are merely creating a log entry to document that this branch of the package executed, not whether the Delete Staging Data step actually succeeded or failed.
You have created a step to log when the delete branch of the UpdateCustomerDim package executes. Next you will create a step to log the success of the Load CustomerStage Table step.
Log the successful execution of the Load CustomerStage Table step in the UpdateCustomerDim package by adding an Execute SQL task
-
On the Task menu, click Execute SQL Task.
-
Type Log Load CustomerStage Table Success in the Description box, select SBS_OLAPAdditionalConnection in the Existing Connection list, and then click Browse.
-
In the Look In list, navigate to C:\Microsoft Press\SQL DTS SBS\Ch8\ChapterFiles, and then double-click LogUpdateCustomerDimLoadCustomerStageTableSuccess.sql.
This script inserts logging information into the AuditEvents table to document when the Load CustomerStage Table step completes successfully. You will configure this step to execute after the success of the Load CustomerStage Table step.
Note Remember that the setting you use for the MaximumErrorCount property will determine the number of errors permissible before a step fails.
-
Click Parameters, select giBatchID in the Input Global Variables list, and then click OK.
-
Click OK to save this Execute SQL task.
-
Right-click an open area of the design sheet, and click Disconnected Edit.
-
In the left pane, expand the Steps node and then click DTSStep_DTSExecuteSQLTask_1.
-
In the right pane, double-click Name and then type LogLoadCustomerStageTableSuccess in the Value box in place of DTSStep_DTSExecuteSQLTask_1.
-
Click OK and then click Close.
-
On the design sheet, click the CustomerStage connection object and then hold down the Ctrl key and click the Log Load CustomerStage Table Success step.
-
On the Workflow menu, click On Success.
You have added a step that creates a log entry in the AuditEvents table when the Load CustomerStage Table step completes successfully. Now you will add a step that creates a log entry in the AuditEvents table when the Load CustomerStage Table step fails to complete successfully.
Log the failure of the Load CustomerStage Table step in the UpdateCustomerDim package by adding an Execute SQL task
-
On the Task menu, click Execute SQL Task.
-
Type Log Load CustomerStage Table Failure in the Description box, select SBS_OLAPAdditionalConnection in the Existing Connection list, and then click Browse.
-
In the Look In list, navigate to C:\Microsoft Press\SQL DTS SBS\Ch8\ChapterFiles, and then double-click LogUpdateCustomerDimLoadCustomerStageTableFailure.sql.
This script inserts logging information into the AuditEvents table to document when the Load CustomerStage Table step does not complete successfully. You will configure this step to execute after the failure of the Load CustomerStage Table step.
-
Click Parameters, select giBatchID in the Input Global Variables list, and then click OK.
-
Click OK to save this Execute SQL task.
-
Right-click an open area of the design sheet, and click Disconnected Edit.
-
In the left pane, expand the Steps node and then click DTSStep_DTSExecuteSQLTask_1.
-
In the right pane, double-click Name and then type LogLoadCustomerStageTableFailure in the Value box in place of DTSStep_DTSExecuteSQLTask_1.
-
Click OK and then click Close.
-
On the design sheet, click the CustomerStage connection object, and then hold down the Ctrl key and click the Log Load CustomerStage Table Failure step.
-
On the Workflow menu, click On Failure.
You have added steps to log the success or failure of the Load CustomerStage Table step in the UpdateCustomerDim package to the AuditEvents table. Next you will modify the Log Load Dimension Table Bypass step that you added earlier in the chapter but did not configure.
Log the bypass of the load dimension table steps in the UpdateCustomerDim package by editing the Log Load Dimension Table Bypass step
-
On the design sheet, double-click the Log Load Dimension Table Bypass step and then click Browse.
-
In the Look In list, navigate to C:\Microsoft Press\SQL DTS SBS\Ch8\ChapterFiles, and then double-click LogUpdateCustomerDimInsertAndUpdateDimTableBypassed.sql.
This script inserts logging information into the AuditEvents table to document when the Update Data in CustomerDim Table step and the Insert New Data in CustomerDim Table step are bypassed.
-
Click Parameters, select giBatchID in the Input Global Variables list, and then click OK.
-
Click OK to save the modification of this Execute SQL task.
You have created a step that will create a log entry in the AuditEvents table when the steps that insert and update data in the CustomerDim table are bypassed. Next you will create steps to log the success or failure of the steps that insert and update data from the CustomerStage table to the CustomerDim table.
Log the success of the Update Data In CustomerDim Table step in the UpdateCustomerDim package by adding an Execute SQL task
-
On the Task menu, click Execute SQL Task.
-
Type Log Update Data in CustomerDim Table Success in the Description box, select SBS_OLAPAdditionalConnection in the Existing Connection list, and then click Browse.
-
In the Look In list, navigate to C:\Microsoft Press\SQL DTS SBS\Ch8\ChapterFiles, and then double-click LogUpdateCustomerDimUpdateCustomerDimTableSuccess.sql.
This script inserts logging information into the AuditEvents table to document that the dimension data in the CustomerDim table was successfully updated by the Update Data In CustomerDim Table step. You will configure this step to execute after the success of the Update Data In CustomerDim Table step.
-
Click Parameters, select giBatchID in the Input Global Variables list, and then click OK.
-
Click OK to save this Execute SQL task.
-
Right-click an open area of the design sheet, and click Disconnected Edit.
-
In the left pane, expand the Steps node and then click DTSStep_DTSExecuteSQLTask_1.
-
In the right pane, double-click Name and then type LogUpdateDataInCustomerDimTableSuccess in the Value box in place of DTSStep_DTSExecuteSQLTask_1.
-
Click OK and then click Close.
-
On the design sheet, click the Update Data In CustomerDim Table step, and then hold down the Ctrl key and click the Log Update Data In CustomerDim Table Success step.
-
On the Workflow menu, click On Success.
Now that you have added the step to create a log entry when dimension data in the CustomerDim table is successfully updated by the Update Data In CustomerDim Table step, you will add a step to create a log entry when this step fails.
Log the failure of the Update Data In CustomerDim Table step in the UpdateCustomerDim package by adding an Execute SQL task
-
On the Task menu, click Execute SQL Task.
-
Type Log Update Data in CustomerDim Table Failure in the Description box, select SBS_OLAPAdditionalConnection in the Existing Connection list, and then click Browse.
-
In the Look In list, navigate to C:\Microsoft Press\SQL DTS SBS\Ch8\ChapterFiles, and then double-click LogUpdateCustomerDimUpdateCustomerDimTableFailure.sql.
This script inserts logging information into the AuditEvents table to document that the dimension data in the CustomerDim table was not successfully updated by the Update Data In CustomerDim Table step. You will configure this step to execute after the failure of the Update Data In CustomerDim Table step.
-
Click Parameters, select giBatchID in the Input Global Variables list, and then click OK.
-
Click OK to save this Execute SQL task.
-
Right-click an open area of the design sheet, and click Disconnected Edit.
-
In the left pane, expand the Steps node and then click DTSStep_DTSExecuteSQLTask_1.
-
In the right pane, double-click Name and then type LogUpdateDataInCustomerDimTableFailure in the Value box in place of DTSStep_DTSExecuteSQLTask_1.
-
Click OK and then click Close.
-
On the design sheet, click the Update Data in CustomerDim Table step, and then hold down the Ctrl key and click the Log Update Data In CustomerDim Table Failure step.
-
On the Workflow menu, click On Failure.
You have added the steps to log whether the Update Data in CustomerDim Table step succeeded or failed. Next you will add the steps to log whether the Insert New Data in CustomerDim Table step succeeds or fails.
Log the success of the Insert New Data In CustomerDim Table step in the UpdateCustomerDim package by adding an Execute SQL task
-
On the Task menu, click Execute SQL Task.
-
Type Log Insert New Data in CustomerDim Table Success in the Description box, select SBS_OLAPAdditionalConnection in the Existing Connection list, and then click Browse.
-
In the Look In list, navigate to C:\Microsoft Press\SQL DTS SBS\Ch8\ChapterFiles, and then double-click LogUpdateCustomerDimInsertCustomerDimTableSuccess.sql.
This script inserts logging information into the AuditEvents table to document that new dimension data in the CustomerStage table was successfully inserted into the CustomerDim table by the Insert New Data In CustomerDim Table step. You will configure this step to execute after the success of the Insert New Data In CustomerDim Table step.
-
Click Parameters, select giBatchID in the Input Global Variables list, and then click OK.
-
Click OK to save this Execute SQL task.
-
Right-click an open area of the design sheet, and click Disconnected Edit.
-
In the left pane, expand the Steps node and then click DTSStep_DTSExecuteSQLTask_1.
-
In the right pane, double-click Name and then type LogInsertNewDataInCustomerDimTableSuccess in the Value box in place of DTSStep_DTSExecuteSQLTask_1.
-
Click OK and then click Close.
-
On the design sheet, click the Insert New Data In CustomerDim Table step, and then hold down the Ctrl key and click the Log Insert New Data In CustomerDim Table Success step.
-
On the Workflow menu, click On Success.
You have added the step to create a log entry when new dimension data is successfully inserted into the CustomerDim table by the Insert New Data In CustomerDim Table step. Now you will add a step to create a log entry when the Insert New Data In CustomerDim Table step fails to insert new dimension data into the CustomerDim table.
Log the Failure of the Insert New Data In CustomerDim Table step in the UpdateCustomerDim package by adding an Execute SQL task
-
On the Task menu, click Execute SQL Task.
-
Type Log Insert New Data in CustomerDim Table Failure in the Description box, select Cust Stage Dest in the Existing Connection list, and then click Browse.
-
In the Look In list, navigate to C:\Microsoft Press\SQL DTS SBS\Ch8\ChapterFiles, and then double-click LogUpdateCustomerDimInsertCustomerDimTableFailure.sql.
This script inserts logging information into the AuditEvents table to document that new dimension data in the CustomerStage table was not successfully inserted into the CustomerDim table by the Insert New Data In CustomerDim Table step. You will configure this step to execute after the failure of the Insert New Data In CustomerDim Table step.
-
Click Parameters, select giBatchID in the Input Global Variables list, and then click OK.
-
Click OK to save this Execute SQL task.
-
Right-click an open area of the design sheet, and click Disconnected Edit.
-
In the left pane, expand the Steps node and then click DTSStep_DTSExecuteSQLTask_1.
-
In the right pane, double-click Name and then type LogInsertNewDataInCustomerDimTableFailure in the Value box in place of DTSStep_DTSExecuteSQLTask_1.
-
Click OK and then click Close.
-
On the design sheet, click the Insert New Data In CustomerDim Table step, and then hold down the Ctrl key and click the Log Insert New Data In CustomerDim Table Failure step.
-
On the Workflow menu, click On Failure.
-
On the toolbar, click Save.
-
Close the UpdateCustomerDim package in DTS Designer.
Now that you have added logging steps to the UpdateCustomerDim package, you are ready to add similar steps to the UpdateProductDim package.
Creating Logging Steps in UpdateProductDim Package
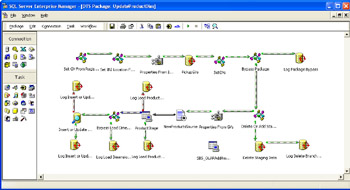
In the following procedures, you will create a number of Execute SQL tasks in the UpdateProductDim package that will each write an entry to the AuditEvents table whenever the step associated with the Execute SQL task succeeds, fails, or executes.
Edit the LogBypass step in the UpdateProductDim package
-
In the SQL Server Enterprise Manager console tree, right-click Data Transformation Services in your local instance.
-
Click Open Package and then open the most recent version of the UpdateProductDim package in the C:\Microsoft Press\SQL DTS SBS\ DataMovementApplication folder using a password of mypassword .
-
On the design sheet, double-click the Log Package Bypass step.
-
Click Browse.
-
In the Look In list, navigate to C:\Microsoft Press\SQL DTS SBS\Ch8\ChapterFiles, and then double-click LogUpdateProductDimPackageBypassed.sql.
This script inserts logging information into the AuditEvents table to log the bypass of the UpdateProductDim package. This step executes if the Bypass Package step enables the Log Package Bypass step and disables the Delete or Add Staging Data step, which disables the remaining steps in the UpdateProductDim package.
-
Click Parameters, select giBatchID in the Input Global Variables list, and then click OK.
-
Click OK to save the modifications to this Execute SQL task.
Now that you can log the bypass of this package if it occurs, you will create a logging step to log whether the delete branch or the add staging data branch of the UpdateProductDim package executes.
Log the execution of the delete branch of the UpdateProductDim package by creating an Execute SQL task
-
On the Task menu, click Execute SQL Task.
-
Type Log Delete Branch Executed in the Description box, select SBS_OLAPAdditionalConnection in the Existing Connection list, and then click Browse.
-
In the Look In list, navigate to C:\Microsoft Press\SQL DTS SBS\Ch8\ChapterFiles, and then double-click LogUpdateProductDimDeleteBranchExecuted.sql.
This script inserts logging information into the AuditEvents table to document that the deleted branch of the UpdateProductDim package executed. You will configure this step to execute after the completion of the Delete Staging Data step.
-
Click Parameters, select giBatchID in the Input Global Variables list, and then click OK.
-
Click OK to save this Execute SQL task.
-
Right-click an open area of the design sheet, and click Disconnected Edit.
-
In the left pane, expand the Steps node and then click DTSStep_DTSExecuteSQLTask_1.
-
In the right pane, double-click Name and then type LogDeleteBranchExecuted in the Value box in place of DTSStep_DTSExecuteSQLTask_1.
-
Click OK and then click Close.
-
On the design sheet, click the Delete Staging Data step, and then hold down the Ctrl key and click the Log Delete Branch Executed step.
-
On the Workflow menu, click On Completion.
Now that you have added a step to log when the delete branch of the UpdateProductDim package executes, you will add a step to log the success of the Load ProductStage Table step.
Log the successful execution of the Load ProductStage Table step in the UpdateProductDim package by adding an Execute SQL task
-
On the Task menu, click Execute SQL Task.
-
Type Log Load ProductStage Table Success in the Description box, select SBS_OLAPAdditionalConnection in the Existing Connection list, and then click Browse.
-
In the Look In list, navigate to C:\Microsoft Press\SQL DTS SBS\Ch8\ChapterFiles, and then double-click LogUpdateProductDimLoadProductStageTableSuccess.sql.
This script inserts logging information into the AuditEvents table to document when new data is successfully added to the ProductStage table. You will configure this step to execute after the success of the Load ProductStage Table step.
-
Click Parameters, select giBatchID in the Input Global Variables list, and then click OK.
-
Click OK to save this Execute SQL task.
-
Right-click an open area of the design sheet, and click Disconnected Edit.
-
In the left pane, expand the Steps node and then click DTSStep_DTSExecuteSQLTask_1.
-
In the right pane, double-click Name and then type LogLoadProductStageTableSuccess in the Value box in place of DTSStep_DTSExecuteSQLTask_1.
-
Click OK and then click Close.
-
On the design sheet, click the ProductStage connection object, and then hold down the Ctrl key and click the Log Load ProductStage Table Success step.
-
On the Workflow menu, click On Success.
You have added a step that creates a log entry in the AuditEvents table when the Load ProductStage Table step completes successfully. Now you will add a step that creates a log entry in the AuditEvents table when the Load ProductStage Table step fails to complete successfully.
Log the failure of the Load ProductStage Table step in the UpdateProductDim package by adding an Execute SQL task
-
On the Task menu, click Execute SQL Task.
-
Type Log Load ProductStage Table Failure in the Description box, select SBS_OLAPAdditionalConnection in the Existing Connection list, and then click Browse.
-
In the Look In list, navigate to C:\Microsoft Press\SQL DTS SBS\Ch8\ChapterFiles, and then double-click LogUpdateProductDimLoadProductStageTableFailure.sql.
This script inserts logging information into the AuditEvents table to document when the Load ProductStage Table step does not complete successfully. You will configure this step to execute after the failure of the Load ProductStage Table step.
-
Click Parameters, select giBatchID in the Input Global Variables list, and then click OK.
-
Click OK to save this Execute SQL task.
-
Right-click an open area of the design sheet, and click Disconnected Edit.
-
In the left pane, expand the Steps node and then click DTSStep_DTSExecuteSQLTask_1.
-
In the right pane, double-click Name and then type LogLoadProductStageTableFailure in the Value box in place of DTSStep_DTSExecuteSQLTask_1.
-
Click OK and then click Close.
-
On the design sheet, click the ProductStage connection object, and then hold down the Ctrl key and click the Log Load ProductStage Table Failure step.
-
On the Workflow menu, click On Failure.
You have added steps to log the success or failure of the Load ProductStage Table step in the UpdateProductDim package to the AuditEvents table. Next you will modify the Log Load Dimension Table Bypass step that you added in Chapter 7 but did not configure.
Log the bypass of the Insert Or Update ProductDim Table step in the UpdateProductDim package by editing the Log Load Dimension Table Bypass step
-
On the design sheet, double-click the Log Load Dimension Table Bypass step and then click Browse.
-
In the Look In list, navigate to C:\Microsoft Press\SQL DTS SBS\Ch8\ChapterFiles, and then double-click LogUpdateProductDimInsertAndUpdateDimTableBypassed.sql.
This script inserts logging information into the AuditEvents table to document when the Insert Or Update ProductDim Table step is bypassed.
-
Click Parameters, select giBatchID in the Input Global Variables list, and then click OK.
-
Click OK to save the modification of this Execute SQL task.
You have created a step that will create a log entry in the AuditEvents table when the Insert Or Update ProductDim Table step is bypassed. Next you will create steps to log the success or failure of the Insert Or Update ProductDim Table step.
Log the success of the Insert Or Update ProductDim Table step in the UpdateProductDim package by adding an Execute SQL task
-
On the Task menu, click Execute SQL Task.
-
Type Log Insert Or Update ProductDim Table Success in the Description box, select SBS_OLAPAdditionalConnection in the Existing Connection list, and then click Browse.
-
In the Look In list, navigate to C:\Microsoft Press\SQL DTS SBS\Ch8\ChapterFiles, and then double-click LogUpdateProductDimInsertOrUpdateProductDimTableSuccess.sql.
This script inserts logging information into the AuditEvents table to document that the dimension data in the ProductDim table was successfully updated by the Insert Or Update ProductDim Table step. You will configure this step to execute after the success of the Insert Or Update ProductDim Table step.
-
Click Parameters, select giBatchID in the Input Global Variables list, and then click OK.
-
Click OK to save this Execute SQL task.
-
Right-click an open area of the design sheet, and click Disconnected Edit.
-
In the left pane, expand the Steps node and then click DTSStep_DTSExecuteSQLTask_1.
-
In the right pane, double-click Name and then type LogInsertOrUpdateProductDimTableSuccess in the Value box in place of DTSStep_DTSExecuteSQLTask_1.
-
Click OK and then click Close.
-
On the design sheet, click the Insert Or Update ProductDim Table step, and then hold down the Ctrl key and click the Log Insert Or Update ProductDim Table Success step.
-
On the Workflow menu, click On Success.
Now that you have added the step to create a log entry when the Insert Or Update ProductDim Table step completes successfully, you will add a step to create a log entry when this step fails.
Log the failure of the Insert Or Update ProductDim Table step in the UpdateProductDim package by adding an Execute SQL task
-
On the Task menu, click Execute SQL Task.
-
Type Log Insert Or Update ProductDim Table Failure in the Description box, select SBS_OLAPAdditionalConnection in the Existing Connection list, and then click Browse.
-
In the Look In list, navigate to C:\Microsoft Press\SQL DTS SBS\Ch8\ChapterFiles, and then double-click LogUpdateProductDimInsertOrUpdateProductDimTableFailure.sql.
This script inserts logging information into the AuditEvents table to document that the Insert Or Update ProductDim Table step was unsuccessful in updating dimension data in the ProductDim table. You will configure this step to execute after the success of the Insert Or Update ProductDim Table step.
-
Click Parameters, select giBatchID in the Input Global Variables list, and then click OK.
-
Click OK to save this Execute SQL task.
-
Right-click an open area of the design sheet, and click Disconnected Edit.
-
In the left pane, expand the Steps node and then click DTSStep_DTSExecuteSQLTask_1.
-
In the right pane, double-click Name and then type LogInsertOrUpdateProductDimTableFailure in the Value box in place of DTSStep_DTSExecuteSQLTask_1.
-
Click OK and then click Close.
-
On the design sheet, click the Insert Or Update ProductDim Table step, and then hold down the Ctrl key and click Log Insert Or Update ProductDim Table Failure.
-
On the Workflow menu, click On Failure.
-
On the toolbar click Save.
-
Close the UpdateProductDim package in DTS Designer.
You have added logging steps to the UpdateProductDim package, so now you are ready to test the execution of the data movement application and view the contents of the AuditEvents table.
Testing the Use of the AuditEvents Table
In the following procedure, you will execute the MasterUpdate package and its subpackages using the default configuration and the delete all configuration. You will then query the AuditEvents table to observe the log entries that were written to the AuditEvents table when the MasterUpdate package and its subpackages executed with different ConfigID values.
Test package execution
-
Using Windows Explorer, navigate to C:\Microsoft Press\SQL DTS SBS\DataMovementApplication, and then double-click MasterUpdateDefaultConfig.cmd.
-
After the batch file completes its execution, switch to SQL Query Analyzer and click Clear Window on the toolbar.
-
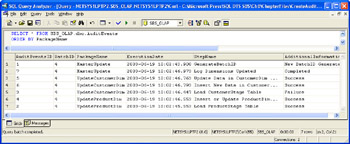
In the query pane, type SELECT * FROM SBS_OLAP.dbo.AuditEvents ORDER BY PackageName , and then click Execute on the toolbar.
This query returns the steps in each package that executed, sorted by the PackageName . Notice that you can quickly determine which packages in the data movement application executed for a particular batch and which steps in each package succeeded or failed. Notice that the steps in the UpdateCustomerDim package are executing in parallel with the steps in the UpdateProductDim package.
-
Switch to Windows Explorer and then double-click Config2.cmd in the DataMovementApplication folder.
-
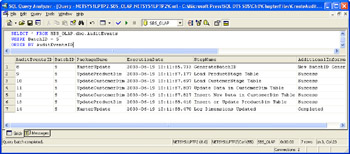
After the batch file completes its execution, switch to SQL Query Analyzer and change the query to read SELECT * FROM SBS_OLAP.dbo.AuditEvents WHERE BatchID = 5 ORDER BY AuditEventsID , and then click Execute on the toolbar.
Notice that the Load CustomerStage Table step, which has two errors in the source file and failed in the previous execution, now reports success because the number of errors does not exceed the MaximumErrorCount value associated with ConfigID 2.
-
Switch to Windows Explorer and then double-click DeleteAllStagingData.cmd in the DataMovementApplication folder.
-
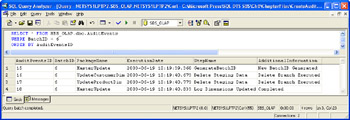
After the batch file completes its execution, switch to SQL Query Analyzer and change the query to read SELECT * FROM SBS_OLAP.dbo.AuditEvents WHERE BatchID = 6 ORDER BY AuditEventsID , and then click Execute on the toolbar.
Notice that you are easily able to determine that for BatchID 6, the delete branches of the UpdateProductDim and the UpdateCustomerDim packages executed.
You have successfully created an audit and error detection table for the data movement application and created steps in the data movement application packages to record execution information. However, the information recorded in the AuditEvents table is not as complete as needed to fully understand the actions performed by each step in the packages.
EAN: 2147483647
Pages: 87