Adding Batch Control
Batch control enables you to identify the rows affected by a particular execution of the data movement application. You will implement batch control by adding a task to the MasterUpdate package that generates a new batch ID value each time the MasterUpdate package is executed. You will then pass the generated batch ID value to each subpackage, which will record the batch ID value with each row it inserts into a dimension table from one of the staging tables.
| Note | If you skipped Chapter 7, execute the IfYouSkippedChapter7.cmd batch file in the C:\Microsoft Press\SQL DTS SBS\Ch8\SkippedChapterFiles folder before you begin these procedures. This batch file restores the SBS_OLTP and SBS_OLAP databases and copies the DTS packages that would have been created in Chapters 1 through 7 into the appropriate folders. It also records the location of the Config.ini initialization file in the Windows registry. If you do not want this batch file to overwrite any packages that you created in Chapters 1 through 7, you must move them or rename them before you execute this batch file. |
Modifying SQL Server Objects to Support Batch Control
In the following procedure, you will create a table and stored procedure in SQL Server that will generate a new batch ID value in the table each time the stored procedure is executed. In a subsequent procedure, you will create an Execute SQL task in the MasterUpdate package that will call this stored procedure and then store the new batch ID value in a global variable for that execution of the data movement application. You will then add a column to each dimension table to store the batch ID value for each record added to the dimension table by the corresponding subpackage.
Create the BatchIDValues table and the GenBatchID stored procedure
-
Open SQL Query Analyzer and connect to your local SQL Server instance as a system administrator.
-
On the File menu, click Open.
-
In the Look In list, navigate to C:\Microsoft Press\SQL DTS SBS\Ch8\ChapterFiles, and then open the BatchID.sql script.
This script creates the BatchIdValues table containing a BatchID column, which is defined using the IDENTITY property, and a BatchName column. This script also creates a GenBatchID stored procedure, which inserts a batch name provided as an input parameter into the BatchIdValues table, and returns the BatchID value generated by the IDENTITY property. This stored procedure will be called by an Execute SQL task that you will create in the MasterUpdate package.

-
Execute the BatchID.sql script to create this table and stored procedure.
Now that you have created the infrastructure to generate a new BatchID value as needed, you must add a column to each dimension table to hold this BatchID value along with the data that is added to each dimension table from the corresponding staging table.
Add the BatchID column to each dimension table
-
On the toolbar, click Load SQL Script.
-
In the Look In list, navigate to C:\Microsoft Press\SQL DTS SBS\Ch8\ChapterFiles and then open the AddColumnsToDimTables.sql script.
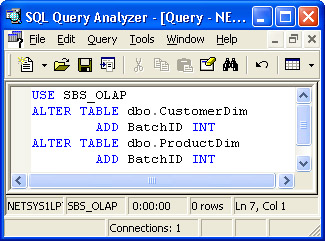
This script adds the BatchID column to the CustomerDim and ProductDim dimension tables. This column will store the BatchID value for each row added to these tables by the UpdateCustomerDim and UpdateProductDim subpackages, respectively.
-
Execute the AddColumnsToDimTables.sql script to add this column to each of these tables.
Now that you have created the infrastructure to store the generated BatchID value in each row added to a dimension table, you are ready to add a step to the MasterUpdate package to generate a BatchID value each time the data movement application is executed.
Generating a BatchID Value, Storing It in the MasterUpdate Package, and Then Passing It to Subpackages
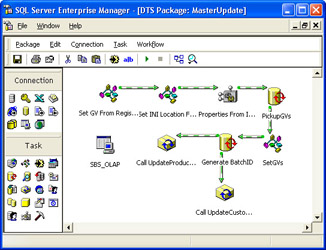
In the following procedures, you will create an Execute SQL task in the MasterUpdate package that calls the GenBatchID stored procedure and records the generated BatchID value into a global variable. You will then modify the Execute Package tasks to pass this BatchID value to each subpackage. Finally, you will update the precedence constraints to ensure the steps in the MasterUpdate package execute in the proper order. The step that calls the GenBatchID must execute after the Properties From INI File step and before the steps that call the subpackages.
Add the Generate BatchID step to the MasterUpdate package by creating an Execute SQL step
-
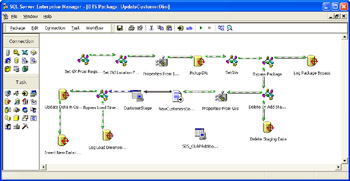
Open SQL Server Enterprise Manager and then right-click Data Transformation Services in your local instance.
-
Click Open Package and then open the most recent version of the MasterUpdate package in the C:\Microsoft Press\SQL DTS SBS\ DataMovementApplication folder using a password of mypassword .
-
On the Task menu, click Execute SQL Task.
-
Type Generate BatchID in the Description box and then type EXEC GenBatchID MasterUpdatePackage in the SQL Statement box.
You will configure this task to use the existing connection object because no other task will be using this connection when this Execute SQL task needs it. You are passing the parameter value of MasterUpdatePackage to the GenBatchID stored procedure to identify the package that generated the new BatchID value. As you add complexity to the data movement application, you can call this stored procedure from a different master package and pass a different package name. This package name is stored in the BatchIDValues table as the BatchName .

-
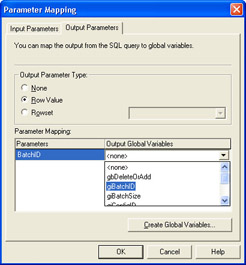
Click Parameters and then click the Output Parameters tab.
You will store the BatchID value returned by this stored procedure in a global variable that you will pass to each subpackage called from the MasterUpdate package.
-
Click Create Global Variables, type giBatchID in the Name column, select Integer (small) in the Type list, type -1 in the Value list, and then click OK.
To create a global variable with an integer data type, you must provide a default value. This default value of -1 will be overridden each time the MasterUpdate package is executed by the BatchID value returned by the GenBatchID stored procedure.
-
Click Row Value as the Output Parameter Type, and then select giBatchID in the Output Global Variables list in the Parameter Mapping box.
The generated BatchID value returned by the GenBatchID stored procedure will be stored in the giBatchID global variable and then passed to each subpackage.
-
Click OK to save the mapping of the SQL query output to a global variable and then click OK to save the Execute SQL task.
Now that you have created a package step to generate a BatchID value and store it in a global variable, you need to pass the value of this global variable to each subpackage.
Pass the giBatchID global variable to each subpackage by modifying the Execute Package tasks
-
On the design sheet, double-click the Call UpdateProductDim Subpackage step and then click the Outer Package Global Variables tab.
-
In the Variables list, select giBatchID and then click OK.
-
On the design sheet, double-click the Call UpdateCustomerDim Subpackage step and then click the Outer Package Global Variables tab.
-
In the Variables list, select giBatchID and then click OK.
You have ensured that the generated batch ID value is passed to each subpackage, so now you need to ensure that the package steps execute in the proper order.
Ensure the package steps execute in the proper order by configuring precedence constraints
-
On the design sheet, delete the On Success constraint between the SetGVs step and the Call UpdateProductDim Subpackage step.
-
On the design sheet, delete the On Success constraint between the SetGVs step and the Call UpdateCustomerDim Subpackage step.
-
On the design sheet, click the SetGVs step, and then hold down the Ctrl key and click the Generate BatchID step.
-
On the Workflow menu, click On Success.
-
On the design sheet, click the Generate BatchID step, and then hold down the Ctrl key and click the Call UpdateProductDim Subpackage step.
-
On the Workflow menu, click On Success.
-
On the design sheet, click the Generate BatchID step, and then hold down the Ctrl key and click the Call UpdateCustomerDim Subpackage step.
-
On the Workflow menu, click On Success.
-
On the toolbar, click Save and then close the MasterUpdate package.
You have finished configuring the MasterUpdate package to generate a BatchID value and pass this value to each subpackage. Next you need to add the giBatchID global variable to each subpackage and then configure the appropriate tasks to add the generated BatchID value to each row added or updated in the corresponding dimension table.
Incorporating the BatchID Value into Tasks in the UpdateProductDim Package
In the following procedures, you will add the giBatchID global variable to the UpdateProductDim package. You will then modify the ProductStageRowsetSP stored procedure to accept the value of the giBatchID global variable as an input parameter and then return its value in the rowset generated by this stored procedure. Next you will create a binding table that matches the schema of the rowset returned by the ProductStageRowsetSP stored procedure for use by the DDQ task in this package. You must create a dedicated binding table because the schema returned by the rowset does not match any existing table in the SBS_OLAP database. Finally, you will modify the DDQ task in this package to read the global variable containing the giBatchID value, pass this value to the ProductStageRowsetSP stored procedure, and then use the rowset returned by the stored procedure to update existing rows and insert new values in the ProductDim table.
Add the giBatchID global variable to the UpdateProductDim package
-
In the SQL Server Enterprise Manager console tree, right-click Data Transformation Services in your local instance.
-
Click Open Package and then open the most recent version of the UpdateProductDim package in the C:\Microsoft Press\SQL DTS SBS\ DataMovementApplication folder using a password of mypassword .
-
Right-click an open area of the design sheet, and then click Package Properties.
-
Click the Global Variables tab.
-
Type giBatchID in the Name column, select Integer (small) in the Type list, type -1 in the Value box, and then click OK.
Now that you have created the giBatchID global variable in this subpackage, you are ready to modify the DDQ task called by the Insert Or Update ProductDim Table step to add the value of this global variable to each new record that it inserts and to each existing record that it updates in the ProductDim table. First you will modify the ProductStageRowsetSP stored procedure to accept the value of the giBatchID global variable as an input parameter and then return it in the rowset used by the DDQ task.
Add the value of the giBatchID global variable to the rowset returned by the ProductStageRowsetSP stored procedure
-
Switch to SQL Query Analyzer and then click Load SQL Script on the toolbar.
-
Navigate to C:\Microsoft Press\SQL DTS SBS\Ch8\ChapterFiles in the Look In list and then open the AlterProductStageRowsetSP.sql script.
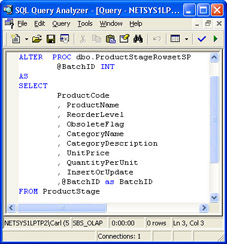
This script modifies the ProductStageRowsetSP by adding the @BatchID variable to hold the value of an input parameter passed into this stored procedure and then include the value of the @BatchID variable in the rowset that it returns to the DDQ task that calls this stored procedure. The DDQ task will pass the value of the giBatchID global variable into this stored procedure and use this rowset to insert or update values in the ProductDim table.
-
Execute the AlterProductStageRowsetSP.sql script to alter this stored procedure.
Now that the BatchID value is being included in the rowset that is returned by the stored procedure, you need to create a binding table that the DDQ task will use. When you created the DDQ task in Chapter 4, you used the ProductStage table as the binding table. However, the rowset being used as the data source in the DDQ task no longer has the same schema as the ProductStage table. The simplest way to solve this problem is to create a binding table that has a schema that matches the source rowset.
Create the ProductBinding table for use in the DDQ task
-
On the SQL Query Analyzer toolbar, click Load SQL Script.
-
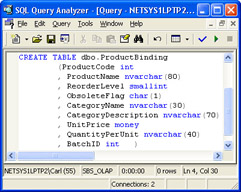
In the Look In list, navigate to C:\Microsoft Press\SQL DTS SBS\Ch8\ChapterFiles and then open the CreateProductBindingTable.sql script.
This script creates a table that matches the schema of the rowset returned by the ProductStageRowsetSP . The schema for this table begins with the schema of the ProductStage table, but without the InsertOrUpdate column, and then adds the BatchID column.
-
Execute the CreateProductBindingTable.sql script to create the ProductBinding table.
Now that you have altered the infrastructure required for the DDQ task to use the BatchID value, you are ready to modify the DDQ task in the UpdateProductDim subpackage so that it writes the BatchID value to the appropriate column in the ProductDim table.
Update the DDQ task in the UpdateProductDim subpackage to use the BatchID value
-
Switch to the UpdateProductDim subpackage in DTS Designer and then double-click the Insert Or Update ProductDim Table step on the design sheet.
-
In the SQL Query box, modify the query to read: EXEC dbo.ProductStageRowsetSP ? and then click Parameters.
-
In the Input Global Parameters list, select giBatchID and then click OK.
-
Click the Bindings tab.
Notice that DTS does not know what table to use as the binding table. In Chapter 4, you defined the ProductStage table as the binding table. However, DTS has detected that the schema of the ProductStage table does not match the schema of the source rowset. As a result, DTS displays the first table in the SBS_OLAP database (the Authors table).
-
On the Bindings tab, verify that SBS_OLAPAdditionalConnection is selected in the Connection list, and then select "SBS_OLAP"."dbo "."ProductBinding" in the Table Name list.
Notice that the BatchID column appears in the binding table to hold the BatchID value in the rowset returned by the ProdStageRowsetSP stored procedure.
-
Click the Transformations tab and then click Remove Invalid Transformations.
-
Click Select All and then click New.
-
Click ActiveX Script, click OK, and then click Properties.
-
Click Browse, navigate to C:\Microsoft Press\SQL DTS SBS\Ch8\ChapterFiles, and then double-click DDQ2.bas.
This modified ActiveX script adds the DTSDestination(BatchID) = DTSSource(BatchID) statement to the ActiveX script immediately before the Select Case statement.

-
Click OK to save the modified ActiveX script, and then click OK to close the Transformation Options dialog box.
-
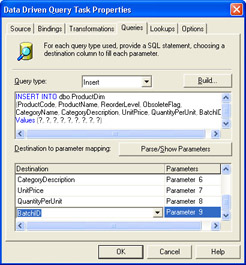
On the Queries tab, verify that Insert is selected as the query type and then modify the Insert query by adding the BatchID column to the column list and adding an additional parameter to the VALUES list. The modified query should read as follows :
INSERT INTO dbo.ProductDim(ProductCode, ProductName, ReorderLevel, ObsoleteFlag, CategoryName, CategoryDescription, UnitPrice, QuantityPerUnit, BatchID)VALUES (?, ?, ?, ?, ?, ?, ?, ?, ?)
-
Click Parse/Show Parameters and then click OK.
This maps the columns in the bindings table to parameters in the VALUES list. Notice that the BatchID column is mapped to Parameter 9 in the VALUES list.
-
In the Query Type list, select Update and then modify the Update query by adding the BatchID column to the SET list. The modified query should read as follows:
UPDATE dbo.ProductDim SETProductName = ?,ReorderLevel = ?,ObsoleteFlag = ?,CategoryName = ?,CategoryDescription = ?,UnitPrice = ?,QuantityPerUnit = ?,BatchID = ?WHERE ProductCode = ?
-
Click Parse/Show Parameters and then click OK.
-
In the Destination To Parameter Mapping box, map the following parameters:
Parameter 1
ProductName
Parameter 2
ReorderLevel
Parameter 3
ObsoleteFlag
Parameter 4
CategoryName
Parameter 5
CategoryDescription
Parameter 6
UnitPrice
Parameter 7
QuantityPerUnit
Parameter 8
BatchID
Parameter 9
ProductCode
-
Click OK to save the modified DDQ task.
-
On the toolbar, click Save and then close the UpdateProductDim package.
Now that you have modified the UpdateProductDim subpackage to incorporate the BatchID value into each record inserted or modified in the Product_Dim table, you are ready to incorporate the BatchID value into the UpdateCustomerDim package.
Incorporating the BatchID Value into Tasks in the UpdateCustomerDim Package
In the following procedures, you will add the giBatchID global variable to the UpdateCustomerDim package. You will then create an insert and an update stored procedure that insert or update data (as the case may be) into the CustomerDim table from the CustomerStage table, while incorporating the batch ID value. These stored procedures will be called by Execute SQL tasks that you will create. You will create a bypass load dimension table task that will bypass these new steps based on the value of the gbBypassLoadDimensionTable global variable. Finally, you will create logging tasks for these new steps, configure user -friendly names for these new steps, and then ensure these steps execute in the proper order.
Add the giBatchID global variable to the UpdateCustomerDim package
-
In the SQL Server Enterprise Manager console tree, right-click Data Transformation Services in your local instance.
-
Click Open Package and then open the most recent version of the UpdateCustomerDim package in the C:\Microsoft Press\SQL DTS SBS\ DataMovementApplication folder using a password of mypassword .
-
Right-click an open area of the design sheet and then click Package Properties.
-
Click the Global Variables tab.
-
Type giBatchID in the Name column, select Integer (small) in the Type list, type -1 in the Value box, and then click OK.
Now that you have created the giBatchID global variable in this subpackage, you are ready to create the tasks required to update the data in the CustomerDim table based on the rows of data in the CustomerStage table, adding the BatchID value to each row being added or updated. However, unlike the records in the ProductStage table, the records in the CustomerStage table are not marked to indicate which values are new and which values are updates to existing values. To solve this problem, you will create separate insert and update tasks that will each use a stored procedure to update to appropriate rows and include the BatchID value.
Create the Customer Insert and Customer Update stored procedures
-
Switch to SQL Query Analyzer and then click Load SQL Script on the toolbar.
-
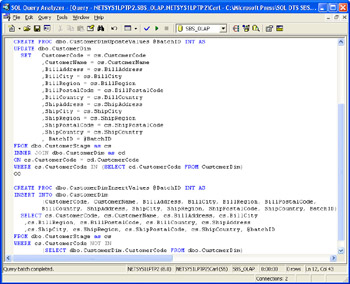
In the SQL Query Analyzer Look In list, navigate to C:\Microsoft Press\SQL DTS SBS\Ch8\ChapterFiles and then open the CustomerDimValues.sql script.
This script creates two stored procedures. The CustomerDimUpdateValues stored procedure updates rows in the CustomerDim table, based on their CustomerCode key, with values from the CustomerStage table. The CustomerDimInsertValues stored procedure inserts those records from the CustomerStage table into the CustomerDim table for which there is no matching CustomerCode entry. Notice that the value for the BatchID column is passed into each of these stored procedures as an input parameter and added to each inserted or updated record.
-
Execute the CustomerDimValues.sql script to create these stored procedures.
Now that you have created the stored procedures that will insert new data or update existing data, you are ready to create the tasks that call these stored procedures to perform the insert and update actions.
Call the CustomerDimUpdateValues stored procedure by creating an Execute SQL task in the UpdateCustomerDim package
-
Switch to the UpdateCustomerDim package in DTS Designer and then click Execute SQL Task on the Task menu.
-
Type Update Data in CustomerDim Table in the Description box, select CustomerStage in the Existing Connection list, and then type EXEC dbo.CustomerDimUpdateValues ? in the SQL Query box.
-
Click Parameters, select giBatchID in the Input Global Variables list, and then click OK.
-
Click OK to save the Execute SQL task.
Now that you have added a step that updates existing customer data in the CustomerDim table, you are ready to add a step that inserts new customer data into the CustomerDim table.
Call the CustomerDimInsertValues stored procedure by creating an Execute SQL task in the UpdateCustomerDim package
-
On the Task menu, click Execute SQL Task.
-
Type Insert New Data in CustomerDim Table in the Description box, select CustomerStage in the Existing Connection list, and then type EXEC CustomerDimInsertValues ? in the SQL Query box.
-
Click Parameters, select giBatchID in the Input Global Variables list, and then click OK.
-
Click OK to save the Execute SQL task.
Now that you have added the Update Data In CustomerDim Table and Insert New Data In CustomerDim Table steps to the UpdateCustomerDim package, you will add a bypass load dimension table step to the UpdateCustomerDim package to enable you to load data into the CustomerStage table without always loading data from the CustomerStage table into the CustomerDim table.
Add a bypass load dimension table step to the UpdateCustomerDim package by creating an ActiveX Script task
-
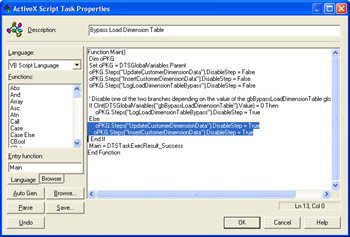
On the Task menu, click ActiveX Script Task, and then type Bypass Load Dimension Table in the Description box.
-
Click Browse, navigate to C:\Microsoft Press\SQL DTS SBS\Ch8\ChapterFiles, and then double-click BypassLoadDimensionTable.bas.
This script is very similar to the previous scripts you used to create branching tasks. However, it disables two tasks if the value of the gbBypassLoadDimensionTable global variable is set to 1.
-
Click OK to save this ActiveX Script task.
Now that you have created the Bypass Load Dimension Table step, you will add a log dimension table bypass step to this package.
Add the Log Load Dimension Table Bypass step to the UpdateCustomerDim package by creating an Execute SQL task
-
On the Task menu, click Execute SQL Task, and then type Log Load Dimension Table Bypass in the Description box.
-
Select SBS_OLAPAdditionalConnection in the Existing Connection list, and then type the following Transact-SQL statement in the SQL Statement box:
UPDATECustomerStageSETCustomerName=CustomerNameWHERE0=1
This Execute SQL package is simply holding a spot for a more complex logging and error handling statement, which you will implement later in this chapter.
-
Click OK to save this Execute SQL task.
Now that you have created these new steps, you are ready to change the names of the steps in this package to user-friendly names.
Create user-friendly names for the new steps in the UpdateCustomerDim package
-
On the Package menu, click Disconnected Edit and then expand the Steps node in the left pane.
-
In the left pane, click DTSStep_DTSExecuteSQLTask_1 and then double-click Name in the right pane.
-
In the Value box, type UpdateCustomerDimensionData in place of DTSStep_DTSExecuteSQLTask_1 and then click OK.
-
In the left pane, click DTSStep_DTSExecuteSQLTask_2 and then double-click Name in the right pane.
-
In the Value box, type InsertCustomerDimensionData in place of DTSStep_DTSExecuteSQLTask_2 and then click OK.
-
In the left pane, click DTSStep_DTSActiveScriptTask_1 and then double-click Name in the right pane.
-
In the Value box, type BypassLoadDimensionTable in place of DTSStep_ DTSActiveScriptTask _1 and then click OK.
-
In the left pane, click DTSStep_DTSExecuteSQLTask_3 and then double-click Name in the right pane.
-
In the Value box, type LogLoadDimensionTableBypass in place of DTSStep_DTSExecuteSQLTask_3 and then click OK.
-
Click Close.
Now that you have configured user-friendly names for the new steps in this package, you are ready to configure the appropriate precedence constraints in the UpdateCustomerDim package to ensure these steps execute in the proper order.
Ensure the package steps execute in the proper order by adding precedence constraints to the UpdateCustomerDim package
-
On the design sheet, click the CustomerStage connection object, and then hold down the Ctrl key and click the Bypass Load Dimension Table step.
-
On the Workflow menu, click On Completion.
If the Load CustomerStage Table step fails to load new data into the CustomerStage table, the Bypass Load Dimension Table step will still execute, and if the default value is not changed, the package will continue and update the CustomerDim table.
-
On the design sheet, click the Bypass Load Dimension Table step, and then hold down the Ctrl key and click the Log Load Dimension Table Bypass step.
-
On the Workflow menu, click On Success.
-
On the design sheet, click the Bypass Load Dimension Table step, and then hold down the Ctrl key and click the Update Data in CustomerDim Table step.
-
On the Workflow menu, click On Success.
-
On the design sheet, click the Update Data in CustomerDim Table step, and then hold down the Ctrl key and click the Insert New Data in CustomerDim Table step.
-
On the Workflow menu, click On Success.
-
On the toolbar, click Save, and then close the UpdateCustomerDim package.
Now that you have configured these three packages to use batch ID values, you are ready to test the execution of these packages.
Testing the Steps That Generate and Add the BatchID Value
In the following procedure, you will test the steps that generate and add the BatchID value to each row inserted or updated in the dimension tables. You will begin by executing the LoadHistoricalData package to delete all test data from the dimension tables. You will then execute the MasterUpdate package and its subpackages using the delete configuration to delete all test data from the staging tables. You will then execute the MasterUpdate package and its subpackages using the default configuration and query the dimension tables to observe the BatchID values. You will then create a new batch file that executes the MasterUpdate package and its subpackages using a ConfigID value of 2 and query the dimension tables to observe the BatchID values.
Test the execution of the data movement application
-
In the SQL Server Enterprise Manager console tree, right-click Data Transformation Services in your local instance and then click Open Package.
-
Navigate to the C:\Microsoft Press\SQL DTS SBS\DataMovementApplication folder and then open the most recent version of the LoadHistoricalData package using a password of mypassword .
-
On the toolbar, click Execute.
Performing this step truncates all data in the dimension and fact tables, and then reloads the original historical data. By executing this task, it will be easier to observe the effect of executing the UpdateCustomerDim and UpdateProductDim packages again because the test data that you have previously loaded into the dimension tables is deleted.
-
Click OK, click Done, and then switch to Windows Explorer.
-
Navigate to the C:\Microsoft Press\SQL DTS SBS\DataMovementApplication folder, and then double-click DeleteAllStagingData.cmd.
Performing this step eliminates all data in the staging tables to make it easier to observe the effect of executing the UpdateCustomerDim and UpdateProductDim packages again because the test data that you have previously loaded into the staging tables is deleted.
-
In the DataMovementApplication folder, double-click MasterUpdateDefaultConfig.cmd to load data from the source files into the staging tables, and then from the staging tables into the dimension tables.
-
After this batch file completes, switch to SQL Query Analyzer and then click Load SQL Script on the toolbar.
-
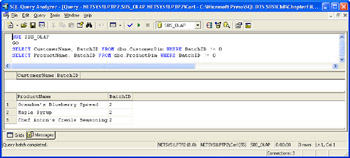
In the Look In list, navigate to C:\Microsoft Press\SQL DTS SBS\Ch8\ChapterFiles and then double-click TestBatchExecution.sql.
This script queries the ProductDim and CustomerDim tables to return those rows inserted or modified by the package execution with the BatchID value that is not equal to 0 or NULL.
-
Execute the query.
Notice that no rows were added to the CustomerDim table and three rows were added or updated in the ProductDim table by the batch with a BatchID value of 2. No rows were added to the CustomerDim table because no rows existed in the CustomerStage table. No rows existed in the CustomerStage table because the number of rows in the source file exceeded the number of errors permitted. The BatchID value is 2 because the BatchID value of 1 was generated when the MasterUpdate package executed using a ConfigID value of 3 (which deleted all staging data).
-
Switch to Windows Explorer, right-click MasterUpdateDefaultConfig.cmd in the DataMovementApplication folder and then click Edit.
-
Change the value of the giConfigID parameter from 1 to 2 and then click Save As on the File menu.
-
Type Config2.cmd in the File Name box, select All Files in the Save As Type list, and then click Save.
-
Close the Config2.cmd file in Notepad and then double-click Config2.cmd in the DataMovement Application folder.
-
After this batch file completes, switch to SQL Query Analyzer and re- execute the TestBatchExecution.sql script.
Notice that 27 rows were added to the CustomerDim table by the batch with a BatchID value of 3, but that four rows were added or updated in the ProductDim table (duplicating the rows added or updated by the batch with the BatchID value of 2). You can see why having a delete branch and a bypass package branch in each subpackage is important. Since the error in the source file affected only the UpdateCustomerDim package, you could have bypassed to the UpdateProductDim package. You will work through these scenarios in Chapter 10.
Now that you have added batch control to your data movement application, you will learn how to add logging tasks to the packages in the application to easily determine the most important steps that occurred in each package and their consequences.
EAN: 2147483647
Pages: 87
- Challenging the Unpredictable: Changeable Order Management Systems
- The Effects of an Enterprise Resource Planning System (ERP) Implementation on Job Characteristics – A Study using the Hackman and Oldham Job Characteristics Model
- Context Management of ERP Processes in Virtual Communities
- Relevance and Micro-Relevance for the Professional as Determinants of IT-Diffusion and IT-Use in Healthcare
- Development of Interactive Web Sites to Enhance Police/Community Relations