Lesson 5: Creating Multiserver Jobs
3 4
SQL Server 2000 allows you to automate administrative tasks across multiple SQL Server 2000 instances. In this lesson, you learn to create master servers and target servers. You also learn to create jobs on the master server that propagate to target servers for execution. Finally, you learn to review remote job history from the master server.
After this lesson, you will be able to
- Create master and target servers
- Create jobs for target servers
- Monitor jobs on target servers
Estimated lesson time: 30 minutes
Creating Master and Target Servers
To create multiserver jobs, you must designate a server as a master server and one or more servers as target servers. This allows you to create jobs on a master server, which distributes the jobs to and receives events from target servers. The master server must be a computer running Windows 2000 or Windows NT 4.0. The master server and all target servers must be running in Mixed Authentication Mode. In addition, SQL Server Agent must be running on the master and all target servers. Finally, select a master server that is not a busy production server because target service traffic can cause a performance hit.
To create a master server, right-click the SQL Server Agent container for the instance that will function as the master server, point to Multi Server Administration, and then click Make This A Master. The Welcome To The Make MSX Wizard page appears as shown in Figure 13.55.
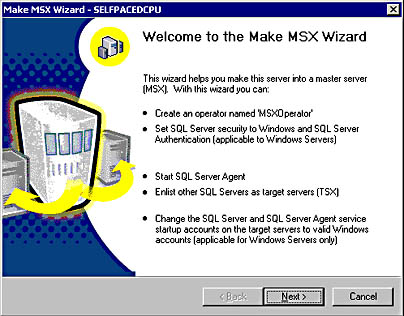
Figure 13.55
The Welcome to the Make MSX Wizard screen.
First, in the Create 'MSXOperator' page, you create an MSXOperator to whom all notifications related to multiserver jobs will be sent. If no MSXOperator is created, multiserver jobs cannot send completion notifications. See Figure 13.56.
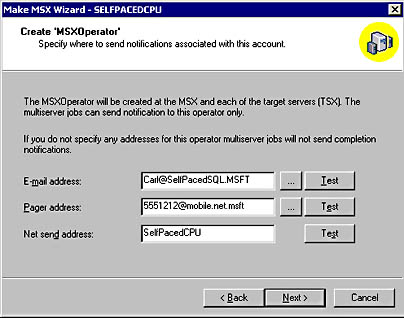
Figure 13.56
Creating an MSXOperator.
Next, in the Select Servers To Enlist page, select SQL Server instances to enlist as target servers from the list of currently registered servers. You must be a member of the sysadmin server role on each instance you are registering. You cannot enlist an instance that is not registered. The SQL Server and SQL Server Agent services on all target servers (as well as on the master server) must be using domain user accounts for the service account (using the same account for the master and all target servers will ease administration). You can also register servers on the fly. See Figure 13.57.
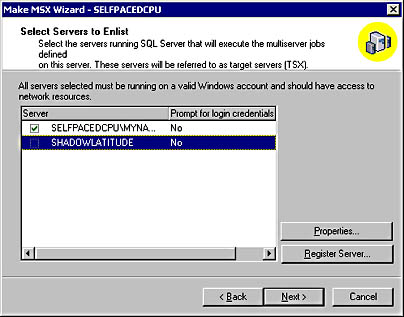
Figure 13.57
Selecting SQL Server instances to enlist as target servers.
Next, in the Provide Target Server Description page, you can provide a description for each target server. See Figure 13.58.
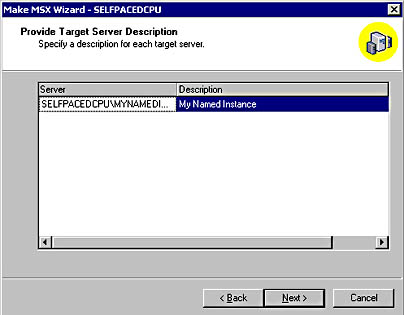
Figure 13.58
Providing a description for the target servers.
Next, in the Completing The Make MSX Wizard page, click the Finish button to create the MSXOperator and enlist each target server. If the wizard cannot connect to an instance (or if the SQL Server Agent service is not running on the instance), you cannot enlist the instance as a target server. See Figure 13.59.
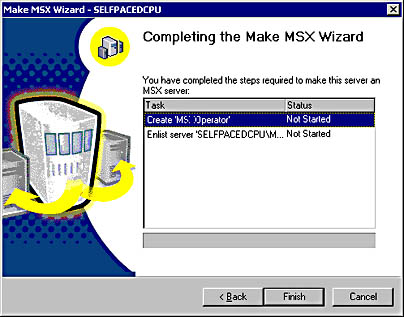
Figure 13.59
Completing the creation of the MSXOperator.
After the Make MSX Wizard completes, the SQL Server Agent on the master server is designated with an MSX and the SQL Server Agent on each target server is designated with a TSX: master_server_name. See Figure 13.60.

Figure 13.60
Master and target server designations.
Creating Jobs for Target Servers
You can create jobs on the master server and designate one or more target servers to which these jobs will be distributed. The job definitions are stored on the master server and a copy is retrieved by each target server. Updates to the central copy are periodically distributed to the target servers. These jobs cannot be modified on any target server.
To create a job for target servers, you define the job in the same manner as you did for a local server job in Lesson 2 of this chapter. However, in the General tab, you click the Target Multiple Servers option button and then select one or more target servers by clicking the Change button. The Change Job Target Servers dialog box appears as shown in Figure 13.61.
Note
All database and file system paths used in multiserver jobs must be valid on each target server for the job to succeed on that target server. Establishing a consistent path and naming convention will make multiserver job administration much simpler.
You can then select target servers from the list of enrolled target servers. See Figure 13.62.
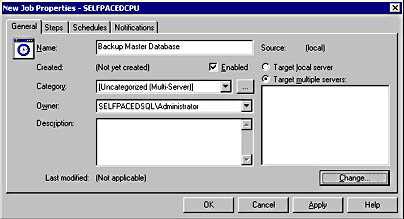
Figure 13.61
Selecting target servers.

Figure 13.62
Selecting target servers from the list.
On the master server, all multiserver jobs have their own container. The target servers periodically poll the master server to download new jobs and changes to existing jobs.
Monitoring Jobs on Target Servers
To monitor jobs on target servers, right-click the SQL Server Agent (MSX) container on the master server, point to Multi Server Administration, and then click Manage Target Servers. The Target Servers dialog box appears as shown in Figure 13.63.
In the Target Service Status tab, notice that each target server is listed along with its local time, the last time the target server polled the master server, the number of unread instructions, and the status of each target server (blocked, OK, or offline). You can force a poll by clicking the Force Poll button, defect a target server by clicking the Force Defection button, or post instructions for one or more target servers by clicking the Post Instructions button. Instructions you can post include defecting, setting a polling interval (default is 60 seconds), synchronizing clocks between the master and target servers, and starting a job. The Post Download Instructions dialog box is shown in Figure 13.64.

Figure 13.63
Managing target servers.
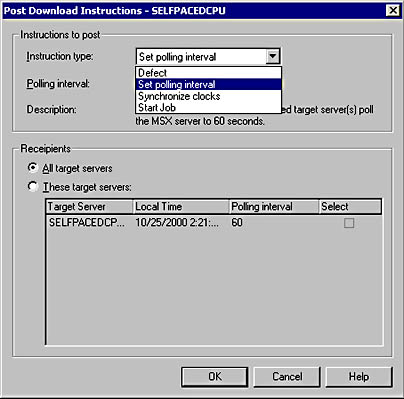
Figure 13.64
Choosing options for posting instructions.
Click the Download Instructions tab to view details regarding instructions that have been downloaded to one or more target servers. You can also filter displayed instructions based on a particular job by selecting the job name in the Job drop-down list. See Figure 13.65.
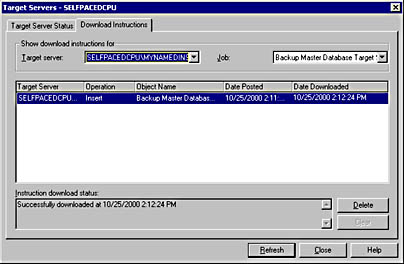
Figure 13.65
Viewing and filtering instruction details
To view the job status and job history of multiserver jobs, in the details pane for the Multi Server Jobs container, right-click the multiserver job, and then click Job Status. The Multi Server Job Execution Status dialog box appears, as shown in Figure 13.66.
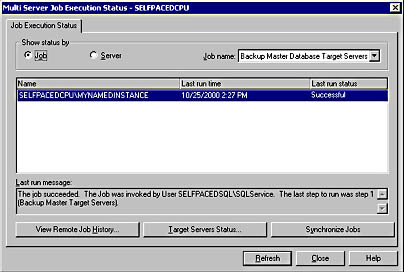
Figure 13.66
Viewing job status and history.
Notice that you can view status by job or by server to view the last time a job was run and whether it was successful. Click the View Remote Job History button to connect to the remote server and view the history of the job. Click the Target Servers Status button to view the status of a particular server. Click the Synchronize Jobs button to resynchronize all jobs on a particular server or a particular job on all servers.
Practice: Creating a Multiserver Job
In this practice you create a multiserver job.
To create a multiserver job
- Ensure that you are logged on to the SelfPacedSQL.MSFT domain controller as Administrator.
- In the SQL Server Enterprise Manager console tree, expand the SelfPacedCPU\MyNamedInstance container, expand the Management container, right-click SQL Server Agent, and then click Start.
- In the console tree, right-click SQL Server Agent for the default instance, point to Multi Server Administrator, and then click Make This A Master.
The Welcome To The Make MSX Wizard page appears.
- Click Next.
The Create 'MSXOperator' page appears.
- In the Net Send Address text box, type SelfPacedCPU, and then click Next.
The Select Servers To Enlist page appears.
- Select the SelfPacedCPU\MyNamedInstance check box, and then click Next.
The Provide Target Server Description page appears.
- Enter a description into the Description cell, and then click Next.
The Completing The Make MSX Wizard page appears.
- Review the information, and then click the Finish button.
A Make MSX Wizard message box appears stating that SelfPacedCPU was successfully made an MSX.
- Click OK.
In the console tree, notice that the SQL Server Agent for the default instance is designated as an MSX and the SQL Server Agent for the MyNamedInstance is designated as a TSX.
- In the console tree, expand the SQL Server Agent container for the default instance.
- Right-click Jobs, and then click New Job.
The New Job Properties - SelfPacedCPU dialog box appears.
- In the Name text box, type Backup All Master Databases.
- Click the Target Multiple Servers option button, and then click the Change button.
The Change Job Target Servers - SelfPacedCPU dialog box appears.
- Click the right-arrow button to select SelfPacedCPU\MyNamedInstance as a target server for this new job, and then click OK.
- Click the Steps tab, and then click the New button.
The New Job Step - SelfPacedCPU dialog box appears.
- In the Step Name text box, type Backup Master Step.
- Verify that the Type drop-down list displays Transact-SQL Script (TSQL) and the Database drop-down list displays master.
- In the Command text box, type BACKUP DATABASE master TO DISK='C:\SQLBackups\master.bak', and then click OK.
- Click the Schedules tab, and then click the New Schedule button.
The New Job Schedule - SelfPacedCPU dialog box appears.
- In the Name text box, type Nightly Schedule.
- Click the Change button.
The Edit Recurring Job Schedule - SelfPacedCPU dialog box appears.
- In the Occurs group box, click the Daily option button, and then click OK to close the Edit Recurring Job Schedule - SelfPacedCPU dialog box.
- Click OK to close the New Job Schedule - SelfPacedCPU dialog box.
- Click the Notifications tab.
- Select the Net Send Operator check box, and then click Whenever The Job Completes in the drop-down list.
- Click OK to close the New Job Properties - SelfPacedCPU dialog box.
- In the console tree, expand the Jobs container for the default instance, and then click Multi Server Jobs.
In the details pane, notice the new multiserver job. After a few moments, the Pending Instructions column will indicate zero. This means that the target server has downloaded the job.
- In the console tree, expand the SelfPacedCPU\MyNamedInstance container, expand the Management container, expand the SQL Server Agent (TSX: SelfPacedCPU) container, and then click Jobs.
- If the Backup All Master Databases job is not displayed, right-click the Jobs container, and then click the Refresh button.
- In the details pane, right-click the Backup All Master Databases job, and then click Properties.
Notice that you cannot edit a job on a target server.
- Click the Close button.
- In the console tree, click the Multi Server Jobs container for the default instance.
- In the details pane, right-click Backup All Master Databases, point to Start Job, and then click Start On All Targeted Servers.
Notice that the Pending Instructions column indicates one pending instruction. After several moments, the instruction will be downloaded and a Messenger Service message box appears indicating that the Backup All Master Databases job was run.
- Click OK.
- Right-click Backup All Master Databases, and then click Job Status.
The Multi Server Job Execution Status - SelfPacedCPU dialog box appears displaying information regarding the Backup All Master Databases job and each target server.
- Click the View Remote Job History button.
The Job History - SelfPacedCPU\MyNamedInstance dialog box appears. Notice the information displayed from the remote server regarding the job.
- Click the Close button to close the Job History - SelfPacedCPU\MyNamedInstance dialog box.
- Click the Close button to close the Multi Server Job Execution Status - SelfPacedCPU dialog box.
- Right-click the Backup All Master Databases job, and then click Refresh Job.
Notice that there are no pending instructions.
- In the console tree, click the Jobs container for the SelfPacedCPU\MyNamedInstance container.
- In the details pane, right-click the Backup All Master Databases job, and then click View Job History.
The Job History - SelfPacedCPU\MyNamedInstance dialog box appears. Notice that the information displayed is identical to that displayed from the remote server regarding the job.
- Click the Close button.
- Close SQL Server Enterprise Manager.
Lesson Summary
You can create jobs that are stored and managed from a central server, called a master server. Target servers can be enlisted, which periodically download these multiserver jobs for execution. The target servers report the status of these jobs to the master server. Using this capability, identical jobs that must be run on multiple servers can be centrally created and managed.
EAN: N/A
Pages: 126
- Chapter I e-Search: A Conceptual Framework of Online Consumer Behavior
- Chapter IV How Consumers Think About Interactive Aspects of Web Advertising
- Chapter V Consumer Complaint Behavior in the Online Environment
- Chapter IX Extrinsic Plus Intrinsic Human Factors Influencing the Web Usage
- Chapter XI User Satisfaction with Web Portals: An Empirical Study