Lesson 3: Performing an Online Database Upgrade from SQL Server 7.0
3 4
When you choose to perform an online database upgrade, you use the Copy Database Wizard to upgrade one or more SQL Server 7.0 databases to an instance of SQL Server 2000. You can upgrade databases from instances on the local computer or from a remote computer. The database being upgraded can be copied or moved. After installation, there are several tasks that you should perform to ensure maximum performance from your upgraded installation.
After this lesson, you will be able to
- Perform an online database upgrade from SQL Server 7.0 to SQL Server 2000
- Understand the tasks you should perform after the database upgrade is complete
Estimated lesson time: 15 minutes
Performing an Online Database Upgrade
The Copy Database Wizard is used to perform an online database upgrade. It is available from several locations within SQL Server Enterprise Manager. You can launch it from the Tools/Wizards menu, by right-clicking an instance of SQL Server 2000 and clicking All Tasks, or by clicking the Wizards tab from the taskpad (if you have enabled the taskpad). See Figure 4.3.
When you run the Copy Database Wizard, follow these steps:
- Launch the Copy Database Wizard, using one of the methods described previously. When the Welcome To The Copy Database Wizard appears, click Next.
- From the Select A Source Server page, select a source server from which you want to move or copy a database.
Note
Because the database upgrade process is transparent and the Copy Database Wizard is also used to copy and move SQL Server 2000 databases, terminology in the wizard only makes reference to copying and moving databases.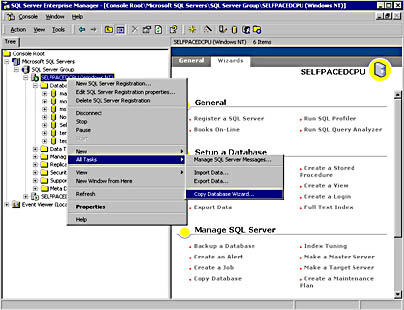
Figure 4.3
Launching the Copy Database Wizard from the All Tasks menu.
On the Select A Source Server page, you can connect to any SQL Server instance on the network (including any local instance). To list the currently active instances of SQL Server, click its associated ellipse button. When the Select Server dialog box is displayed, select the desired active server. Finally, you must connect using either a Windows or SQL Server login account that has system administrator privileges on the source server. See Figure 4.4.
- After you have selected the source server, you must select the destination server from the Select A Destination Server page. Again, to list the currently active instances, click its associated ellipse button. The destination server does not have to be the instance of the server from which you are running the Copy Database Wizard. However, when you are copying or moving a database between servers, the service account used by the SQL Server service on the destination server must be a domain user account to have the rights to copy files over the network. The local system account has no such rights and therefore can only be used when the source and destination servers are on the same computer. Finally, you must connect using either a Windows or SQL Server login account that has system administrator privileges on the destination server. See Figure 4.5.
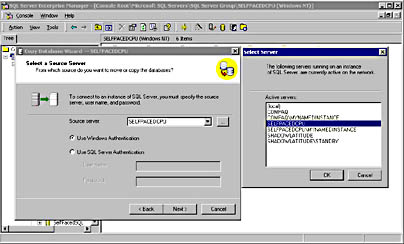
Figure 4.4
Selecting a source server.
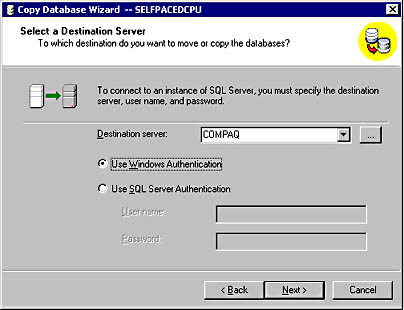
Figure 4.5
Selecting a destination server.
- Next, you must select a user database to move or copy on the Select The Databases To Move Or Copy page. You can move or copy multiple databases in one operation, by selecting the associated check boxes under the Move or Copy columns. However, you cannot move or copy a database if a database with the same name exists on the destination server. You must resolve any name conflicts prior to running the Copy Database Wizard, because database names cannot be renamed during a move or copy operation. In addition, you cannot move system databases (only user databases are available to be moved). See Figure 4.6.
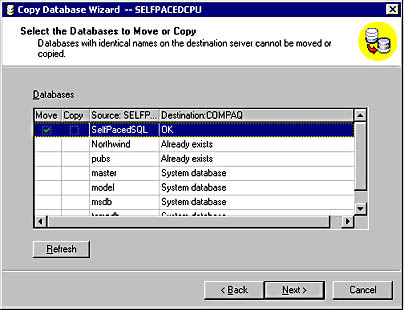
Figure 4.6
Selecting a user database.
- After you have selected the database you want to move or copy, you can change the default location for the data and log files on the Database File Location page. You select a new location by clicking the Modify button. When the Database Files dialog box appears, you click the ellipse button next to the destination you want to change. When the CDW dialog box appears, select the new default location for the files. You are also given the option, in the Destination Files column, to change the filename for the destination database files (but not the name of the database itself). The default location for the files is the Data folder for the instance to which the database is being copied or moved. The Database Files dialog box also informs you regarding available disk space on the destination drive. See Figure 4.7.
- By default, all logins for the databases being copied or moved, along with all logins for stored procedures, jobs, and user-defined error messages, are copied along with the database. However, you can modify this default to selected specific logins only on the Select Related Objects page. See Figure 4.8.
- Finally, on the Schedule The DTS Package page, you can schedule the copy or move operation to occur immediately, to run once at a specified date and time, or as a scheduled DTS package at a later time. Be aware that the DTS package must be able to place the source database in single-user mode prior to copying or moving it, or it will terminate the processing of the DTS package with an error message. If SQL Server Enterprise Manager (or any other client) is connected to the source server at the time the package runs, this open connection will prevent the package from running. See Figure 4.9.
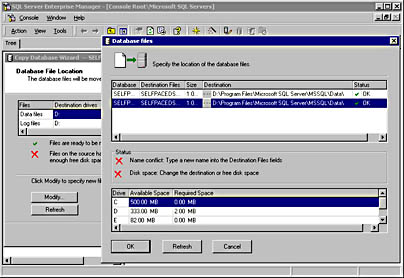
Figure 4.7
Changing the default location for the data and log files.
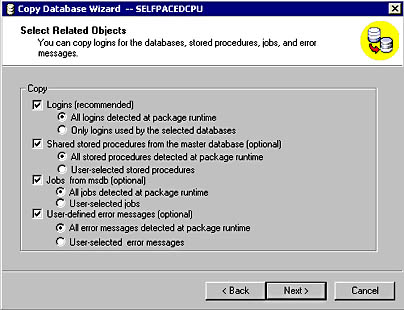
Figure 4.8
Selecting database objects to upgrade.
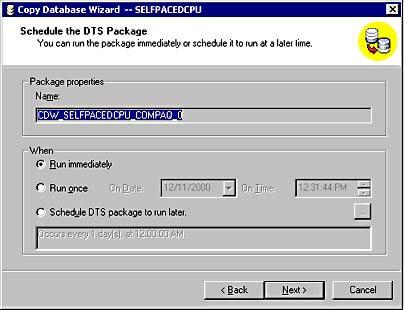
Figure 4.9
Scheduling the DTS package.
- Depending upon whether you are copying or moving the files, either the Completing The Copy Database Wizard page or the Completing The Move Database Wizard page appears. Verify that the options listed there are correct, and then click the Finish button. See Figure 4.10.
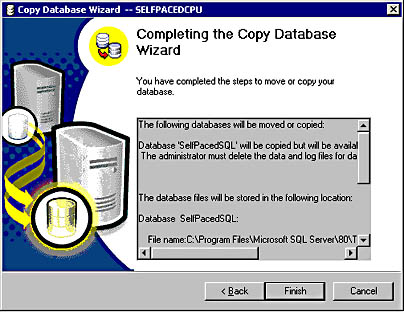
Figure 4.10
Completing the Copy Database Wizard.
- The Log Detail dialog box, shown in Figure 4.11, appears when the actual move or copy takes place. This dialog box displays information about the status of each file and also displays any error messages that occurred during the transfer.
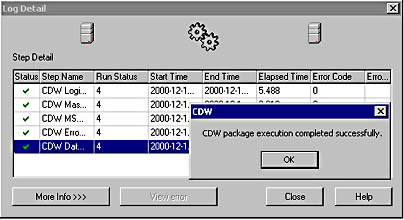
Figure 4.11
The Log Detail dialog box displays information about the upgrade.
Note
A move between servers or disk drives does not remove the underlying data and log files from the file system, but simply detaches the database from the source server and reattaches it to the destination server.
Performing Post-Upgrade Tasks
After the Copy Database Wizard successfully completes the online database upgrade, there are a number of tasks that the database administrator should perform. You should perform the following tasks:
- Repopulate all full-text catalogs if full-text search is being used. The upgrade process disables all full-text catalogs because of a format change that occurs during the upgrade. Repopulation can be time-consuming, so planning an appropriate amount of time is important. Maintaining full-text catalogs is covered in Chapter 12.
- Update statistics. This process can also be time-consuming on large databases, but using SQL Server 7.0 statistics with SQL Server 2000 could result in poor query performance. Updating statistics is covered in Chapter 12.
- Delete the underlying data and log files after verification of the upgraded database.
Lesson Summary
The Copy Database Wizard is used to upgrade SQL Server 7.0 databases to a SQL Server 2000 installation. After the upgrade, the SQL Server 7.0 installation remains intact. The upgraded databases can be copied or moved. In the event of a move, the underlying data and log files are generally not removed and should be removed manually. Finally, the database administrator should update statistics and repopulate all full-text catalogs if full-text search is being used to optimize the performance of the upgraded installation.
EAN: N/A
Pages: 126