14.2 Creating a Cookie with JavaScript
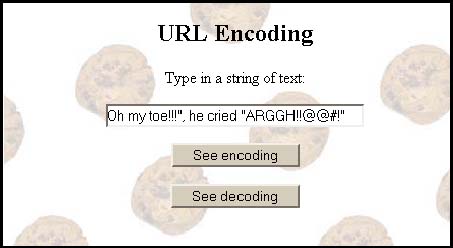
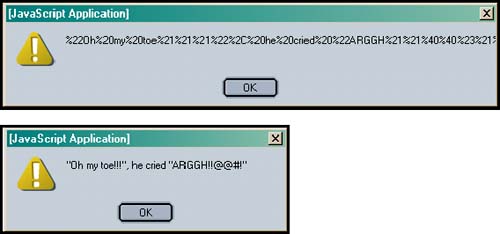
| In the following examples, we will create a cookie, view the cookie, and then destroy it. It is important to note when you are setting cookies that they are stored in the browser's memory and not written to the hard drive until you exit the browser. 14.2.1 The Cookie ObjectThe cookie is stored by JavaScript as a document object for both reading and writing cookie data. Cookies are made by assigning attributes to the cookie property. When you start your browser, if there are cookies, they pertain to the current document. The document.cookie property contains a string of name =value pairs representing the names of all the cookies and their corresponding values, such as a session ID number or a user ID. All the other attributes set for the cookie, such as expiration date, path , and secure, are not visible. In a JavaScript program, if you execute the statement shown in Figure 14.3, you will see all the cookies set for this page. Figure 14.3. Using alert(document.cookie);. When you reload the page, the document.cookie property will contain all the cookie text saved for that page. 14.2.2 Assigning Cookie AttributesTo create a cookie, assign the name=value pairs to the document.cookie property. Be careful with quotes, making sure the variables you use are not quoted, but the text that the cookie needs, such as the word "name" , and "=" are quoted. Also, this will be a big string where the different parts are concatenated together with the + operator. The following format sets a cookie using all possible attributes. Those attributes enclosed in square brackets are optional: FORMAT name=value;[expires=date];[path=path];[domain=somewhere.com];[secure] Example: document.cookie="id=" + form1.cookie.value ";expires=" + expiration_date+";path=/"; The escape() and unescape () Built-In FunctionsIt is important to know that when assigning string name=value attributes to a cookie, you cannot use whitespace, semicolons, or commas. The escape() function will encode the string object by converting all non- alphanumeric characters to their hexadecimal equivalent, preceded by a percent sign; for example, %20 represents a space and %26 represents an ampersand. In order to send information back and forth between browser and server, the browser encodes the data in what is called URI encoding. You can see this encoding in the location bar of your browser; when you go to Google and search for something, you will see the search string in the location bar of the browser all encoded. Since the browser handles cookies, the cookie strings can be encoded with JavaScript's built-in escape() function to ensure that the cookie values are valid. The unescape() function converts the URI-encoded string back into its original format and returns it. The encodeURI() and decodeURI() built-in functions are a more recent version of escape() and unescape() and do not encode as many characters. Example 14.1<html><head><title>The escape() Method</title> </head><center><h2>URL Encoding </h2> <script language="JavaScript"> 1 function seeEncoding(form){ var myString = form.input.value; 2 alert( escape(myString )); } 3 function seeDecoding(form) { var myString = form.input.value; 4 alert( unescape(myString) ); } </script> <body background="cookebg.jpg" > <form name="form1"> Type in a string of text: <p> <input type="text" name="input" size=40> <p> <input type="button" value="See encoding" 5 onClick="seeEncoding(this.form); "> <p> <input type="button" value="See decoding" 6 onClick="seeDecoding(this.form); "> <p> </form> </center> </body> </html> EXPLANATION
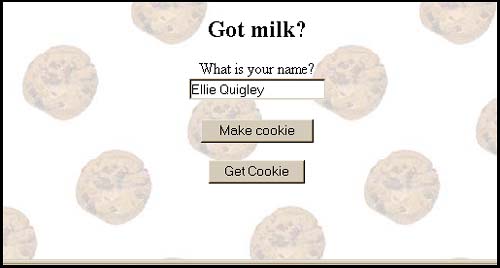
14.2.3 Let's Make a Cookie!Now that we have all the ingredients , let's put them together and make a cookie, then pull it out of the oven (your program) and voila! a delicious cookie for your browser. The following example creates a cookie called "name" . The value assigned to it will be the user's name. You will see this name=value pair in the document.cookie property. Example 14.2<html><head><title>Making a Cookie</title> <script language="JavaScript"> 1 function makeCookie(form) { 2 var when = new Date(); when.setTime(when.getTime() + 24 * 60 * 60 * 1000); // 24 hours from now 3 when.setFullYear(when.getFullYear() + 1); // One year from now yname=form.yourname.value; 4 document.cookie=escape("name")+"="+escape(yname)+ ";expires="+when.toGMTString(); alert(document.cookie); } 5 function welcome(myForm){ you=myForm.yourname.value; 6 var position=document.cookie.indexOf("name="); if ( position != -1){ var begin = position + 5; var end=document.cookie.indexOf(";", begin); if(end == -1){ end=document.cookie.length;} 7 you= unescape(document.cookie.substring(begin, end)); 8 alert("Welcome " + you); } else{ alert("No cookies today");} } </script> </head> <body background="cookiebg.jpg" onLoad="document.form1.reset()" > <center> <h2> Got milk?</h2> <form name="form1"> What is your name? <br> 9 <input type="text" name="yourname" > <p> 10 <input type="button" value="Make cookie" onClick=" makeCookie(this.form) ;"> <p> 11 <input type="button" value=" Get Cookie" onClick="welcome(this.form); "> <p> </form> </body> </html> EXPLANATION
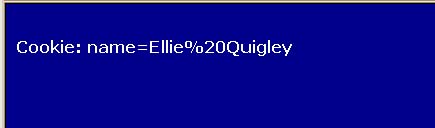
14.2.4 Retrieving Cookies from a ServerWhen retrieving cookies, you can only get those that were written for the server you are on and written by you. You cannot read and write cookies that belong to someone else or reside on a different server. In the last example, we got one cookie; in the following example all the cookies for this page are displayed. Example 14.3<html><head><title>See my Cookies</title> </head> 1 <body background="cookebg.jpg" onLoad="document.form1.reset()" > <center> <h2> Got milk?</h2> 2 <form name="form1"> Click to see document.cookie property <p> 3 <input type="button" value="See Cookie" onClick="seeCookie();"> <p> </form> <script language="JavaScript"> 4 function seeCookie(){ 5 if(document.cookie == ""){ document.write("No cookies"); } else{ 6 var myCookie = document.cookie.split("; "); 7 for(var i=0;i<myCookie.length; i++){ document.write("<body bgcolor=darkblue> <font face=verdana color=white>"); // document.write("<b>Cookie: " + myCookie[i].split("=")[0] +"<br>"); 8 document.write("<b>Cookie: " + myCookie[i] + "<br>"); } } } </script> </center> </body> </html> EXPLANATION
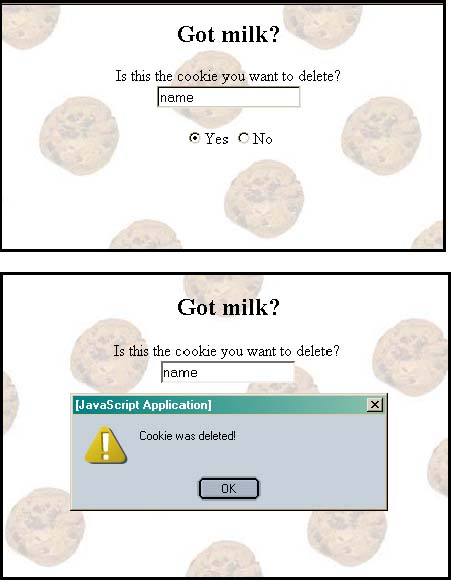
14.2.5 Deleting a CookieIf you want to delete a cookie for the current page, set the expiration date of the cookie to a date earlier than the current date. This will cause the cookie to be deleted when the session ends. Example 14.4<html><head><title>Delete Cookie</title><head> <script name = "JavaScript"> var i = 0; 1 function delCookie (cookieName) { 2 document.cookie = cookieName + "=" +"; expires=Thu, 01-Jan-1970 00:00:01 GMT"; alert("Cookie was deleted!"); seeCookie(); } 3 function seeCookie(){ if(document.cookie == ""){ alert("No cookies"); return false; } else{ 4 var myCookie = document.cookie.split("; "); if ( i < myCookie.length ){ 5 document.form1.cookietype.value = myCookie[i].split("=")[0]; i++; // Increase the index value to see the next cookie } else{alert("No more cookies");} } } </script> </head> 6 <body background="cookebg.jpg" onLoad="seeCookie()" > <center> <h2> Got milk?</h2> 7 <form name="form1"> 8 Is this the cookie you want to delete? <br> <input type="text" name="cookietype" > <p> 9 <input type="radio" name="radio" value="choice" 9 onClick="delCookie(document.form1.cookietype.value);">Yes <input type="radio" name="radio" value="choice" 10 onClick="seeCookie();">No <p> </form> </center> </body> </html> EXPLANATION
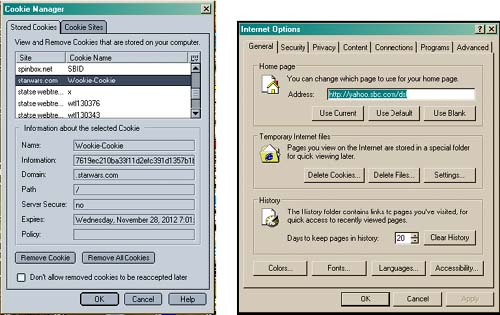
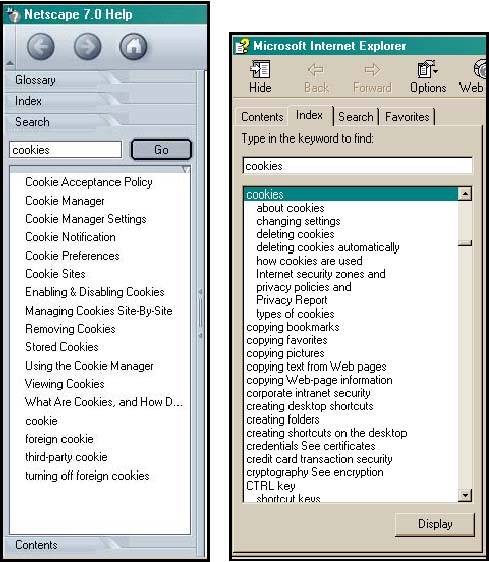
Using the Browser to Remove CookiesAnother way to delete cookies is to go in your browser to the Tools menu in Navigator, then to the Cookie Manager, and then to Manage Stored Cookies. In IE, go to the Tools menu and Internet Options. See Figure 14.11. Then you can remove all or some cookies from the hard drive. Figure 14.11. Netscape Navigator 7 Cookie Manager from the Tools menu (left); Internet Explorer from the Tools menu (right). 14.2.6 Cookie HelpWhether you like them, or hate them, you have complete control over whether to accept all cookies, some cookies, delete cookies, and so on. Check your particular browser for all of your options. For example, under the Help option in Navigator and IE, some of the cookie topics you might review are shown in Figure 14.12. Figure 14.12. Cookie Help! |


EAN: 2147483647
Pages: 150