11.2 Introduction to Forms
| At the heart of the Web is the form. It is used to pass information from the browser to the server. Anytime you go online and order a book, trade at an auction, fill out a survey, or send an e-mail using a Web browser, you are working with a form. An HTML form offers you a number of ways to accept input, such as radio buttons , checkboxes, pop-up menus , and text boxes; these are called virtual input devices. Once the form has been filled out by a user , it normally is sent to a server where the input is processed by a server-side program, such as a CGI, ASP, or PHP application. 11.2.1 HTML Review of FormsAll forms are in HTML documents. They begin with a <form> tag and its attributes, followed by the input fields where the user enters form information, and end with a </form> tag. [View full width]
The action attribute is assigned the URL of the server program that will be executed when the data is submitted by pressing the submit button. A method attribute may be assigned to the <form> tag. The method attribute indicates how the form will be processed. The get method is the default (and does not need to be specified) and the post method is the most commonly used alternative. The get method is preferable for operations that will not affect the state of the server; that is, simple document retrieval, database lookups, and the like. The post method is preferred for handling operations that may change the state of the server, such as adding or deleting records from a database. (See Appendix C for a complete discussion.) The browser gets input from the user by displaying fields that can be edited. The fields are created by the HTML <INPUT TYPE=key/value> tag. These fields appear as checkboxes, text boxes, radio buttons, and other forms. The data that is entered into the form is sent to the server in an encoded string format in a name /value pair scheme. The value represents the actual input data. Before the server-side program is called, JavaScript can be used to validate the data that was entered into the form by using event handlers. If the form is not going to be sent to the server for processing, then the action, target , and method attributes are not necessary. A summary of the steps in producing a form follows :
11.2.2 Input Types for FormsTable 11.4 shows the various form input types. Table 11.4. HTML form input types.
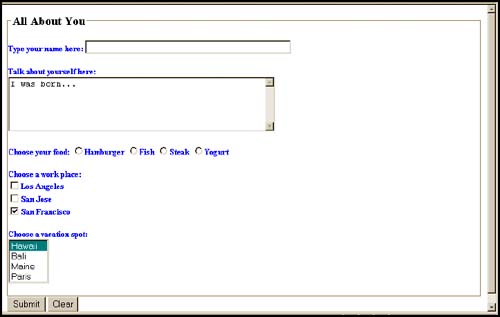
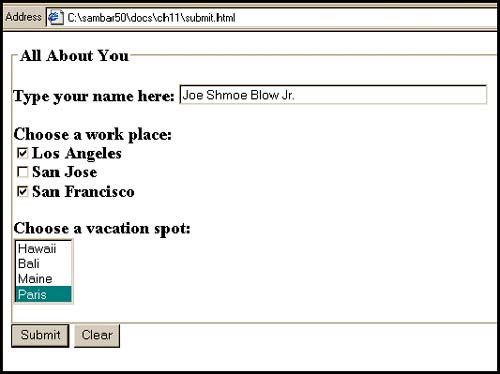
First let's see how input gets into the form by looking at a simple document (see Figure 11.6) and the HTML code used to produce it (see Example 11.5). The user will be able to click on a button or enter data in the text box. The input in this example won't be processed when the submit button is pressed. Nothing will be displayed by the browser. Example 11.5<html><head><title>An HTML Form</title></head> <body><b> 1 <form action="/cgi-bin/bookstuff/form1.cgi" method="post"><p> <fieldset><legend><font size="+1"> All About You</legend> <p><font size="-1" color="blue"> Type your name here: 2 <input type="text" name="namestring" size="50"> <p> Talk about yourself here:<br> 3 <textarea name="comments" align="left" rows="5" cols="50"> I was born... </textarea> <p> Choose your food:<b> 4 <input type="radio" name="choice" value="burger">Hamburger <input type="radio" name="choice" value="fish">Fish <input type="radio" name="choice" value="steak">Steak <input type="radio" name="choice" value="yogurt">Yogurt <p> <b>Choose a work place:</b><br> 5 <input type="checkbox" name="place" value="LA">Los Angeles <br> <input type="checkbox" name="place" value="SJ">San Jose <br> <input type="checkbox" name="place" value="SF" checked> San Francisco <p> <b>Choose a vacation spot:</b><br> 6 <select multiple name="location"> <option selected value="hawaii"> Hawaii <option value="bali">Bali <option value="maine">Maine <option value="paris">Paris </select> <p></fieldset> 7 <input type="submit" value="Submit"> 8 <input type="reset" value="Clear"> 9 </form> </body> </html> Figure 11.6. A simple HTML form. Output from Example 11.5. EXPLANATION
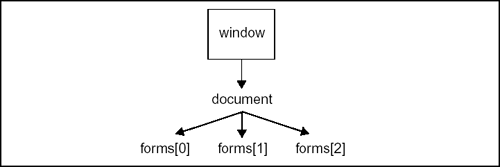
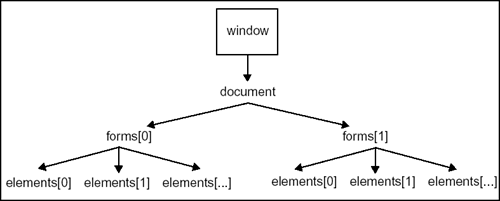
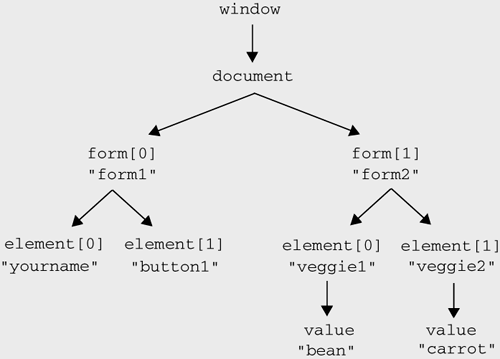
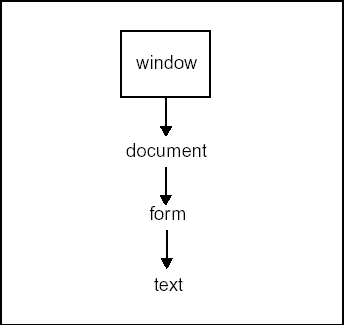
11.2.3 JavaScript and the forms ObjectIn the previous example, the HTML form had nothing to do with JavaScript. After a form has been filled out, the information is normally sent from the browser to a server in a URL encoded format. The server then calls a CGI program to handle the information. So where does JavaScript come into all of this? Well, before sending the form off to the server, JavaScript can check to see if the form was filled out properly. If we like, every input field can be validated by JavaScript. It can check for empty fields. It can check for a valid credit card number, e-mail address, zip code, and so on. In addition, rather than having the user submit the form, submission can be controlled by JavaScript with its own submit() method. And by naming the forms, JavaScript can handle multiple forms and input types, respond to user-initiated events, and call functions to handle the data that was submitted. As shown in the HTML Example 11.5 a document may have a number of HTML forms and input types such as simple text boxes, radio buttons, checkboxes, and so on. JavaScript provides objects that parallel HTML tags; for example, the JavaScript forms object parallels the HTML < form > tag and the JavaScript elements object parallels the input devices such as radio buttons or checkboxes. In this section we will focus on the structure of the JavaScript forms object and how to use it in terms of the DOM. In Chapter 12, "Handling Events," you will learn how to catch the form before it is sent to the server. In Chapter 13, "Regular Expressions and Pattern Matching," you will learn how to check all the input fields of a form before processing it, using the magic of regular expressions and pattern matching. The forms[] ArraySince the document contains forms, the forms object is also a property of the document object. Every time you create a form in a given document, the browser creates a unique form object and assigns it as an element of an array, called the forms[] array. The index value of the array, starting at 0, corresponds to the order in which the form occurs in the document; the first form is assigned to forms[0] , and each successive form would get the next index value. When accessing a form from JavaScript, the first form to appear in the page would be referred to as document.forms[0] and the next form document.forms[1] , and so on. See Figure 11.7. Figure 11.7. How the forms[] array is created. If you name the form ( name is an attribute of the HTML <form> tag), you can use that name to represent the JavaScript forms object. Rather than saying document.forms[0] or document.forms[1] , you can reference the form by its name. For example, if the first HTML form is named myform1 , the corresponding JavaScript object, document.forms[0] , can now be referenced as document.myform1. The elements[] ArrayHTML forms contain input types like buttons and text boxes, also called fields. Similarly, the JavaScript forms object consists of a property called elements . This is a JavaScript array that parallels all of the HTML fields within the form. Each of the input types in the elements[] array is also an object in its own right. See Figure 11.8. Figure 11.8. How the elements[] array is created. When going down the DOM hierarchy, document.forms[0].elements[0] refers to the first field in a form. The elements objects also contains properties, such as the name, type , and value of the field. For example, document.forms[0].elements[0].name references the name of the field and document.forms[0].elements[0].type references the type of the field, such as submit, reset, button, text, radio, or checkbox . If you name the field or input types, those names can be used to reference the corresponding JavaScript object. For example, document.myform1.yourname.value is easier to read and type than document.forms[0].elements[0].value, although they reference the same field value. The following example contains two forms, each containing input types. The name of the first form is form1 and the name of the second form is form2 . Each form is an element of the forms[] array. Example 11.6(Two Forms) <form name="form1"> <input type="text" name="yourname">: Type your name here<br> <input type="button" name="button1" value="Push Button" </form> <form name="form2"> <input type="radio" name="veggie1" value="bean">Beans <input type="radio" name="veggie2" value="carrot">Carrots </form> (Object Hierarchy) Properties and MethodsThe forms object is a property and child of the document object. Each form is an element of the forms[] array and each form has properties that correspond to the HTML attributes of the form as well as properties that describe the form. As discussed previously, these properties may be objects in their own right; for example, the button property of the form is also an object with its own properties. Some of the properties of the forms object are listed in Table 11.5 and methods are listed in Table 11.6. Properties of the elements object are listed in Table 11.7. Table 11.5. Properties of the forms object.
Table 11.6. Methods of the forms object.
Table 11.7. Properties of the elements object.
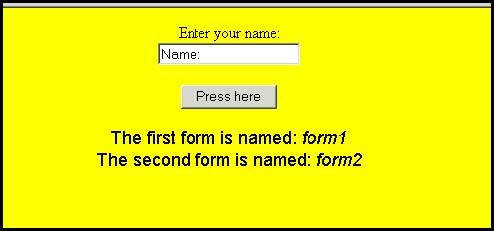
11.2.4 Naming Forms and ButtonsHow JavaScript References a Form by NameThe <form> tag has a name attribute that allows you to give your form a name. It is somewhat easier and more readable to reference a form by its name than by using the array syntax, such as forms[0] and forms[1] . In the following example, two HTML forms are created: one contains a text box, and the other a button. Each of the forms is given a name with the name attribute. In the JavaScript program, the two forms are accessed by walking down the JavaScript tree hierarchy, starting at the top of the tree, separating each of the nodes with a dot. Example 11.7<html> <head><title>Naming Forms object</title></head> <body> 1 <form name="form1"> Enter your name: 2 <input type="text" name="namefield" value="Name: "> 3 </form> 4 <form name="form2"> 5 <input type="button" value="Press here"> 6 </form> <font size="+1"> 7 <script language="JavaScript"> // How do we reference the form in JavaScript? // Go down the document tree: window/document/form.property // The window object can be left off, since it is at the top 8 document.write("The first form is named: "+ window.document.form1.name ); 9 document.write("The second form is named: "+ document.form2.name ); </script> </body></html> EXPLANATION
The elements and properties of the HTML <form> tag are shown in Table 11.8. Table 11.8. <form> tag elements and properties.
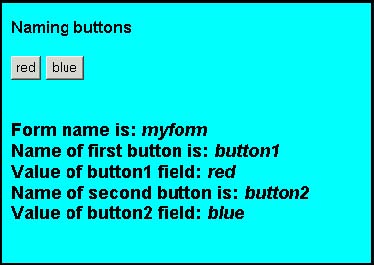
How JavaScript References the Form Elements by NameEach form object is an element of the forms[] array and each form contains input types such as buttons, text boxes, checkboxes, and so on. Each of the input types is also stored in an array called elements[] in the order the input device in found in the document. In the following example, there is one form, called myform . It contains two elements, button input types, named button1 and button2 , respectively. Example 11.8<html><head><title>Naming Buttons</title> </head> <body bgcolor="cyan"><font face="arial"> <b>Naming buttons<br> <font size="+1"> 1 <form name="myform"> 2 <input type="button" name="button1" value="red"></input> 3 <input type="button" name="button2" value="blue"></input> 4 </form> <script language="JavaScript"> document.write("<b><br>Form name is: </b><em>" 5 + document.myform.name) ; document.write("</em><b><br>Name of first button is:</b><em> " 6 + document.myform.button1.name ); document.write("</em><b><br>Value of button1 field:</b><em> " 7 + document.myform.button1.value ); document.write("</em><b><br>Name of second button is:</b><em> " +document. myform.button2.name ); document.write("</em><b><br>Value of button2 field:</b><em> " +document. myform.button2.value ); </script> </body> </html> EXPLANATION
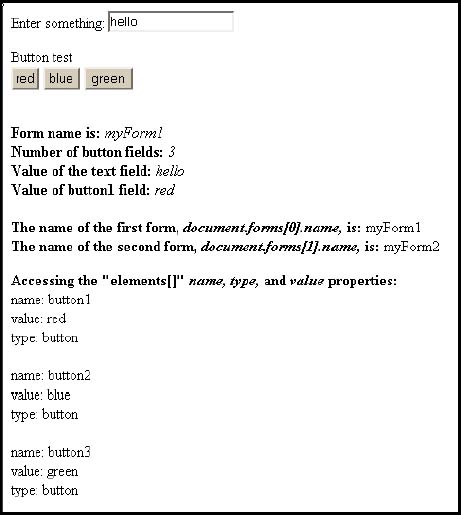
In the following example, the document contains two named forms, myForm1 and myForm2 . Each of the forms contain input types: the first form contains a text box and the second form contains three buttons. A JavaScript program gets access to the forms and properties by using their names to reference them. Example 11.9<html><head><title>Form and Element Properties</title> </head> <body> 1 <form name="myForm1"> Enter something: 2 <input name="enter" type="text" value="hello"> </form> 3 <form name="myForm2"> Button test<br> 4 <input type="button" name="button1" value="red"></input> <input type="button" name="button2" value="blue"></input> <input type="button" name="button3" value="green"></input> </form> <script language="JavaScript"> document.write("<b><br>Form name is: </b><em>" 5 +document.myForm1.name); document.write("</em><b><br>Number of button fields:</b><em> " 6 +document.myForm2.length); document.write("</em><b><br>Value of the text field:</b><em> " 7 +document.myForm1.enter.value); document.write("</em><b><br>Value of button1 field:</b><em> " 8 +document.myForm2.button1.value); document.write("</em><br><br><b>The name of the first form, <em>document.forms[0].name,</em> is: </b>" 9 +document.forms[0].name); document.write("<br><b>The name of the second form, <em> document.forms[1].name,</em> is: </b>" +document.forms[1].name); document.write("<p><b>Accessing the \"elements[]\" <em>name, type, </em>and</em><em> value</em> properties: </b>"); 10 for(var i = 0; i < document.myForm2.length; i++){ 11 document.write("<br>name: " + document.myForm2.elements[i].name +"<br>"); 12 document.write("value: " +document.forms[1].elements[i].value +"<br>"); document.write("type: " +document.forms[1].elements[i].type +"<br>"); } </script> </body> </html> EXPLANATION
11.2.5 Submitting Fillout FormsSubmitting an HTML Form Without JavaScriptWhen the user clicks on a submit button, the form is normally sent right off to the server for further processing by another application such as a CGI script. Before the server gets the form, its content is gathered by the browser, encoded, and then sent to the URL address supplied in the action attribute of the form. (In the previous examples, the action attribute was not used because there was no reason to process the sample forms.) The application on the server side is started up to decode and process the form information. From there, an acknowledgement may be sent back to the user, an e-mail delivered, the processed information sent to a database, or whatever else we define. Now let's look at an example of an HTML form and how it is submitted to a server application. Example 11.10<html><head><title>An HTML Form</title></head> <body><b> 1 <form action="/cgi-bin/bookstuff/form1.cgi" method="post"><p> <fieldset><legend><font size="+1"> All About You</legend> <p> 2 Type your name here: <input type="text" name="namestring" size="50"> <p> 3 <b>Choose a work place:</b><br> <input type="checkbox" name="place" value="LA">Los Angeles<br> <input type="checkbox" name="place" value="SJ">San Jose<br> <input type="checkbox" name="place" value="SF" checked>San Francisco<p> <b>Choose a vacation spot:</b><br> 4 <select multiple name="location"> <option selected value="hawaii"> Hawaii <option value="bali">Bali <option value="maine">Maine <option value="paris">Paris </select> <p></fieldset> 5 <input type="submit" value="Submit"> 6 <input type="reset" value="Clear"> 7 </form> </body> </html> EXPLANATION
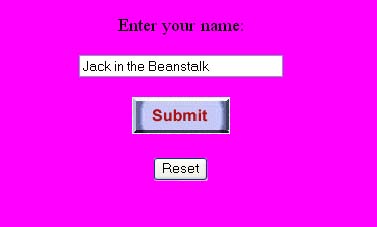
Submitting a Form with an ImageThe image input type gives you another way to submit a form. You can replace the standard submit button with a graphical image. The src attribute must be included to specify the location (URL) of the image. As with other image tags, the alt attribute (HTML 4.0) should be used to give replacement text for browsers that cannot load the image. Many browsers rely on either the name or value attribute as alternate text, so if there is any doubt, all three attributes for the same purpose should be used. Example 11.11<html><head><title>An Image Input Type</title> <body bgcolor="magenta"> <font size="+1"> <center> Enter your name: <br> 1 <form action ="example.cgi" method="post"> 2 <input type="text" size=50 > <p> 3 <input type="image" src="submit.gif" alt="submit" > <br> 4 <input type="reset"> 5 </form> </center> </body> </html> EXPLANATION
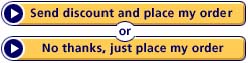
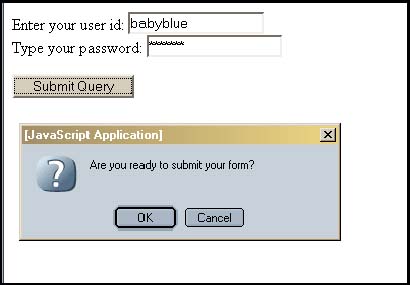
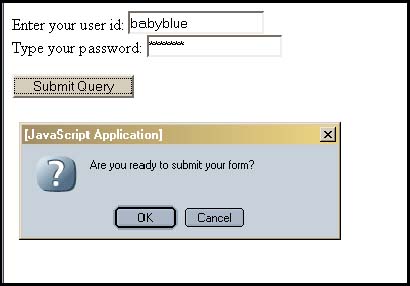
Figure 11.14. An image as a Submit button (IE). Submitting a Form with JavaScript (Event Handlers)A discussion of forms would be incomplete without mentioning how JavaScript implements form events (See Chapter 12, "Handling Events," for a complete discussion.) Events are triggered by a user when he initiates some action, like pressing a key, clicking his mouse on a button, or moving his mouse over a link. When such an action occurs, the browser detects it, and depending on what event is triggered, something will be done in response. A function may be called, a form can be validatedsomething happens. See Figure 11.15. Figure 11.15. The user initiates an action, and an event is triggered. With a form, an event handler allows you to control whether the form is submitted or cleared. For example, after the user has filled out the form, normally it is sent right off to a CGI, PHP, or ASP program on the server side to be processed. But if a JavaScript event handler is set up, then when the user presses the submit button, the handler can check the input data, and based on what comes in, determine whether to go ahead with the submission of the form data or reject it. That way, the user doesn't have to wait for the form to go to the server, have it validated there, and then sent back for mistakes that he could have corrected right away. (See "Form Validation with Regular Expressions" on page 446 in Chapter 13 for a complete discussion.) Likewise, before clearing all the values typed into the form, an event handler can confirm with the user that this is really what he wants to do, before resetting all the input devices to their default values. With forms there are two event handlers that allow you to catch the form before it goes to the server. They are the onClick event handler and the onSubmit event handler. The onReset event can be used to clear the form's input devices or to stop them from being cleared. The onClick Event HandlerOne way to either accept or reject the submission is to use the onClick event handler. The onClick event handler is an attribute of the HTML submit or button input type. When the user presses the button, the event is triggered, and if the handler function returns true , the form will be submitted; otherwise , it will be rejected. Example 11.12<html><head><title>onClick Event Handler and Forms</title> <script language="JavaScript"> 1 function readySubmit(){ if(confirm("Are you ready to submit your form? ")){ return true; } else{ return false; } } </script> </head> <body> 2 <form action="/cgi-bin/testform.cgi" method="post"> Enter your user id: 3 <input type="text" name="textbox" value=""> <br> Type your password: <input type="password" name="secret"> <p> 4 <input type="submit" onClick="readySubmit();"> </body></html> EXPLANATION
Figure 11.16. Submitting a form and the onClick event. The onSubmit Event HandlerAnother important form event handler, called onSubmit , will also be triggered when the user presses the submit button or the Enter key, just before the form is submitted. The onSubmit event handler is added as an attribute of the <form> tag, (and only the <form> tag), to control what happens when the user presses the submit button. When a function is assigned to the onSubmit event handler, if the value returned by the function is true , the form will be submitted to the server, but if it returns false , the form will be stopped and the user will be given a chance to re-enter data in the form. The following example produces the same output as the previous one, but notice the placement of the handler. Instead of being associated with a button, it is associated with the form and set as an attribute of the <form> tag. Example 11.13<html> <head><title>onSubmit Event Handler and Forms</title> <script language="JavaScript"> 1 function readySubmit() { if(confirm("Are you ready to submit your form? ")){ return true;} else{ return false;} } </script> </head> <body> <form action="/cgi-bin/testform.cgi" method="post" 2 onSubmit="return(readySubmit());" > Enter your user id: <input type="text" name="textbox" value=""> <br> Type your password: <input type="password" name="secret"> <p> 3 <input type="submit" > </body> </html> EXPLANATION
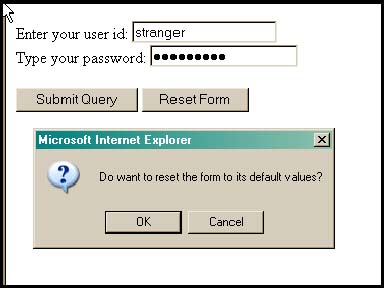
Figure 11.17. Submitting a form and the onSubmit event. The onReset Event HandlerThe HTML reset button allows the user to clear the form fields and set them back to their default values. JavaScript will let you set up an onReset event handler to either accept or reject this action. This event handler can be used to make sure that clearing an entire form is really what you want to do before it's too late, especially if you've done a lot of typing and don't want to re-enter all that data. Example 11.14 <html> <head><title>The onReset Event</title> <script language="JavaScript"> 1 function resetAll(){ 2 if(confirm("Do you want to reset the form to its default values? ")){ 3 return true; } else{ 4 return false; } } </script> </head> <body> 5 <form action="/cgi-bin/testform.cgi" method="post" 6 onReset="return resetAll();" > Enter your user id: 7 <input type="text" name="textbox" value=""> <br> Type your password: 8 <input type="password" name="secret"> <p> <input type="submit" onClick="readySubmit();"> 9 <input type="reset" value="Reset Form"> </body> </html> EXPLANATION
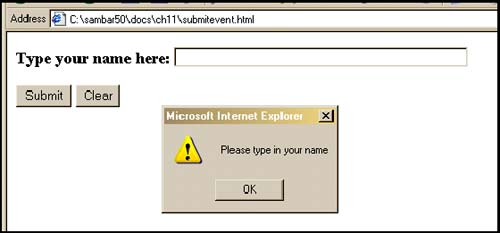
The this KeywordThe this keyword is especially helpful when dealing with forms. The this keyword refers to the current object. For forms containing multiple items, such as checkboxes, radio buttons, and text boxes, it is easier to refer to the item with the this keyword than by using its full name when calling a function. When using an event handler, the this keyword always refers to the object that triggered the event. If the event is triggered from within the <form> tag, this refers to the current form, but if it is triggered by an element within the form, such as an input device, then it references that element. Each element has a form property that references the form in which it was created. In the following segment of an HTML document, note that when the onClick event handler is triggered within the first button input type, the form property is used to reference the form itself, whereas in the second button, the this keyword refers to the current button. FORMAT <form> <-- The JavaScript form object <input type="button" <-- This a JavaScript element value="Print Form Stuff" onClick="display_formval(this.form);" > <-- this keyword references the form object by using the element's form property <input type="button" value="Print Button Stuff" onClick="display_buttonval(this) ;" > <-- this keyword references the current object, the button </form> Example 11.15<html> <head><title>An HTML form and the "this" keyword and Event Handler</title> <script language="JavaScript"> 1 function checkForm(yourinfo){ 2 if( yourinfo.namestring.value == ""){ // Check for an // empty string alert("Please type in your name"); return(false); } else{ return(true); } } </script> </head> <body><b> <form name="info" action="/cgi-bin/bookstuff/form1.cgi" method="post" 3 onSubmit="return checkForm(this)"> <p> <font size="+1"><p> Type your name here: 4 <input type="text" name="namestring" size="50"> <p> 5 <input type="submit" value="Submit"> <input type="reset" value="Clear"> </form> </body> </html> EXPLANATION
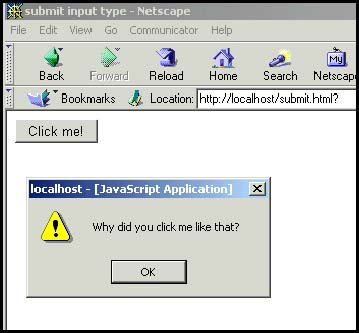
Using the button Input Type Rather than submitAs shown in the previous examples, before the browser sends data to the server, an onSubmit or onClick event handler is triggered when the user presses the submit button or the Enter key. But what if you don't want the form to go off to the server? Then you will have to reject the submission or the browser will reset all the field values to their defaults. If the form is not going to submit data to a server, the button input type can be used instead of the submit button. The button object has no default behavior and is used as a triggering device so that when the user presses the button, it causes something to happen. The onClick event handler is commonly used with buttons and is set as an attribute of the button input type . The onClick event handler is triggered when the user clicks the button associated with it. Example 11.16 <html> <head><title>button input type</title> <script language="JavaScript"> 1 function greetme(){ alert("Why did you click me like that? "); } </script> </head> <body> 2 <form name="form1"> <!-- event handler for a button is an attribute for its input type --> 3 <input type="button" value="Click me!" 4 onClick="greetme()"> </form></body> </html> EXPLANATION
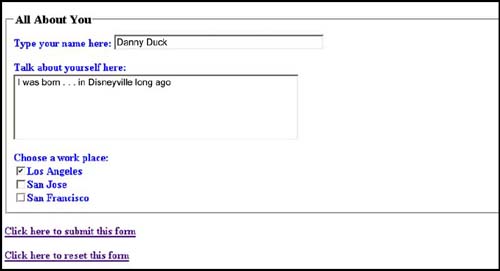
The submit() and reset() MethodsIn addition to event handlers, JavaScript provides two methods for the forms object, the submit() and the reset() methods. These methods emulate the event handlers of the same name: the submit() method submits the form just as though the user had pressed the submit button, and the reset() method resets the form elements to their defaults just as if he had typed the reset button. Neither of these methods trigger the onSubmit or onReset event handlers. (Note that the methods must be spelled with lowercase letters .) Example 11.17<html><head><title>An HTML Form</title></head> <body> <b> 1 <form name=myForm action="http://localhost/cgi-bin/environ.pl" method="post"> <p> <fieldset><legend><font size="+1"> All About You</legend> <p><font size=3 color="blue"> Type your name here: 2 <input type="text" name="namestring" size="50"> <p> Talk about yourself here:<br> 3 <textarea name="comments" align="left" rows="5" cols="50">I was born... </textarea> <p> <b>Choose a work place:</b><br> 4 <input type="checkbox" name="place" value="LA">Los Angeles <br> <input type="checkbox" name="place" value="SJ">San Jose <br> <input type="checkbox" name="place" value="SF" checked>San Francisco <p></fieldset> </form> <p> 5 <a href="#" onClick="javascript: myForm.submit();"> Click here to submit this form</a> <p> 6 <a href="#" onClick="javascript: myForm.reset();"> Click here to reset this form</a> </body> </html> EXPLANATION
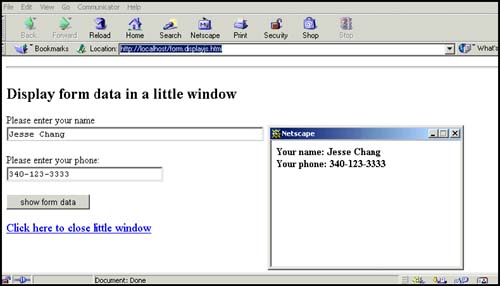
Figure 11.20. When the user clicks one of the links, either the submit() or the reset() method will be invoked. Displaying A Form's Content in a Pop-Up WindowAfter filling out a form, you may want to display the form content for confirmation before submitting it to a server. This can be done by creating another window, called a pop-up, and outputting the form data dynamically into that window. Example 11.18 uses JavaScript to open a new window to display the gathered form data from another file. Example 11.18<html><head><title>Display Form Input</title> <script language="JavaScript"> 1 function showForm(myform) { 2 NewWin=window.open('','','width=300,height=200'); 3 name_input="<b>Your name: " + myform.user_name.value + "</b><br>"; 4 NewWin.document.write(name_input); phone_input="<b>Your phone: " + myform.user_phone.value + "</b><br>"; 5 NewWin.document.write(phone_input); } 6 function close_window(){ NewWin.window.close(); } </script> </head><hr> <body><h3> Display form data in a little window</h2><p> 7 <form name="formtest" > 8 Please enter your name: <br> <input type="text" size="50" name="user_name"> <p> Please enter your phone: <br> <input type="text" size="30" name="user_phone"> <p> 9 <input type="button" value="show form data" onClick="showForm(this.form)";> </form> <font size="+1"> 10 <a href="javascript:void(0)" onClick="close_window()"> Click here to close little window</a> </font> </body> </html> EXPLANATION
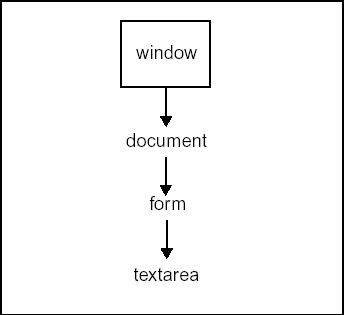
11.2.6 Programming Input DevicesWith JavaScript, you can alter the contents of the form's input devices dynamically. Since each input device is an object, each has properties and methods, and can be manipulated like any other JavaScript object (i.e., it can be assigned to, changed, deleted, etc.). You can program checkboxes, assign values to text areas and text boxes, change the value in fields, add choices to drop-down menus, verify password entries, and do all of this on the fly. The following section shows you how to program input devices. The text ObjectThe text object parallels the HTML text field <input type="text"> and also has name and value fields. To reference a text field from JavaScript, go down the document tree, starting at the document , then to the form , and then the text element. To get a value in the text field, for example, you would use the following syntax: document.form1.textbox1.value, where form1 is the name of the form and textbox1 is the name of the text field. Shown in Figure 11.22 is the JavaScript object hierarchy for the text object. Table 11.9 lists its properties and Table 11.10 lists its methods. Figure 11.22. The text object within the JavaScript hierarchy. Table 11.9. Properties of the text object.
Table 11.10. Methods of the text object.
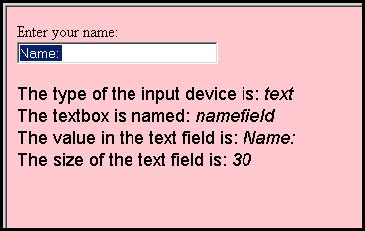
Example 11.19<html> <head><title>Text Boxes</title></head> <body bgcolor="pink"> 1 <form name="form1"> Enter your name:<br> 2 <input type="text" name="namefield" size=30 value="Name: " 3 onFocus="document.form1.namefield.select()"> 4 // onFocus=" this.select() "> </form> <font face=arial size="+1"> <script language="JavaScript"> // How do we reference the form in JavaScript? // Go down the document tree: document.form[].element.property 5 document.write("The type of the input device is:<em> "+ document.form1.namefield.type ); document.write("<br></em>The textbox is named:<em> "+ document.form1.namefield.name ); document.write("<br></em>The value in the text field is:<em> "+ document.form1.namefield.value ); document.write("<br></em>The size of the text field is:<em> "+ document.form1.namefield.size ); </script> </body><html> EXPLANATION
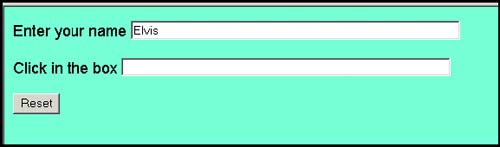
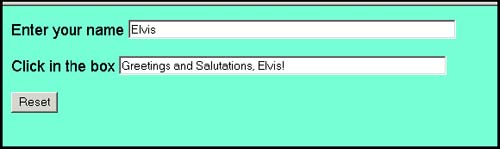
Example 11.20<html> <head><title>Assigning Value on the Fly to a Text Field</title></head> <body bgcolor="aquamarine"> <font face=arial size="+1"> 1 <form name=" form1 "> Enter your name 2 <input type="text" name="yourname" size=60> <p> Click in the box 4 <input type="text" 5 name="message" size=60 6 onClick="this.value='Greetings and Salutations, '+ document.form1.yourname.value+ '!';"> <p> 7 <input type="reset"> </form> </body> EXPLANATION
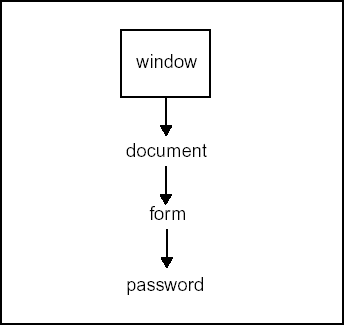
The password ObjectThe password object is much like the text object except that the input does not appear as text, but as asterisks or bullets, depending on the browser. The idea is to prevent a snoopy onlooker from seeing what is being typed in the box, but this is hardly a safe or secure type of password. If you look at the source of the HTML document, anywhere the actual password is spelled out, it appears in plain text for the viewer of the source. The password object parallels the HTML password field <input type="password"> and also has name and value fields. To reference a text field from JavaScript, you go down the document tree, starting at the document , the form , and then the text element. To get a value in the text field, for example, you would use document.form1.passwd.value , where form1 is the name of the form and passwd is the name of the password field. Figure 11.26 shows the JavaScript object hierarchy for the password object. Tables 11.11 and 11.12 show properties and methods of the password object. Figure 11.26. The password object within the JavaScript hierarchy. Table 11.11. Properties of the password object.
Table 11.12. Methods of the password object.
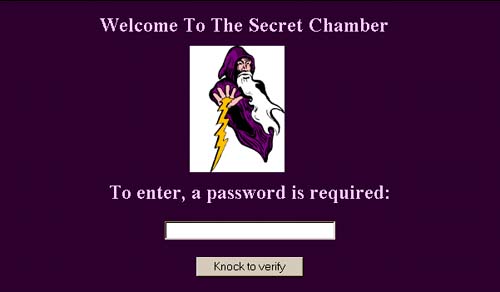
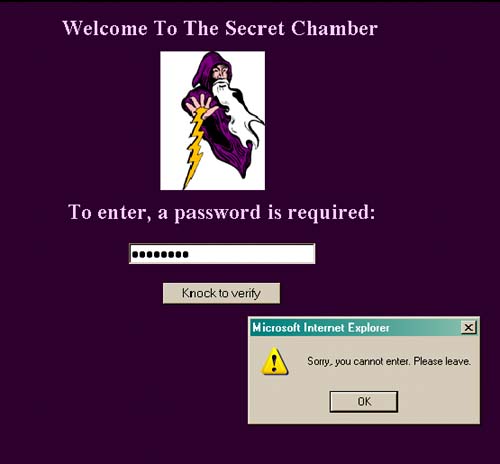
Example 11.21<html> <head><title>Password Boxes</title> <script language="Javascript"> 1 function verify(pw){ 2 if ( pw.value == "letmein") { alert("The chamber door will open now!"); } 3 else{ alert("Sorry, you cannot enter. Please leave."); } } </script> </head> <body bgcolor="#330033"><font color="FFCCFF"> <center> <h2> Welcome To The Secret Chamber<h2> <img src="wizard.jpg"><br> To enter, a password is required:<br> 4 <form name="form1" > 5 <input type="password" name="passwfield" size="30" 6 onBlur="return verify(this)"> </form> 7 <input type=button value="Knock to verify" > <font face=arial size="+1"> </body> EXPLANATION
The textarea ObjectIf you don't have enough room to say it all in a text field, then you can use the text area box for multiple lines of input. The textarea object parallels the HTML <textarea> tag. The number of characters in a line is specified with the cols attribute of the <textarea> tag, and the number of rows in the box are specified by the rows attribute. If the wrap attribute is defined, when the user reaches the end of a line, a newline will be inserted and the input will start on the next line; otherwise a scrollbar will appear. The textarea object, like the text object, has a number of properties and methods that make it possible to access and change the text area from within a JavaScript program. These are shown in Tables 11.13 and 11.14. To reference a text area box from JavaScript, you go down the document tree, starting at the document , then to the form , and then the textarea element. To get a value in the text area box, for example, you would use document.form1.textarea1.value , where form1 is the name of the form, and textarea1 is the name of the text area. Figure 11.29 shows the JavaScript object hierarchy for the textarea object. Figure 11.29. How the textarea object is created within the JavaScript hierarchy. Table 11.13. Properties of the textarea object.
Table 11.14. Methods of the textarea object.
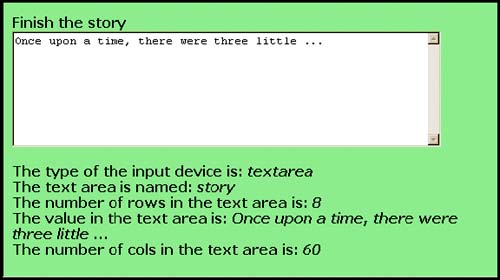
Example 11.22<html> <head><title>Text Area Boxes</title></head> <font face=verdana> <body bgcolor="lightgreen"> <form name="form1"><b> Finish the story <br><b> 1 <textarea name="story" rows=8 cols=60 > Once upon a time, there were three little ... </textarea> </form> <script language="JavaScript"> document.write("The type of the input device is:<em> "+ 2 document.form1.story.type ); document.write("<br></em>The text area is named:<em> "+ 3 document.form1.story.name ); document.write("<br></em>The number of rows in the text area 4 is:<em> "+ document.form1.story.rows ); document.write("<br></em>The value in the text area is:<em> "+ 5 document.form1.story.value ); document.write("<br></em>The number of cols in the text area 6 is:<em>"+ document.form1.story.cols ); </script> </body> </html> EXPLANATION
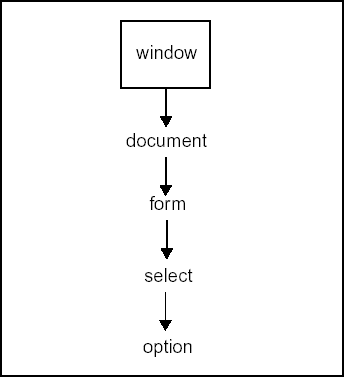
Selection Lists (Drop-Down Menus)The HTML <select> tag defines a field for display as a drop-down or a scrolling box. A select list consists of menu items called options. JavaScript supports a select object. The select object can be named but the options cannot. However, the select object has an options property that is an array of all the option items, so that if you have to get access to one of the options, you can use the options array. The selectedIndex property contains a number that represents the index number of the option that has been selected. If, for example, the first option in the menu is selected, then the value of the selectedIndex property is 0 (since array elements start at 0). To get a value in the selection list, you could use, for example, document.form1.select1.options[0].value , where form1 is the name of the form, select1 is the name of the select object, and options[0] is the first option in the list. Tables 11.15 and 11.16 list the properties and methods of the select object. Figure 11.31 shows the JavaScript object hierarchy for the select object. Figure 11.31. How the select object is created within the JavaScript hierarchy. Table 11.15. Properties of the select object.
Table 11.16. Methods of the select object.
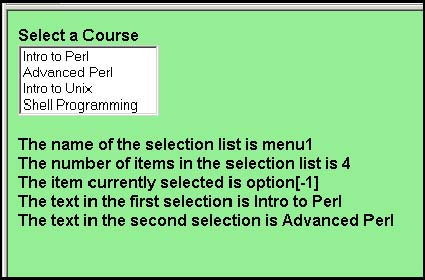
Example 11.23<html> <head><title>Drop Down Menus</title></head> <body bgcolor=lightgreen> <font face=arial > <b>Select a Course 1 <form name="form1"> 2 <select name="menu1" size="4" > 3 <option name="choice1" value="Perl1">Intro to Perl</option> <option name="choice2" value="Perl2">Advanced Perl</option> <option name="choice3" value="Unix1">Intro to Unix</option> <option name="choice4" value="Shell1">Shell Programming</option> 4 </select> <p> </form> 5 <script language="JavaScript"> document.write("The name of the selection list is ", 6 document.form1.menu1.name ); document.write("<br>The number of items in the selection list 7 is ", document.form1.menu1.length ); document.write("<br>The item currently selected is option["+ 8 document.form1.menu1.selectedIndex + "]"); document.write("<br>The text in the first selection is "+ 9 document.form1.menu1.options[0].text ); document.write("<br>The text in the second selection is "+ document.form1.menu1.options[1].text) ; </script> </body> </html> EXPLANATION
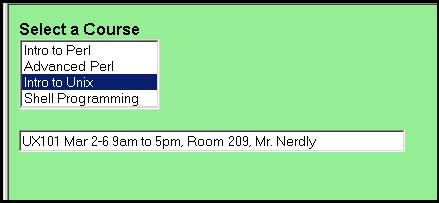
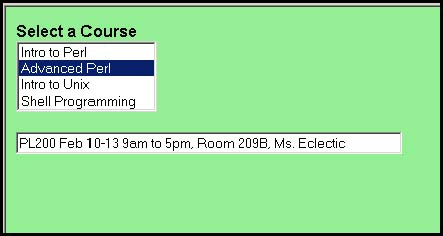
Example 11.24<html> <head><title>Drop-Down Menus</title> <script language="JavaScript"> 1 function schedule(f) { 2 if( f.menu1.selectedIndex == 0 ){ // Could also say: document.form1.menu1.selectedIndex 3 f.text1.value="PL100, Feb 3-7, 9am to 5pm, Room 2133, Dr. Baloney " // Could also say: document.form1.text1.value } if(f.menu1.selectedIndex == 1){ f.text1.value="PL200 Feb 10-13 9am to 5pm, Room 209B, Ms. Eclectic"; } if(f.menu1.selectedIndex == 2){ f.text1.value="UX101 Mar 2-6 9am to 5pm, Room 209, Mr. Nerdly"; } if(f.menu1.selectedIndex == 3){ f.text1.value="SH201 Apr 10-13 9am to 5pm, Room 209B, Miss Bashing"; } } </script> <body bgcolor=lightgreen> <font face=arial > <b> 4 <form name="form1"> Select a Course<br> 5 <select name="menu1" size="4" onChange="schedule(this.form)"> 6 <option name="choice1" value="Perl1">Intro to Perl</option> <option name="choice2" value="Perl2">Advanced Perl</option> <option name="choice3" value="Unix1">Intro to Unix</option> <option name="choice4" value="Shell1">Shell Programming</option> </select><p> 7 <input type="text" name="text1" size=60 /> </form> </body></html> EXPLANATION
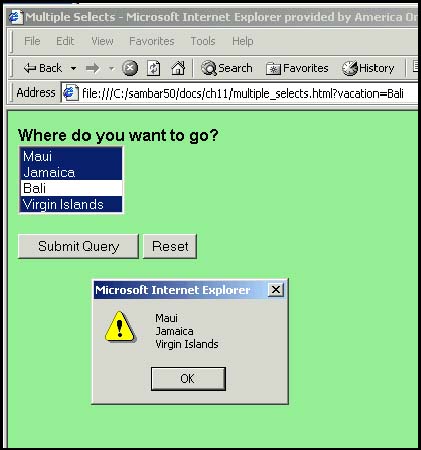
Multiple SelectsIf you use the multiple attribute of a select list, more than one option can be selected. To select more than one item, hold down the Control key while clicking on an item. If more than one item is chosen , the selectedIndex value will indicate only the first one that was selected. To test whether more than one option has been selected, you can use the selected property of the options object. This property will result in true if an option has been selected; false otherwise. See Example 11.25. Example 11.25<html> <head><title>Drop Down Menus</title> <script language="JavaScript"> 1 function showme(form) { 2 var choices=""; 3 for (i=0;i< form.vacation.options.length ;i++){ 4 if( form.vacation.options[i].selected == true){ 5 choices += form.vacation.options[i].text +"\n"; } } 6 alert(choices); } </script> <body bgcolor=lightgreen> <font face=arial > <b> 7 <form name="form1" onSubmit="showme(this);"> Where do you want to go? <br> 8 <select name="vacation" size=4 multiple> <option>Maui <option>Jamaica <option>Bali <option>Virgin Islands </select> <p> <input type="submit"> <input type="reset"> </form> </body> </html> EXPLANATION
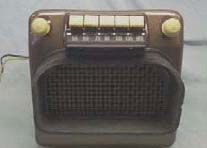
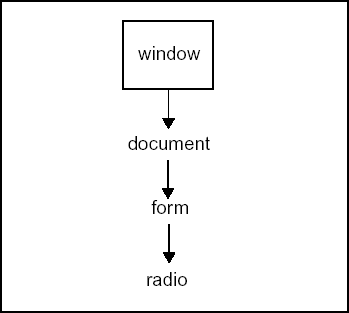
Radio ButtonsLike the buttons on an old-fashioned radio, you can only push one button when using HTML radio buttons. When a radio button is checked, it is selected, and when another button is checked, the previously checked one is deselected. In short, only one button at a time can be checked. This type of button is useful if you want a user to be able to select only one of a list of items. Figure 11.37. Play that tune! HTML radio buttons are similar to buttons on an old-fashioned radio: only one can be pressed at a time. Radio buttons are created with the HTML <input type="radio"> and are represented in JavaScript as a radio object with specific properties and methods used to manipulate the object. Each button is a property of the radio object and assigned to an array of elements in the order they are placed in the form. The checked property of the radio object specifies whether a button was checked. It returns Boolean true if the button was selected, and false if not. To reach a value in the radio list, for example, you would use: document.form1.radio1 , where form1 is the name of the form, and radio1 is the name of the radio object. Figure 11.38 shows the JavaScript object hierarchy for the radio object. Tables 11.17 and 11.18 list the properties and methods of the radio object. Figure 11.38. How the radio object is created within the JavaScript hierarchy. Table 11.17. Properties of the radio object.
Table 11.18. Methods of the radio object.
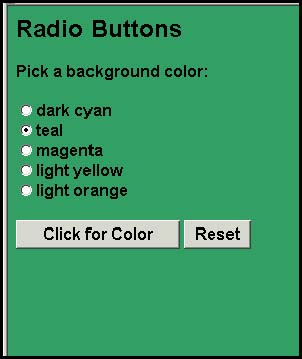
Example 11.26<html> <head><title>Radio Buttons</title> <script name="JavaScript"> 1 function changeBg(f) { 2 for (var i = 0; i < f.color.length;i++){ 3 if(f.color[i].checked) { 4 document.bgColor= f.color[i].value; } } } </script> </head> <body bgcolor="#CCFFFF"> <font face="arial"><b> 5 <form name="formradio"> Pick a background color:<p> 6 <input type=radio name="color" value="#0099CC">dark cyan<br> <input type=radio name="color" value="#339966">teal<br> <input type=radio name="color" value="#F33CC">magenta<br> <input type=radio name="color" value="#FFFF66">light yellow<br> <input type=radio name="color" value="#FF9933">light orange<br> <p> <input type=button 7 value="Click for Color" onClick="changeBg(this.form);" > <input type=reset> </form> </body> </html> EXPLANATION
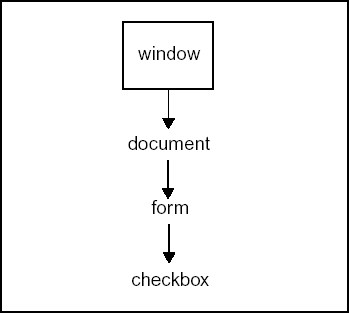
Figure 11.39. Using radio buttons; only one can be checked. CheckboxesAlthough radio buttons can only be checked once, a user can check as many checkboxes as he wants. When a checkbox is clicked, it is on, and when it is not, it is off. Checkboxes are created with the HTML <input type="checkbox"> and are represented in JavaScript as a checkbox object with specific properties and methods used to manipulate the object. Each checkbox is a property of the checkbox object and assigned to an array of elements in the order they are placed in the form. The checked property of the checkbox object specifies whether a box was checked. It returns true if checked, and false if not. To reach a value in the checkbox list, you could use, for example, document.form1.check1 , where form1 is the name of the form, and check1 is the name of the checkbox object. Figure 11.40 shows the JavaScript object hierarchy for the checkbox object. Tables 11.19 and 11.20 list the properties and methods of the checkbox object. Figure 11.40. How the checkbox object is created within the JavaScript hierarchy. Table 11.19. Properties of the checkbox object.
Table 11.20. Methods of the checkbox object.
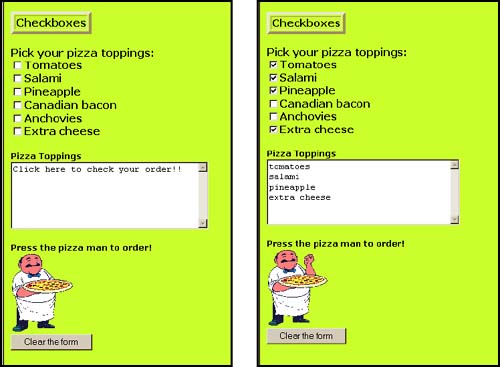
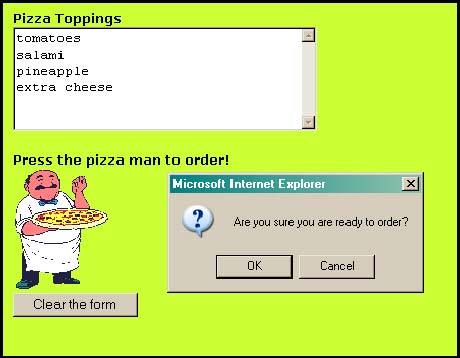
Example 11.27<html> <head><title>Checkboxes</title> <script name="JavaScript"> 1 function check(f) { var str=""; 2 for ( var i = 0; i < f.topping.length;i++ ){ 3 if(f.topping[i].checked){ 4 str += f.topping[i].value + "\n"; // Create a string // of items checked // by the user } } 5 f.order.value=str; // Put str value into the text area } 6 function OK(){ var result= confirm("Are you sure you are ready to order? "); if(result == true){ 7 document.formchbox.submit(); } else { return false;} } </script> </head> <body bgColor="#CCFF33"> <font face="verdana"><b> <table border="4"><tr><td><b>Checkboxes</b></td></tr></table> 8 <form name="formchbox" method="post" action="/sambar50/cgi-bin/chb.pl" > Pick your pizza toppings:<p> 9 <input type="checkbox" name="topping" value="tomatoes">Tomatoes<br> <input type="checkbox" name="topping" value="salami">Salami<br> <input type=checkbox name="topping" value="pineapple">Pineapple<br> <input type=checkbox name="topping" value="Canadian bacon">Canadian bacon<br> <input type=checkbox name="topping" value="anchovies">Anchovies<br> <input type=checkbox name="topping" value="extra cheese">Extra cheese<br> <p><font size="-1"> Pizza Toppings <br> 10 <textarea name="order" rows=6 cols=35 11 onFocus="javascript:check(this.form);"> Click here to check your order!! </textarea> <p> Press the pizza man to order! <br> 12 <input type=image src="Pizza_chef.gif" onClick="javascript:return OK();"> <br> <input type=reset value="Clear the form"> </form> </body> </html> EXPLANATION
Figure 11.41. The initial form with empty checkboxes (left) and after the user has clicked on some of the checkboxes (right). Figure 11.42. When the user clicks on the pizza man, a confirmation box appears. 11.2.7 Simple Form ValidationHave you ever filled out a form to buy something, clicked the submit button, waited, waited, and then received a big red message saying that the card number you entered was invalid? And then after all that waiting, you had to retype the entire form because all of the fields were reset? By letting JavaScript do some preliminary checking of the form input for obvious mistakes and erroneous information, you can save the user a lot of time and aggravation. Then, after the preliminary checking is done, the form is ready to go off to a server program, such as Perl or PHP, where it can be further validated and processed. This section will show you a little about validating forms: doing preliminary checking to see if a password is the correct length, making sure a field isn't empty, checking for unwanted characters, and more. Chapter 13, "Regular Expressions and Pattern Matching," shows you how to validate e-mail addresses, credit cards, zip codes, names, phone numbers, social security numbers , and the like by using regular expressions, a powerful pattern matching tool provided by JavaScript. Checking for Empty FieldsForms often have mandatory fields that must be filled out before the form can be submitted. The following example checks for empty fields. Example 11.28<html><head><title>An HTML Form and the onSubmit Event Handler</title> <script language="JavaScript"> 1 function checkForm(yourinfo){ 2 if(yourinfo.namestring.value == "" yourinfo.namestring.value == null){ // Check for an empty string or null value 3 alert("Please type in your name"); 4 return(false); } else{ 5 return(true); } } </script> </head> <body> <b> 6 <form name="info" action="/cgi-bin/bookstuff/form1.cgi" method="post" 7 onSubmit="return checkForm(document.info)"><p> <font size="+1"><p> Type your name here: 8 <input type="text" name="namestring" size="50"> <p> 9 <input type="submit" value="Submit"> <input type="reset" value="Clear"> </form> </body> </html> EXPLANATION
Checking for Alphabetic CharactersIf checking input fields for alphabetic characters, such as a user name, the following example will go through a loop evaluating each character in a string to guarantee it is an alphabetic. See Chapter 13, "Regular Expressions and Pattern Matching," for more on this type of validation. Example 11.29<html><head><title>Verifying a Name</title> <script language="JavaScript"> 1 function validate(form){ 2 if(alpha(form.first) == false){ alert ("First name is invalid"); return false; } 3 if(alpha(form.last) == false){ alert("Last name is invalid"); return false; } return true; } 4 function alpha(textField) { 5 if(textField.value.length != 0){ 6 for (var i = 0; i < textField.value.length;i++){ 7 var ch= textField.value.charAt(i); // alert(ch); # Using alert to see what characters // are coming in 8 if((ch < "A" ch > "Z") && (ch< "a" ch >"z")){ return false; } } } else { 9 return true; } } </script> </head> <body bgcolor="lightgreen"> <font face=verdana> <b> 10 <form name="alphachk" onSubmit="return validate(this);"> Enter your first name: <br> 11 <input name="first" type="text" size=60> <p> Enter your last name: <br> 12 <input name="last" type="text" size=60> <p> 13 <input type=submit value="Check it out"> <input type=reset> </form> </body> </html> EXPLANATION
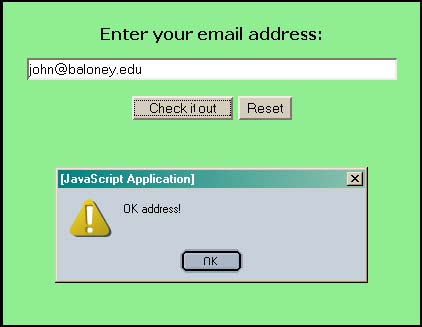
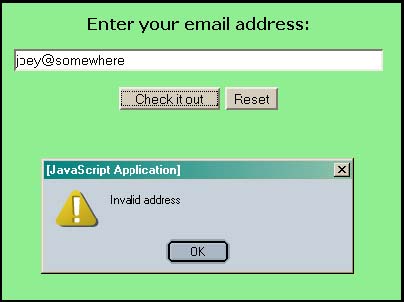
Checking E-Mail AddressesYou are frequently asked to include your e-mail address when filling out a form. There are some requirements for a valid e-mail address such as TommyTucker@somewhere.com. One requirement is that there is an @ symbol after the user name, and that there is at least one dot (.) in the address. The following example is a preliminary check for the existence of both of those characters, but it is far from a complete check. See Chapter 13, "Regular Expressions and Pattern Matching," for a much more robust version of e-mail validation using regular expressions. Example 11.30<html><head><title>Checking Email</title> <script language="JavaScript"> 1 function email(form){ // Validate the address 2 if( form.address.value.indexOf("@") != -1 && form.address.value.indexOf(".") != -1 ){ alert("OK address!"); 3 return true; } else { alert("Invalid address"); 4 return false; } } </script> </head> <body bgcolor="lightgreen"> <font face=verdana> <b> <center> 5 < form name="mailchk" action="/cgi-bin/ml.pl" method="post" onSubmit="return email(this); "> Enter your email address: <p> 6 <input name="address" type="text" size=60> <p> 7 <input type=submit value="Check it out"> <input type=reset> </form> </center> </body> </html> EXPLANATION
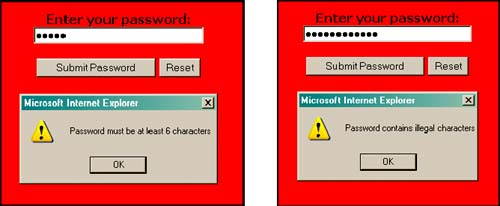
Checking Password FieldsThere are a number of checks made on password entries. Does it have the right number of characters? Does it contain one numeric character? Is it case sensitive? The following example is a simple validation routine to check for alphanumeric characters and that the number of characters in the password field is not less than six. Example 11.31<html><head><title>Verifying a Password</title> <script language="JavaScript"> 1 function valid(form){ 2 if( form.pass.value.length == 0 ){ alert("Please enter a password"); return false; } 3 if( form.pass.value.length < 6 ){ alert("Password must be at least 6 characters"); return false; } for (var i = 0; i < form.pass.value.length;i++){ var ch= form.pass.value.charAt(i); 4 if((ch < "A" ch > "Z") && (ch< "a" ch >"z") && (ch < "0" ch > "9")){ alert("Password contains illegal characters"); return false; } } 5 alert("OK Password"); return true; } </script> </head> <body bgcolor="red"> <font face=verdana> <b><center> 6 <form name="passchk" onSubmit="return valid(this);"> Enter your password: <br> 7 <input name="pass" type="password" size=33> <p> <input type=submit value="Submit Password"> <input type=reset> </form> </center> </body> </html> EXPLANATION
|


EAN: 2147483647
Pages: 150