Working with Fields
| < Day Day Up > |
| The primary purpose of a layout is to allow users to interact with data. By interact , we mean everything from viewing, editing, and formatting to finding and sorting. Although a field is at some level just another type of layout object and can be manipulated using the same tools as other layout objects, a number of tools are designed specifically for working with fields. These provide you with a great deal of freedom and flexibility for creating the interfaces that work best for your users and your solution. We don't cover every option of every tool here, but rather try to give you a sense of what the tools are and some of the situations in which to use them. Adding Fields to LayoutsThere are essentially two different ways that you can add fields to a layout: by using the Field button in the status area and by duplicating an existing field. The first of these ”which is generally also the first method that people learn ”involves clicking and dragging the Field button in the status area out to the section of the layout where you want to place the field. The attributes of a field added this way are governed by the current default format attributes. However, the field's width is always 79 pixels. Its height is determined by a combination of the default font, font size , pen width, and object effects (for example, embossing, engraving , drop shadow). As with other layout objects, when you duplicate an existing field, the new field has all the attributes of the previously existing field. Remember, you can duplicate any layout object either by selecting it and choosing E dit, D uplicate or pressing (
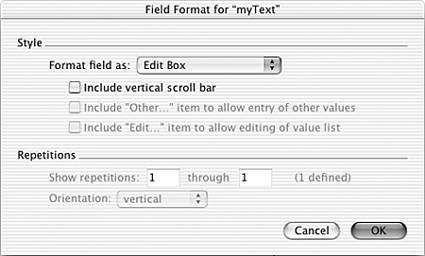
Each field object on a layout is defined to display data from a particular field. Unless you have selected S ample Data in the V iew, S how menu, you see the field's name on the object when you're in Layout mode. If the field name begins with :: , that's an indication that the object is linked to a related field. To know what relationship is used, you need to go into the Specify Field dialog. That's also where you can re-define a field object to display the contents of a different field. You can get to the Specify Field dialog either by ( TIP If a field has been defined as a button, then double-clicking it takes you to the Button Definition dialog, not the Specify Field dialog. Similarly, if multiple fields are grouped together, then right-clicking doesn't offer you the option to go to the Specify Field dialog. Field FormattingYou can apply several field formatting options to the fields on a layout. To get to the field format dialog, which is shown in Figure 4.17, select a field, then choose F ormat, Field Fo r mat. You can also (Control-click) [right+click] a field and select Field Format. Figure 4.17. The Field Format dialog enables you to format a field as a pop-up list, pop-up menu, check box set, or radio button set. It also includes settings for how to display repeating fields. For standard fields where a user will be manually entering and editing data, the Edit Box format is appropriate. The option to include a vertical scroll box is usually used only when a user is able and/or expected to type in multiple lines of text. The options to format a field as a Pop-up List, Pop-up Menu, Checkbox Set, or Radio Button Set require that you specify a value list that will provide the content for the selection values. The bottom half of the Field Format dialog is relevant only for fields that have been defined to allow multiple repetitions. You can hard-code the starting and ending repetitions and specify whether a vertical or horizontal orientation should be used. Field Behavior
Figure 4.18. Using the Field Behavior dialog, you can specify in which modes a field can be entered, as well as the keystrokes that can be used to exit a field. In this dialog, you can control whether a user is able to enter a particular field while in Browse or Find mode. In previous versions of FileMaker, there was no distinction between modes; a field was either enterable or not. Typically, a user should be able to enter a field in both Browse and Find mode. Sometimes, though, you'll want a field to be enterable in only one of these modes. For instance, you might have a field that you don't want users to manually edit, but that they may need to use as part of a query. On the other hand, there may be unindexed fields on your layout that, for performance reasons, you don't want users to search on.
CAUTION Normally, the Enter key serves to commit a record and exit all fields. If you change all your field behavior to have Enter go to the next field, be aware that users need to explicitly click on the background of a layout or perform some script or navigation routine to commit record changes. Setting the Tab OrderWhen moving from field to field on a layout with the Tab key (or (Return) and/or [Enter], as described in the previous section), the order in which the fields are activated is known as the tab order . The default tab order is the order the fields appear on the layout from top to bottom. Rearranging fields changes the tab order. Anyone with the ability to modify a layout can change its tab order; do so by selecting L ayouts, Set T ab Order. Tab order is stored with the layout, so there's no opportunity to customize the tab order for different users. The Set Tab Order dialog is shown in Figure 4.19. After the tab order has been edited manually, rearranging fields doesn't change the tab order. New fields are added to the end of the tab order automatically, regardless of position. Figure 4.19. You can change the tab order of a layout to make data entry flow in a logical progression for end users.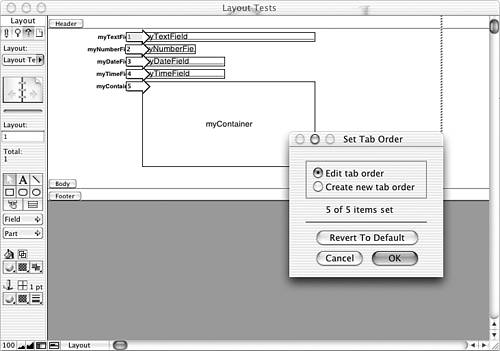 Merge FieldsIf you've ever done a mail merge, then the concept of merge fields should be familiar to you. Merge fields give you a way of incorporating field data within text blocks on a layout. This is very useful when creating form letters , labels, and reports . Merge fields display field data, but they don't behave like or have all the properties of normal fields. A user can't click into a merge field to do data entry, for instance. To add a merge field to a layout, choose I nsert, M erge Field, or press ( Figure 4.20. Merge fields allow field data to be displayed inline with text and avoid the need for sliding fields. The primary benefit of merge fields is that field data can be flexibly placed within a text block; text before and after the merge field is repositioned to close up any extra space. Thus, within a text block, you could have "Hi <<First Name>> , How are you?" On one record, that would come out as "Hi Joe, How are you?", whereas on another it might be "Hi Frederick, How are you?" Text, number, date, and time formatting applied to a text block are applied to any appropriate merge field within the text block. It is not possible to have a single text block that contains multiple merge fields that have different number formats applied to them. |
 For more information on creating value lists,
| < Day Day Up > |